1
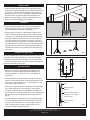
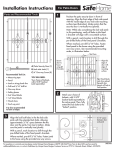
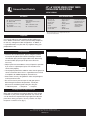
42" x 6' ROUTED SPACED PICKET FENCE
INSTALLATION INSTRUCTIONS
Universal Forest Products
PATENT PENDING
Tools and items needed
Kit contents
•4 - 2x4 fence rail brackets
•1 - Bottom Rail
(Actual size: 2" x 4" - 72")
•1 - Top Rail
(Actual Size: 2" x 4" - 72")
•4" x 4" - 6'
fence posts*
•Power saw
•Hammer
•Level
•Posthole digger
•Power drill
•11 - Pickets
(Actual size: 1/2" x 3-1/2" 40-1/2")
•12 - 2" bracket screws
•8 - 1" bracket screws
•Tape measure
•Carpenter’s
pencil
•Safety glasses
•Gloves
•String
•Grade stakes
• Concrete & gravel
•2x4 bracing posts
•Exterior wood
glue and/or 1"
exterior grade
fasteners**
* One per panel and one to complete the fence run
**Recommended fasteners
Preparation
Check local ordinances and regulations before building your
fence. Before construction, contact your local utility companies
to mark any underground cables and pipelines. In addition, it
is a good idea to discuss plans with any neighbors along your
proposed fence line.
Design and layout
• D
etermine the number of posts, panels and gates needed
to complete the job based on total linear footage. Take into
consideration post, panel and gate widths when determining
the total number (one post per kit plus one to finish the
fence run).
• A
djust layout to accommodate as many full panels as possible.
If you must use a partial panel, place it in the farthest rear
corner of the property.
• L
ocate property boundaries and drive stakes into the ground at
corners and ends of fence line. It is a good idea to check local
municipalities for additional property line ordinances.
Fig. 1
Step method
• S
tretch twine or heavy string between stakes and pull tight to
mark layout of fence line.
• B
e sure to measure your fence panels and gates prior to
determining the location of the postholes. Locate post
placement in the following order along the string line:
• End/corner posts • Gate posts • L
ine posts
Installing fences on sloped landscapes
Most yards are relatively level and will allow for a fairly simple
installation. If your yard is steeply pitched or very uneven, be
sure to allow for the required mounting height of the adjacent
panel when setting your posts. You may need to “stair step”
the panels in extreme cases (fig. 1).
©2015 Universal Forest Products Inc. All rights reserved.
2895 Progress Way, Woodburn, OR 97071 503.266.6240 8195_6/15
www.ufpi.com
fig. 1
Digging postholes
• A
general rule of thumb is to place 1/3 of the post into the
ground. Check local regulations for any special requirements
or frost laws. The fence will be stronger if end, corner and
gate posts are set at least 6" deeper than needed. Backfill
the holes with 6" of gravel to drain water away from the
bottom of the posts (fig. 2). Keep the height of your fence
panels in mind when digging your postholes.
Setting posts
Cement
• Install end and corner posts first. Tie a string between the
posts along the fence line. This establishes a reference,
ensuring the posts are properly aligned (fig. 3).
6" Gravel
• B
race the posts using 2x4s nailed to both the posts and
stakes in the ground. This will keep them straight while the
concrete sets. Check for plumb (90° angle) on two adjacent
sides prior to pouring concrete. Fill hole with ready-mix
concrete, following the package instructions. Tamp the
concrete to remove any air pockets. Overfill the holes at the
top and slope the concrete away from the post to keep water
from pooling. Recheck plumb and alignment of all posts
and allow concrete to cure according to the manufacturer’s
instructions.
10" - 12"
Fig. 2
Cutting posts to proper heights
fig. 3
An easy method to ensure your post tops are level is to run a
string from corner post to corner post at the desired height,
keeping the string taut. Mark each post at the string line and
cut off the tops of the posts. Finish off your posts with optional
decorative finial tops or post caps.
D
E
B
C
Fig. 3
Panel construction
• M
easure and mark the center of the post for bottom rail
placement. Recommended height for the bottom fence
rail to the ground is 2". Measure 1-1/2" to the bottom of
the bracket.
A
• P
lace the bottom fence rail bracket on the fence post and
align the center indicator mark on the bracket with the mark
on the post. Insert and fasten a 2" screw through the screw
hole A (fig. 4) and into the post.
Fig. 4
WoodburnFig3.ai
Post
• M
easure the height of your fence for placement of the upper
fence rail bracket. We recommend 26-1/4" spacing from
the top of the bottom bracket to the bottom of the top rail
bracket. Mark the center of the post by measuring the bottom
of the lower fence rail to the bottom of the upper fence rail
(fig. 5).
Upper 2x4 Rail
Bracket
Measurement between
the bottom of the upper
and lower rails
• P
lace the top fence rail bracket on the fence post and align
the center indicator mark on the bracket with the mark on
the post. Insert and fasten a 2” screw through screw hole
A (fig. 4) and into the fence post. Repeat steps on next
fence post for top and bottom bracket.
DeckoRailFig1.ai
Lower 2x4 Rail
Bracket
Fig. 5
©2015 Universal Forest Products Inc. All rights reserved.
2895 Progress Way, Woodburn, OR 97071 503.266.6240 8195_6/15
www.ufpi.com
DeckoRailFig2.ai
• S
et your fence rail in place to ensure correct bracket
placement. Insert and fasten the 1" fence rail bracket screws
through holes B and E to secure the rail and bracket together
(fig. 6). Repeat steps for top rail and brackets.
• Insert and fasten the 2" rail bracket screws through holes D
and C to finish securing your fence rail system to the post
(fig. 6). Repeat steps on next fence post.
• W
ith the fence rails in place, start sliding the pickets through
the top rail and into the bottom rail (fig. 7). To secure pickets
into place we recommended using exterior wood glue to
adhere pickets into the bottom rail or securing with exterior
fasteners (nails or screws) through the top rail.
Finishing your fence
• A
pplying a protective finish is recommended to prolong the
life of your fence. The type of finish will be determined by the
look desired, as well as the species of wood used. There are
three finished treatment options: stain, paint or waterproofing
sealer. Clean your fence with a cleaner/brightener that
contains a mildewcide prior to applying your stain.
• S
tain - provides a durable finish coat while maintaining
the natural look of wood. A semitransparent stain is
recommended for new fences. It gives an even appearance
and a hint of color while allowing the grain to show through.
fig. 6
29/16"
• P
aint - adds color as it protects and seals the fence. The
color can easily be coordinated with your home. Clean, dry
and prime with oil-based primer prior to painting the fence.
A durable exterior latex paint is recommended.
• W
aterproofing sealer - best for woods that are not
naturally resistant to decay and exposure to weather.
The sealer helps prevent rain and moisture from soaking
into the wood. Add a UV stabilizer to slow discoloration.
261/4"
2"
DeckoRailFig3.ai
fig. 7
Care and maintenance
• C
ontinuous changes in weather conditions are hard on
your fence. Your initial maintenance plan should be
determined by water absorption and loss, mildew growth
and UV discoloration.
• F
irst-year maintenance – reapply cleaner/brightener as
described in initial maintenance, as well as your method
of finish (paint, stain or waterproofing sealer).
• F
uture periodic preventative maintenance – depending on
the location of your fence with regard to direct sun exposure,
foliage coverage, etc., it may be sufficient to clean/brighten
and recoat every two years. A power washer may be
necessary to properly clean your fence.
THE DIAGRAMS AND INSTRUCTIONS IN THIS BROCHURE ARE FOR ILLUSTRATION PURPOSES ONLY AND ARE NOT MEANT TO REPLACE A LICENSED PROFESSIONAL. ANY CONSTRUCTION
OR USE OF THE PRODUCT MUST BE IN ACCORDANCE WITH ALL LOCAL ZONING AND/OR BUILDING CODES. THE CONSUMER ASSUMES ALL RISKS AND LIABILITY ASSOCIATED WITH THE
CONSTRUCTION OR USE OF THIS PRODUCT. THE CONSUMER OR CONTRACTOR SHOULD TAKE ALL NECESSARY STEPS TO ENSURE THE SAFETY OF EVERYONE INVOLVED IN THE PROJECT,
INCLUDING, BUT NOT LIMITED TO, WEARING THE APPROPRIATE SAFETY EQUIPMENT. EXCEPT AS CONTAINED IN THE WRITTEN LIMITED WARRANTY, THE WARRANTOR DOES NOT PROVIDE
ANY OTHER WARRANTY, EITHER EXPRESS OR IMPLIED, AND SHALL NOT BE LIABLE FOR ANY DAMAGES, INCLUDING CONSEQUENTIAL DAMAGES.
WoodburnFig7.ai
©2015 Universal Forest Products Inc. All rights reserved.
2895 Progress Way, Woodburn, OR 97071 503.266.6240 8195_6/15
www.ufpi.com
fi
Universal Forest Products
INSTRUCCIONES DE INSTALACIÓN DE CERCA DE ESTACAS
ESPACIADAS Y RANURADAS, DE 1.07 M x 1.83 M
PATENTE PENDIENTE
Herramientas y artículos necesarios
Contenido del kit
• 4 - soportes para barandillas
de cerca, de 2x4
• 1 - barandilla inferior
(Tamaño real: 5.1 cm x 10.2
cm - 1.83 m)
• 1 - barandilla superior
(Tamaño real: 5.1 cm x 10.2
cm - 1.83 m)
• 11 - estacas (Tamaño real: 1.3
cm x 89 cm - 1.03 m)
•1
2 - tornillos de soporte de 2"
• 8 - tornillos de soporte de 1"
• Postes de cerca
de 10.2 cm x 10.2
cm - 1.83 m*
• Sierra eléctrica
• Martillo
• Nivel
• Cavador de hoyos
de poste
• Taladro eléctrico
• Cinta de medir
• Lápiz de
carpintero
• Gafas de
seguridad
• Guantes
• Cuerda
• Estacas
graduadas
• Concreto y grava
• Postes de
soporte, de 2x4
• Pegamento
para madera en
exteriores y/o
sujetadores con
clasificación para
exteriores, de
1" **
*Uno por panel y uno para completar el cercado
**Sujetadores recomendados
Preparación
Verifica las ordenanzas y regulaciones locales antes de levantar
tu cerca. Antes de la construcción, contacta a las compañías de
servicio locales para marcar cualquier tubería o cables subterráneos.
Adicionalmente, es una buena idea hablar de tus planes con los
vecinos cercanos a la línea de cerca que te propones.
Diseño y trazado
• Determina el número de postes, paneles y puertas necesarios para
el trabajo completo, sobre la base del largo total en pies. Ten en
cuenta el ancho de los postes, paneles y puertas al determinar el
número total (un poste por kit más uno para terminar el cercado).
• Ajusta el trazado para que quepa la mayor cantidad posible de
paneles completos. Si tienes que usar un panel incompleto,
colócalo en la esquina trasera más alejada de la propiedad.
• Localiza los límites de tu propiedad y clava estacas en el suelo
en las esquinas y los extremos de la línea de cerca. Es una buena
idea verificar en la municipalidad las ordenanzas adicionales sobre
la línea de propiedad.
Fig. 1
fig. 1
Step method
• Extiende un cordel o cuerda resistente entre las estacas y
estíralo(a) bien para marcar el trazado de la línea de la cerca.
• Asegúrate de medir los paneles y las puertas de tu cerca antes
de determinar la ubicación de los hoyos para postes. Ubica la
posición de los postes en el siguiente orden a lo largo de la línea
de la cuerda:
• Postes de extremo/esquina
• Postes de puerta
• Postes de línea
Cómo instalar cercas en terrenos inclinados
La mayoría de los patios están relativamente nivelados y permitirán
una instalación bastante sencilla. Si tu patio tiene pendiente muy
inclinada o es muy irregular, asegúrate de dejar espacio suficiente
para la altura de montaje del panel adyacente al colocar tus postes.
Puede que necesites “escalonar” los paneles en casos extremos
(Fig. 1).
©2015 Universal Forest Products, Inc. Todos los derechos reservados.
2895 Progress Way, Woodburn, OR 97071 503.266.6240 8195_6/15
www.ufpi.com
WoodburnFig1.ai
Cómo cavar los hoyos de los postes
• Como regla general, se inserta 1/3 del poste en el suelo. Verifica
las regulaciones locales para cualquier requisito especial o
regulaciones sobre las heladas. La cerca será más fuerte si la
profundidad de los postes de los extremos, las esquinas y la
puerta es 15.2 cm mayor que la profundidad necesaria. Rellena el
fondo de los hoyos con 15.2 cm de grava para drenar el agua de
la parte inferior de los postes (Fig. 2). Ten en cuenta la altura de los
paneles de la cerca cuando caves los hoyos de los postes.
Cemento
Cómo colocar los postes
• Instala primero los postes de los extremos y las esquinas.
Extiende una cuerda entre los postes a lo largo de la línea de la
cerca. Esto fija una referencia, asegurando que los postes estén
correctamente alineados (Fig. 3).
15.2 cm de grava
• Apuntala los postes con vigas de 2x4 clavadas a los postes y a
las estacas enterradas en el suelo. Esto los mantendrá rectos
mientras fragua el concreto. Verifica la plomada (ángulo de 90°)
en dos caras adyacentes antes de verter el concreto. Rellena los
hoyos con concreto premezclado, siguiendo las instrucciones del
paquete. Apisona el concreto para eliminar cualquier bolsa de aire.
Haz que el concreto se desborde en la parte superior de los hoyos
y adopte una inclinación descendiente desde el poste para evitar
que el agua se acumule. Comprueba de nuevo la plomada (ángulo
de 90°) y alineación de todos los postes y deja que el concreto
fragüe según las instrucciones del fabricante.
Fig. 2
25.4 cm - 30.5 cm
fig. 3
Cómo recortar los postes a la altura apropiada
Un método fácil para asegurar que los topes de tus postes están
al mismo nivel consiste en extender una cuerda desde un poste
extremo a otro, a la altura deseada, manteniendo la cuerda tensa.
Marca cada poste a la altura de la línea de la cuerda y recorta los
topes de los postes. Dale un acabado a tus postes con remates
decorativos o topes para postes.
Construcción del panel
D
E
B
C
• Mide y marca el centro del poste para ubicar la barandilla inferior.
La altura recomendada de la barandilla inferior de la cerca es a 5.1
cm del suelo. Mide 3.8 cm hasta la parte inferior del soporte.
A
• Coloca el soporte de barandilla inferior en el poste y alinea la
marca indicadora del centro en el soporte con la marca en el
poste. Inserta y sujeta un tornillo de 2 plg a través del orificio para
tornillo A (Fig. 4) y dentro del poste.
Fig. 3
Fig. 4
WoodburnFig3.ai
Poste
Soporte de barandilla
superior, de 2x4
• Mide la altura de tu cerca para colocar el soporte de barandilla
superior. Recomendamos espaciar 66.7 cm desde la parte
superior del soporte inferior hasta la parte inferior del soporte de
barandilla superior. Marca el centro del poste midiendo desde
la parte baja de la barandilla inferior hasta la parte inferior de la
barandilla superior (Fig. 5).
Medida entre la parte inferior
de las barandillas superior e
inferior
• Coloca el soporte de barandilla inferior en el poste de la cerca y
alinea la marca indicadora del centro en el soporte con la marca
en el poste. Inserta y sujeta un tornillo de 2 plg a través del orificio
para tornillo A (Fig. 4) y dentro del poste de cerca. Repite los pasos
en el siguiente poste de cerca para los soportes inferior y superior.
DeckoRailFig1.ai
Soporte de barandilla
inferior, de 2x4
Fig. 5
©2015 Universal Forest Products, Inc. Todos los derechos reservados.
2895 Progress Way, Woodburn, OR 97071 503.266.6240 8195_6/15
www.ufpi.com
DeckoRailFig2.ai
• Coloca tu barandilla de cerca en su lugar para asegurar una
correcta ubicación del soporte. Inserta y fija los tornillos de
soporte de barandilla de 1” a través de los orificios B y E para unir
firmemente la barandilla y el soporte (Fig. 6). Repite los pasos para
los soportes y la barandilla superior.
• Inserta y fija los tornillos de soporte de barandilla de 2” a través de
los orificios D y C para terminar de fijar tu sistema de barandillas al
poste (Fig. 6). Repite los pasos en el siguiente poste de cerca.
• Con las barandillas de cerca en su lugar, comienza a deslizar
las estacas a través de la barandilla superior y dentro de la
barandilla inferior (Fig. 7). Para asegurar las estacas en su lugar,
recomendamos usar el pegamento para madera en exteriores
al adherir las estacas a la barandilla inferior o asegurar con
sujetadores para exteriores (clavos o tornillos) a través de la
barandilla superior.
fig. 6
• Se recomienda aplicar un acabado protector para prolongar la
vida útil de tu cerca. El tipo de acabado estará determinado por
la apariencia deseada, así como los tipos de madera usada. Hay
tres opciones de tratamiento de acabado: tinte, pintura o sellador
impermeabilizante. Antes de aplicar el tinte, limpia tu cerca con un
limpiador/abrillantador que contenga un fungicida
29/16"
Cómo terminar tu cerca
• Tinte - proporciona un acabado duradero y mantiene la apariencia
natural de la madera. Se recomienda un tinte semitransparente
para cercas nuevas. Esto da una apariencia uniforme y un toque de
color, a la vez que permite ver la veta.
• Pintura - añade color mientras protege y sella la cerca. El color se
puede combinar fácilmente con el de la casa. Antes de pintar la
cerca, límpiala, sécala y aplica un imprimador con base de aceite.
Se recomienda una pintura de látex para exteriores.
• Sellador impermeabilizante - mejor para las maderas que no
sean naturalmente resistentes al deterioro y a la exposición a la
intemperie. El sellador evita que la lluvia y la humedad penetren en
la madera. Añade un estabilizador de rayos UV para demorar la
decoloración.
261/4"
2"
DeckoRailFig3.ai
fig. 7
Cuidado y mantenimiento
• Los cambios continuos de las condiciones climáticas surten
efectos severos sobre tu cerca. Tu plan de mantenimiento
inicial debe determinarse por la absorción y pérdida de agua, el
crecimiento de hongos y la decoloración por rayos UV.
• Mantenimiento durante el primer año - Vuelve a aplicar el
limpiador/abrillantador como se describe para el mantenimiento
inicial, así como para el método de acabado (pintura, tinte o
sellador impermeabilizante).
• Mantenimiento preventivo periódico en el futuro - En función de
dónde esté tu cerca con respecto a la exposición directa a la luz
solar, la cobertura del follaje, etc., podría ser suficiente limpiar/pulir
y aplicar el revestimiento cada dos años. Puede que necesites
una máquina para lavar a presión a fin de limpiar adecuadamente
tu cerca.
LOS DIAGRAMAS E INSTRUCCIONES EN ESTE FOLLETO TIENEN SOLO FINES ILUSTRATIVOS Y NO PRETENDEN REEMPLAZAR A UN PROFESIONAL CON LICENCIA. CUALQUIER CONSTRUCCIÓN
O USO DE ESTE PRODUCTO TIENE QUE ESTAR EN PLENA CONFORMIDAD CON TODOS LOS CÓDIGOS LOCALES DE ZONIFICACIÓN Y/O CONSTRUCCIÓN. EL CONSUMIDOR ASUME TODOS LOS
RIESGOS Y RESPONSABILIDADES ASOCIADOS A LA CONSTRUCCIÓN O EL USO DE ESTE PRODUCTO. EL CLIENTE O EL CONTRATISTA DEBE TOMAR TODAS LAS MEDIDAS NECESARIAS PARA
GARANTIZAR LA SEGURIDAD DE TODOS LOS INVOLUCRADOS EN EL PROYECTO, INCLUYENDO PERO SIN LIMITARSE A, EL USO EL EQUIPO DE SEGURIDAD APROPIADO. SALVO LO EXPRESADO
EN LA GARANTÍA LIMITADA POR ESCRITO, EL GARANTE NO OFRECE NINGUNA OTRA GARANTÍA, EXPLÍCITA O IMPLÍCITA, NI SERÁ RESPONSABLE POR NINGÚN DAÑO, INCLUSO INDIRECTO.
WoodburnFig7.ai
©2015 Universal Forest Products, Inc. Todos los derechos reservados.
2895 Progress Way, Woodburn, OR 97071 503.266.6240 8195_6/15
www.ufpi.com
fi