1
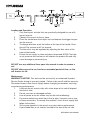
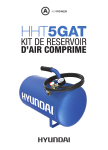
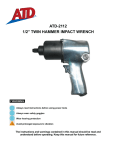
1/2” IMPACT WRENCH
HPT-IM12-1
ENGLISH USER MANUAL
PRINTSPEC: EN-HPT-IM12-1-0-2010v1
© 2010 MIDLAND INTERNATIONAL INC.
Thank you for purchasing a Hyundai Air Tool.
Please register your product in order for us to ensure your continuous satisfaction with our product.
This manual covers the safety, operation, and maintenance procedures for the
HPT-IM12-1.
It is important that this manual be read and fully understood before operating
the compressor. Failure to do so may cause serious injuries and/or equipment
damage.
TECHNICAL DATA
SQUARE DRIVE
CAPACITY BOLT SIZE
FREE SPEED
MAX TORQUE
AVERAGE AIR CONSUMPTION
OPERATING PRESSURE
AIR INLET SIZE
AIR HOSE
WEIGHT
½”
5/8” (16 mm)
7,000 RPM
230ft/lb (31.8 kg-m)
4 CFM
90 PSI (6.3 bar)
¼”
3/8”
5.4 Lbs (2.5 kg)
A WEIGHTED SOUND
PRESSURE LEVEL
92.6 dB (A)
SOUND POWER LEVEL
103.6dB (A)
VIBRATION IN THE HANDLE
2.8m/s2
IMPORTANT SAFETY RULES
1. Only operate in a clean and safe working environment.
2. Do not wear watches, rings, bracelets, and/or loose clothing when
using the wrench.
3. WARNING! Disconnect the wrench from air supply before changing
accessories or servicing.
4. Replace any damaged or worn parts. Only use Hyundai authorized
parts.
5. WARNING! Do not exceed the recommended air pressure of the
wrench.
4
HPT-IM12-1 User Manual
6.
7.
8.
9.
10.
11.
12.
13.
14.
15.
Make sure to keep the hose away from heat, oil, and sharp edges.
Check the air hose for wear before each use and ensure that all connections are secure.
Only use impact sockets that are specifically designed for use with
this impact wrench.
Wear approved eye/face, hand, and hearing protection to reduce the
risk of injury.
Maintain correct balance and footing when operating the wrench.
Keep children and non-essential persons away from the working area.
Do not use the wrench for tasks that it is not designed to perform.
Do not use the wrench if damaged in any way or thought to be faulty.
Do not carry the wrench by the air hose.
Do not direct air from the air house at yourself or others.
When not in use, disconnect the wrench from the air supply and store
it in a safe and dry location.
OPERATING INSTRUCTION DESCRIPTION
This ½” Impact Wrench is designed to install and remove nuts and bolts. The
wrench is made of a die-cast aluminum body with a front exhaust, rubber scuff
guards on the nose and back, and a built-in regulator to vary the speed and
power of the wrench. It is ideal for changing tires, as well as general assembly,
and other workshop applications.
Air Supply
1.
Ensure the tool’s air valve (or trigger) is in the OFF position before connecting the wrench to the air supply.
2.
The wrench requires 90 PSI of air pressure to operate. Do not exceed
the specified air pressure to prevent damage and/or personal harm.
3.
Drain the tank daily or after each use. Moisture in the air line will
damage the wrench.
Lubrication
An automatic in-line filter-regulator lubricator is recommended (Fig.), as it increases tool life and keeps the tool in good working order. The in-line lubricator
should be regularly checked and filled with air tool oil. Proper adjustment of the
in-line lubricator is performed by placing a sheet of paper next to the exhaust
ports and holding the throttle open for approximately 30 seconds. The lubricator
is properly set when a light stain of oil collects on the paper. Excessive amounts
of oil should be avoided.
HPT-IM12-1 User Manual
5
Loading and Operation
1.
Only use impact sockets that are specifically designed for use with
impact wrench.
2.
Connect the wrench to the air hose.
3.
Place the socket over the subject nut and depress the trigger to operate the wrench.
4.
To change direction, push the button at the top of the handle. Direction of R for reverse and F for forward.
5.
The flow of air may be regulated by adjusting the flow valve at the
base of the handle.
6.
Ensure the air supply is clean and does not exceed 90 PSI. Too high
an air pressure and unclean air will shorten the product life and may
cause damage or personal injury.
DO NOT use any additional force upon the wrench in order to remove a
nut.
DO NOT allow wrench to run free for an extended period of time, as this
will shorten its life.
Maintenance
WARRANTY NOTICE: This tool must be serviced by an authorized Hyundai
Service Dealer during its warranty period. Failure to do so will void the warranty.
Disconnect wrench from the air supply before changing accessories, servicing
or performing maintenance.
1.
Lubricate the air wrench daily with a few drops of air tool oil dripped
into the air inlet
2.
Do not use worn or damaged sockets.
3.
Loss of power or erratic action may be due to the following:
• Excessive moisture or restriction in the air pipe. Incorrect size or type
of hose connectors. To remedy this problem, check the air supply and
follow instructions.
• Grit or gum deposits in the wrench may also reduce performance.
If your model has an air strainer, located in the area of the air inlet,
6
HPT-IM12-1 User Manual
4.
remove the strainer and clean it.
When not in use, disconnect from air supply, clean wrench and store
in a safe, dry, childproof location.
WARNING! If any of the following symptoms appear during your use of the
wrench, stop using the tool immediately, or serious personal injury could result.
Disconnect tool from air supply before attempting repair or adjustment.
WARRANTY NOTICE: This tool must be serviced by an authorized Hyundai
Service Dealer during its warranty period. Failure to do so will void the warranty.
TROUBLESHOOTING
PROBLEM
Tool runs at
normal speed,
but loses under
load.
HPT-IM12-1 User Manual
CAUSE
•
•
Motor parts are worn.
Cam clutch worn or
sticking due to lack of
lubricant.
CORRECTION
•
Lubricate the clutch
housing.
• Check for excess
clutch oil. Clutch
cases need to be only
half full. Overfilling
can cause drag on
high speed clutch
parts. Typical oiled/
lubricated wrench
requires ½ ounce
of oil.
GREASE LUBRICATED
NOTE: Heat usually indicates insufficient grease in
chamber. Severe operating
conditions may require
more frequent lubrication.
7
Tool runs slowly.
Limited air flows
from exhaust.
•
•
•
Tools will not
run.
Air flows freely
from exhaust.
•
Motor parts jammed
with dirt particles
Power regulator in
closed position
Air flow blocked by dirt.
•
One or more motor
vanes stuck due to
material build up.
•
•
•
•
•
Tool will not
shut off
8
•
‘O’ rings throttle valve
dislodged from seat
inlet valve.
•
Check air inlet filter
for blockage.
Pour air tool lubricating oil into air inlet as
per instructions.
Operate tool in
short bursts, quickly
reversing rotation
back and forth, where
applicable.
Pour air tool lubricating tool into air inlet.
Operate tool in
short bursts, quickly
reversing rotation
back and forth, where
applicable
Disconnect air supply.
Free motor by rotating
drive shank manually,
where applicable
Replace ‘O’ ring.
HPT-IM12-1 User Manual