1
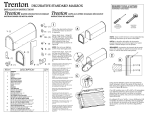
Windmere
Decorative Frame Assembly
Assemblage du cadre décoratif
Ensamblaje del marco decorativo
Flag Assembly
Assemblage du drapeau
Ensamblaje del banderín
• Snap into place
• Mettez en place d’un coup sec
• Goloque a presión
Using (6) #8 x 3/8 screws
included, attach the door
frame to the door being
careful not to overtighten.
A
En utilisant 6 vis nº 8 de
3/8 po (incluses), fixez l’ huisserie à la porte en veillant à
ne pas les serrer à bloc.
Utilizando los (6) tornillos núm. 8 x 3/8 incluidos, fije
el marco de la puerta a la puerta con cuidado para
no ajustarlo de más.
Handle & Catch Assembly
Assemblage de la poignée et du loquet
Ensamblaje de la manija y del retén
Handle
Poignée
Manija
#MB420
Tools needed:
Outils requis:
Se requiere herramientas:
Mailbox Assembly Instructions
Instructions d’ assemblage de la boîte aux lettres
Instrucciones para el ensamblaje del buzón
Note: Door open/close tension can
be adjusted by using the slotted holes
to raise or lower the catch to get the
proper tension.
Remarque : la tension d’ ouverture
ou de fermeture de la porte peut être
ajustée en utilisant les fentes pour
lever ou baisser le loquet.
Nota: La tensión de apertura/cierre de
la puerta puede ajustarse utilizando
los orificios ranurados para levantar
o bajar el retén, a fin de obtener la
tensión adecuada.
• Reverse Side of Flag
• Revers du drapeau
• Dorso del indicador
B
• Flag Holder
• Support de drapeau
• Soporte del indicador
C
• Flag Assembly
• Ensemble de drapeau
• Conjunto del indicador
• Plastic Prongs
• Broches en plastique
• Puntas plásticas
Step 1: Attach Flag (A) to Flag Holder (B) by gently snapping the reverse side of the Flag (A) into place on the reverse side of the
Flag Holder (B) to form Flag Assembly.
Étape 1: fixez le drapeau (A) sur le support de drapeau (B) en enclenchant doucement le revers du drapeau (A) sur le revers du
support de drapeau (B) pour créer l’ assemblage du drapeau.
Paso 1: Fije el banderín (A) en el portabanderín (B) ajustando suavemente el reverso del banderín (A) en su lugar, en el reverso del
portabanderín (B) para formar el ensamblaje del banderín.
Step 2: Flip Flag Assembly (C) over and attach to the left side of mailbox by inserting the (2) Plastic Prongs into the (2) outer
holes in mailbox.
Étape 2: retournez l’ assemblage du drapeau (C) et fixez le côté gauche de la boîte aux lettres en insérant les deux (2) pattes en
plastique dans les deux (2) ouvertures externes de la boîte aux lettres.
Paso 2: Dé vuelta el ensamblaje del banderín (C) y fíjelo en el lado izquierdo del buzón insertando las (2) clavijas de plástico dentro
de los (2) orificios externos del buzón.
Using (2) 10-24 x 3/4” screws and hex nuts, attach the handle to the
front of the door and catch to the inside back of the door as shown in the
illustration above.
À l’ aide des deux (2) vis nº 10-24 de 3/4 po et des écrous hexagonaux,
fixez la poignée sur le devant de la porte et le loquet au dos de celle-ci
comme indiqué sur l’ image ci-dessus.
Utilizando (2) tornillos 10-24 x 3/4" y tuercas hexagonales, fije la manija
en la parte delantera de la puerta y el retén en la parte posterior interna
de la puerta, como se muestra en la ilustración anterior.
Step 3: Insert Phillips head screw through washer and insert into the middle hole of the Flag Assembly. From inside the mailbox,
thread the hex nut onto the Phillips head screw and tighten with wrench and screwdriver.
Étape 3: insérez les vis cruciformes à travers les rondelles et fixez-les dans l’ ouverture centrale de l’ assemblage du drapeau. De l’
intérieur de la boîte aux lettres, logez la vis cruciforme dans l’ écrou hexagonal et resserrez à l’ aide d’ une clé et d’ un tournevis.
Paso 3: Inserte los tornillos de cabeza Phillips a través de la arandela y, luego, en el orificio central del ensamblaje del banderín.
Desde el interior del buzón, enrosque la tuerca hexagonal en el tornillo de cabeza Phillips y ajuste con la llave de tuercas y el destornillador.
Decorative Emblem Instructions
Instructions pour le montage d’ un emblème
Instrucciones para instalar el emblema decorativo
Step 1: Place emblem onto front side of mailbox door in desired
location. Masking tape can be applied to emblem to assure that
it does not slip during the installation process.
Étape 1: Placez le gabarit sur la partie avant de la boîte aux
lettres. Du ruban-cache puet être appliqué sur le gabarit pour
assurer que la grabarit ne glisse pas pendant le processus
d'installation.
Paso 1: Coloque la plantilla a escuadra en el frente de la puerta
del buzón. Es posible aplicar cinta de enmascarar a la pantilla
para asegurar que no se resbale durante el proceso de instalación.
Step 2: Remove protective strip from the tape on the reverse
side of the bronze emblem and firmly press down into position.
Étape 2: Retirez la bande protectrice du ruban sur le revers de
l'emblè en bronze et pressez fermement en position.
Paso 2: Retire la tira protectora de la cinta del dorso del
emblema de bronce y presiónelo firmemente para colocarlo
en su sitio.
CUSTOMERS ARE REQUIRED TO CONTACT THE LOCAL POST OFFICE BEFORE INSTALLING THE MAILBOX
TO ENSURE ITS CORRECT PLACEMENT AND HEIGHT AT THE STREET. GENERALLY, MAILBOXES ARE
INSTALLED AT A HEIGHT OF 41-45 IN. FROM THE ROAD SURFACE TO INSIDE FLOOR OF THE MAILBOX
OR POINT OF MAIL ENTRY (LOCKED DESIGNS) AND ARE SET BACK 6-8 IN. FROM FRONT FACE OF CURB
OR ROAD EDGE TO THE MAILBOX DOOR.
LES CLIENTS DOIVENT S'ADRESSER AU BUREAU DE POSTE LOCAL AVANT D'INSTALLER LA BOÎTE AUX
LETTRES AFIN DE S'ASSURER DE SON BON EMPLACEMENT ET DE SA BONNE HAUTEUR PAR RAPPORT À LA
RUE. LEST BOÎTES AUX LETTRES SONT GÉNÉRALEMENT INSTALLÉES À UNE HAUTEUR DE 104,1 cm -114,3 cm,
DE LA SURFACE DE LA ROUTE JUSQU'À LA BASE INTÉRIEURE DE LA BOÎTE AUX LETTRES OU L'ORIFICE
D'INSERTION DU COURRIER (BOÎTES VERROUILLABLES) ET À UNE DISTANCE DE 15,2 cm - 20,3 cm DU BORD
DE LA ROUTE OU DU TROTTOIR JUSQU'A LA PORTE DE LA BOÎTE AUX LETTRES.
SE EXIGE A LOS CLIENTES DIRIGIRSE A LA OFICINA DE CORREOS LOCAL ANTES DE INSTALAR EL BUZÓN
PARA ASEGURAR SU COLOCACIÓN CORRECTA CON RESPECTO A LA ALTURA DE LA CALLE. GENERALMENTE,
LOS BUZONES SE INSTALAN A UNA ALTURA DE 41 A 45 PULGADAS (104,1 cm - 114,3 cm) DE LA SUPERFICIE
DEL CAMINO HASTA EL FONDO DEL BUZÓN O EL PUNTO DE ENTRADA DE LA CORRESPONDENCIA (DISEÑOS
CON SEGURO) Y ESTÁN ALEJADOS 6 A 8 PULGADAS (15,2 A 20,3 cm) DE LA PARTE FRONTAL DE LA CALZADA O
EL BORDE DEL CAMINO HASTA LA PUERTA DEL BUZÓN.
www.gibraltarmailboxes.com
HIWDMMB55-01