1
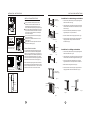
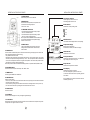
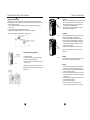
WA-8088E 8,000BTU Portable Air Conditioner Inside you will nd many helpful hints on how to use and maintain your air conditioner properly. Just a little preventative care on your part can save you a great deal of time and money over the life of your air conditioner. Before operating this product, please read the instructions carefully and save this manual for future use. CONTENTS Read This Manual Inside you will nd many helpful hints on how to use and maintain your air conditioner properly. Just a little preventive care on your part can save you a great deal of time and money over the life of your air conditioner. You'll nd many answers to common problems in the chart of troubleshooting tips. If you review our chart of Troubleshooting Tips rst, you may not need to call for service at all. SOCIABLE REMARK Disposal..............................................................................................................................................2 SPECIFICATIONS Specications......................................................................................................................................2 SAFETY PRECAUTIONS Safety rules .......................................................................................................................................3 Electrical information .........................................................................................................................3 ! CAUTION Contact the authorized service technician for repair or maintenance of this unit. Contact the installer for installation of this unit. The air conditioner is not intended for use by young children or inrm persons without supervision. Young children should be supervised to ensure that they do not play with the air conditioner. If the power cord is to be replaced, replacement work shall be performed by authorized personnel only. Installation work must be performed in accordance with the national wiring standards by authorized personnel only. ENERGY SAVING TIPS Energy save.......................................................................................................................................4 Operating condition ...........................................................................................................................4 IDENTIFICATION OF PARTS Accessories .......................................................................................................................................4 Names of parts...................................................................................................................................5 INSTALLATION INSTRUCTIONS Location..............................................................................................................................................6 Window kit installation ......................................................................................................................7 Exhaust hose installation ..................................................................................................................8 Through-the-Wall installation .............................................................................................................8 OPERATING INSTRUCTIONS Control panel ....................................................................................................................................9 Remote .............................................................................................................................................11 Water drainage .................................................................................................................................16 CARE AND MAINTENANCE Care and maintenance ....................................................................................................................17 TROUBLESHOOTING TIPS Trouble shooting ..............................................................................................................................18 NOTE The rating data indicated on the energy label is based on the testing condition of installing un-extended air exhaust duct without adaptor A or B (The duct and the adaptor A & B are listed in the accessories chart of the Instruction Manual). See the right gure. Unit was operating on COOL mode and HIGH fan speed. 1 SAFETY PRECAUTIONS SOCIABLE REMARK Safety rules DISPOSAL: Do not dispose this product as unsorted municipal waste. Collection of such waste separately for special treatment is necessary. Dispose packaging materials, such as plastic and carton, in the appropriate waste bins. When this product reaches the end of its useful life, do not dispose with general household waste. For the correct collection and treatment of this product, take them to the collection point for reuse of electrical and electronic equipment. Contact your local authority for the appropriate collection point in you neighborhood. Wild disposal of waste in forests and landscapes endangers your health when hazardous substances leak into the ground-water and nd their way into the food chain. SPECIFICATIONS Cooling capacity To prevent injury to the user or other people and property damage, the following instructions must be followed. Incorrect operation due to ignoring of instructions may cause harm or damage. ! Always do this Never do this Do not operate your air conditioner in a wet room such as a bathroom or laundry room. Do not touch the unit with wet or damp hands or when barefoot. Do not press the buttons on the control panel with anything other than your ngers. Do not remove any xed covers. Never use this appliance if it is not working properly, or if it has been dropped or damaged. Never use the plug to start and stop the unit. Do not cover or obstruct the inlet or outlet grilles. Do not use hazardous chemicals to clean or come into contact with the unit. Do not use the unit in the presence of inammable substances or vapour such as alcohol, insecticides, petrol, etc. Do not allow children to operate the unit unsupervised. Do not use this product for functions other than those described in this instruction manual. Your air conditioner should be used in such a way that it is protected from moisture. e.g. condensation, splashed water, etc. Do not place or store your air conditioner where it can fall or be pulled into water or any other liquid. Unplug immediately if it occurs. Always transport your air conditioner in a vertical position and stand on a stable, level surface during use. Turn off the product when not in use. Always contact a qualied person to carry out repairs. If the supply cord is damaged, it must be replaced with a new power supply cord obtained from the product manufacturer and not repaired. Keep a clearance of at least 12 inches all around unit for proper air ow. If the air conditioner is knocked over during use, turn off the unit and unplug immediately. To prolong the life of the compressor, after powering off the unit, wait at least 3 minutes before turning the unit back on. 8,000 BTU EER 8.9 Power consumption 890W / 8A Power supply 115V / 60Hz / 1 PH Starting current 32A Compressor type Rotary Air volume (High) 355 m3/h / 209 CFM Noise level: Indoor/Outdoor (High) 56/61 dB Refrigerant type R410A / 8.47 oz Design pressure 550/340 PSIG Moisture removal capacity 0.9 L/h Power cord length / Plug type 6.5 ft / 14#x3/LCDI Operating temperature For your safety Do not store or use gasoline or other ammable vapors and liquids in the vicinity of this or any other appliance. Avoid re hazard or electric shock. Do not use an extension cord or an adaptor plug. Do not remove any prong from the power cord. WARNING Electrical Information Be sure the electrical service is adequate for the model you have chosen. This information can be found on the serial plate, which is located on the side of the cabinet and behind the grille. Be sure the air conditioner is properly grounded. To minimize shock and re hazards, proper grounding is important. The power cord is equipped with a three-prong grounding plug for protection against shock hazards. Your air conditioner must be used in a properly grounded wall receptacle. If the wall receptacle you intend to use is not adequately grounded or protected by a time delay fuse or circuit breaker, have a qualied electrician install the proper receptacle. Ensure the receptacle is accessible after the unit installation. 62°F to 95°F Recommended room size 150-250 sq. ft. Unit dimension 13.6W x 14D x 27.7H inches Package dimension 14.8 x 15.8 x 34.5 inches Net/Gross weight 50.7 / 59.5 2 3 IDENTIFICATION OF PARTS ENERGY SAVING TIPS Energy Save Use the unit in the recommended room size. Locate the unit where furniture cannot obstruct the air ow. Keep blinds/curtains closed during the sunniest part of the day. Keep the lters clean. Keep doors and windows closed to keep cool air in and warm air out. If a very hot day is expected, turn on the unit early to keep the room cool and keep the heat out. NAMES OF PARTS Front 1 2 3 4 6 5 Operating condition 1 Control Panel 2 Remote Signal Receptor 3 Horizontal Louver Control Lever (adjust manually) 4 Vertical Louver Control Lever (adjust manually) 5 Front Panel (housing) 6 Carrying Handle (both sides) The air conditioner must be operated within the temperature range indicated below: MODE ROOM TEMPERATURE COOL 17°C-35°C / 62°F-95°F DRY 13°C-35°C / 55°F-95°F Fig.1 IDENTIFICATION OF PARTS PARTS : PARTS NAME : QUANTITY : Adaptor A: connects unit to hose Adaptor B: connects hose to slider kit Exhaust Hose Window Slider Kit and Bolt 1 set Rear 7 Upper Air Filter 3/pc Foam seal (Behind the grille) 8 Air Intake FAN HIGH MED LOW TIMER ON TIMER OFF ON/OFF FAN SPEED ECONOMY TEMP RESET LOCK FOLLOW LED ME DISPLAY TURBO SET TEMPERATURE( C) AUTO COOL DRY HEAT ION SWING MODE Remote Control (Requires 2 AAA batteries, not included) 1 pc Drain hose 7 1 pc 9 Air Outlet 8 10 Lower Air Filter 9 11 Air Intake (Behind the grille) 14 12 Bottom tray drain outlet Wall adaptor for through-the-wall installation (not included, option to purchase) Please refer to page 8 for installation instructions 10 13 Wheel 11 14 Continuous Drain Outlet Check that all accessories are included in the package. Please refer to the installation instructions for their usage. NOTE: All the illustrations in this manual are for explanation purposes only. Your air conditioner may be slightly different. The actual shape shall prevail. Suggested tools for window kit installation 1. Screwdriver (medium size Phillips) 2. tape measure or ruler 3. Knife or scissors 4. Saw (in the event that the window kit needs to be cut down in size because the window is too narrow for direct installation). 4 13 12 Fig.2 5 INSTALLATION INSTRUCTIONS INSTALLATION INSTRUCTIONS Installation for a double-hung sash window INSTALLATION INSTRUCTIONS Foam seal A (adhesive type) Location The air conditioner should be placed on a rm foundation to minimize noise and vibration. For safe and secure positioning, place the unit on a smooth, level oor strong enough to support the unit. The unit has casters to aid placement, but it should only be rolled on smooth, at surfaces. Use caution when rolling on carpet surfaces. Do not attempt to roll the unit over objects. The unit must be placed within reach of a properly rated grounded socket. Never place any obstacles around the air inlet or outlet of the unit. Allow at least 12 inches of space from the wall for efcient air-conditioning. Fig.3. n 2i 12 in 1 Fig.3 Horizontal window Window Slider Kit Minimum:26.5in (2.22ft). Maxmum:48 in (4.04ft). 2. Adjust the length of the slider kit according to the width of the window. Place slider kit to window stool, on top of foam seal. Fig.7. 3. Trim another foam seal (with adhesive) to the proper length and place on top of the slider kit. Window kit 4. Close the window sash securely against the kit. Fig.8. 26.5 ~ 48.0 Window stool Fig.7 5. Trim the last foam seal to the proper length to seal the open gap between the top window sash and outer window sash. Fig.9. Window kit Window Slider kit Installation Fig.4 Horizontal window Window Slider Kit Minimum:26.5 in (2.22ft). Maxmum:48 in (4.04ft). Fig.6 1. Trim foam seal (with adhesive) to the proper length and attach to window stool. Fig.6. Installation for a sliding sash window Your window slider kit has been designed to t most standard vertical and horizontal window applications. However, it may be necessary for you to improvise or modify some aspects of the installation procedures for certain types of window. Please refer to Fig 4 & 5 for minimum and maximum window opening requirements. Window slider kit can be xed with a bolt (Fig. 5a) Window stool Foam seal 2. Adjust the length of the slider kit according to the height of the window. Place slider kit against foam seal. Fig.11. Fig.9 Note: If the window opening is less than the minimum required length and the slider kit needs to be cut down to size, cut the piece with the hole in it, but cut the end without the hole. Do not cut out the hole in the kit. 1. Trim foam seal (with adhesive) to the proper length and attach to window frame. Fig.10 Fig.8 3. Trim another foam seal (with adhesive) to the proper length and attached it to the open side of the slider kit. 4. Slide window close against the kit. Fig.12 5. Trim the last foam seal to the proper length to seal the open gap between the two window sashes. Fig.13. Fig.5 Foam seal A (adhesive type) bolt Fig.10 Window slider kit Window panel Foam seal 26.5 ~ 48.0 Fig.5a Fig.13 Fig.12 Fig.11 6 7 INSTALLATION INSTRUCTIONS OPERATING INSTRUCTIONS - CONTROL PANEL Exhaust Hose Installation The exhaust hose and adaptor must be installed or removed in accordance with the usage mode: Fig.14 ELECTRONIC CONTROL - OPERATING INSTRUCTIONS Before you begin, thoroughly familiarize yourself with the control panel and remote controller and all its functions, then follow the symbol for the functions you desire. Note: Some of the unit’s functions can only be controlled by the remote controller. COOL mode = install FAN / DRY mode = remove OPERATION PANEL OF THE AIR CONDITIONER 1. Attach both adaptors A and B to the exhaust hose. Extend each end of the hose by couple inches and turn the adaptor as shown in Fig 14. Do not over-tighten. Refer to previous page for window kit installation. 2. Align Adaptor A to the air outlet opening and push along the arrow direction as in Fig 15. Fig.15 4 Through-the-Wall Installation 1 The exhaust hose can be installed through the wall. It is necessary to purchase the following parts: Wall Adaptor (sold separately, please contact Sunpentown at 1-800-330-0388 or visit www.spt-usa.com) Screws and expansion plugs (can be purchased at any hardware store) Fig.16 1. Prepare a hole in the wall and install the Wall Adaptor to the opening (from outside). Secure with 4 expansion plugs and screws. Fig.16. 2. Attached exhaust hose to the Wall Adaptor. Fig.18 Fig.17 The exhaust hose can be compressed or extended moderately according to the installation requirement, but it is desirable to keep the hose length to a minimum. CAUTION: Make sure there are no obstacles blocking the air outlet of the exhaust hose (in the range of 20 inches), for the exhaust system to work properly. 8 Power indicator light 2 3 Timer indicator light (set only by remote controller) 1 MODE select button Selects the appropriate operating mode. Each press of the button will select mode in the following sequence: COOL, FAN and DRY. The corresponding mode indicator will illuminate. NOTE: Fan speed cannot be changed or set on the control panel (unit will operate under auto-fan speed). Fan speed can only be set or changed by the remote controller for COOL and FAN modes. Cover the hole using the adaptor cap when not in use. IMPORTANT: DO NOT OVER BEND THE EXHAUST HOSE 2 2 UP ( + ) and DOWN ( - ) button Used to increase or decrease temperature setting in 1°C or 1°F increments. Adjustable range: 62°F to 86°F (17°C to 30°C) NOTE: The control is capable of displaying temperature in Fahrenheit or Celsius. To convert from one to the other, press and hold the UP and Down buttons simultaneously for 3 seconds. 9 3 ON-OFF button Power switch, press to turn on/off. 4 LED Display Displays set temperature under COOL mode. Displays room temperature under DRY and FAN modes. Error codes: E1- Room temperature sensor error. Unplug the unit and plug it back in. If error repeats, call for service. E2- Evaporator temperature sensor errorUnplug the unit and plug it back in. If error repeats, call for service. E4- Display panel communication errorUnplug the unit and plug it back in. If error repeats, call for service. Protection codes: P1- Bottom tray is full - connect drain hose to the drain outlet to empty the bottom tray. If code repeats, call for service. OPERATING INSTRUCTIONS - CONTROL PANEL OPERATING INSTRUCTIONS - REMOTE Operating Instructions HANDLING THE REMOTE CONTROLLER COOL operation - Press the MODE button until “COOL” indicator light illuminates. Unit will run under auto-fan speed. - Press the (+) or (-) buttons to set desired room temperature. - Fan speed can be set/changed with remote. DRY (dehumidify) operation - Press the MODE button until “DRY” indicator light illuminates. - Under this mode, you cannot select a fan speed or adjust the temperature. - Keep windows and doors closed for the best dehumidifying effect. - Do not put the duct to window. FAN operation - Press the MODE button until “FAN” indicator light illuminates. The unit will run under auto-fan speed. - Temperature cannot be set under this mode. - Fan speed can be set/changed with remote. - Do not put the duct to window. Fig.20 CAUTIONS - The air conditioner will not respond if curtains, doors or other barriers block the signal from the remote controller to the unit. - Prevent any liquid from coming in contact with the remote controller. - Do not expose the remote controller to direct sunlight or heat. - If the infrared signal receiver on the unit is exposed to direct sunlight, the air conditioner may not respond. Close curtains/blinds to block sunlight from falling on the receiver. - If other electrical appliances react to the remote controller, move those appliances if possible. SLEEP operation This feature can only be activated by the remote control. Please refer to next section. Installing / Replacing Batteries. The remote controller is powered by two AAA batteries (not included). The batteries are housed in the back of the remote, protected by a cover. 1. Remove the cover by pressing down and sliding off (according to arrow direction). 2. Remove old batteries and insert new batteries, placing the (+) and (-) ends correctly. 3. Replace cover by sliding it back into position. OTHER FEATURES Auto-Restart If the unit breaks off unexpectedly due to power cut, it will restart at previous function when power resumes. Adjust manually Adjust manually Wait 3 minutes before resuming operation After the unit has stopped (or powered off), there will be a 3-minute delay before unit will start up again. This is to protect the compressor. Operation will automatically resume after 3 minutes. Air Flow Adjustment The louvers can be adjusted manually. (Fig 19) - Do not place or hang any heavy objects on the louver. - Keep the louver fully opened during operation. Fig.19 Location of the remote controller Use the remote controller within a distance of 8m (26 ft) from the appliance, pointing it towards the receiver. When setting the timer, the remote will automatically transmit signal to the unit at the specied time. Note: if remote is kept in a position that hinders proper signal transmission, a time lag of up to 15 minutes may occur. After replacing batteries, set the clock on the remote controller (refer to page 14). Fig.21 CAUTION - Do not mix old and new batteries of a different type. - Remove batteries if the remote controller is not to be used for extended period of time. Battery leakage may occur and damage the remote. - Keep the remote controller away from all liquids. - Protect the remote controller from high temperatures and direct sunlight. - Keep controller away from EMI (Electro-Magnetic Interference) supplied by other appliances. NOTE: This equipment has been tested and found to comply with the limits for a Class B digital device, pursuant to part 15 of the FCC rules. These limits are designed to provide reasonable protection against harmful interference in a residential installation. This equipment generates, uses and can radiate radio frequency energy and, if not installed and used in accordance with the instructions, may cause harmful interference to radio communications. However, there is no guarantee that interference will not occur in a particular installation. If this equipment does cause harmful interference to radio or television reception, which can be determined by turning the equipment off and on, the user is encouraged to try to correct the interference by one or more of the following measures: - Reorient or relocate the receiving antenna. - Increase the separation between the equipment and receiver. - Connect the equipment into an outlet on a circuit different from that to which the receiver is connected. - Consult an experienced technician for help. 10 11 INSTALLATION INSTRUCTIONS - REMOTE OPERATING INSTRUCTIONS - REMOTE Fig.22 1. ON/OFF Button Power button, press to turn unit ON/OFF. Transmission Indicator Indicator lights up whenever remote is transmitting signals to the AC unit. 2. MODE Button Each time the button is pressed, the operation mode is selected in the following sequence: COOL - DRY - FAN Mode Indicator Indicates the current operating mode: 3. TEMP/TIME Buttons - Push to increase temperature setting or adjust Timer in a clockwise direction - Push to decrease temperature setting or adjust Timer in a counter-clockwise direction. NOTE: press and hold and buttons simultaneously for 3 seconds will alternate the temperature display between °C and °F scale. Cool Dry Fan ON/OFF Indicator This indicator will be displayed when unit is operating. 4. RESET Button If the recessed Reset button is pressed, all current settings will be cancelled and the controller will be reset to default. 5. SLEEP Button Press to activate or disable Sleep function. Select this function during the sleeping hours to maintain the most comfortable temperature and save energy. - Only available under COOL mode. - When Sleep mode is activated, set temperature will increase by 1°C/2°F after 30 minutes. After another 30 minutes, set temperature will again increase by 1°C/2°F. This new temperature will be maintained for 7 hours, then set temperature will return to original set temperature. This ends the Sleep mode and unit will continue to operate as originally programmed. Note: Sleep function would be cancelled if the following buttons are pressed: ON/OFF, MODE or FAN. 6. FAN SPEED Button Press to select the fan speed in three steps: LOW - MED - HIGH. 7. TIMER Button Used to program TIMER ON or TIMER OFF. 8. CANCEL Button Applies to Timer settings: - If Timer On, Timer On-Off or Timer Off-On feature has been set, pressing the Cancel button will override the Timer program and turn off unit. - If Timer Off is set, pressing the Cancel button will cancel timer off setting and turn unit on (if unit is off). - If no Timer feature has been set, pressing the Cancel button will have no action. Temperature Display Displays the set temperature. If FAN mode is selected, there will be no display. LOCK Indicator Indicates the remote is locked. Fig.23 Fan Speed Indicator Indicates the selected fan speed: Auto, Low, Medium or High. Displays Auto when in Dry mode. Sleep Indicator Indicates the Sleep feature is activated. Time Display Indicates Timer On/Off or clock time. Clock time is displayed only when no timer is set. To check time when Timer feature is operating, press the Clock button. Note: All displays on the remote controller are shown for illustration purposes only. 9. CLOCK Button Press to set the time. 10. LED Button Press to turn off the display on the unit, press again to light the display 11. LOCK Button When pressed, all current settings are locked in and the remote controller will not respond to any actions except LOCK. Press again to cancel Lock mode. 12 13 OPERATING INSTRUCTIONS - REMOTE Setting the Clock Set the clock before you start operating the air conditioner. The clock will be displayed on the remote control panel regardless if air conditioner is in use or not. 1. After batteries are inserted in the remote, the clock panel will display “12:00”. 2. Press and hold the CLOCK button for 3 seconds, the time will ash. 3. Press (forward) or (backward) buttons to set time. 4. Each press of the button will move the time forward or backward by one minute. Press and hold to move the time forward/backward in 10-minute intervals. 5. Once the right time is achieved, press the CLOCK button or release / button and wait for 5 seconds. The clock stops ashing, time has been set. OPERATING INSTRUCTIONS - REMOTE NOTE: - When timer operation is set, the remote controller automatically transmits the timer signal to the unit at the specied time. Therefore, keep the remote controller in a location from which it can transmit the signal to the unit properly. - Timer setting is limited to 24 hours. Examples of Timer Setting TIMER-ON: this feature is useful when you want the unit to automatically turn on at a certain time (like before you return home from work). Example, start AC in 8 hours: 1. Press the TIMER button until the Timer-On indicator is displayed and setting time is ashing. 2. Press / button until “8.0” is displayed. 3. Release / button and wait for 3 seconds. The set time stops ashing, timer is set. Note: The clock time must be set before Timer feature can be set. If you adjust the clock time after setting On/Off Timer, the remote will send the adjusted timer information to the unit. CAUTION: Static electricity or other factors (in case of extremely high voltage) can cause remote controller clock to initialize. If your remote controller is initialized (ashing 12:00), readjust the clock before operation. COOL / FAN operation Ensure the unit is plugged in and power is available. 1. Press the MODE button to select COOL or FAN mode. 2. Press the / button to set desired temperature (COOL mode only). 3. Press the FAN button to select fan speed: Auto, Low, Med or High. 4. If the unit is off, press ON/OFF button to start operation. Press ON/OFF button again to stop operation. Fig.24 TIMER-OFF: this feature is useful when you want the unit to automatically turn off at a certain time (like after you go to bed). Example, stop the AC after 6 hours: 1. Press the TIMER button until the Timer-Off indicator is displayed and setting time is ashing. 2. Press / button until “6.0” is displayed. 3. Release / button and wait for 3 seconds. The set time stops ashing, timer is set. Fig.25 DRY (Dehumidifying) operation Ensure the unit is plugged in and power is available. 1. Press the MODE button to select DRY mode. 2. Press the / button to set desired temperature. 3. If the unit is off, press ON/OFF button to start operation. Press ON/OFF button again to stop operation. NOTE: In Dry mode, fan speed is automatically controlled and cannot be adjusted. Fig.26 TIMER operation 1. Press the TIMER button and the remote ashes “0.0” next to either Timer-On or Timer-Off indicator. 2. Set desired time by pressing to move forward or to move backward. - Press or hold the / button to move time by 0.5 hour increments, up to 10 hours, then by 1 hour increments up to 24 hours. - The selected time will register in 3 seconds after setting. 3. After setting the timer for Timer-On or Timer-Off, check the Timer indicator on the display panel is illuminated. To Cancel: press the CANCEL button will remove all timer settings. To change setting, repeat steps 1 to 3. 14 Fig.27 COMBINED TIMER (Timer-Off -> Timer On) This feature is useful when you want the unit to stop after you go to bed and to start again in the morning when you wake up. Example, stop the AC after 2 hours and start again 10 hours after setting: 1. Press the TIMER button until the Timer-Off indicator is displayed and setting time is ashing. 2. Press / button until “2.0” is displayed. 3. Press the TIMER button again to display Timer-On indicator. 4. Press / button until “10.0” is displayed. 5. Release buttons and wait for 3 seconds. The set time stops ashing, timer is set. COMBINED TIMER (Timer-On -> Timer Off) This feature is useful when you want the unit to start before you wake up and stop after your leave the house. Example, start the AC 5 hours after setting and stop 8 hours after setting: 1. Press the TIMER button until the Timer-On indicator is displayed and setting time is ashing. 2. Press / button until “5.0” is displayed. 3. Press the TIMER button again to display Timer-Off indicator. 4. Press / button until “8.0” is displayed. 5. Release buttons and wait for 3 seconds. The set time stops ashing, timer is set. 15 OPERATING INSTRUCTIONS - WATER DRAINAGE Emptying the Water Tank When the water in the bottom tray reaches its maximum capacity, the unit will beep 8 times and display will show “P1”. At this time, the compressor will immediately stop (Cool/Dry modes) but fan will continue to operate. 1. Place a collection pan underneath the bottom drain spout or carefully move the unit to a drain location. 2. Remove the drain plug and water will begin to drain out. 3. Replace the drain plug and restart the unit. P1 indicator should disappear. CARE AND MAINTENANCE Air lter (take out) Note: Be sure to replace the drain plug before restarting the unit. Fig.31 Fig.28 Air lter (install) Continuous Drainage (optional) For COOL/DRY modes: 1. Remove the plug from Continuous Drain Outlet. 2. Connect a 3/4” hose (not included). 3. Place the open end of the hose directly over drain area or bucket. Fig.29 Note: Make sure connections are secure to prevent leakage. Make sure there are no kinks that may stop the water ow. Fig.32 IMPORTANT: - Be sure unit is off and unplugged before cleaning or servicing. - Do not use gasoline, thinner or other chemicals to clean. - Do not wash the unit directly under a tap or spray with water hose. May cause electrical danger. - If the power cord is damaged, it should be repaired by manufacturer or certied electrician. Air Filters Clean the lters at least once every two weeks to prevent inferior fan operation due to dust accumulation. 1. Remove lter according to arrow direction in Fig 31. 2. Wash the air lter by immersing gently in warm water (about 104°F) with a neutral detergent. Rinse the lters and allow to dry completely in a shady area - do not place under direct sunlight. 3. Replace lter according to arrow direction in Fig 32. Note: The grill and air lter are connected and can be separated. Housing Use a lint-free cloth soaked with neutral detergent to clean the unit’s housing. Finished by a dry clean cloth. Storage 1. Remove the rubber plug at the Continuous Drain Outlet and attach hose to drain out water (refer to page 16). 2. Remove the plug from the bottom drain outlet and allow water to drain (refer to page 16). 3. Run the unit in FAN mode for half a day in a warm room. This will dry the inside of the unit and prevent mold and mildew growth. 4. Power off the unit and unplug from power source. Wrap the cord and bundle it with tape. 5. Clean the air lters and reinstall. 6. Remove the batteries from the remote controller. 7. Cover with a plastic bag and store in a cool, dry place. Fig.30 16 17 TROUBLESHOOTING TIPS TROUBLES WARRANTY POSSIBLE CAUSES SUGGEST REMEDIES - P1 appears in the display window Drain the water in the bottom tray. 1. Unit will not start - Room temperature is lower than the set temperature.(Cooling mode) - The windows or doors in the room are not closed. 2. Not cool enough - There are heat sources inside the Remove the heat sources if possible. room. blocked. Connect the duct and make sure it can function properly. - Temperature setting is too high. Decrease the set temperature. - Air lter is blocked by dust. Clean the air lter. - The ground is not level or not at enough. 5. Gurgling sound Make sure all the windows and Your Guarantee doors are closed. - Exhaust air duct is not connected or 4. Noisy or vibration Adjust the temperature. Place the unit on a at, level ground if possible. - The sound comes from the owing of the refrigerant inside the air-conditioner. It is normal. If this product is found to be faulty as a result of faulty materials or workmanship within one year from date of purchase, it will be repaired free of charge. This guarantee is subject to the following terms: Sunpentown must be notied of the fault. Proof of purchase must be presented to Sunpentown's nominated representative. The warranty will be void if the product if modied, misused or repaired by an unauthorized person. The warranty after repair will not be extended beyond the original one-year period. All replacement parts will be new or reconditioned. Parts, which are replaced, become the property of Sunpentown. The warranty applies for the use of the product in the USA only. What is NOT COVERED: Warranty does not include freight charges. Damage due to installation error, product abuse and/or misuse. Incidental or consequential damage caused by possible defects with this product. Labor cost incurred for the installation and/or removal of a possible defective unit. Damage to product caused by improper power supply voltage, accident, re, oods or acts of nature. Failure of product resulting from unauthorized modications to the product. Improper installation or failure to perform the necessary maintenance. Normal wear and tear on parts or replacement of parts designed to be replaced. Damage to personal property from use of product. Replacement or repair of household fuses, circuit breakers, wiring or plumbing. This GUARANTEE is in addition to your Statutory Rights SUNPENTOWN INTERNATIONAL INC. 14625 Clark Ave. City of Industry, CA 91745 Tel: 800-330-0388 [email protected] www.sunpentown.com 18 19