1
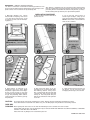
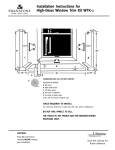
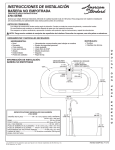
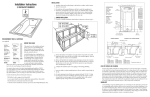
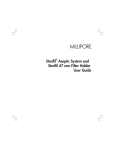
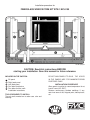
Installation procedure for
FIBERGLASS WINDOW TRIM KIT WTK-1/BC-8100
Pat. No. 4,391,072
CAUTION: Read ALL instructions BEFORE
starting your installation. Save this manual for future reference.
INCLUDED IN THE CARTON:
A
B
C
D
E
Sill panel
Right jamb panel
Left jamb panel
One tube of adhesive
One tube of white caulk
Installation instructions
TOOLS REQUIRED TO INSTALL
The only tools needed are a saber saw, ruler and
caulking.
DO NOT NAIL PANELS TO SILLS. THE HOLES
IN THE PANELS ARE FOR MANUFACTURING
PURPOSES ONLY!
INSTALLATION PROCEDURE
Allow panels to adjust to room temperature for at
least 6 hours (65⬚–90⬚F).
Remove unnecessary window moldings, if any,
and clean area of dirt, chipped paint, loose plaster,
etc.
IMPORTANT — Adhesive Venting Instructions
The adhesive manufacturer recommends the following procedure be used
to prevent the possibility of adhesive bleed through when attaching to a nonporous surface, such as ceramic tile or vinyl coated dry wall:
After adhesive is applied to panel as instructed, DO NOT remove backing
from tape. Position panel as instructed and press firmly against the wall. Pull
panel away from the wall and allow the adhesive to dry for three (3) minutes.
Remove backing from tape and then press panel into final position.
INSTALLATION PROCEDURE
1. MEASURE BEFORE YOU START!
Measure width of sill opening, mark, and cut
1-1/2⬙ LESS than the measurement. (Cut off
the end with the holes used for manufacturing purposes.)
2. Measure depth of sill area. Mark and cut
panel to exact size.
3. Cut left and right vertical panels to
desired height and depth. (Lining up with
height of tub surround material if applicable.)
NOTE: AT THIS POINT, IT IS ADVISABL TO
TRIAL FIT ALL 3 PANELS.
4. Apply adhesive to underside of sill.
Cushion-seal foam strip is factory applied
and provides a good seal for uneven edges.
Be sure to center sill panel ‹Ω¢⬙ away from
each side wall. Vertical jamb panel will cover
the gap. After positioning, follow “adhesive
venting instructions” then final fit by pressing
firmly into place.
5. With vertical jamb panels cut to size,
apply adhesive per “S” pattern shown above.
After following “adhesive venting instructions,” remove backing from tape and apply
a bead of white caulk to end of panel that
overlaps sill. Place into position and press
down so tape and adhesive make good contact to wall.
6. Caulk cut edges where necessary to seal
out moisture. It is not necessary to caulk
overlapping finished edges, unless desired.
Pat. No. 4,391,072
CAUTION:
CARE AND
CLEANING:
Dry cleaning agents and solvents will damage the surface. Burning cigarettes will damage and discolor the surface.
Please allow unit to be installed 24 hours before using. This will allow proper curing of adhesive and caulking material.
Wash regularly with warm water, use soft cloth with mild detergent such as Fantastic, Mr. Clean or Lestoil.
Scouring pads made of nylon, saran or polyethylene may be used, but NEVER USE ABRASIVE SCOURING POWDERS, CLEANSERS
OR PADS…THEY WILL DULL THE FINISH.
Protect finish with any fiberglass wax or automotive paste wax.
FORM #526-8-85-20M