1
Graduation Design
Mccs-391
Mobile Phone E-Mail Report
Date: 2006/1/24
Project member:
Dana (p-02-0939-4)
Zhu LiQun(p-02-0893-3)
Yang Zhuobin(P-02-0894-9)
Supervise By: Andrew
1
Graduation Design
Mccs-391
Proposal index:
1.Background……………………………………………………………3
2. The architecture of the Mobile Phone E-mail ……………………………5
3. Function list …………………………………………………………6
4. The disadvantage of using Mobile phone as client………………………..7
5. Technology used………………………………………………………7
6. System Requirement…………………………………………………..7
7. User Protocol:………………………………………………………..9
8. System Design
8.1 Database Design
8.1.1 Server
8.1.2 Client
8.2 Interface Design
8.3
Protocol design
9. User manual & Installation guide
9.1 User Manual
9.2 Installation guide
9.2.1 Installation of the server
10. Conclusion
2
Graduation Design
Mccs-391
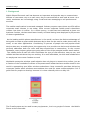
1. Background
Mobile Phone Electronic mail has become an important and popular way to communicate.
Millions of consumers rely on e-mail every day to communicate at work and at home. As a
result, marketers are increasingly using e-mail and text messaging to sell products and
services.
The mobile email market is vast and untapped. Industry experts report there are 650 million
corporate email inboxes in use today, while current corporate mobile email subscribers
number less than 10 million. In a recent survey, it said that had mobilized at least one
business function, wireless email was virtually universal having been deployed by 82 percent
of these organizations.
As the leading mobile phone manufacturer in the world, we have the distinct advantage of
being able to make a great mobile business device that can be used to make phone calls, do
email, or use other applications. Considering 70 percent of people who use popular email
devices also carry a mobile phone, the opportunity is to provide one device and solution that
perfectly addresses both the voice and data experiences is tremendous, In the current
landscape, many industry players are going after a slice of the potential mobile email market.
The mobile phone E-mail can offer businesses the type of cost-effective, easy-to-use, and
reliable business solutions they are seeking. It is more affordable, intuitive and collaborative
so employees have more freedom to work
Worldwide enterprise wireless email adoption has only begun to scratch the surface, just as
a fraction of the hundreds of millions of corporate email seats that have mobile access in the
world is approaching two billion wireless subscribers. Now successful providers delivering
corporate mobile email solutions must address the need for mass market adoption. It’s a
good field for people to develop, because it is close relatedly with our daily life.
The E-mail system can be used in many equipments , but in my project I choose
Phone as the client side.
3
the Mobile
Graduation Design
Mccs-391
As every know, the frequency of Mobile Phone is grater than the frequency of PDA used. For
example, there are 100 people here, may be 90 people have a Mobile Phone each, but may be
only 5 people have PDA. People can send E-mail after they make a call if they like, but PDA
can’t make a call, the can only send or receive E-mail for example. The Mobile phone is more
useful in people’s daily life. So I choose the Mobile phone.
4
Graduation Design
Mccs-391
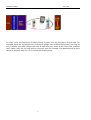
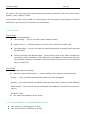
2. The architecture of the Mobile Phone E-mail
Mail proxy Server side:
Act as a agent
Filter for the useful information
Send you information if error happens
Mail client use the number25 port, SMTP to send the E-mail to Mail Server.
Relevantly, the Mail Client uses the number 110 port, POP3 to receive E-mail.
The relation between Mail server and Mail Proxy Server, they also use SMTP to send E-mail,
use POP3 to receive E-mail.
But the import thing that I need to do is through the Internet to make the Mail Proxy Server
and the Mobile phone to communicate to each other. The technique that I use is the J2ME. It
is very import and difficult in this project.
5
Graduation Design
Mccs-391
Of course, user can add some contents about the Mail in phone DB. Just as the user name,
classify, time, subject, E-mail.
And in proxy server side, the DB can record which user have what E-mail address, the DB is
efficient for the Internet to transform the information.
3. Function list
Server Side
Powerful mail management
z Mail filtering- - (server can filter some rubbish E-mail)
z
Spam control- - (different space the server can control the E-mail well)
z
Mail protection- - (server can use the special technology to protect the E-mail not
be disturbed)
z
Directly leverage the address Book- -(proxy server have a DB, which consists the
username’s group members, it also has the E-mail address of that group member.
For example, company can send E-mail about their products to the user that they
think it useful for)
Client Side
z Can be Login successfully
z Add new custom information-- ( name, classify, time, subject, E-mail address)
Delete-- ( user is allowed to delete the selected E-mail messages)
Search—( user can search the needed E-mails by name, time, subject, E-mail address)
Send E-mail—( user send E-mail by entering E-mail address, connected to the proxy
server)
Receive E-mail
z Can check the capacity of the phone
4. The disadvantage of using Mobile phone as client
z
z
The memory in mobile phone is little
The user interface is difficult to control
6
Graduation Design
z
z
Mccs-391
The computation power is low
The input from the mobile phone is inconvenient
5. Technology used
J2ME (Java 2 Platform, Micro edition)
J2SE ( Java 2 Platform, Standard Edition)
POP3 (Post Office Protocol-Version3)
SMTP (Simple Mail Transfer Protocol)
Socket layer programming
GPRS (General Packet Radio Service)
RMS ( Rights Management System)
6. System Requirement
In Mobile phone E-mail System, it consists two parts, one is the Client side, the other side is
the server
Client side:
Operational environment: Mobile phone (Nokia 7610,Nokia6670,Nokia 6630….)
Development Environment: J2ME wireless Toolkit 2.2
J2SDK
Platform: Window XP
DataBase: JDBC-ODBC (use Microsoft Access)
Server sides:
Equipment: PCs
Platform: Window XP
Program Tool: J2SE
7
Graduation Design
Mccs-391
7. User Protocol:
Client
Login:
LGI| username |password
Server
LGI| status1
Status1:
01—OK
02—user doesn’t exist
03—password is invalid
Logout:
LGO| username
LGO| status2
Status2: 01—OK
Send E-mail:
SND| username|
receiver/group| title|
message(text)
SND|status3
Status3: 01—OK
Receive mail title:
TTL| username
TTL|status8|number1|date|title1|sender1|number2|date|title2|
sender2|…
Status8:
01— successful receive title
02-- error happen
Receive mail content:
RCV| username| number
RCV| status4| title| sender| date| content
Status4:
01-- successful receive mail
02-- the mail isn’t found
Delete a mail:
DEL| username| number
DEL| status5
Status5:
01—OK
02—receiver isn’t found
02—the mail isn’t found
Set group ID:
SET| username| group ID|
email1| email2|…
SET|status6
Status6:
01-- the group ID is successfully set
found
Request for email address
associated with the group ID
REQ| username| group ID
REQ| Status9|email1|email2|….
Status9:
01—Ok
02--Error
Delete group:
DLG| username| group ID
DLG|status7
Status7:
01—OK
02—the group ID isn’t found
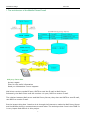
8. System Design
8.1 Database design
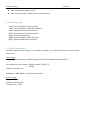
8.1.1 Server
There are two databases in the proxy server:
8
02-- the group isn’t
Graduation Design
Mccs-391
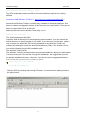
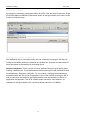
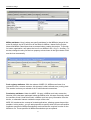
There are two attributes in “DB”: username and password. Because there’s no register in our programming, if
people want to use this system, they should register in Internet first.
There are three attributes in mailgroup: username, groupid and groupAddress. These are the protocol to
communicate with clients.
9
Graduation Design
Mccs-391
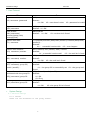
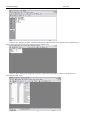
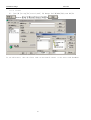
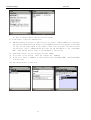
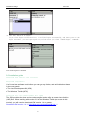
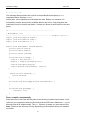
8.1.2 Client
(I). [open]Æ [Setting]Æ [control panel] Æ[ Manage Tool]Æ[ODBC]Æ[System DNS]Æ
ÆChose “
Ӯ
->
If you add correct, then the client side can successful connect to the server side DataBase.
10
Graduation Design
Mccs-391
8.2 Interface design
11
Graduation Design
Mccs-391
8.3 Protocol design
Client
Server
Login:
LGI| username |password
LGI| status1
Status1:
01—OK
02—user doesn’t exist
03—password is invalid
Logout:
LGO| username
LGO| status2
Status2:
01—OK
Send E-mail:
SND| username| receiver/group| title| message(text)
SND|status3
Status3:
01—OK
02—receiver isn’t found
Receive mail title:
TTL| username
TTL| title1|sender1|title2|sender2|…
Receive mail content:
RCV| username| number
RCV| status4| title| sender| date| content
Status4:
01-- successful receive mail
02-- the mail isn’t found
Delete a mail:
DEL| username| number
DEL| status5
Status5:
01—OK
02—the mail isn’t found
Set group ID:
SET| username| group ID| email1| email2|…
SET|status6
Status6:
01-- the group ID is successfully set
02-- the group isn’t found
Request for email address associated with the group
ID
REQ| username| group ID
REQ| email1|email2|….
Delete group:
DLG| username| group ID
DLG|status7
Status7:
01—OK
02—the group ID isn’t found
12
Graduation Design
Mccs-391
9. User manual & Installation guide
9.1 User Manual
(I) Connect to the server side DataBase.
(II) Open the Server Side.
(III) Now I am telling how to use the System:
¾ Login: input Username and Password Which is exits is Server’s Database. You must enter correct,
then you can successfully login, else you can login.
¾
Show how many main functions that exist in:
¾
Now I tell how to Send a Email:
Now
tell you the use of “Send Email Store”:
It will show you a list of the Email that you have send to the Server.
You can see it clearly if you click the “OK” Command.
If you want to see more detail, you can click the “OK” Command in Menu, then you see.
Also, if you want to delete the sent email in your MailBook RMS, please click the “Delte”
Command, then it is successfully deleted from the RMS.
Now the send function is finished.
13
Graduation Design
¾
Mccs-391
Now it return the receive function:
In Receive a E-mail interface,
If you want to receive the Email title and date only, please enter the “Receive” Command,
then it will show a list that you receive all.
If you want to receive the content of Email, you should click “Receive Content” Command,
then it show for you.
If you want to see the detail content, please enter the “Go” Command,
Also it can be delete if you don’t like it.
Now the receive function is over.
14
Graduation Design
Mccs-391
¾ This is another import function in this system:
It is the Group, it has two subfunctions.
Add Group means if you want to add a new type of person’s Email address as a groupid,
and then this add groupid will return to the sendEmail function as a groupid, it can show
you that you can send a email to one people or more than two people. All that is after
you click the “Save” Command which will help the add information to the “GroupBook
RMS”. This Record will be store to the DataBase in Server side.
Show Group can let you see the group you have added.
If you want to see clearly, click the “Detail Ok” Command.
If you click “Delte” Command, it will be delete from “GroupBook RMS” and the DataBase
in Server side.
Now the Group function is also over.
15
Graduation Design
¾
Mccs-391
The last function is Logout:
If you click Logout in Function List, it will be logout successfully, and then return to the
Login interface, you can Login again if you like after you click “BackToLogin” Command..
Now all description is finished.
9.2 Installation guide
Download and install the software
Required components
You'll need two software tools before you can go any further, and we'll talk about these
in the next panels:
• The Java Development Kit (JDK)
• The Wireless Toolkit (WTK)
Download the Java Development Kit (JDK)
The JDK provides the Java source code compiler and a utility to create Java Archive
(JAR) files. When working with version 2.0 of the Wireless Toolkit (as we are in this
tutorial), you will need to download JDK version 1.4 or greater.
Download JDK version 1.4.1.( http://java.sun.com/products/jdk/1.4.1 )
16
Graduation Design
Mccs-391
Download the Wireless Toolkit (WTK)
The WTK download contains an IDE as well as the libraries required for creating
MIDlets.
Download J2ME Wireless Toolkit 2.0.( http://java.sun.com/products/sjwtoolkit/ )
Note that the Wireless Toolkit is currently only available for Windows platforms. Sun
plans to release unsupported versions in the future for Linux and Solaris. There are no
plans to support Mac OS X at this time.
MIDlet development with the Wireless Toolkit Page 3 of 54
Install the software
The Java Development Kit (JDK)
Install the JDK as directed in its accompanying documentation. You can choose the
default directory or specify another if you prefer. If you choose to do the latter, make a
note of where you install the JDK. During installation of the Wireless Toolkit, the
software will attempt to locate the Java Virtual Machine (JVM); if it is unable to do so,
you will be prompted for the JDK installation path.
The Wireless Toolkit (WTK)
The Wireless Toolkit is contained within a single executable file, which you downloaded
in the previous panel. Run this file to begin the installation. We suggest that you use
the default installation directory. However, if you do not use the suggested directory,
make sure the path you select does not include any spaces.
Creating your first MIDlet
Starting the KToolbar
Start the WTK by locating and running KToolbar. You should see a display similar to
the figure below.
17
Graduation Design
Mccs-391
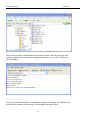
Creating a project
Let's begin by creating a new project within the WTK. Click the New Project icon. Enter
the Project Name and MIDlet Class Name shown in the figure below, then click Create
Project to finish this step.
Setting the project properties
One additional step is necessary before we can create the new project: We have to
configure the MIDlet attributes. Attributes are divided into six areas; the discussion of
each area below is followed by an illustrating figure.
Required attributes. There is a total of seven attributes that you must specify when
creating a MIDlet suite. These attributes are divided among the JAR manifest file and
Java Application Descriptor (JAD) file. For our purpose, clarifying the breakdown of
properties within the files is not of importance. One of the benefits of using an IDE is
that we can leave the details to the implementation and concentrate our efforts on
application development. The WTK creates default values for each attribute, as
illustrated in the figure below; we'll use these default values for our MIDlet.
18
Graduation Design
Mccs-391
MIDlet attributes. Here is where we specify attributes for the MIDlet(s) stored in the
suite. By default, the WTK will fill in all the fields for MIDlet-1 based on the Project
Name and MIDlet Class Name that we entered when creating the project. To provide
for better organization, we'll place the icon for our MIDlet in the images directory. To
do that, change the entry for the Icon property to that shown in the figure below. We'll
see the icon momentarily.
Push registry attributes. With the release of MIDP 2.0, MIDlets can listen for a
connection from a remote resource; this process is often referred to as pushing data.
This section is where you maintain a list of valid inbound connections.
Permission attributes. Under the MIDP 1.0 spec, a MIDlet could only access the
libraries (APIs) that were packaged inside the MIDlet suite; this was commonly called
the sandbox model. Under this model, a MIDlet could not query information from the
device, or otherwise interact outside the scope of the suite.
MIDP 2.0 introduces the concept of trusted applications, allowing access beyond the
sandbox. In this section, you can add properties to specify which APIs are accessible.
Attributes specified in MIDlet-Permissions are those that are required in order for the
MIDlet to run. Those specified in MIDlet-Permissions-opt are optional.
19
Graduation Design
Mccs-391
Writing the code
The following listing contains the code for a simple MIDlet that displays a List
component and a scrolling Ticker.
At this point, it isn't important to understand the code. Rather, our intention is to
successfully compile and preverify a MIDlet without any errors. Copy and paste the
code below into your favorite text editor. I'll show you where to save the file in the next
panel.
/*-------------------------------------------------* MobileEmail.java
*-------------------------------------------------*/import java.io.*;
import javax.microedition.midlet.*;
import javax.microedition.lcdui.*;
import javax.microedition.io.*;
public class MobileEmail extends MIDlet {
private Session session;
private Display display;
private boolean isPaused;
protected void startApp() {
session = new Session();
display = Display.getDisplay(this);
session.setDisplay(display);
Login login=new Login(display, session);
}
public boolean isPaused() {
return isPaused;
}
protected void destroyApp(boolean unconditional) {
}
protected void pauseApp() {
isPaused = true;
}
}
Save, compile, and preverify
Save the source code from the last panel in the directory location shown below. You'll
notice as you navigate the directory hierarchy that the WTK has created the C:\WTK22
directory and all its subdirectories. The src directory is where you store source files.
Note: The drive and directory will vary depending on the location where you installed
the toolkit.
20
Graduation Design
Mccs-391
Once the file is saved, click the Build icon on the KToolbar. This will invoke the Java
compiler, followed by the preverifier. Assuming that there are no errors, click Run to
start the MIDlet.
Running the MIDlet
Once you've started the MIDlet, the Application Manager will appear. Our MIDlet name
and icon will be shown on the display, as illustrated in the figure below.
21
Graduation Design
Mccs-391
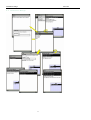
9.2.1 Installation of the server
1)If you want to install the server, you have to download the J2SE tool, you can go to the
“www.sun.com” to download the tool.
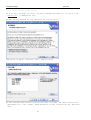
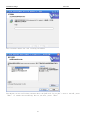
2) When you have download the tool then press the tool you can see
Then choose “I agree” then press “Next” and you can see
In this interface there are four tools you can choose to install, and choose the first one
“development tool”. The “change” means which drive you want to install the tool. Then press
“Next”
22
Graduation Design
Mccs-391
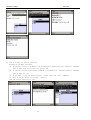
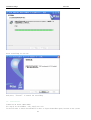
This interface means the tool is being installed.
This means you can stall other software about the J2SE tool. If you don’t want to install, press
“Exit” to finish the installing. But if you want, press “Next”
23
Graduation Design
Mccs-391
After installing you can see
And press, “Finish” to finish the installing.
10. Conclusion
Limitation & future improvement
Not supply for Attachment, only supply for text
If the user want to check second E-mail, he have to login the mailbox again, because in our system
24
Graduation Design
Mccs-391
user only can check one received E-mail when login the mailbox.
The protocol used simple POP3, not used more complex protocol –IMAP
In future: the mobile phone will be developed more intelligence and it will improve the software in mobile
phone. Some limitation will be fixed. Some function will be improved. According the development of GPRS, the
Internet may be more static, the Mobile connection will be more static and the speed will be more fast.
End
~~~
25