1
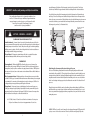
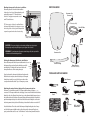
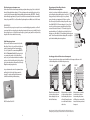
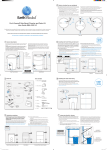
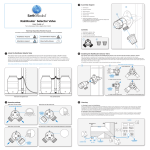
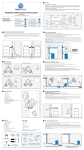
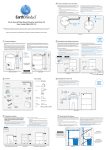
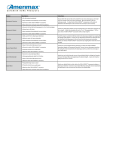
Maximizing rainwater collection
Up to three Stoneware Urns can be linked together using EMSCO’s Linking Kit #2277 to gather the
maximum amount of rainwater. To link Storage Urn #1, drill a 3/4” hole in the primary urn (on the
opposite side of the urn from the downspout) 2-1/2” down from the diverter tubing hole (8-3/4” from
the top of the urn lip. Drill another 3/4” hole at the exact same depth in Storage Urn #1 so that it faces the
primary urn. It is important that these holes be level with each other to allow the water to flow in either
direction. Place grommets in each of the two holes and connect with tubing, avoiding any bends, curves
or kinks.
To add a second storage unit, drill a 3/4” hole in Storage Urn #1 on the opposite side of the urn from the
first hole. The second hole should be 2-1/2” lower than the first hole drilled (11-1/4” from the top of the
urn lip). Drill a matching 3/4” hole in Storage Urn #2 at the same level. Connect the two with grommets
and tubing. Each urn’s capacity will decrease as holes are added at 2-1/2” increments. While collecting
rainwater, make sure the spigots are turned to the off position.
6-1/4”
EMSCO Linking Kit #2277
8-3/4”
Primary
Urn
Storage
Urn #1
Preparing the urn for winter
To protect your stoneware urn from damage in
climates where the temperatures drop below
freezing in winter, it will need to be emptied
and disconnected. Gently pull the tubing out of
the urn opening. Use a string, wire tie or zip tie
to secure the tubing to the downspout above
the diverter with the loose end facing upward.
Water from winter rain or melting snow will
now flow in an uninterrupted path from the
gutter and through the entire length of the
downspout. Now, you can open the spigot and
drain the water from the urn. Store the urn
upside down or inside until spring.
A mild soap and water solution can be used to clean
both inside and outside of urn. Fill urn about 1/4 full
and shake/agitate to loosen any debris. Remove
bottom outlet hose and spray water into top hole
to flush. Wipe outside with non-abrasive cloth.
with built-in
11-1/4”
www.emscogroup.com
© 2011 Emsco Group
ER 801
planter
Storage
Urn #2
IMPORTANT – Read these safety warnings carefully before installation.
Please read through all instructions before beginning the installation of your
new Rescue™ Stoneware Urn. Improper installation, usage and maintenance
may cause damage to your home/property or possible injury and/or death.
Emsco Group is not responsible for any damages or injuries
caused as a result of or by improper installation.
!
C AU TIO N – WARNING – HAZ AR DS
inner ribs/bumpers of the diverter. If the downspout is inserted too far (more than 2”) into the top
of the diverter, it will block the upper chamber outlet hole and disrupt the flow of water into the urn.
Now, slide the lower portion of the downspout up into/onto the bottom portion of the water diverter
until it stops. The enclosed locking screws attach both the top and bottom sections of downspout to the
diverter for a more secure connection. When the diverter is in place and both downspout sections are now
connected to the diverter, you can reattach the lower downspout bracket you removed earlier to secure
the downspout to your house. (See illustration below)
If necessary, secure with
locking screws.
!
DURING INSTALLATION AND SET UP
Installation Hazards – Stoneware Urns are for water collection and outdoor use only. No other
uses are recommended. Downspout edges may be sharp. Wear protective gloves when cutting and
handling downspouts to avoid cuts or scratches. Always wear safety glasses when doing cutting or
drilling to prevent eye injuries. Protect the home’s siding with a sheet of wood inserted between
the downspout and the siding to prevent damage.
Electrical Hazard – If downspout contains heating cables, there is a potential electrocution
or fire hazard during installation, which may cause serious injury or death.
DURING USE
Drowning Hazard – Children should NEVER be allowed to play on or near a Stoneware Urn.
Nor should they climb on an urn. NEVER use the Stoneware Urn if it is cracked, warped, broken or
damaged in any way. If any of these conditions exist, empty the urn and do not use. NEVER position
the urn near a deck, stairs, chair or other structures or items that would allow a child to climb above
or onto the urn.
Water Contamination Hazard – Drinking water from a Stoneware Urn may cause serious illness
or death. DO NOT let people (or animals) drink water from an urn. Water in urn may become stagnant
or contaminated. Use urn water only for watering plants or outdoor cleaning uses. DO NOT use for
cooking, washing or in any way that may result in ingestion of the water.
Tipping Hazard – If not properly set up, accidental tipping of your Stoneware Urn may occur
causing personal injury or property damage. Preparing the area where your urn will be placed is
important. It must be level and provide solid support. DO NOT place Stoneware Urn on any surface
that is not flat and even. Always use a solid surface under the urn.
Attaching the downspout diverter tubing to the urn
The loose end of the tubing coming from the diverter should be pulled gently towards the urn and
inserted into the hole you drilled 6-1/4” from the top of the urn. Moisten the outside of tubing for easier
insertion into the urn’s inlet hole. Gently pull the tubing through the hole in the urn until it is level and
straight between the diverter and the urn. Adjust the urn and tubing so there is no excess slack, kinks or
bends. Once the tubing is in the proper position, it should extend no more than 2” into the urn. Trim off
any excess.
When the diverter is installed at the same level in relation to the urn diverter tubing, it will fill the urn
until full and allow excess water to bypass the diverter and flow down your downspout. Now is a good
time to test your installation by spraying water from your garden hose onto your roof and observe water
running into your urn.
As of 3/1/2009, the state of Colorado does not allow the use of rainwater collection systems.
Check your local ordinances for restrictions in using any rainwater collection device.
WARNING: NEVER use the urn if it is cracked, warped, broken or damaged in any way. NEVER permit a child
to play on or near or climb on the stoneware urn. Remember, a filled urn can weigh nearly 700 pounds.
2
7
Marking downspout for diverter installation
After insuring the urn is level and in its final installation
location, place a level on top of the urn and make a pencil
mark on the downspout 5-1/2” below the bottom
of the level. Using a tape measure, make a second
mark 1” below the first one.
PARTS INCLUDED
Stoneware Urn
Connector
Level
6’ Hose (assembled)
TIP: Place a scrap piece of plywood or cardboard between
the house and the downspout before cutting to protect your
home’s siding. For the second cut, place the downspout and
scrap wood on ground or work surface for easier cutting.
Shut-Off Valve
Remove lower bracket. Connection may vary. A slotted
or Phillips screwdriver or a socket wrench may be needed.
CAUTION: Always wear safety glasses when cutting or drilling to prevent eye injuries.
Downspout edges may be sharp. Wear gloves to protect against cuts or scratches.
WARNING: If your downspouts and/or gutters contain heating cables, there is potential for electrocution or fire hazard during installation.
Discard
1” Piece
Using a hacksaw, cut the downspout at the first pencil mark you made.
After the first cut is complete, remove the bottom piece of downspout
from the house to make the second cut. Make your second cut on the
second pencil mark and discard the 1” piece of downspout you cut out.
Attaching the water diverter tubing to the downspout and urn
The diverter is to be installed on standard 2”x3” downspout with the narrow end facing up — or —
on oversized 3”x4” downspout with the wide end facing up. Be sure to install the diverter with the diverter
tubing holes on the side of diverter facing the urn. Once you have determined which downspout size you
have and thus which end of the diverter faces upward (keeping the diverter tubing holes facing the urn),
push diverter tubing into the top hole on the diverter. Moisten the outside of tubing for easier insertion
into diverter grommet. Insert just the end of the tubing so it extends into the diverter no more than 1/4”.
Next, slide the diverter UP onto the cut end of the downspout leading from the gutter above. You may
need to flex the downspout slightly in order to get the diverter onto the downspout. Wear gloves to
protect your hands from scratches or cuts. Push the diverter 2” onto the downspout until it contacts the
6
Screwdriver
Screws
Cutting the downspout for diverter installation
Remove the downspout bracket below your installation marks to loosen First
Cut
the downspout from your house (keep bracket handy as you will be
Second
reinstalling later). This will provide some clearance between the
Cut
downspout and house to allow for cutting downspout.
Tape Measure
Stoneware Urn
Diverter Tubing
Water Diverter
(with 2 Black Grommets)
TOOLS AND SUPPLIES NEEDED
Tape Measure
Screwdriver
Pencil
Hacksaw
Safety Glasses
Gloves
Wood Board
3
Level
Drill - with 3/4”
Diameter Bit
Positioning your stoneware urn
Position the urn near the desired downspout making sure planter drainage (weep) hole is at the back of
the unit. Although the diverter tubing is 36”, for best performance the urn should be positioned as close
as possible to the downspout without bending or kinking the diverter tubing. IMPORTANT – When full,
the urn will weigh approximately 700 pounds. In order for the urn to remain stable when in use and full
of water, the ground MUST be level, flat and firm. Repositioning the urn is difficult once it is full of water.
FOR BEST RESULTS
If leaves and debris in your gutters are a problem, we recommend installing gutter guards/screens. This will
prevent any debris from entering the gutter and working its way into the downspout, potentially blocking the
diverter tubing, diverter or both. Any debris small enough to get past the gutter guard/screen will pass easily
through both the diverter and the diverter tubing.
Stabilizing target area
The base surface the urn sits on must be solid, stable,
flat and level (side to side as well as front to back) and
capable of supporting a full urn of water weighing
close to 700 pounds. We recommend using EMSCO’s
24” x 24” Rain Barrel Pad #2192, landscape blocks
or a cement pad to provide a solid, stable and level
surface. Once you have the urn fixed into its installation
position, re-check for stability and level. You should test
your location and make sure the urn will not fall over by
filling the urn with your garden hose.
Preparing and installing diverter
Drill hole in urn for incoming water
In order to locate where to drill the diverter tubing hole, Drill site
for 3/4”
you should position the urn with the planter’s weep hole connector
tubing
facing your house (to hide it from sight). Once positioned, hole
you need to mark a spot approximately 45 degrees on either
side of the weep hole (toward the downspout you will be using).
You will drill ONLY ONE 3/4” diverter-tubing hole. Using a 4’ level
across the top of the urn, measure straight down (do not follow
contour of the outside of the urn) 6 -1/4” from the top lip of the
urn and mark this spot. Check that this spot is below the floor of
the planter area. Now drill the 3/4” diverter tubing hole through your
mark. This will ensure that the diverter tubing will be as straight as
possible without kinking when entering the urn.
HOUSE
45°
45°
pre-drilled
weep hole
Drill site
for 3/4”
connector
tubing
hole
Top View
6-1/4”
from top
of urn
Side View
Locating position of diverter on downspout
For proper operation, the water diverter must be installed on the downspout at the same level
as the urn tubing diverter hole drilled in the previous step.
TOO LOW
TOO HIGH
CORRECT
Once you determine the urn is in the optimum location
and that it’s level, the height of the urn cannot be
changed. The position and height of the urn must
be final before installing the diverter tubing.
When the diverter is installed
too low in relation to the urn
diverter tubing hole, the urn
will not fill with water.
EMSCO Rain Barrel Pad #2192
When the diverter is installed
too high in relation to the urn
diverter tubing hole, the urn
will overfill causing the water
to overflow from the diverter
and/or hose.
When the diverter is installed
level in relation to the urn
diverter tubing hole, the urn
will fill and excess water will be
directed back down your home’s
downspout.
Emsco Group cannot be held responsible for basement leakage, foundation leakage or any
resulting damage caused by improper installation of this rain collection urn and diverter kit.
4
5