1
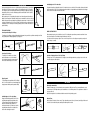
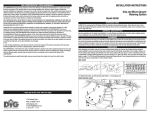
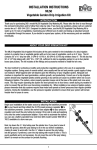
INSTALLATION INSTRUCTIONS
2 YEAR WARRANTY
DIG CORPORATION warrants these products to be free from defects in material and workmanship for a period of two
years from date of purchase. This warranty does not cover damage resulting from accident, misuse, neglect, modification,
improper installation or subjection to line pressure in excess of 50 lbs. per square inch. This warranty shall extend only to
the original purchaser of the product for use by the purchaser. This warranty shall not cover batteries or any malfunction of
the product due to battery failure. The obligation of DIG CORPORATION under this warranty is limited to repairing or replacing
at its factory this product which shall be returned to the factory within two years after the original purchase and which on
examination is found to contain defects in material and workmanship.
DIG CORPORATION SHALL IN NO EVENT BE LIABLE FOR ANY INCIDENTAL OR CONSEQUENTIAL DAMAGES OF ANY KIND; THE
SOLE OBLIGATION OF DIG BEING LIMITED TO REPAIR OR REPLACEMENT OF DEFECTIVE PRODUCTS. SOME STATES DO NOT
ALLOW THE EXCLUSION OR LIMITATION OF INCIDENTAL OR CONSEQUENTIAL DAMAGES, SO THE ABOVE LIMITATION OR
EXCLUSION MAY NOT APPLY TO YOU.
Unattended use for prolonged periods without inspection to verify proper operation is beyond the intended use of this
product, and any damage resulting from such use shall not be the responsibility of DIG CORPORATION. There are no
warranties which extend beyond the description on the face hereof. In the case of purchase of the product for use other
than, for irrigation purposes, DIG CORPORATION hereby disclaims any implied warranties including any warranties of
merchantability and fitness for a particular purpose. In the case of the purchase of the product for personal, family or
household purposes, DIG CORPORATION disclaims any such warranties to the extent permitted by law. To the extent that any
such disclaimer or implied warranties shall be ineffectual, then any implied warranties shall be limited in duration to a period
of one year from the date of the original purchase for use by the purchaser. Some states do not allow limitation on how long
an implied warranty lasts, so the above limitation may not apply
to you.
In order to obtain performance under this warranty, the unit must be returned to the factory, along with proof of purchase
indicating original date of purchase, shipping prepaid, addressed as follows:
DIG CORPORATION, 1210 Activity Drive, Vista, CA 92081. Repaired or replaced units will be shipped prepaid to the name
and address supplied with the unit returned under warranty. Allow four weeks for repairs and shipping time. Repair of
damaged units not otherwise within warranty may be refused or done at a reasonable cost or charge at the option of DIG
CORPORATION.
This warranty gives you specific legal rights, and you may also have other rights which vary from state to state.
Drip Watering Kit
Model G77-AS
introduction
THANK YOU for purchasing the DIG Model G77-AS Drip Watering Kit. Please take the time to read through the enclosed
instructions and follow them step by step. If you have any questions, please call our customer service line at 1-800-3442281.
general description
Use these guidelines for the design and installation of a cost effective and reliable drip irrigation system for your landscape
area, to promote efficient water use and to protect natural resources.
planning
Make a rough sketch of the areas you would like to water. Make sure you take into account plant type, the location of each
tree, shrub, or groundcover, planting density and soil type. Based on the plant size and concentration, you will determine the
number of drippers per plant. Show the site’s water sources and paved areas. This will require measuring the area you wish
to water. We recommend using graph paper; this will make drawing to scale easier.
designing
When designing your system, make sure to have a design drawing before you start the job. Design drawings should be
clearly readable to scale, and should include water location, layout of poly tubing, drip emitters, fittings, end line for flushing,
plant materials and sidewalks. Different species and sizes of plants will have different water requirements, so take into
account the plant type, location, size and soil type. Trees, shrubs,roses, and vegetables within a different height and size will
require a different number of drip emitters per plant.
DRIP LAYOUT EXAMPLES
For detailed information, see DIG planning guide DS20-L, or www.digcorp.com
1.800.322.9146 FAX: 760.727.0282
1210 Activity Drive
Vista, CA 92081
www.digcorp.com
e-mail: [email protected]
© 2008 DIG CORP
Rev. 101408
E
DRIP EMITTER SPACING SUGGESTIONS:
In sandy soil with small plants closely spaced, use a 1-GPH (4 liter) drip emitter every 10 to 12 in. (20-30 cm).
In loamy soil with plants up to 2 feet high, spaced a few feet apart, use a 1-GPH (4 liter) drip emitter per plant.
In loamy soil with plants 2 to 3 feet high (60-90 cm), use 2 1-GPH (4 liter) drip emitters per plant, spaced 12 in. apart.
In sandy soil with plants 3 to 5 feet high (90-150 cm), use 3 to 4 1-GPH (4 liter) drip emitters per plant, spaced 12 to 16 in.
apart.
In loamy soil with plants 5 to 7 feet high (90-213 cm), use 4 to 6 1-GPH (4 liter) drip emitters per plant, spaced 12 to 16 in.
apart.
In clay soil with plants 2 to 3 feet high (60-90 cm), spaced 3 to 4 feet apart, use a 1-GPH (4 liter) drip emitter per plant,
spaced 18 in. apart.
INSTALLATION
Begin your installation at the water source by attaching the backflow preventer (1) to your faucet,
then attach the 25 PSI preset pressure regulator (2) to the backflow preventer (3). Connect the
hose adapter to your pressure regulator and insert the poly tubing to the adapter. If you wish to
automate the system, you can use a DIG battery operated controller (Model 9001D or 9001EZ)
available in a store near you.
Next, lay down your 1/2 in. poly tubing. If you plan to leave it above the ground, allow the poly
tubing to sit in the sun before installation, making it easier to work with. Use stake to secure poly
tubing to the ground. If you are burying the poly tubing, dig a trench about 6 in. from the roots of
your plants. A shallow trench, 5-8 in. deep is all that is needed to keep the poly tubing safe from
cultivation practices. Do not bury the end of the poly tubing, allow it to remain on the surface for
periodic flushing.
w
e
q
TYPICAL INSTALLATION
Connecting and installing 1/2 in. fittings:
To install your 1/2 in. fittings, cut the poly tubing with a hand pruner, being careful to keep dirt from entering the line. Push
the poly tubing into the fitting by wiggling it as you apply force
Connecting 1/4 in. fittings:
To install your 1/4 in. barbs, tees or elbows,
push the microtube over each of the barbed
ends. Soaking the microtube in warm water will
make it softer and the fittings easier to install.
Using the punch:
To insert drippers, microsprinklers and 1/4 in. fittings
into 1/2 in. line, hold the line in one hand and apply just
enough pressure with the punch to puncture tubing.
Installing drippers to 1/2 in. poly tubing:
Drippers are installed by punching a hole in 1/2 in.
poly tubing and snapping the larger barbed side
in. If your tubing is buried, the drippers should
always be located above the ground. This is
achieved by inserting a 1/4 in. barb or tee into the
poly tubing and running 1/4 in. microtube to the
surface where the dripper is installed.
Installing drippers to 1/4 in. micro tube:
For plants far from the poly tubing, first insert a 1/4 in. barb or tee into one end of the 1/4 in. microtube, then insert the barb
into the punched hole in the 1/2 in. poly tubing and run the microtube to the plant. Next insert the barbed inlet of the dripper
into the end of the microtube and secure with a stake.
Initial System Start-Up
Before turning the system on for the first time, leave all 1/2 in. tubing ends open and turn your water on and allow it to run
freely for a few minutes. This will flush out any dirt that may be in the line.
Close the end of the line by using a “figure 8” hose end or end cap. Check to see the drippers are operating correctly and
that no leakage is occurring.
Repairing or Plugging a Hole on 1/2 in. Poly Tubing:
If leakage occurs on 1/2 in. tubing at the base of a dripper, remove the dripper and insert a goof plug to close the hole and
reinsert the dripper in a different place.
WATERING
Watering Recommendation:
Example: For shrubs up to 3-5 feet in diameter, we recommend a 3-4 GPH in full sun. The recommended flow rate can be
achieved using 3-4, 1-GPH drip emitters spaced around the tree or 2, 2-GPH drip emitters. These guidelines are suitable for
most areas and soils.
Note: Plants larger than 2 feet in diameter should have more than 1-drip emitter per plant.
Watering Time:
Run the system 45 minutes to 2 hours every 3-5 days, depending on your location (cool to warm) and soil type. After a week
check the soil, the health of the plants, and adjust the watering time as needed.