1
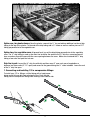
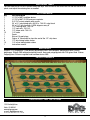
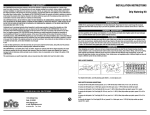
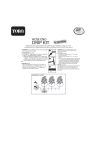
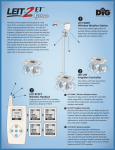
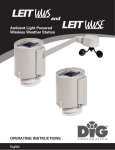
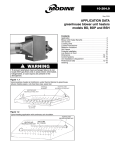
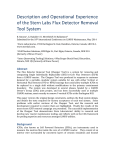
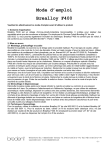
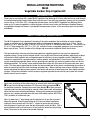
INSTALLATION INSTRUCTIONS
ML50
Vegetable Garden Drip Irrigation Kit
Introduction
Thank you for purchasing DIG’s model ML50 Vegetable Drip Watering Kit. Please take the time to read through
the enclosed instructions and to follow them step-by-step. If you have any questions, please call our customer
service line at 1-800-344-2281. Designed for planter boxes, use the ML50 Vegetable Drip Watering Kit to
water up to 10 rows of vegetables, maximizing your efficient use of water and having an abundant amount
of vegetables through the season. If you decide to expand your system, all the necessary parts are available
individually.
about your drip irrigation kit
The ML50 Vegetable Drip Irrigation Kit includes all the parts needed for the installation of a drip irrigation
system in a planter box or vegetable garden with up to ten rows of vegetables, each up to 5’ long. The kit
contains 50’ of ¼” drip line with .5 GPH @ 15 PSI or .65 GPH @ 25 PSI drip emitters every 9”. The kit also has
50’ of 1/2”drip tubing with .600” ID x .700” OD, sufficient to start a vegetable garden for up to four planter
boxes (see picture). The kit includes all the fittings and accessories needed to install the ten rows.
The best method for achieving a healthy and productive vegetable garden is the use of an appropriate
irrigation system. During years of normal rainfall, rains usually wet the soil and provide a good supply of deep
soil moisture. What happens later will depend upon the efficiency of your irrigation system. Adequate soil
moisture is important for seed germination, uniform growth, and productivity. Correct use of a drip irrigation
system should keep vegetable plants actively growing in dry periods yet cause no problem when rain occurs
following irrigation. The system, when properly operated, keeps soil at the base of the plant (root zone area)
moist. This may require operating the system for short periods two to four times a week during dry weather in
order to prevent the soil from ever becoming completely dry. When installing a low volume irrigation system,
please remember that drip systems require clean water and operate at lower pressures than regular sprinkler
systems. During the installation, use the pressure regulator provided to ensure that your system will remain
trouble-free for years to come.
Installation
Begin your installation at the water source by attaching the backflow preventer
q to your faucet and then attach the 25 PSI preset pressure regulator w to
the backflow preventer. Connect the swivel hose adapter e to your pressure
regulator and insert the poly tubing by moving it from side to side and applying
force into the swivel compression adapter. If you wish to automate the system,
you can use a battery operated hose end timer (DIG model number 9001DB or
7001) available at a store near you.
Next, lay down the ½” drip tubing near the planter box. If you plan to leave it
above the ground, allow the poly tubing to sit in the sun before installation,
making it easier to work with. Use the ½” stakes to secure the poly tubing
into the ground. If preferred, cover the drip tubing with mulch to hide it. This is
purely aesthetic and is not necessary. Do not cover the end of the poly tubing;
allow it to remain on the surface for periodic flushing.
1
Option one, for planter boxes: Near the planter, connect the ½” tee and add an additional section of drip
tubing to the top of the planter. To the end of the drip tubing add a ½” elbow as well as another piece of 1/2”
tubing perpendicular to the vegetable row.
Option two, for vegetable rows: At ground level, lay out the drip tubing perpendicular to the vegetable
rows. The ½” drip tubing is used as the main line to deliver the water to the ¼” drip line, assuming you will
have a number of parallel rows with the same spacing between the rows. Make sure to extend the ½” drip
tubing a few extra feet past the last row.
Drip line layout: Lay out the ¼” drip line with drip emitters every 9” near each row of vegetables or
between two close rows (6”-10” apart) and secure to the ground using the ¼” stake included. Leave the end
of the ¼” drip line open.
1. Connecting and installing 1/2 in. compression fittings:
To install your 1/2 in. fittings, cut the tubing with a hand pruner,
being careful to keep dirt from entering the line. Push the drip
tubing into the compression fitting while moving it from side to side.
2
2. Connecting and installing 1/4 in. barb fittings:
To install your 1/4 in. fittings, cut the tubing with a hand pruner,
being careful to keep dirt from entering the line. Push the 1/4
in. dripline onto the barb fitting by wiggling it as you apply
force. Next, punch a hole in the 1/2” drip tubing using the
punch and insert open end of the ¼” barb connector.
3. Secure the tubing:
Use stakes to secure the drip tubing and
dripline to the ground.
4. Flush the line:
Before turning the system on for the first time, leave all 1/2
in. drip tubing ends and 1/4 in. dripline ends open and turn on
your water and allow it to run freely for a few minutes. This will
flush out any dirt that may be in the line.
5. Close the system:
Close the end of the 1/2 in. drip tubing by using a “figure 8” hose end and use a
goof plug to close off the end of the 1/4 in. tubing . Check to see the dripline is
operating correctly and that no leakage is occurring from the fittings.
3
watering times
Turn the water on for 20 to 30 minutes every two days. After a week or two check the soil and the health of the
plants, and adjust the watering time as needed.
Qty 1
1
1
1
1
1
3
8
15 1
1
4
4
10
1
Kit Contents
Part Description ¾” FHT x MHT backflow device
¾” FHT x MHT 25-PSI pressure regulator
3/4” FHT swivel adapter with screen
50’ of ½” poly tubing with .600 ID x .700 OD, color black
50’ of 1/4” drip line with .5 GPH drippers every 9” 1/2” coupling with .700 O.D. 1/2” tees with .700 O.D. 1/2” elbow with .700 O.D.
1/4” barbs
Punch
Strip of 10 goof plugs
Figure “8” hose ends to close the end of the 1/2” drip hose
1/2” drip tubing holder stakes 1/4” micro tubing holder stakes
Instruction manual
MATERIALS
Dripline: 7510 Fingerprint™ low-density polyethelyne resin. Inline drippers: polyethylene with a silicon
diaphragm. Fittings: ABS with polycarbonate inserts. Hose end: polypropylene with 20% glass filled. Stakes:
Polypropylene. Pressure regulator and backflow device: ABS.
LAYOUT EXAMPLE
1.800.344.2281 FAX: 760.727.0282
1210 ActivityDrive
Vista, CA 92081
www.digcorp.com
e-mail: [email protected]
© 2010 DIG CORP Rev. 012111 26-023
4