1
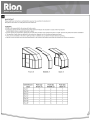
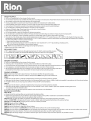
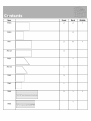
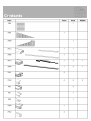
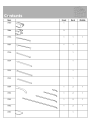
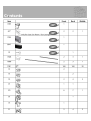
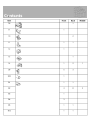
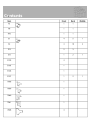
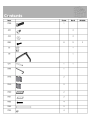
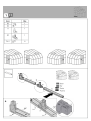
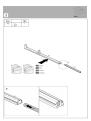
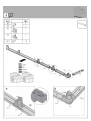
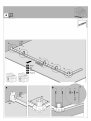
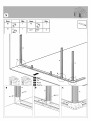
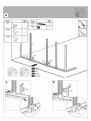
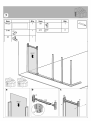
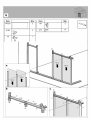
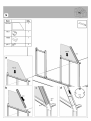
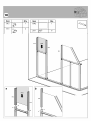
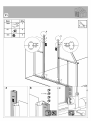
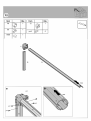
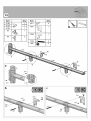
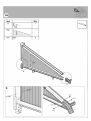
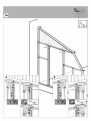
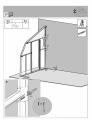
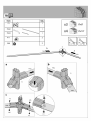
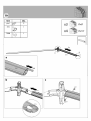
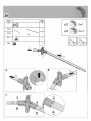
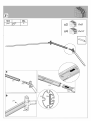
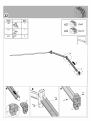
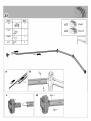
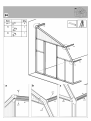
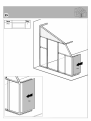
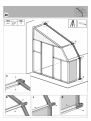
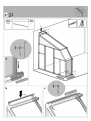
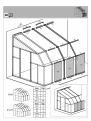
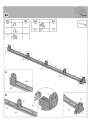
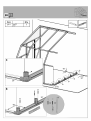
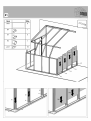
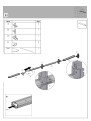
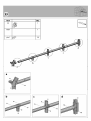
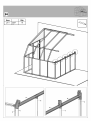
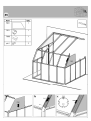
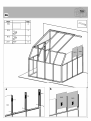
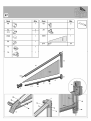
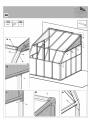
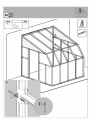
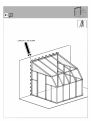
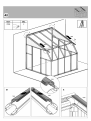
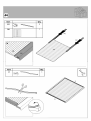
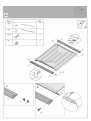
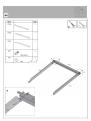
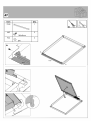
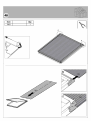
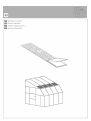
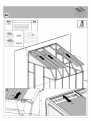
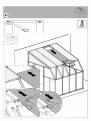
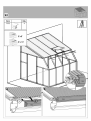
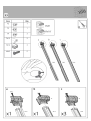
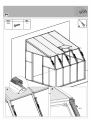
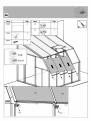
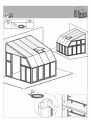
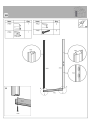
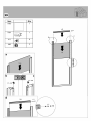
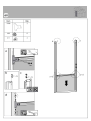
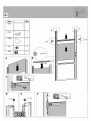
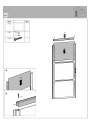
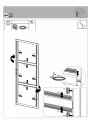
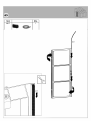
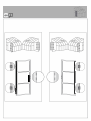
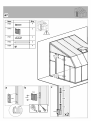
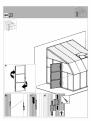
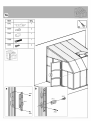
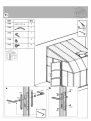
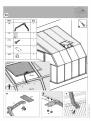
garden and gardening
Assembly Instructions
Sun Room 8' - Clear Glazing
x2
4After Sale Service
Email: customer.service @palram.com
USA
Canada
877 -627 -8476
1 800 -866 -5749
I
England 01302 -380775
Germany 0180-522 -8778
France
1
0169 791 094
International +972 4- 848 -6942
garden and gardening
IMPORTANT
Please read these instructions carefully before you start to assemble this SunRoom 8'.
Keep these instructions in
a
safe place for future reference.
GENERAL
RION is not responsible for the misuse
of tools or parts
All opaque panels with the stamped words THIS SIDE OUT indicates the outside to create a full UV protection.
Remove plastic sticker as panels are locked in place.
All clear panels are protected by plastic film on both sides and don't have specific direction to install. Remove the plastic film before installation.
The quantity of parts that are required for the extension, depends on the number packages purchased.
Door can be assembled on the left or right hand side; in addition you can determine door direction opening.
Specific screws and bolts must be purchased based on the surface (wall and ground) that the SunRoom 8' will be connected to.
Middle 2'
Front 4'
Back 4'
Pack Qty
(Front 4')
Pack Qty
(Middle 2')
8' x 8'
1
x
1
8' x 10'
1
1
1
8' x 12'
1
2
1
8' x 14'
1
3
1
8' x 16'
1
4
1
8' x 18'
1
5
1
8' x 20'
1
6
1
Greenhouse
Sizes
Pack Qty
(Back 4')
garden and gardening
SAFETY ADVICE
of tools or parts.
of utmost importance to assemble all of the parts according to the directions. Please follow them closely and do not skip any of the steps.
We strongly recommend using working gloves during assembly.
If using a step ladder or power tools ensure that you follow the manufacturer's safety advice.
If local building codes require permits or licenses make sure that they are acquired before beginning.
Your SunRoom 8' should be secured to the prepared foundation using the recommended hardware.
Do not attempt to assemble the SunRoom 8' in windy or wet conditions.
Dispose of all plastic bags. Please keep them out of reach of small children.
RION is not responsible for the misuse
It is
Keep children away from the assembly area.
Do not lean against or push the SunRoom 8' during construction.
Do not attempt to assemble this SunRoom 8' if you are tired, have taken drugs or alcohol or if you are prone to dizzy spells.
When your SunRoom 8' is fully assembled examine it for sharp edges and trim with a razor knife if necessary.
If you live in a hot climate area, where outside temperatures exceed 46° C (115° F) under the sun or 36° C (99° F) in the shade, this may cause the
temperature inside the SunRoom 8' to exceed 55° C (131° F). Such conditions may harm your plants and will damage the SunRoom 8' by warping
the structural profiles. In order to prevent damage:
-
Ensure good ventilation during hot days.
Make sure that the temperature inside the SunRoom 8' never exceeds 55°
such as the Shade Net (available as an accessories option).
Note: RION is not responsible for any damage due to high temperatures.
* Always close roof vent in high winds.
C
(131°
F)
by providing
a
shading screen,
REQUIRED TOOLS
GT1 - Special
tool to connect pins through lined up holes. Pin Tool fix and lock profiles in place.
product you will need the following tools (these items are not supplied).
To assemble this
A, 411
BEFORE ASSEMBLY
RION is not responsible for the misuse
of tools or parts.
Selecting a site - the SunRoom 8' must be, positioned and fixed on a flat level surface.
Sort the parts and check according to the contents parts list. Do not begin assembly if any other parts are missing.
If you prepare a concrete foundation do not excavate and pour concrete in frozen ground.
We recommend that you place your SunRoom 8' in a spot where it will receive direct sunlight and will be
protected from the wind as much as possible. The door should not face prevailing winds.
DURING ASSEMBLY
ATTENTION:
1
When encountering the
information icon, please refer
to therelevant assembly step
for additional comments and
assistance.
iiThis icon indicates that the
installer should be inside the
Step 1: Determine which side to place the door. The decision will affect the upcoming steps.
product.
Steps 1, 3: Arrange all 2D connectors with the stamped word "OUT" facing out of the SunRoom 8'.
Step 4:
Make sure that the frame is perfectly straightened by measuring and verifying that they leveled.
Make sure that the frame is leveled and anchor it to the ground with screw / screw + dibble / spike (not supplied) in accordance with the selected surface.
The wall to which you are securing your SunRoom 8' must be 90° to the foundation.
Step 17:
Make sure that the frame is perfectly straightened by measuring and verifying that they leveled.
Make sure that the frame is leveled and anchor it to the wall with screw / screw + dibble / spike (not supplied excluding part # BC1)
in accordance with the selected surface.
The wall to which you are securing your SunRoom onto must be 90° to the foundation.
Reinforcement Arch Profiles
Steps 18 -23:
Ensure that all the metal profiles are inserted inside the plastic profiles.
Repeat each step based on your SunRoom 8' size and the number of arch profiles needed to be assembled as illustrated.
(These assembly instructions refer only to SunRoom 8'x8' and 8'x10').
Step 27: Make sure that the profiles are perfectly straightened by measuring and verifying that they are leveled.
Anchor the Part 7937 to the ground with screw / screw + dibble / spike (not supplied) according to the selected surface.
Step 28: Repeat Steps 24 -27 according to the amount of modules purchased.
Step 30: Repeat and refer to Step 4.
Steps 39 -40: Repeat and refer to Step 17.
Step 41: Seal the SunRoom 8' edges with Silicon Sealant.
Step 57: Insert the rubber strip (Part GF) from the outside of the SunRoom 8'. Cut the remaining edges.
Step 64: Insert the rubber strip (Part 7945) from the outside of the SunRoom 8'. During this step, turn the door in order to insert the rubber strip correctly.
Step 66: Determines door direction. The door can be installed and open either as a left or right hand door.
Step 69: Adjust the hinges height in accordance with the upper post and lower ramp of the door aperture, as specified in level C.
Item
Front
Back
PN55
2
2
PN53
1
2
PN1
2
PN127
3
PN51
6
1
1
PN134
1
7953
3
7942
1
7803
2
1
1
7802
Middle
1
Contents
Item
Front
586
Back
Middle
1
<a 71.4tlelot
7801
1
7809
1
7612
1
1
7805
1
1
7614
1
2
1
7804
1
2
1
7951
2
7552
4
4
2
992
2
991
1
989
1
7950
1
7952
2
Item
Back
Middle
1
1
1
1
1
Front
7949
1
01'
7884
2
0-.
7936
li
Y
7937
7536
1
7534
1
7535
1
7533
1
7934
1
2
1
7933
1
2
1
7935
1
2
1
7932
1
2
1
7957
1
DSN
Contents
Item
?
Front
Back
Middle
2
1
1
........./
GF*
2
*only for clear Sun Room / Sun Lounge
7954
8017
SF
1
SIS!_
7608
7800
PIN1
72
73
74
'
liP
!ln
1st-
pü!
01
If
jlh
2D
7
1
1
2
3
1
2
3
1
160
160
30
2
2
2
4
1
1
6
7
2
1
Ìll,l
53
j
efi
75
1
1
ÌIuII
51
0
4
2
Item
Front
76
Back
Middle
1
71
1
10
2
11
1
12
1
13
1
1
14
1
2
09
5
3
1
III
S R2
1
B1
1
1
B2
4
8
B3
1
B4
3
B5
1
1
B12
1
1
2
Contents
Item
R1
Front
Back
Middle
1
1
R4
1
1
R10
1
1
E1
4
5
1
E2
4
10
2
E13
2
3
E15
1
2
1
E100
4
E105
1
E106
1
E107
1
2
1
7938
\1
®
1
7939
1
7940
1
oin
7941
0
1
roo
7898
4
Item
Front
7948
Back
Middle
2
2
2
Ce
10
BC1
7220
1
7912
1
J
7913
1
8039
3
7994
1
7995
1
7996
2
466
26
10
4
411
26
10
4
4008
4
7441
1
7442
4
7445
4
)))))))))))))))))0%
7224
6
Contents
Item
Front
7958
Back
Middle
1
CI
465
.
4
111
422
4
O,
4043
:
8
9
OVlllllll1111
22
1
IWO
1D
-;;
99
1
\
li
,
///
/
\
\\
1`.
GT1
1
7993
1
7918
2
iliNi
7919
2
7920
/0
7921
/o
7923
7922
7924
2
oO
2
4
0
V
2
4
1
3
item
Qty.
i.
B3
-,
B4
11
1
1
Iii
1,,.
Óil
2D
Pi n
1
/11111`
1
NO'
6
2
item
Qty.
SR2
1
B3
® Door
DE Tür
FR
Porte
® Puerta
,;',
.
.a
%
Item
Qty.
B2
1
B4
2
01
1
2D
2
pini
12
779
® Door
DE Tür
FR
Porte
CO Puerta
2D
.
\;,.
a
B4
.._
Ill
Póil)
. , 2D
,
B2
b
,
b
b
BE Door
ur
FR
Por
® Puerta
`__`
QI.
`.
;
b
..., `
-.i,i,.i
wM.Y
Item
Qty.
Item
B1
1
R1
E1
1
4.
pini
Qty.
1
6
759
131
coe
a
E1
R1
c
or
DE Tür
FR
:"."4"M11111
Porte
® Puerta
b
El
pin"!
pini
.
Item
Qty.
Item
El
2
7224
Qty.
e
466
7938
1
7939
1
2
O1
2
10 mm
El
`
El
_
7939
7938
DE Tür
FR
Porte
® Puerta
a
466
ua;l
LZLNd
L3 OO
11.0
'
L
wall
'AO
60
L
ii
L
Luid
dS:
8
Or
aZ
L
Uli`'
LZINd
e
q
aZ
wall
110
wail
LZLNd
Z
60
110
IV
Ii
L3 OO
SL
0
4
.4
Z
Z
I
V
Luid
L
It
60
e
LZ/
i
q
9
Item
Qty.
PN134
1
R10
7608
pini
a
i
72
1
1
2
Item
Qty.
Item
Qty.
B12
1
7942
1
E13
2
pini
6
B12
7942
E13
E13
n
a
B12
11
Item
Qty.
7884
2
Op.
411
ell
466
ra
e
1
8
12
Item
R4
-
Qty.
Item
Qty.
1
12
1
am
B5
1
pini
7800
i
1
72
4
Item
Qty.
Item
Qty.
E106
1
pini
6
E105
1
E100
1
7941
/il
¡
2D
09
7940
2
Ìjß
,'.
IDi
2
1
oin
7224
0
466
e
.
llll`
1
1
j
:)
0
E100
--_
'
2
2
7940
a
E106
'---.
7941
E105
'---.
C
Item
71
Qty.
\°
1
'\ \
7801
1
Is
pini
72
6
b
pini
Item
pini
7224
466
a
Qty.
4
Di
e
2
2
c
i
pini
pint
i
Item
Qty.
BC1
2
A
V
Mrwall
LS
L
Z£6L
L
££6L
L
LL17
9917
e
í"'Ì
'kÒ
it?
E)
Z
Z
q
Ir
wail
'AÒ
Luid
Z
L3 S
809L
a
`f\
i
L
L
3
wall
LS
S£6L
,
-*
Ì
17£6L
LL17
9917
e
'kÒ
L
L
L
it?
E)
Z
Z
'AO
uid
`:-ÿ
I1
1,
00:
111''
'kb
CIZ
L
L3
L
Luid
V\ I!
I
11
'l arII
Ir
wall
L
110
V
%
LOL3
008L
Luid
bl
e
3
'..
:,
f
f
6L
L
L
L
17
Item
Qty.
pin1
6
E2
2
B2
1
-
8'x8'
8'x10'
Item
Qty.
PN1
3
B2
6
E2
6
7936
2
pini
40
Item
Qty.
PN1
4
B2
8
E2
8
7936
3
pini
56
Item
Qty.
Item
B2
4
2D
Qty.
t4Illll
11
1
01
1
pini
7,2
3
16
-
T
3
!
11
I., 1UI_ I
11
11 11
11
11
Item
Qty.
10
2
09
1
2D
1
E2
4
7957
1
2D
10
10
E2
`
1
09
11
E2
`
E2
7957
a
Item
53
Qty.
4l
1
7957
pini
1
n2
16
--
.
Ó
d
'''
/
C
+%
-
.
a
a
b
d
c
10
09
2D
.
Item
Qty.
PN51
1
R10
7608
pini
4
.-.,
i
1
1
2
Item
Qty.
P53
2
E13
2
.40
B12
1
79
pini
6
B12
J
PN51
E13
r
E13
PN53
PN53
Item
Qty.
Item
R4
1
09
Qty.
ij
2
jil
2D
2
E2
E13
1
7800
1
B5
1
1
tV111`
10
7809
1
s
pini
13
1
76
1
20
13
B5
2D
E2
E2
E13
09
09
2D
Item
pini
Qty.
14
i
Item
Qty.
BC1
2
A
40
Item
7937
Qty.
1
\
N
\l
1,-1
a\l*.............__.....,-4....._
a
-
I.
,
.
41
CAULK
/
SILICON
43
Item
992
Qty.
-
_ _
2
,--1
4,0
586
1
Item
Qty.
SF
1
45
a
1
.
411
q
411
46
Item
Qty.
7536
1
y
7
7533
1
7534
1
465
.`
2
111
M4x8mm
422
2
M4
7536
7533
mm
47
Item
Qty.
7535
1
yn
7
465
2
1111
M4x8mm
422
2
M4
a
et
mm
ki
Wall
Z08L
110
L
® Windows Location
Standort
Fenêtre Emplacement
Ventana Ubicación
DE Fenster
FR
®
50
Item
Qty.
7803
3
Item
Qty.
Window
1
!II
O
a
b
b
C
4043
4043
74
x
7674
7672
X3
54
Item
Qty.
4043
5
llllll
Pl.
Item
Qty.
Item
Qty.
PN55
3
72
1
74
3
7552
3
4043
4
1,0))llllll»)
7552
r--i
.
1,14411
.
.
-,rg 9i 1
ii 0
¡Ì1
L
íL
!
II
i
i
58
Item
Qty.
Item
Qty.
7949
1
7952
2
7445
2
Ì
1
7950
1
,_
7949
7950
7949
a
a
7952
,
1-,
Item
Qty.
7953
1
a
d
7951
1
I
i
b
411
466
40
,
i
,
i
a
d
7951
411
__o
411
----------®
i
..
id
r,o
I
,
2
a
. "'1`'C
i
I
I
=
t
i
6
,
Item
Qty.
7898
2
466
8
411
4
a
411 +466
61
Item
Qty.
7953
1
7951
1
Iv
7898
2
'
411
466
6
Ò
=
6
a
c
7898
466
c+f
Item
Qty.
7953
1
7952
1
b
L
7445
ao
00,
ra
b
t
7445
X445
T
1
i
F.1
Item
7918
Qty.
0
2
30cm
7920
7924
11.8"
/0
2
4
rp
30cm
a
11.8"
7920
7924
7918
0
x2
b
c
Item
7954
Qty.
Item
Qty.
8017
1
8017
Item
Qty.
7923
4
7919
2
-:-_-=_.:,,
7921
2
0:4
7922
2
0
7924
4
a
b
o
7921
o
OD7924
OD
o
1
Item
Qty.
DSN
1
a
70
Item
Qty.
7912
1
0
8039
7913
(3=l
2
41)
0
1
7958
4043
1
2
Ql»»»
a
0
4043
i
"v.
8039
i
Nog
4043
7958
71
Item
7948
Qty.
C®
,0
®
t
7994
2
1
I
7993
7995
1
7996
2
7442
ll
4
4:10-0
a
7948
7948
7442
l'- '
m
7442
7994
.
e
7996
7995
-1
7442
V
7993
V 7442
(3)
master RION SunRoom8'
V1
-7