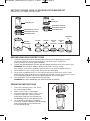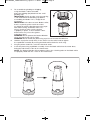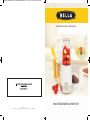
1
SO-308235_13606 BELLA 12 Pc Rocket Blender White Cover _Layout 1 11-07-08 10:49 AM Page 1
INSTRUCTION MANUAL / RECIPE GUIDE
For customer service questions or comments
1-866-832-4843
www.sensioinc.com
ROCKET BLENDER 12 PIECE SET
©2011 Sensio.
BELLA® is a registered trademark of Sensio Inc., Montréal, Canada
H3B 3X9
SO-308235_13606 Interior r2_Layout 1 11-08-01 1:44 PM Page 1
TABLE OF CONTENTS
Important safeguards.............................................................................................................2
Additional important safeguards ............................................................................................3
Notes on the cord ................................................................................................................3
Notes on the plug..................................................................................................................3
Plasticizer Warning ................................................................................................................3
Electric Power .......................................................................................................................3
Getting to know your 12 pc Rocket Blender..........................................................................4
Before using for the first time.................................................................................................4
Operating instructions .....................................................................................................4-5-6
Food Processing hints ...........................................................................................................6
Grinding Coffee .....................................................................................................................6
User maintenance instructions...............................................................................................7
Care & Cleaning Instructions..................................................................................................7
Storing Instructions................................................................................................................7
Recipes............................................................................................................................8-25
SO-308235_13606 Interior r2_Layout 1 11-08-01 1:44 PM Page 2
IMPO RTA N T S A F EGUA R DS
When using electrical appliances, basic safety precautions should always
be followed, including the following:
1.
READ ALL INSTRUCTIONS.
2.
To protect against risk of electrical shock do not put cord, plugs, or appliance
in water or other liquid.
This appliance should not be used by children and care should be taken
when used near children.
Unplug from outlet when not in use, before putting on or taking off parts,
and before cleaning.
Avoid contacting moving parts.
Do not operate any appliance with a damaged cord or plug or after
the appliance malfunctions, or is dropped or damaged in any manner.
Bring it to a qualified technician for examination, repair or electrical
or mechanical adjustment.
The use of attachments, including canning jars, cups or covers
not recommended or sold by the manufacturer may cause a risk of injury
to persons.
Do not use outdoors.
Do not let cord hang over edge of table or counter.
Do not let cord contact hot surfaces, including the stove.
Blades are sharp. Handle carefully. Use the blade’s collar to handle.
Do not blend hot liquids.
Always completely assemble the blade and cup before placing on the Motor
Base. AVOID CONTACT WITH MOVING PARTS.
3.
4.
5.
6.
7.
8.
9.
10.
11.
12.
13.
F O R H O US EH O LD US E O N LY
S AV E T H ES E IN ST RUCT IO N S
2
SO-308235_13606 Interior r2_Layout 1 11-08-01 1:44 PM Page 3
A DDIT IO N A L IMPO RTA N T
S A F EGUA R DS
1.
2.
3.
4.
5.
6.
7.
8.
9.
All users of this appliance must read and understand this instruction guide
before operating or cleaning this appliance.
The cord to this appliance should be plugged into a 120 V AC electrical outlet
only.
If this appliance begins to malfunction during use, immediately release pressure
on either cup (small grinding or tall blending) and unplug the cord.
Do not use or attempt to repair the malfunctioning appliance.
If this appliance falls or accidentally becomes immersed in water,
unplug it immediately. Do not reach into the water!
Do not use this appliance after it has fallen into or becomes immersed in water.
To reduce the risk of injury to persons or property, never use this appliance
in an unstable position.
Do not use this appliance for other than its intended use.
Do not use if either cup (blending cup or grinding) is cracked or chipped.
IMPORTANT! This product is not an ice crusher. Always make sure to add
at least one cup liquid to the processing cup before adding ice or foods
that are frozen solid. Do not overfill. Failure to add enough liquid before
processing may cause the processing cup to break or chip.
NOTES ON THE CORD
The provided short power-supply cord (or detachable power-supply cord) should
be used to reduce the risk resulting from becoming entangled in or tripping over a longer cord.
Do not use an extension cord with this product.
NOTES ON THE PLUG
This appliance has a polarized plug (one blade is wider than the other).
To reduce the risk of electric shock, this plug will fit in a polarized outlet only one way.
If the plug does not fit fully into the outlet, reverse the plug. If it still does not fit, contact
a qualified electrician. Do not modify the plug in any way.
PLASTICIZER WARNING
CAUTION: To prevent Plasticizers from migrating from the finish of the counter top
or table top or other furniture, place NON-PLASTIC coasters or place mats between
the appliance and the finish of the counter top or table top. Failure to do so may cause
the finish to darken; permanent blemishes may occur or stains can appear.
ELECTRIC POWER
If the electrical circuit is overloaded with other appliances, your appliance may not operate
properly. It should be operated on a separate electrical circuit from other appliances.
3
SO-308235_13606 Interior r2_Layout 1 11-08-01 1:44 PM Page 4
GETTING TO KNOW YOUR 12-PIECE ROCKET BLENDING SET
Product may vary slightly from illustration
Small
Grinding Cup
Tall Blending Cup
Grinding Blade / Flat Blade
Grinding Blade Gasket Seal
Blending Blade / Cross Blade
Grinding Blade Collar
Blending Blade Gasket Seal
Blending Blade Collar
Tall Blending
Cup
Motor Base
2 Cup Rings
2 Solid Lids
Polarized Plug
Shaker Lid
with
Small Holes
Shaker Lid
with
Large Holes
BEFORE USING FOR THE FIRST TIME
1.
2.
3.
4.
5.
Carefully unpack the Rocket Blending Set and remove all packaging materials.
Check the contents to ensure that all parts and accessories are present,
and have been received in good condition.
Handle the blending blade and the grinding blade attachments by their collars only.
WARNING: Do not touch blades. Blade attachments are very sharp.
Use extreme care when handling. Failure to do so can result in personal injury.
Wash all lids in warm, soapy water. Rinse and dry thoroughly.
Clean each cup before first use. Fill cup one-quarter full with clean, warm water.
Following the steps outlined in the Operating Instructions, pulse several times using
first the blending blade and then the grinding blade. Rinse thoroughly.
The motor base may be wiped with a damp cloth.
WARNING: DO NOT IMMERSE THE MOTOR BASE IN WATER.
OPERATING INSTRUCTIONS
1.
2.
3.
4.
Place the motor base on a flat, clean,
dry countertop or table.
Make sure the unit is unplugged.
The Rocket Blender comes with 2 sizes
of processing cups. Place the food
to be processed into the desired cup:
tall blending cup or small grinding cup.
To assemble for blending, chopping,
or mixing, using the blade’s collar to handle,
place the blending (cross) blade into
the tall blending cup.
4
SO-308235_13606 Interior r2_Layout 1 11-08-01 1:44 PM Page 5
5.
6.
7.
8.
To assemble for grinding or whipping,
using the blade’s collar to handle,
place the grinding (flat) blade into the small
grinding cup.
IMPORTANT: Check to make sure the cup ring
is not attached to the blending cup before
assembling the blade. If it is, simply lift off
to remove.
IMPORTANT: In the base of each blade’s collar,
there is a plastic gasket seal that creates
an airtight fit with the Rocket processing cups.
After dishwashing and before each use,
always check to make sure the gasket
is properly in place, as the heat from some
dishwashers may cause the gasket
to become loose.
WARNING: Never operate the Rocket Blender
when the processing cup is empty.
WARNING: Never overfill the processing cup. Do not exceed the MAX line.
Hold the cup (tall or small) firmly in one hand. Use the other hand to tighten
the cup/blade assembly by turning the blade collar clockwise until snug.
Plug the power cord into a 120V AC electrical outlet.
Invert the processing cup/blade assembly. Insert the blade collar into the motor base,
fitting the tabs into the slots on the motor base.
NOTE: The Rocket Blender will not operate unless the 3 locking tabs on the blade collar
are properly fitted into the 3 slots on the motor base.
5
SO-308235_13606 Interior r2_Layout 1 11-08-01 1:44 PM Page 6
9.
10.
11.
12.
13.
14.
To process, turn the processing cup (tall or small) clockwise into the motor base
and press down on the top of the cup. The blender will operate until pressure is released.
To pulse, simply press down on the processing cup and release in short bursts.
The motor will stop when pressure is released. Check results and continue to pulse,
if necessary, until the desired consistency is reached.
WARNING: Do not operate the motor continuously for more than 3 minutes at a time.
Allow the motor to rest for 3 minutes before continuing.
When processing is completed, turn the cup counter-clockwise in the base and lift
to remove the cup/blade assembly.
Invert the cup/blade assembly. Hold the cup (tall or small) firmly in one hand.
Use the other hand to turn the blade collar counter-clockwise and remove the blade
from the processing cup.
Add the cup ring to enjoy fresh juice, blended drinks or smoothies immediately.
Press down to fasten the cup ring to any of the blending cups.
Unplug the Rocket Blender when not in use and before cleaning.
FOOD PROCESSING HINTS
•
•
•
WARNING: Do not operate the motor continuously for more than 3 minutes at a time.
Allow motor to rest for 3 minutes before continuing.
Never overfill the processing cup. The maximum capacity of the tall blending cup is 13.5
oz./399 ml. The maximum capacity of the small grinding cup is 6 oz./175 ml.
For best results, solid foods should not be larger than 1-inch pieces. Cut or tear food
into pieces approximately equal in size before processing.
Fasten either shaker lid (small holes or large holes) to either cup
(small grinding or tall blending) to use for cooking or serving.
The large-hole shaker top may be used to serve: grated Parmesan cheese, chocolate,
flavored sugars, or coarse spice blends. Use the small-hole shaker top for finely ground
spices such as nutmeg or cinnamon stick.
GRINDING COFFEE
Preparing, using, and storing freshly-ground coffee is simple with the Rocket blending set.
1. Add coffee beans to the small grinding cup. If desired, add any other flavoring
ingredients, such as cinnamon or vanilla bean.
2. Add the grinding blade.
3. Pulse until coffee beans are the desired texture. The coarser the grind,
the milder the brew. For espresso grind, pulse until the beans are ground to a fine
powder.
6
SO-308235_13606 Interior r2_Layout 1 11-08-01 1:44 PM Page 7
USER MAINTENANCE INSTRUCTIONS
This appliance requires little maintenance. It contains no user-serviceable parts.
Any servicing requiring disassembly other than cleaning must be performed by a qualified
appliance repair technician.
CARE & CLEANING INSTRUCTIONS
1.
2.
3.
4.
5.
6.
7.
8.
CAUTION: Never immerse the motor base, plug or cord in water or any other liquid.
Always unplug the Rocket Blender before cleaning.
Whenever possible, rinse parts immediately after processing to make cleanup easier.
Always handle blades using the blade collar.
CAUTION: Use extreme care when handling blades. Do not touch the blades
with your fingers. The blades are very sharp and can cause injury if touched.
If necessary, use any small nylon bristle brush to remove processed food
from the blade and the blade area.
For quick clean-ups, fill processing cup (blending or grinding) one-quarter full with clean,
warm water. Following the steps outlined in the Operating Instructions, pulse several
times using first the blending blade and then the grinding blade. Rinse thoroughly.
Remove cup rings after use to clean. Wash all lids and cup rings in warm soapy water.
Rinse and dry thoroughly.
CAUTION: Never use rough scouring pads or abrasive cleansers on any plastic
or metal parts as the surface may be damaged.
Processing blades, processing cups and lids are all top-rack dishwasher safe.
IMPORTANT: After dishwashing, always check to make sure the gasket seal
in the base of the blade collar is properly in place, as the heat from some dishwashers
may cause them to become loose.
The motor base may be wiped with a damp cloth or sponge. Dry thoroughly.
WARNING: DO NOT IMMERSE THE MOTOR BASE IN WATER.
STORAGE INSTRUCTIONS
1.
2.
3.
4.
Unplug and clean unit.
Store in original box or in a clean, dry place.
Never store Rocket Blender while it is hot or plugged in.
Never wrap cord tightly around the appliance. Never place any stress on cord, especially
where the cord enters the unit, as this could cause the cord to fray and break.
7
SO-308235_13606 Interior r2_Layout 1 11-08-01 1:44 PM Page 8
RECIPES
–––––––––––––––––––––––––––––––––––––––––––––––––––––––––––––––––––––––––––
SAVORY SAUCES, DRESSING AND MARINADES
–––––––––––––––––––––––––––––––––––––––––––––––––––––––––––––––––––––––––––
SPICY JALEPENO PICANTE SAUCE
–––––––––––––––––––––––––––––––––––––––––––––––––––––––––––––––––––––––––––
EGGLESS CAESAR DRESSING
–––––––––––––––––––––––––––––––––––––––––––––––––––––––––––––––––––––––––––
PINK PESTO
–––––––––––––––––––––––––––––––––––––––––––––––––––––––––––––––––––––––––––
FRESH BASIL PESTO
–––––––––––––––––––––––––––––––––––––––––––––––––––––––––––––––––––––––––––
TRADITIONAL MARINARA SAUCE
–––––––––––––––––––––––––––––––––––––––––––––––––––––––––––––––––––––––––––
PENNE PASTA WITH PINK PESTO AND GRILLED CHICKEN SALAD
–––––––––––––––––––––––––––––––––––––––––––––––––––––––––––––––––––––––––––
BAKED BOCCONCINI MOZZARELLA AND TOMATO SAUCE ANTIPASTI
–––––––––––––––––––––––––––––––––––––––––––––––––––––––––––––––––––––––––––
BASIL PESTO LAYERED BRIE ANTIPASTI APPETIZER
–––––––––––––––––––––––––––––––––––––––––––––––––––––––––––––––––––––––––––
GRIDDLE CORN CAKES WITH SPICY TOMATO SALAD
–––––––––––––––––––––––––––––––––––––––––––––––––––––––––––––––––––––––––––
8
SO-308235_13606 Interior r2_Layout 1 11-08-01 1:44 PM Page 9
RECIPES
–––––––––––––––––––––––––––––––––––––––––––––––––––––––––––––––––––––––––––
QUICK AND EASY CAESAR SALAD
–––––––––––––––––––––––––––––––––––––––––––––––––––––––––––––––––––––––––––
QUICKIE BEAN DIP
–––––––––––––––––––––––––––––––––––––––––––––––––––––––––––––––––––––––––––
CREAMY ALFREDO
–––––––––––––––––––––––––––––––––––––––––––––––––––––––––––––––––––––––––––
BANANA STRAWBERRY SMOOTHIE
–––––––––––––––––––––––––––––––––––––––––––––––––––––––––––––––––––––––––––
CREAMY BROCCOLI SOUP
–––––––––––––––––––––––––––––––––––––––––––––––––––––––––––––––––––––––––––
“EGGS”-CELLENT EGG-NOG
–––––––––––––––––––––––––––––––––––––––––––––––––––––––––––––––––––––––––––
CHEESECAKE
–––––––––––––––––––––––––––––––––––––––––––––––––––––––––––––––––––––––––––
HUMMUS
–––––––––––––––––––––––––––––––––––––––––––––––––––––––––––––––––––––––––––
SCRAMBLED EGGS IN SECONDS
–––––––––––––––––––––––––––––––––––––––––––––––––––––––––––––––––––––––––––
MANGO STRAWBERRY DELIGHT
–––––––––––––––––––––––––––––––––––––––––––––––––––––––––––––––––––––––––––
9
SO-308235_13606 Interior r2_Layout 1 11-08-01 1:44 PM Page 10
SAVORY SAUCES, DRESSING
AND MARINADES
It couldn’t be any easier! Simply place all ingredients in the blending cup and process
until mixture is puréed to desired consistency. In minutes, you will have savory sauces
for your favorite dishes. Try some of the easy recipes we have included.
–––––––––––––––––––––––––––––––––––––––––––––––––––––––––––––––––––––––––––
SPICY JALEPENO PICANTE SAUCE
1/2 jalepeno pepper, seeds removed
1 fresh tomato, core removed and cut into 4 pieces
1 clove garlic
2 Tbsp. orange juice
2 Tbsp. lime juice
1 Tbsp. sherry vinegar
1 tsp. salt
1/8 tsp. pepper
1/4 cup extra virgin olive oil
–––––––––––––––––––––––––––––––––––––––––––––––––––––––––––––––––––––––––––
1. Combine all the ingredients into the large blending cup.
2. Twist cup into base, push down and pulse
until desired consistency is reached.
–––––––––––––––––––––––––––––––––––––––––––––––––––––––––––––––––––––––––––
10
SO-308235_13606 Interior r2_Layout 1 11-08-01 1:44 PM Page 11
EGGLESS CAESAR DRESSING
SPICY JALEPENO PICANTE SAUCE
1 garlic clove
1 Tbsp. capers, drained and rinsed
1 tsp. mustard
2 Tbsp. lemon juice
1 tsp. salt
1/8 tsp. pepper
1/3 cup extra virgin olive oil
–––––––––––––––––––––––––––––––––––––––––––––––––––––––––––––––––––––––––––
1. Combine all the ingredients into the large blending cup.
2. Twist cup into base, push down and pulse
until desired consistency is reached.
–––––––––––––––––––––––––––––––––––––––––––––––––––––––––––––––––––––––––––
PINK PESTO
1 cup sun-dried tomatoes
2 Tbsp. toasted pine nuts
1 tsp. salt
1/8 tsp. pepper
1/4 cup Parmesan cheese
1/4 cup cream
–––––––––––––––––––––––––––––––––––––––––––––––––––––––––––––––––––––––––––
1. Combine all the ingredients into the large blending cup.
2. Twist cup into base, push down and pulse
until desired consistency is reached.
–––––––––––––––––––––––––––––––––––––––––––––––––––––––––––––––––––––––––––
11
SO-308235_13606 Interior r2_Layout 1 11-08-01 1:44 PM Page 12
FRESH BASIL PESTO
1 cup packed basil leaves
1 clove garlic
2 Tbsp. pine nuts
1 tsp. salt
1/8 tsp. pepper
1/4 cup Parmesan cheese
1/3 cup extra virgin olive oil
–––––––––––––––––––––––––––––––––––––––––––––––––––––––––––––––––––––––––––
1. Combine all the ingredients into the large blending cup.
2. Twist cup into base, push down and pulse
until desired consistency is reached.
–––––––––––––––––––––––––––––––––––––––––––––––––––––––––––––––––––––––––––
TRADITIONAL MARINARA SAUCE
1 (8 oz.) can whole peeled tomatoes
1 garlic clove
6 basil leaves
1 tsp. salt
1/8 tsp. pepper
2 Tbsp. extra virgin olive oil
–––––––––––––––––––––––––––––––––––––––––––––––––––––––––––––––––––––––––––
1. Combine all the ingredients into the large blending cup.
2. Twist cup into base, push down and pulse
until desired consistency is reached.
–––––––––––––––––––––––––––––––––––––––––––––––––––––––––––––––––––––––––––
12
SO-308235_13606 Interior r2_Layout 1 11-08-01 1:44 PM Page 13
PENNE PASTA WITH PINK PESTO
AND GRILLED CHICKEN SALAD
This easy salad is simply delicious any time of the year.
Serve warm as a quick and convenient dinner with a Caesar Salad on the side
or at room temperature for a light and satisfying lunch.
–––––––––––––––––––––––––––––––––––––––––––––––––––––––––––––––––––––––––––
1/2 cup penne pasta, cooked al dente and drained
1 cup Pink Pesto
1- 8 oz. grilled or baked chicken breast, cut into strips
2 Tbsp. toasted pine nuts
4 basil leaves
grated Parmesan cheese
–––––––––––––––––––––––––––––––––––––––––––––––––––––––––––––––––––––––––––
1. While still warm, toss drained pasta with Pink Pesto until well coated.
2. Add the chicken and pine nuts and toss gently.
3. Top with torn basil leaves and grated fresh Parmesan cheese.
–––––––––––––––––––––––––––––––––––––––––––––––––––––––––––––––––––––––––––
Serves 2.
–––––––––––––––––––––––––––––––––––––––––––––––––––––––––––––––––––––––––––
13
SO-308235_13606 Interior r2_Layout 1 11-08-01 1:44 PM Page 14
BAKED BOCCONCINI MOZZARELLA
AND TOMATO SAUCE ANTIPASTI
Serve this appetizer hot out of the oven for your guests.
The creamy melted cheese and fresh tomato sauce will be the best bruschetta
topping you will ever serve.
–––––––––––––––––––––––––––––––––––––––––––––––––––––––––––––––––––––––––––
4 oz. fresh mozzarella (Bocconcini)
1 cup traditional Marinara Sauce
1 Tbsp. balsamic vinegar
sliced Italian bread
–––––––––––––––––––––––––––––––––––––––––––––––––––––––––––––––––––––––––––
1. Coat a 6” or 8” oven proof baking dish with the Marinara Sauce.
2. Pull the mozzarella apart into 4-6 pieces and add to the sauce.
3. Bake in oven at 350 degrees for about 20 minutes
or until sauce is bubbly and cheese is melted
and slightly golden on the edges.
4. Remove from oven. Let cool slightly before serving.
5. Serve with bread for dipping.
–––––––––––––––––––––––––––––––––––––––––––––––––––––––––––––––––––––––––––
Serves 4-6 as an appetizer.
–––––––––––––––––––––––––––––––––––––––––––––––––––––––––––––––––––––––––––
14
SO-308235_13606 Interior r2_Layout 1 11-08-01 1:44 PM Page 15
BASIL PESTO LAYERED BRIE
ANTIPASTI APPETIZER
This appetizer is great in a pinch when you want to serve
an elegant antipasti dish but don’t have much time.
–––––––––––––––––––––––––––––––––––––––––––––––––––––––––––––––––––––––––––
1 (8 oz.) brie or camembert cheese wheel or wedge
2 Tbsp. basil pesto
2 Tbsp. sun-dried tomato slices, drained on paper towels
fresh basil leaves
1 Tbsp. toasted pine nuts
–––––––––––––––––––––––––––––––––––––––––––––––––––––––––––––––––––––––––––
1. With a sharp knife, cut brie in half horizontally and separate.
2. Spread pesto evenly on the bottom half of the cheese.
3. Top with pine nuts and sun-dried tomatoes
and cover with the top half of cheese.
4, Press both halves together gently to seal the pesto in the cheese.
5. Wrap in plastic wrap and refrigerate until ready to use.
6. To serve, remove from plastic wrap, bring to room temperature
and top with fresh basil leaves and a sprinkle of pine nuts.
7. Serve with sliced crostini rounds.
–––––––––––––––––––––––––––––––––––––––––––––––––––––––––––––––––––––––––––
Serves 4-6 as an appetizer.
Note: For an easy variation, mix pesto with other cheeses, such as goat
cheese or mascarpone. Simply bring cheese and basil pesto to room temperature.
Combine 8 oz. softened cheese with 2 Tbsp. pesto and mix gently.
–––––––––––––––––––––––––––––––––––––––––––––––––––––––––––––––––––––––––––
15
SO-308235_13606 Interior r2_Layout 1 11-08-01 1:44 PM Page 16
GRIDDLE CORN CAKES
WITH SPICY TOMATO SALAD
This recipe is best in the summer season when freshly picked ears of corn
and heirloom tomatoes are in abundance at your local farmer’s market.
–––––––––––––––––––––––––––––––––––––––––––––––––––––––––––––––––––––––––––
1/2 cup cornmeal
1/2 cup all purpose flour
1 Tbsp. baking powder
1 tsp. salt
4 Tbsp. melted butter + 2 tbsp. butter
1 ear fresh corn, kernels removed
1/2 cup milk
1 cup chopped assorted heirloom tomatoes
1 recipe Spicy Jalepeno Picante Sauce
1/4 cup crème fraiche (or sour cream)
1/2 cup fresh cilantro leaves
–––––––––––––––––––––––––––––––––––––––––––––––––––––––––––––––––––––––––––
1. In medium mixing bowl, combine cornmeal, flour, baking powder and salt.
2. In a small saucepan, melt 4 Tbsp. butter and add fresh corn kernels.
Sauté for a few minutes over low heat.
3. Pour butter and corn into flour mixture. Add dry ingredients.
Whisk ingredients together until batter is smooth. Let rest for a few minutes.
4. Toss tomatoes with 1/2 cup of Spicy Jalepeno Picante Sauce
and set aside until ready to use. In non-stick pan, heat 2 tbsp.
butter over medium-low heat until melted.
5. Ladle in 1/2 cup cornmeal batter. Cook until sides of cakes
bubble gently and cakes are light golden brown, about 2 minutes.
6. Gently turn them over with a spatula and cook for another 2 minutes
or until golden brown. Batter makes about 8 griddle cakes.
7. For each serving, place two griddle cakes onto a plate.
Top with tomato mixture, a dollop of crème fraiche and fresh cilantro leaves.
–––––––––––––––––––––––––––––––––––––––––––––––––––––––––––––––––––––––––––
Serves 2-4.
–––––––––––––––––––––––––––––––––––––––––––––––––––––––––––––––––––––––––––
16
SO-308235_13606 Interior r2_Layout 1 11-08-01 1:44 PM Page 17
QUICK AND EASY CAESAR SALAD
This is a wonderfully lighter version of the traditional Caesar Salad Dressing.
Try it as a sauce for chicken salad mixed with mayonnaise
or drizzled on grilled vegetables.
–––––––––––––––––––––––––––––––––––––––––––––––––––––––––––––––––––––––––––
1 bunch romaine lettuce leaves
1 hardboiled egg
1/2 cup croutons
1/4 cup Caesar Dressing
shaved Parmesan cheese
freshly cracked pepper
–––––––––––––––––––––––––––––––––––––––––––––––––––––––––––––––––––––––––––
1. Wash and dry lettuce leaves. Remove large leaves and set aside for another use.
2. Using the tender leaves inside lettuce, divide leaves onto two plates,
overlapping in an artful arrangement.
3. Top with coarsely chopped hardboiled egg and croutons.
4. Drizzle each plate with 2 tbsp. Caesar dressing.
5. Top with shaved Parmesan cheese and freshly cracked pepper.
–––––––––––––––––––––––––––––––––––––––––––––––––––––––––––––––––––––––––––
Serves 2.
–––––––––––––––––––––––––––––––––––––––––––––––––––––––––––––––––––––––––––
17
SO-308235_13606 Interior r2_Layout 1 11-08-01 1:44 PM Page 18
QUICKIE BEAN DIP
Blend this all natural, great tasting bean dip in no time at all.
Freshly made and ready to serve in minutes.
–––––––––––––––––––––––––––––––––––––––––––––––––––––––––––––––––––––––––––
1 (15 oz.) can black beans, rinsed and drained
1-2 cloves of garlic
1/4 cup roasted red peppers
1/4 cup (fat-free) chicken or vegetable broth
2 Tbsp. balsamic vinegar
dollop of sour cream (optional)
cayenne pepper to taste (optional)
chili pepper to taste (optional)
–––––––––––––––––––––––––––––––––––––––––––––––––––––––––––––––––––––––––––
1. Combine all ingredients into the large blending cup.
2. Twist cup into base, push down and pulse
until desired consistency is reached.
–––––––––––––––––––––––––––––––––––––––––––––––––––––––––––––––––––––––––––
18
SO-308235_13606 Interior r2_Layout 1 11-08-01 1:44 PM Page 19
CREAMY ALFREDO
Everyone loves this creamy, delicious sauce. The Rocket Blender
can help you prepare this great tasting dish in minutes.
A meal everyone will enjoy!
–––––––––––––––––––––––––––––––––––––––––––––––––––––––––––––––––––––––––––
1/4 cup heavy cream
2 Tbsp. butter
1 clove garlic
1/2 cup Parmesan cheese
3 sprigs fresh parsley (optional)
salt and pepper to taste
dash of basil
shallots (optional)
–––––––––––––––––––––––––––––––––––––––––––––––––––––––––––––––––––––––––––
1. Combine all ingredients into the large blending cup.
2. Twist cup into base, push down and pulse until desired consistency is reached.
Place contents into a microwavable bowl and heat to desired temperature.
3. Stir and serve over hot pasta.
–––––––––––––––––––––––––––––––––––––––––––––––––––––––––––––––––––––––––––
19
SO-308235_13606 Interior r2_Layout 1 11-08-01 1:44 PM Page 20
BANANA STRAWBERRY SMOOTHIE
Refreshing and healthy at the speed of a Rocket!
–––––––––––––––––––––––––––––––––––––––––––––––––––––––––––––––––––––––––––
1 banana
4-5 strawberries
splash of orange juice or milk
1/8 teaspoon vanilla
1 cup previously finely crushed ice
–––––––––––––––––––––––––––––––––––––––––––––––––––––––––––––––––––––––––––
1. Combine all the ingredients into the large blending cup.
2. Twist cup into base, push down and pulse until smooth consistency is reached.
3. Serve chilled!!
–––––––––––––––––––––––––––––––––––––––––––––––––––––––––––––––––––––––––––
CREAMY BROCCOLI SOUP
What’s better than a delicious, hearty soup to start off a meal
or warm you up on a cold day? Warm up with some great tasting,
warm delicious broccoli soup in no time!
–––––––––––––––––––––––––––––––––––––––––––––––––––––––––––––––––––––––––––
1 cup broccoli florettes
1 clove of garlic
1/4 cup chopped onions
1/2 cup of chicken stock
1/3 cup cream (milk or non-fat yogurt)
salt and pepper to taste
ground thyme to taste (optional)
shredded cheese to top (optional)
–––––––––––––––––––––––––––––––––––––––––––––––––––––––––––––––––––––––––––
1. Add broccoli, garlic, onion and chicken stock to a microwavable bowl
and heat until broccoli is soft.
2. Combine mix and other remaining ingredients to large blending
cup and twist cup into base. Pulse until desired consistency is reached.
20
SO-308235_13606 Interior r2_Layout 1 11-08-01 1:44 PM Page 21
“EGGS”-CELLENT EGG-NOG
What are the holidays without Egg Nog? Impress your guests with this easy
to make smooth and creamy egg nog!
–––––––––––––––––––––––––––––––––––––––––––––––––––––––––––––––––––––––––––
3 eggs
2 Tbsp. sugar
dash of salt
1 1/2 cups milk (whole or 2%)
1/2 tsp vanilla
–––––––––––––––––––––––––––––––––––––––––––––––––––––––––––––––––––––––––––
1. Sprinkle of ground nutmeg to finish!
2. Combine all the ingredients into the large blending cup.
3. Twist cup into base, push down and pulse until desired consistency is reached. Serve at
desired temperature, with a sprinkle of freshly ground nutmeg.
–––––––––––––––––––––––––––––––––––––––––––––––––––––––––––––––––––––––––––
CHEESECAKE
Blend smooth and creamy (not to mention delicious) cheesecake
in a matter of minutes! Amazingly creamy!!
–––––––––––––––––––––––––––––––––––––––––––––––––––––––––––––––––––––––––––
1 (8oz.) package cream cheese
2 eggs
1/2 cup sugar
1 tsp. vanilla
1 graham cracker crust
–––––––––––––––––––––––––––––––––––––––––––––––––––––––––––––––––––––––––––
1. Before you start, preheat oven to 350 degrees.
2. Add all the ingredients (except graham cracker crust)
to the tall blending cup and mix until smooth.
3. Place graham cracker crust into bake pan.
4. Pour mixture into crust and bake at 350 degrees for 20-25 minutes (until set).
21
SO-308235_13606 Interior r2_Layout 1 11-08-01 1:44 PM Page 22
SENSUALLY SMOOTH
CHOCOLATE MOUSSE
A perfect ending to a delicious meal. Light, fluffy, smooth, chocolaty mousse…
Great for anyone with a sweet tooth.
–––––––––––––––––––––––––––––––––––––––––––––––––––––––––––––––––––––––––––
1/4 cup heavy cream
2 Tbsp. chocolate syrup
1/2 tsp. vanilla
–––––––––––––––––––––––––––––––––––––––––––––––––––––––––––––––––––––––––––
1. Combine all the ingredients into the large blending cup.
2. Twist cup into the base, push down and pulse until a smooth consistency
is reached. Add cup ring and enjoy.
–––––––––––––––––––––––––––––––––––––––––––––––––––––––––––––––––––––––––––
ROCKIN’RASPBERRY/
PINEAPPLE JUICE
Thirst-quenching, all natural and fresh raspberry-pineapple juice!
Who needs store bought juice when you can make it at home?
–––––––––––––––––––––––––––––––––––––––––––––––––––––––––––––––––––––––––––
1/3 of a pineapple trimmed and cut into 1” pieces
handful of raspberries
–––––––––––––––––––––––––––––––––––––––––––––––––––––––––––––––––––––––––––
1. Combine all the ingredients into the large blending cup.
2. Twist cup into base, push down and pulse until a smooth a consistency is reached.
3. Add cup ring and enjoy.
–––––––––––––––––––––––––––––––––––––––––––––––––––––––––––––––––––––––––––
22
SO-308235_13606 Interior r2_Layout 1 11-08-01 1:44 PM Page 23
HUMMUS
This traditional Middle Eastern dish can be blended in no time
with your Rocket Blender. Makes a great sandwich spread or dip
for the whole family!
–––––––––––––––––––––––––––––––––––––––––––––––––––––––––––––––––––––––––––
1/4 cup chicken or vegetable stock
14 oz. can chickpeas (garbanzo beans), rinsed and drained
3 cloves garlic
3 Tbsp. lemon juice
3 tsp. tahini (sesame paste)
1/2 tsp. sea salt
–––––––––––––––––––––––––––––––––––––––––––––––––––––––––––––––––––––––––––
1. Combine all the ingredients into the large blending cup.
2. Twist cup into base, push down and pulse until a smooth consistency is reached.
3. Traditional hummus is served in a bowl with drizzled olive oil
and paprika sprinkled on top! (This is optional.)
–––––––––––––––––––––––––––––––––––––––––––––––––––––––––––––––––––––––––––
ITALIAN GARLIC BREAD
Garlic bread at its finest! A perfect mouth watering blend of butter,
cheese and garlic in every bite… A real treat for the taste buds!
–––––––––––––––––––––––––––––––––––––––––––––––––––––––––––––––––––––––––––
1/2 cup butter
2-3 cloves
1 oz. Parmesan cheese
sprig of fresh parsley
loaf of Italian (or French) bread
sweet basil or oregano to taste
–––––––––––––––––––––––––––––––––––––––––––––––––––––––––––––––––––––––––––
1. Combine all the ingredients into the large blending cup.
2. Twist cup into base, push down and pulse until a smooth consistency is reached.
3. Pour ingredients into a microwavable dish and heat until butter is melted.
4. Pour ingredients over hot toasted bread and serve!
23
SO-308235_13606 Interior r2_Layout 1 11-08-01 1:44 PM Page 24
SCRAMBLED EGGS IN SECONDS
Serve up the most fluffy, flavorful eggs you’ve ever tasted in no time.
Perfect for those rushed mornings, or afternoon snacks!
–––––––––––––––––––––––––––––––––––––––––––––––––––––––––––––––––––––––––––
2 eggs
splash of milk or cream
salt and pepper (optional)
You can also add:
cheese
tomatoes
green onions
spinach
ham
bell peppers
…whatever else you crave!
–––––––––––––––––––––––––––––––––––––––––––––––––––––––––––––––––––––––––––
1. Combine all the ingredients into the large blending cup.
2. Twist cup into base, push down and pulse until a smooth consistency is reached.
3.Pour mixture into a frying pan and cook until done. Serve immediately.
–––––––––––––––––––––––––––––––––––––––––––––––––––––––––––––––––––––––––––
24
SO-308235_13606 Interior r2_Layout 1 11-08-01 1:44 PM Page 25
MANGO STRAWBERRY DELIGHT
A fruity refreshing drink that’s easy to blend whenever you want.
–––––––––––––––––––––––––––––––––––––––––––––––––––––––––––––––––––––––––––
4-5 slices of mango
4-5 strawberries
dash of orange juice
1 cup of previously finely crushed ice
–––––––––––––––––––––––––––––––––––––––––––––––––––––––––––––––––––––––––––
1. Combine all the ingredients into the large blending cup.
2. Twist cup into base, push down and pulse until a smooth consistency is reached.
3. Add cup ring and serve immediately!
–––––––––––––––––––––––––––––––––––––––––––––––––––––––––––––––––––––––––––
25