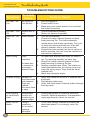
1
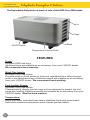
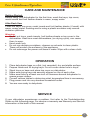
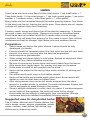
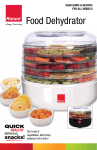
Expandable 528
DEHYDRATOR
Owner’s Manual User Guide
MODEL 528 - Grey
EXPANDABLE 528
D E H Y D R AT O R
Owner’s Manual User Guide
CONGRATULATIONS
You’re now the proud owner of the L’EQUIP 528 Dehydrator. This energy
efficient dehydrator is designed with both your health and convenience in
mind and opens up a new dimension in preserving food.
We’re confident you will appreciate its ease of operation as you enjoy all the
different creations you can make for years to come.
WELCOME TO THE WONDERFUL WORLD OF
DEHYDRATING!
2
Table Of Contents
TABLE OF CONTENTS
Important Safeguards...................................... 4
Benefits of Dehydrating.................................... 5
Dehydrator Description & Features.................. 6
Care & Maintenance / Operation...................... 7
Troubleshooting Guide..................................... 8
How to Dehydrate............................................ 9
Pretreating............................................ ............ 10
Filling the Drying Trays..................................... 11
Drying Times & Temperature Guide.................. 12
Storing Dried Foods......................................... 13
Reconstitution.................................................. 14
Fruit.................................................................. 15-16
Fruit Leather...................................................... 17
Meats, Fish & Poultry........................................ 18-19
Jerky................................................................. 19-20
Vegetables........................................................ 21-22
Herbs................................................................ 23-24
Potpourri.......................................................... 25
Recipes............................................................ 26-39
Beverages............................................ 27
Breakfast.............................................. 28
Jams.................................................... 29
Desserts............................................... 30-32
Fruit Leather......................................... 33
Soups/Sauces..................................... 36-37
Snacks................................................. 38
Vegetables........................................... 39
Accessories...................................................... 40
Warranty........................................................... 41
3
EXPANDABLE 528
D E H Y D R AT O R
Owner’s Manual User Guide
Important Safeguards
IMPORTANT SAFEGUARDS
When using electrical appliances, basic safety precautions should always be
followed, including the following:
READ ALL INSTRUCTIONS
•
•
•
•
•
•
•
•
•
•
•
•
•
•
•
•
Do not touch hot surfaces.
To protect against electrical hazards, do not immerse cord, plugs, or the
base of the dehydrator in water or other liquid.
Use close supervision when any appliance is used by or near children.
Unplug from outlet when not in use and before cleaning.
Do not operate any appliance with a damaged cord or plug. If the
appliance malfunctions or if it has been damaged in any manner, return
the appliance to an authorized service facility for examination, repair and/
or adjustment.
The use of accessory attachments not recommended by the
manufacturer may cause hazards.
Do not use outdoors.
Do not let cord hang over edge of table or counter or touch hot surfaces.
Do not use appliance for other than intended household use.
Do not place on or near a hot gas or electric burner, or in a heated oven.
Turn appliance off first, then remove plug from outlet.
Do not place dehydrator on a towel or carpet as this will restrict the
dehydrators airflow and could result in damage to the appliance. Always
leave at least one inch of space around the dehydrator for proper
ventilation.
The appliance has a short power cord to reduce the hazards resulting
from becoming entangled in or tripping over a longer cord.
An extension cord may be used if care is exercised during its use. Use
a heavy extension cord (5 amp rating or higher). If using a longer cord,
arrange so it will not drape over the counter or tabletop.
Do not expose dehydrator to temperatures above 180ºF. Do not wash in
dishwasher.
This appliance has a polarized plug. One blade is wider than the other.
As a safety feature this plug will fit in a polarized outlet only one way. If
the plug does not fit fully in the outlet, reverse the plug. If it still does not
fit, contact a qualified electrician. Do not attempt to defeat this safety
feature.
SAVE THESE INSTRUCTIONS
HOUSEHOLD USE ONLY
4
Benefits of Dehydrating
WHAT IS DEHYDRATION?
Dehydration refers to a process in which moisture is removed from food,
preventing spoilage, and allowing dried food to be stored safely for later use.
Few nutrients are lost during dehydration.
BENEFITS OF DEHYDRATING FOOD:
•
•
•
•
•
•
•
•
•
•
•
The food retains almost all of its nutrients and taste.
You can control the quality of your food; preserving food at its nutritional
peak.
The weight and size of food is reduced.
There are no worries about spoilage, unlike frozen foods, if there is a loss
of electricity.
Food becomes more energy-dense.
Food is not subjected to extreme high temperatures as in the canning
process.
Preparation is easy and the drying process doesn’t need to be constantly
attended.
Dehydrating can be done overnight.
Dehydrated foods are easy to store and simple to use.
Storing dehydrated foods is energy efficient.
Dehydration concentrates natural flavor, sweetness and aroma of food.
Since natural sugars concentrate as you remove moisture, the dried product
is naturally sweet. Usually, you won’t need to add sugar because of this
natural sweetness.
Dehydrated foods should be stored in an airtight container.
5
EXPANDABLE 528
D E H Y D R AT O R
Owner’s Manual User Guide
Dehydrator Description & Features
The Expandable Dehydrator is made of safe, stable BPA Free ABS plastic.
Lid
Trays
Base
On/Off Switch
Temperature Control Knob
FEATURES
Trays:
Includes 6 BPA free trays
Additional trays are available as an accessory from your L’EQUIP dealer.
We recommend hand washing.
Mesh Tray Inserts:
Includes 6 BPA free inserts
Prevents small or diced pieces of fruits and vegetables from falling through
holes in the dehydrator trays. Additional inserts are available as an accessory
from your L’EQUIP dealer. We recommend hand washing.
Fruit Leather Sheets:
Includes 2 BPA free sheets
These sheets fit directly into the trays and are designed to prevent the fruit
puree from spilling. Additional sheets are available as an accessory from your
L’EQUIP dealer. Must be hand washed.
Temperature:
Micro-processor controlled heat sensor stabilizes the drying environment.
Solid-state variable temperature control insures precise results.
6
Care & Maintenance/Operation
CARE AND MAINTENANCE
Getting Started:
Before using your dehydrator for the first time, wash the trays, top cover,
mesh inserts and fruit leather sheets in warm, soapy water.
After Each Use:
Clean the trays, top cover, mesh inserts and fruit leather sheets, (if used), with
warm, soapy water. Soaking and/or using a plastic scrubber may remove
stubborn particles.
Warning:
• Do not put trays, mesh inserts, fruit leather sheets or top cover in the
dishwasher. Heat from most dishwashers, (on drying cycle), can cause
them to warp.
• Hand wash only.
• Do not use abrasive scrubbers, cleaners or solvents to clean plastic.
These will scratch the surfaces of the appliance.
• Do not submerge the power unit/base in water. Wipe with a clean cloth.
OPERATION
1.
2.
3.
4.
5.
Place dehydrator base on a flat, (not carpeted), dry and stable surface.
Prepare foods and fill drying trays. Do not cover center hole in trays!
Stack trays on base and place top cover on dehydrator.
Make sure drying trays are securely aligned on top of each other.
Make sure there is at least one inch of clearance around dehydrator to
ensure proper airflow.
6. Consult various tables to determine what temperature/time is neccessary.
7. Plug power cord into any standard household outlet.
8. You are now ready to dehydrate.
SERVICE
If your dehydrator experiences a problem, first refer to the Troubleshooting
Guide on the following page. For service or warranty see Warranty and Service
information at the back of this manual.
7
EXPANDABLE 528
D E H Y D R AT O R
Owner’s Manual User Guide
Troubleshooting Guide
TROUBLESHOOTING GUIDE
Symptom
Probable
Cause
Items to Check
No Heat - No
Fan
No Power to
Unit Switch.
1.
2.
3.
Unit is plugged in.
Power switch is on.
Make sure your house power is on and that
the outlet is working.
No Heat – Fan
OK
Broken wire in
unit.
1.
2.
Check temperature setting.
Return for service if persists.
Heat OK – No
Fan
Motor stalled.
1.
2.
Turn off immediately.
Check for foreign objects (pieces of dried
food) jamming fan. Turn base assembly
upside down and shake vigorously. Turn unit
on side and shake particles out. If fan still
doesn’t operate, return unit for service.
If liquid has been spilled into the air vents on
the fan housing, the unit must be replaced or
returned for inspection.
3.
Slow Drying
Trays
overfilled.
1.
2.
Air leaks due
to warped or
improperly
stacked trays.
3.
4.
8
Air must flow around food freely for food to
dry. Try reducing quantity on each tray.
Check for foreign objects (pieces of dried
food) jamming or slowing the fan.
Replace warped trays. Note: The heat from
most dishwashers (on the drying cycle) can
warp the drying trays. Trays must be hand
washed only.
Stack trays properly again.
Uneven Drying Variation in
1.
food thickness
and ripeness.
2.
Trays not
3.
rotated.
Too much food
in trays.
Verify that foods are uniform in ripeness and
thickness.
Periodically rotate trays
Verify that food does not block airflow through
the tray stack.
Over-heating
or Insufficient
Heat
Temperature
control not
functioning at
proper range.
1.
Unplug dehydrator to clear the electronic
controls. Reset temperature. If temperature
varies significantly, return for service.
Noisy Fan or
Motor
Foreign
material in
fan or motor
bearings
damaged.
1.
Try to clear foreign material by shaking as
described above. If no change, return for
service
How to Dehydrate
HOW TO DEHYDRATE
The only way to become an expert is through experience. Experiment with
various drying times and temperatures. Record what works best for you.
Equipment:
• Sharp paring knife (Use stainless steel blades. Carbon blades may turn
some fruits and vegetables dark. A vegetable slicer or electronic slicer
may also be useful.)
• Cutting board
• Blender (for making leathers and powders)
• Storage containers
• Optional: Peeler, steamer and basket, or kettle and collapsible steamer
Before dehydrating, wash hands thoroughly. Make sure the counter, cutting
board, utensils, equipment and storage containers are clean prior to using.
Selecting Food:
Pick the best quality food at the peak of ripeness and flavor. Cut away any
bruised or damaged sections.
Decide Then Dehydrate:
Before beginning, decide how dehydrated food will be used. For example:
snacks, baked goods, soups, sauces or dips. This will help determine how
thick to slice food, whether to peel or not and whether to salt or season.
To Peel or Not:
Peels tend to be tough when dried and take longer to dry; however, the peels
of fruits and vegetables often contain much of the food’s nutritional value.
Peeling is a personal preference. If you would normally peel the food for a
specific recipe, plan to peel the food to be dehydrated. Peel apples intended
for pies or tomatoes intended for soup. It is better not to peel, if the dried
food is to be eaten as a snack.
Cutting Makes a Difference:
• Slice or cut food to uniform thickness. This allows even drying.
• Don’t slice food too thin. ¼” is preferred for most fruits and vegetables.
• Moisture rich foods such as watermelon, may need to be sliced thicker to
dehydrate properly.
• Moisture escapes best from a cut or broken surface, not through tough
skin. The larger the cut area, the faster and better the food dehydrates.
• Thin stalked vegetables like green beans, asparagus or rhubarb should be
cut in half lengthwise, or with an extreme diagonal cut.
• Broccoli stems should be halved or quartered, depending upon diameter.
• Fruit should be sliced across the core.
• Make thin, flat cuts.
• Small fruits like strawberries can be cut in half. Smaller berries should
either be cut in half or blanched slightly to break the skin.
9
EXPANDABLE 528
D E H Y D R AT O R
Owner’s Manual User Guide
Pretreating
PRETREATING
Dipping in a Pretreating Solution: (generally used for fruits)
Some fruits, such as apples, pears, peaches, apricots and bananas tend
to oxidize and darken somewhat during drying or when stored beyond 6-7
months. To prevent discoloration and extend shelf life, pretreat as follows:
• Dipping Solution: We prefer using bottled lemon juice, 2 parts juice to
1 part water. You may also use orange juice, pineapple juice, (fresh or
bottled), fresh lemon juice, ascorbic acid or a produce protector such as
Fruit-Fresh. Ascorbic acid may be purchased from drug stores. Mix 1 tsp
ascorbic acid per quart of water. Follow label directions for Fruit-Fresh.
• Allow fruit to sit in pretreating solution for 2-5 minutes. Do not leave fruit
in the solution for longer than 10 minutes.
• Strain through fine mesh strainer before placing on drying trays.
Blanching/Steaming Benefits: (generally used for vegetables)
• Sets color
• Stops ripening process (enzymatic action)
• Prevents changes in flavor
• Facilitates the drying process and reduces drying time
• Reduces contamination from molds and bacterial growth.
NOTE: Many vegetables such as beans, corn, peas and broccoli must be
steamed or blanched before drying. Carrots and celery should be blanched
or steamed. Although untreated vegetables used within three to four months
will have acceptable flavor, heat treated vegetables will have better color
and reconstitute much more quickly. A few vegetables, such as onions,
garlic, peppers, tomatoes and mushrooms can be dried and reconstituted
successfuly without heat treatment. Generally, if vegetables must be steamed
or blanched for freezing, they must be treated for drying. Blanching is faster
than steaming.
How to Blanch:
• Place vegetables in a basket or colander.
• Dip filled basket or colander into a pot of boiling water for 5-20 seconds
depending upon the size of cut vegetable. (Leave in water only until you
notice a change in color).
• Remove immediately. Dip in ice cold water to stop cookig process.
• Drain and place on drying trays.
How to Steam:
• Place vegetables in a basket or colander that will allow steam to circulate
around the vegetables.
• Dip filled basket or colander into a pot with about 2 inches of boiling
water. Food should not make contact with water.
• Cover and steam 3-5 minutes.
• Remove immediately. Dip in ice cold water to stop cooking process.
• Drain and place on drying trays.
10
Filling the Drying Trays
FILLING THE DRYING TRAYS
Caution: If loose particles get into the base or moisture drips down to the
base and gets into the motor, it will damage the motor and electronics. To
prevent any damage make sure you follow the instructions below carefully.
Before filling the trays:
• Be sure to blot all excess moisture from foods that have been washed,
sugared, marinated or are high in moisture, (such as very ripe tomatoes or
citrus fruit) to prevent dripping.
Filling the trays:
• Once the food has been properly sliced (and pretreated, if desired), begin
filling the dehydrating trays.
• Arrange food on the tray in a single layer. Leave a little space between
each piece of food.
• Make sure the center hole in each tray is always left uncovered to allow
air to circulate.
• If only one side of the food is cut, place the cut side up.
NOTE: Always fill the trays with food before placing trays onto the base.
Filled Trays:
• Do not immediately place filled trays onto the dehyddrator base.
• Let excess moisture drip off the trays before putting on the base by either
tapping each tray firmly on a towel to remove excess moisture or let filled
trays sit away from the dehydrator for 10 minutes, on a towel or paper
towels.
• Placing trays on a towel or paper towels to collect moisture will make
cleanup easier.
Optional:
• To catch any remaining overflow that may occur, use fruit leather sheets
placed on the bottom two trays.
• Alternate placing the sheets on one half of each tray. This will allow the
warm air to circulate.
• Place these two bottom trays (without food), directly on the dehydrator
base.
• Do not use wax paper, as the wax will melt at dehydration temperatures.
Remember to always leave the center hole uncovered or unobstructed.
Fruit leather sheets and empty trays may be removed when food stops
dripping.
11
EXPANDABLE 528
D E H Y D R AT O R
Owner’s Manual User Guide
Drying Times & Temperature Guide
DRYING TIMES
It is impossible to give exact drying times because the moisture content of
each food varies with the weather, soil conditions, where it was grown, how
thick it was sliced as well as the particular variety of food. Denser food takes
longer to dry. With a little experience, you’ll be able to tell which foods take
the longest. For example tomatoes, which are normally quite juicy, will take
longer than cabbage, which is dry. Citrus fruits will take longer than apples.
Record your successes for future reference.
Begin to check sliced fruits, vegetables and meats periodically after several
hours of drying time. Check more often near the end of the drying process.
Herbs, leathers or chopped and shredded foods may dry sooner. If foods
have been over dried and seem brittle or slightly browned, they are still usable
for soups or most baked goods. They may take slightly longer to reconstitute
and require additional water, but flavor is generally not impaired.
DRYING TEMPERATURES
Temperature settings can vary, there are no absolutes and quite a few
variables in drying food. The only way to become proficient is to dry, dry, and
dry some more. Certain varieties of produce and humidity in the air make a
difference in the drying time and quality of dried products.
Experiment with different drying temperatures, thicknesses of produce, and
pre-treatment vs. no pre-treatment.
The following are good starting points when drying different types of foods:
•
Fruits—130° to 140°
•
Vegetables—125° to 135°
•
Jerky—Start at highest setting (153°), after 4 hours, turn down
to 140°-145° and dry until desired texture is reached.
•
Herbs—95° to 100°
•
Nuts—90°
There is not a set time limit for drying foods. It depends on the type of food,
how thick it is sliced, and the amount of water in the food.
TRAY ROTATION
The L’EQUIP Dehydrator is designed to operate with up to 20 trays. When
using more than 4 trays, periodic rotation will give optimum results. Inspect
drying trays periodically. Rotate trays if food being dried requires it. Place top
tray on the bottom, followed by the next uppermost tray, etc.
12
Storing Dried Foods
STORING DRIED FOODS
When food is sufficiently dehydrated, thoroughly cool before storing
(approximately 15-30 minutes). If food is allowed to sit too long in the open
air, it will begin to absorb moisture. Select appropriate airtight storage
containers and store at optimal conditions. If moisture or condensation
appears in storage container, food has not completely dried. Return to dryer
and continue to dehydrate until completely dry.
Containers:
Any container that is clean, airtight, and moisture-proof is suitable for storage.
Fill each container as much as possible. Heavy, zippered plastic bags or heat
sealing bags make excellent choices. Filled bags may be placed in metal
cans with lids (shortening or coffee cans are good). This will keep out insects
and light. Glass jars with tight-fitting lids can be used with or without plastic
bags. Plastic containers with lids are good, but should be used in conjunction
with locking plastic bags, because plastic containers are not airtight. Do not
use paper or cloth bags, lightweight plastic bags, bread wrappers, unlined
metal containers or any container without a tight-fitting lid.
Labeling:
Label dehydrated food with the name of the product, date dried, and
quantity/weight. This helps in rotating food and minimizes waste.
Location:
Cool, dark and dry are the keys to maintaining the quality of dried food. Glass
jars or plastic containers should be placed in a paper bag or in a closed
cabinet to keep out light. Cement walls and floors are often damp. Dried food
containers should not be placed directly on the floor, or touching a basement
or cellar wall. Do not store dried food near items with a strong odor, such as
varnish, paint remover or kerosene.
Length of Storage:
In most cases, dried fruits and vegetables should not be stored longer than
one year. Plan to use all dried meats, fish, poultry or jerky within a month
or two. Rotate on a first-dried, first-to-be-used basis. Check dried foods
periodically. If the food seems more moist than when packed, mositure may
be getting into the container. Spread food on drying trays and dry again.
Then pack the food in an airtight container. Mold indicates that food was not
properly dried the first time, or was not properly stored. Discard or compost
moldy food. Do not try to use it.
13
EXPANDABLE 528
D E H Y D R AT O R
Owner’s Manual User Guide
Reconstitution
RECONSTITUTION
Reconstitution refers to putting moisture back into food. You will often want
to reconstitute dried foods before adding to recipes, using as side dishes or
combining with other ingredients.
• When allowed to soak in liquid, dried food will swell to its original shape
and size.
• Place food in a container with enough water or liquid to cover. Then soak
until it is at desired consistency.
• Refrigerate while soaking to prevent spoilage. Do not add seasonings
during this process.
• You may use liquids other than water, including juices, consommé, milk,
etc.
• Try not to use more liquid than necessary for reconstitution, as nutrients
will be drained away with the excess.
• There is no need to reconstitute ahead of time when making soups. Dried
vegetables can be added directly to the soup about one hour before
serving.
• For chopped or shredded vegetables and fruits to be used in cookies, no
reconstitution is usually needed. If the pieces are crisp and dry, sprinkle
with 1 Tbsp water per ½ cup of dried food.
• For vegetables and fruits to be used in soufflés, pies, quick breads,
doughs or batters, use 2 parts water to 3 parts (by volume) dried food.
• For vegetables and fruits which will be cooked in liquid, such as
vegetable side dishes, fruit toppings, and compotes, use 1 to 1½ parts
water to 1 part dried food. Extra liquid may be required for proper
cooking.
• Chopped and shredded foods reconstitute quickly. Generally, 15 to 30
minutes is sufficient. Whole pieces or slices of fruit or vegetables and
meat cubes take longest to reconstitute and are best left to soak in the
refrigerator overnight.
• Some foods take longer to reconstitute than others. Carrots and beans
require more time than green peas or potatoes. A rule of thumb: those
that take the longest to dehydrate will take the longest to reconstitute.
• If food cannot be soaked as long as necessary, place in boiling water,
remove from stove, and let stand 2 to 3 hours.
• Rehydrating meat is usually completed in 1 to 4 hours by soaking in an
equal amount of water (in the refrigerator), or by gently simmering in
water. Use only enough water to cover meat.
• If you drain reconstituted foods, save the liquid. This liquid has great
nutritional value. Freeze for use in soups, leathers, pies or compotes.
• Do not add spices, salt, bouillon cubes or tomato products until
vegetables are reconstituted and cooked. These items may hinder
rehydration.
14
Fruit
FRUIT
Dried fruit has no preservatives, is nutritious, and has a naturally sweet taste.
Suggested uses: snacks, cookies, pies, cobblers, cakes, breads, ice creams,
pancakes, jams, fruit leather, sweetener for waffles or cereals and more.
Process:
• Select firm, ripe fruit (not overly ripe), free of bruises and blemishes Sort
through grapes and berries. Remove those with imperfections.
• Wash fruit that is to be dehydrated with the skin.
• Peel fruits, if desired or necessary. For easy peeling of fruits such as
peaches, dip in boiling water until skin cracks.
• Waxy skinned fruits like cherries, cranberries, grapes (raisins), and
blueberries that will be left whole must have their skins poked or be
placed in boiling water for 1-2 minutes to remove waxy coating.
• Berries may be blanched or steamed to pop their skins which will shorten
the dehydration time. Cut, remove stems, stones, pits, cores and seeds.
Cutting uniform slices will allow food to dry evenly.
• Cut fruit into slices, pieces or halves. Uniform slices ¼” are best for most.
• See PRETREATING section for fruits that may turn dark during the drying
process.
• Use mesh inserts for any small fruits or pieces that might fall through the
holes in the dehydrator trays.
• Place fruit evenly on trays. If using more than 4 trays rotate once during
drying time.
Tutti-Fruit:
Dissolve flavored gelatin according to directions on package. Soak apple or
pear slices in mixture for 10 minutes. Blot dry on paper towels. Dehydrate.
15
EXPANDABLE 528
D E H Y D R AT O R
Owner’s Manual User Guide
Fruit
NOTE: Dry fruit at 130°-140°. Use average times only as a general guideline.
Variables can contribute to a large difference in drying times. To test for dryness: remove a piece
of fruit. Let it cool. Cut or tear. Fruit should have almost no moisture. Most fruts will still be
pliable and leathery. Bananas and strawberries should be almost crisp. You can leave softer, if
you do not plan on storing for a long time. Store dehydrated fruit in an airtight container.
Fruit
Preparation
Average
Drying
Time/ Hrs
Test for
Dryness
Apples
Peel if desired. Core. Cut slices, rings or chop into pieces
4-10
Leathery, no
moisture when cut
Apricots
Do not peel. Halve and pit. Turn inside out or cut slices.
8-16
Leathery, pliable
Bananas
Peel. Cut into slices 1/8” - 1/4”.
6-12
Leathery, slightly
sticky in the center,
brittle
Firm Skin
Berries
(Blueberries, cranberries, etc) Sort. Poke skin or place in
boiling water for 1-2 min. Blot dry.
10-18
Hard
Berries
Leave whole.
10-18
Hard
Cantaloupe
Cut in half. Remove seeds and peel. Cut slices. Blot dry
on paper towel.
8-20
Leathery, suedelike
Cherries
Wash, pit and remove stems. Poke skin or place in
boiling water for 1-2 min. Blot dry.
20-26
Citrus Fruit
Peel, if desired. Cut into slices.
6-12
Coconut
Remove Outer Skin. Slice.
12-16
Cranberries
Wash. Remove stems. Place in boiling water for 1 - 2
min. Blot dry.
14-22
Grapes
Cut in half. Remove seeds. Place cut side up. Seedless
green are better than red or black. Poke skin or place in
boiling water 1 -2 min. Blot dry.
13-36
Kiwi
Peel. Cut into slices. Slice 1/4” - 3/8 thick.
13-17
Mangos
Remove skin and slice.
10-18
Melons
Remove skin and seeds. Use deepest tray for watermelon.
Cut in slices as thick as deep tray size will allow.
12-16
Peaches
Peel, if desired. For easy peeling, dip in boiling water
until skin cracks. Cut in half. Pit. Cut in slices.
6-16
Leathery, may be
slightly sticky in center
Pears
Wash. Peel if desired. Core. Cut in slices or rings.
6-16
Leathery, no
moisture when cut
Pineapple
Remove crown, skin & eyes. Cut in half. Cut in slices, leaving
core in or remove, dice or chop and use Mesh Inserts.
6-12
Pliable, still slightly
sticky. No visible
signs of moisture
Plums
Do not peel. Cut in half. Pit. Turn inside out or cut in slices.
8-16
Leathery, pliable
Rhubarb
Trim. Wash. Slice diagonally into ¾” pieces. Steam 3 - 4
min. Use Mesh Inserts.
6-14
Brittle
Strawberries
Wash. Cut in half. Place cut side up.
6-12
Hard, brittle
16
Hard
Raisin-like texture
Fruit Leather
FRUIT LEATHER
Pureed fruit dried in thin sheets becomes a tasty, candy-like fruit leather
snack.
• Pit, then puree fruit of your choice, adding just enough liquid (fruit juice or
water) for the blender to puree effectively. Often no liquid is needed.
• Fruit may also be mixed with applesauce. One cup applesauce will
prevent leather from cracking or splitting.
• If fruit is tart, you may also add a sweetener.
• Lightly spray fruit leather sheets with vegetable oil before pouring on
puree to prevent sticking when removing leather. You can also use a little
olive oil. Rub it on a fruit leather sheet with a paper towel.
• Place fruit leather sheet(s) into dehydrator tray(s). Pour one cup of fruit
puree onto a sheet. Remember to leave the drying tray’s center hole
uncovered.
• For adequate circulation, only one half of the drying tray should be used.
Place fruit leather sheets on alternate halves of the trays in the stack.
• After all fruit leather sheets are filled, stack the drying trays on the base.
• Set temperature to 135°. Dehydratrate about 8-11 hours, (general rule).
• Rotate fruit leather sheets, (not dehydrator trays), twice during drying
time, (about every 3 hours).
• Leather is done when you notice puree to have a leather texture with no
sticky spots. It should easily remove from the fruit leather sheet.
• Wrap in plastic wrap and store at room temperature or refrigerate.
• Spices, chopped nuts or coconut may be added to the puree for extra
flavor. For further variation, puree several types of fruit together. Don’t
be afraid to experiment! Vary the amounts according to availability, taste
and imagination. If the puree tastes good, the leather will be better.
Remember the flavors, and sweetness, concentrate with drying.
Try the following combinations:
•
•
•
•
•
•
•
•
Apples, oranges, bananas and sunflower seeds
Cooked cranberries, oranges and honey
Raspberries, bananas and coconut
Strawberries and bananas
Strawberries, and rhubarb
Pineapple and peaches
Raspberries and apples
Apricots and plums
17
EXPANDABLE 528
D E H Y D R AT O R
Owner’s Manual User Guide
Meats, Fish and Poultry
MEATS, FISH AND POULTRY
The L’EQUIP Dehydrator can make dried meat and jerky. Dried meat refers to
meat, poultry, or fish that has been cooked then dried. Jerky is raw meat or
fish that has been seasoned and dried.
Dried meats are best when made for upcoming camping and backpacking
trips. When reconstituted, they yield a tasty meat, somewhat like fresh
cooked. Practically any meat can be dried, but fatty meats are not
recommended.
Suggested uses:
Snacks, soups, stews, casseroles, pizza toppings or rehydrate and use in
salads.
Guidelines:
• Choose lean cuts of meat. The leaner the meat, the better quality of the
dried product. Chicken breasts are leaner than dark meat.
• Cleanliness is critical when working with raw meats. Make sure all
surfaces, utensils and your hands, are washed thoroughly.
• Except for jerky, all meats, fish and poultry should be cooked before
being dried. Braising, pot roasting or steaming are best, because no fat is
used with these cooking methods.
• Never dehydrate raw chicken or poultry because it could contain
salmonella.
• Cut meats across the grain into thin strips about 1” wide and ¼” thick.
• Trim off all fat and connective tissues. For easier cutting, partially freeze
by placing meats on the bottom of the freezer for about 30 minutes. Turn
and freeze 15 minutes longer. To prepare fish, filet, then cut into 1” strips.
• Do not store dried meat, fish, or poultry longer than two months.
• Store dried meat in an airtight container, a sealed plastic bag, or jar with
an airtight lid. Keep in the refrigerator or freezer.
Note:
Meats, poultry, and fish generally take 6-12 hours to dry. This is a general
guideline. Drying times may vary. Dehydrated meats, poultry and fish darken
iin color when dried. Dehydrate until pieces are dry but will bend without
breaking, with no evidence of moisture.
18
Meats, Fish and Poultry
MEATS, FISH AND POULTRY
Meats
Cuts to Select
Preparation
Test for
Dryness
Beef
Lean cuts: Round,
Rump, Flank
Cook as for pot roast, until tender. Chill.
Remove all fat. Cut into cubes or strips.
Season, if desired.
Brittle
Chicken or
Turkey
White Meat
Cook by steaming or roasting. Chill.
Remove fat and hard skin. Cut or break into
pieces or cubes ½” thick, 2” long. Season
if desired.
Hard
Fish
Lean Fish:
Bass, haddock
pike, snapper,
halibut, cod, perch,
flounder
sole, whiting
Clean fish by removing head, skin and any
bones. Steam fish without adding butter.
Cool. Break into pieces about 2” square,
not thicker than ½”. Must not contain bones
or skins. May be sprinkled with paprika,
salt, pepper, onion and garlic powder or
other spices before drying.
Brittle
JERKY
Jerky is the only meat to be placed uncooked in the dehydrator. Your L’EQUIP
Expandable Dehydrator quickly turns thin strips of seasoned meat into a
hearty snack. It is recommended that pork not be dried for jerky, as the drying
temperature is not high enough to kill harmful bacteria.
NOTE: Start Jerky at 153° (highest setting). Halfway through decrease
temperature to 140°-145° and dry until desired texture is reached.
Jerky generally takes 6-10 hours to dry. This is a general guideline. Drying
times may vary. Dehydrate until strips are dry, but can be bent without
breaking. Jerky should be tough (slightly chewy), not brittle, with no evidence
of moisture.
PREPARING JERKY
•
•
•
•
It is essential when working with raw meats to keep working conditions
clean. Wash hands thoroughly each time you touch another item. Make
sure all surfaces and utensils are washed completely.
To prepare ground beef: Always use the leanest ground beef. You will
need a jerky gun accessory to shape the ground beef into strips.
To prepare fish: filet, then cut into 1” strips.
To prepare meat: Select lean meats, (lean flank or round steak makes
great jerky). Trim off all fat and connective tissue. Cut into strips about
1”-1½” thick.
NOTE: For easier cutting, place meat in the freezer for about 30 minutes to
partially freeze. Turn over and freeze 15 more minutes. Cut across the grain
into strips about 1/8” thick.
19
EXPANDABLE 528
D E H Y D R AT O R
Owner’s Manual User Guide
Seasoning Jerky
SEASONING JERKY
•
•
•
Season or marinate meat or fish from ½ hour to overnight in the
refrigerator. Increase the marinating time for a stronger flavored jerky.
A simple salt solution marinade improves flavor while reducing the
potential of spoilage. Most barbecue marinades may be used, as long as
they contain no oil. Adding lemon juice to the marinade will help preserve
redness. Vinegar added to a marinade will soften the wild taste of game
meats.
Meat may also be seasoned with salt, pepper, garlic, onion powder,
or other spices instead of marinating. Because flavors intensify during
drying, use salt sparingly. However, season meat dried for jerky a little
heavier than for regular cooking.
Discard unused marinade that has been mixed with meat.
NOTE: Doing ground beef jerky is slightly different than other meat
jerkys. Use the leanest ground beef possible. Instead of a marinade or
a dry rub use a Jerky Spice mixture that includes a cure. Mix this in with
the ground beef. Allow time for the ground beed and spice to marinate.
This not only provides enhanced flavor but allows time for the cure to take
action. Follow instructions on the Jerky Spice label.
To prevent dripping of marinade:
•
•
•
•
Drain off any excess marinade
Blot as much excess moisture from food as possible.
Tap the tray firmly on a towel to remove excess moisture.
Let drying trays sit away from dehydrator for 10 minutes, to let excess
marinade drip off. (You may want to place trays on a towel or paper
towels for easy cleanup.)
Soy Marinade
Marinates about 1½ pounds beef
• ¼ cup soy sauce
• 2 Tbsp honey
• ½ tsp dry mustard
• ¼ tsp garlic powder
Combine ingredients in bowl.
Add thinly sliced meat. Marinate
30 minutes, turning occasionally.
20
Vegetables
VEGETABLES
Dried vegetables are very versatile. Use them to make soups, stews, soufflés,
casseroles, and dips. They can also be used in recipes calling for fresh or
canned vegetables.
Preparation:
•
•
•
•
•
•
•
•
Select fresh, firm, ripe vegetables that are free from blemishes. Tender
green beans, corn and peas are preferred. Celery, carrots and peppers
should be crisp. Dry as soon as possible after picking to retain the most
nutrients.
Wash vegetables thoroughly in cold water before processing.
Trim, core, peel, slice or shred vegetables.
If cutting vegetables into slices make sure they are a uniform size. ¼”- ½”
are best for drying.
See section on PRETREATING for information about vegetables that
need to be steamed/blanched before drying. Some vegetables require no
pretreatment. Blanching decreases drying time.
Spread vegetables in a single layer, unless shredded or grated.
Dry vegetables until there is no visible sign of moisture and they are
brittle, hard, or crisp. Peas should shatter when hit with a knife.
If using more than 4 trays, rotate once or twice during drying time.
Vegetable Powders:
Vegetables may be pureed, dried as leathers, and then powdered for
making juices, soup bases, dips, salad dressings, or baby foods. Dehydrate
vegetable leather until very brittle. Immediately powder small amounts at a
time in a dry blender or coffee grinder. Brittle, sliced or chopped vegetables
can also be powdered. Powders must be stored in airtight containers to avoid
clumping. For example, reconstitute powdered tomatoes with water until they
are the consistency you desire. Adding a
small amount of water makes a great tomato
paste, adding more water makes a a great
tomato or pizza sauce. Remember powders
have very concentrated flavor.
Vegetable Chips:
Vegetable chips offer a great crunchy
texture and taste. Select vegetables such as
cucumbers, eggplants, zucchini, or parsnips.
There is no need to peel. Cut very thin slices
(1/8” thick). Steam 3 or 4 minutes, if chips
will be stored longer than 5 months. Sprinkle
generously with salt before drying. (Seasoned
salts make an interesting chip). Dry until very
brittle. These can be served plain or with dips.
21
EXPANDABLE 528
D E H Y D R AT O R
Owner’s Manual User Guide
Vegetables
NOTE: Dry vegetables at 125°-135°. Use average times only as a general
guideline. Many variables can contribute to a large difference in drying times.
Vegetables should contain only 5% moisture and should look and feel crisp
and brittle.
Vegetable
Preparation
Avg. Dry
Time (Hrs)
Asparagus
Remove woody end. Slice diagonally into ½”-1” pieces. Blanch/steam.
3 - 10
Green Beans
Snip off ends, pull off strings. Dry whole or slice diagonally into ½”-1”
pieces or cut lengthwise. Blanch/steam.
6 - 12
Beets
Steam until tender. Cool and peel. Cut in slices, cubes or shoestring strips.
3 - 10
Broccoli
Cut all stalks in halves or quarters. Blanch/steam.
Cabbage
Trim outer leaves. Cut in half. Core. Cut into strips or dry whole leaves.
Blanch/steam.
Carrots
Remove tops and stringy end. Peel, cut crosswise, lengthwise or
diagonally into slices, cubes or grate. Blanch/steam.
4 - 12
Cauliflower
Cut off woody base. Separate into small flowerets, slice or cube into
pieces. Blanch/steam.
6 - 14
Celery
Trim. Cut lengthwise or crosswise into strips or pieces. Leaves may also be
dried. Blanch/steam.
3 - 10
Corn
Remove husk and silk. Blanch/steam. Plunge immediately into cold water.
When cool, drain. Cut kernels from cob.
6 - 12
Cucumbers
Peel (skin is bitter when dried). Slice or shred. Salt, if desired.
4 - 10
Eggplants
Trim. Peel. Cut into round slices, julienne strips or cubes. Blanch/steam.
Skin may be dried separately.
4 - 14
Greens
Cut off stems. Blot dry on paper towels.
4 - 10
Mushrooms
Remove woody stems. Wipe with brush or cloth. Do not wash. Slice or
cube. Small mushrooms may be dried whole.
4 - 10
Okra
Trim off stem and tip. Slice pods into pieces or cut lengthwise.
4 - 10
Onions
Cut off stem and root. Remove outer skin cut in slices, rings or dice.
6 - 12
Peas
Sort. Blanch/steam.
5 - 14
Peppers
Remove stem and seed head. Cut in rings, strips or dice. Seeds may also
be dried. Blanch/steam. For seeds use leather sheets.
5 - 12
Potatoes
Peel. Remove green lining just under skin. Cut away bruises. Cut into
slices, strips or grate. Blanch/steam.
4 - 12
Pumpkins
Cut in half. Scrape away pulp and seeds. Remove rind. Cut into wedges 1”-3”
wide and then into strips ½” wide. Seeds can also be dried. Blanch/steam.
6 - 12
Winter Squash
(Butternut,
Acorn)
Cut in half. Remove seeds and stringy fiber. Peel off rind. Cut into strips or
cubes. Seeds may also be dried. Blanch/steam.
4 - 10
Summer Squash
(Zucchini)
Peel if desired. Cut in slices, cube, julienne strips or coarsely grate. If larger
than 12” remove seeds and fibrous tissue. For vegetable chips soak in soy
sauce before drying.
4-10
Tomatoes
Remove stem area. Peel, if desired. Cut in slices. Blot excess moisture
before drying.
6-12
22
4 - 10
4 - 10
Herbs
HERBS
Dried herbs are much more flavorful than fresh herbs. 1 tsp dried herbs = 1
Tbsp fresh herbs. (¼ tsp dried ginger = 1 tsp fresh grated ginger; 1 tsp onion
powder = 1 medium onion; 1/8 tsp dried garlic = 1 clove garlic).
Many herbs can be harvested through the entire growing season. Two-thirds
of the plant may be cut, leaving the rest to grow. Once plants are cut, regular
cuttings will prevent them from flowering.
Flowers, seeds, leaves and stems can all be used for seasoning. If flowers
are used in teas, dry them whole. Remove any tough or discolored parts.
Dried herbs have an excellent shelf life. If stored under normal storage
conditions, they will keep their potency for four years or more. Dark colored
containers are best for storage. Light fades color and weakens flavors.
Preparation:
•
•
•
•
•
•
•
•
•
•
•
•
•
•
Select herbs just before the plant blooms. Leaves should be fully
developed, yet tender.
Flowers should be harvested when they first open and are still very fresh.
Harvest on a sunny morning after the dew has evaporated.
Herbs require no pretreatment.
Wash leaves and stems lightly in cold water. Spread on absorbent towel
or shake off any visible moisture or pat dry.
Be sure to remove any brown spots and insect debris from the leaves.
Strip leaves from larger stems. Dry parsley and sage on the stems.
Entire pods or seeds of chili peppers can be dried.
Herbs can be placed on the drying trays within minutes of picking and
cleaning.
Use either mesh insert trays or fruit leather sheets.
Herbs will be brittle and crumble easily when dried. Some leaves will
darken in color but that does not affect flavor.
After drying leaves, they can be left whole, stripped from the stem,
ground in a coffee grinder or crushed. To crush rub between fingers, use
mortar and pestle or press through a fine screen.
Store in airtight containers in a cool, dark, dry place. If moisture appears
on the inside of the container, the herbs will need further drying.
Dried herbs can be difficult to distinguish from one another. Storage
containers should be labeled immediately following drying.
Suggested uses for dehydrated herbs:
Use in Italian, Mexican and Chinese dishes. Also
use in soups, stews, sauces, vegetables, salads,
cakes, cookies, meat dishes, fish dishes, egg
dishes and in seasoning mixes.
23
EXPANDABLE 528
D E H Y D R AT O R
Owner’s Manual User Guide
Herbs
NOTE: Dry herbs at 95°-100°. Use average times only as a general guideline.
Many variables can contribute to a large difference in drying times. Check
herbs periodically to ensure correct drying results.
Herb
Part of plant to dehydrate
Avg. Dry
Time (Hrs)
Basil
Leaves
1-3
Chili Peppers
Pods
5-12
Chives
Leaves (Chop)
2-3
Cilantro
Leaves
1-3
Cumin
Seeds
2-5
Dill
Leaves
13
Fennel
Leaves and seeds
1-3
Leaves
2-5 Seeds
Garlic
Cloves (Break bulbs into cloves. Remove outer peel of each
clove)
35
Ginger
Root and leaves
13
Mint
Leaves
13
Oregano
Leaves
13
Parsley
Leaves and stems
13
Rosemary
Leaves
13
Sage
Leaves and stems
13
Tarragon
Leaves
13
Thyme
Leaves
13
Herb Butter:
• ½ cup butter or margarine, softened
• 1 Tbsp lemon juice
• 1 Tbsp crushed dried herbs*
• Salt and pepper
* Suggested herbs include dill, oregano, basil and tarragon.
In small bowl cream butter or margarine. Slowly add lemon juice. Add herbs,
and salt and pepper to taste. Cover and refrigerate.
Seasoned Salt:
• 4 parts powdered dehydrated onions or garlic
• 1 part salt
Mix thoroughly. Store in shaker bottle.
24
Potpourri
Potpourri
Potpourri is a blend of flowers, herbs, essential oils, spices, and a fixative
material that allows your fragrance to last such as Fiberfix or Orris Root. Use
whole dried flower petals, heads, leaves, buds, herbs or spices. Try roses,
lilacs, lavender, violets or dried orange, lemon, lime, tangerine, and grapefruit
peels. Be careful that one scent does not overpower the main one.
• Remove petals and herbs from their stems.
• Dry in a single layer on mesh tray insert or fruit leather sheets.
• Dry until brittle, which may take from 2-10 hours.
• If using more than 4 trays, rotate once or twice during drying time.
• Store different flowers, herbs, etc. in different containers till ready to mix.
• Potpourris can be placed in cloth bags to make sachets.
Rose Potpourri
• ¾ cup dried rose petals
• ¼ cup dried mint leaves
• 2 Tbsp dried lavender flowers
• 2 Tbsp powdered dried orange peel
• 1 Tbsp dried bay leaf pieces
• 1 Tbsp dried stick cinnamon pieces
• 1 Tbsp orrisroot *
• 3 drops lavender oil
Combine all ingredients. Stir. Place in anairtight jar.
* A fixative commonly added to potpourris to hold
fragrances for long periods of time. Available at some
drug stores, herb shops, or perfumery supply
houses. Fiberfix is natural cellulose fiber chips
and is an alternative to Orris Root.
Lavender Sachet
• ½ cup dried lavender leaves and flowers
• ½ cup dried orange peel pieces
• Small cloth bags
Combine lavender and orange peel. Fill small cloth bags and stitch closed.
Place in drawers and closets or just sprinkle Lavender Sachet in bath water.
Dry Potpourri
• 1 Tbsp orrisroot
• 1 tsp sugar
• 1 Tbsp ground spices
• 1 tsp salt
• 2 Tbsp dried peels, leaves, or small pieces of fragrant wood
In a large bowl thoroughly mix all ingredients. Cover and allow to sit for 4 to 6
weeks, stirring gently every other day. When potpourri begins to lose its smell,
add a few drops of a scented oil to reactivate.
Herb Potpourri
• ½ cup dried lemon balm
• ½ cup dried spearmint
• ¼ cup dried thyme
• 1 cup dried rosemary
• ½ cup dried sage
• ½ cup dried summer savory
• 12 cardamon seeds, crushed
• ¼ cup dried lemon peel
• 2 Tbsp orrisroot
• 5 drops pure lemon extract
• 5 drops pure orange extract
Combine all ingredients in a crock and mix periodically. Put in an airtight
container or a decorative jar.
25
EXPANDABLE 528
D E H Y D R AT O R
Owner’s Manual User Guide
Recipes
RECIPES
Adapt your own recipes to include dried foods. You will generally need to
substitute about ½ to 2/3 cup dried for every 1 cup fresh food when converting.
Beverages........................................................... 27
Breakfast............................................................ 28
Jams................................................................... 29
Desserts........................................................ 30-32
Fruit Leather........................................................ 33
Soups/Sauces............................................... 36-37
Snacks................................................................ 38
Vegetables.......................................................... 39
26
Recipes - Beverages
Fruit Fizz
Beverages
• 1 cup water
• Ginger ale
• 1 cup fruit leather
• Sugar / Grenadine syrup (to taste)
• Ice cubes
Puree fruit leather with water. Let stand 15 minutes. Puree again. Fill tall glass
with ice cubes. Pour glass two-thirds full of puree. Add ginger ale to fill. Stir.
Sweeten to taste with grenadine syrup or sugar syrup.
Fruit Sipper
Reconstitute 1 part dried fruit with 2 parts water. Puree. Fill tall glass with ice
cubes. Pour glass half full of puree. Add ginger ale to fill. Stir. Sweeten to taste
with grenadine or sugar syrup.
Banana Smoothie
• ½ cup dried banana chips
• ¼ tsp vanilla
• 8 oz. yogurt
• Honey (to taste)
• 8 oz. milk
• 1-2 cups coarsely crushed ice
• ½ tsp cinnamon (optional)
Place banana chips, yogurt, milk, cinnamon and vanilla in blender. Whip until
smooth. Add honey to taste, and blend again. Add ice and whip until ice is
finely crushed and beverage is thinned to desired consistency. Makes about
3 cups.
Substitution:
Any dried fruit may be used instead of bananas.
27
EXPANDABLE 528
D E H Y D R AT O R
Owner’s Manual User Guide
Recipes - Breakfast
Breakfast
Banana Bread
• 1 ½ tsp baking powder
• 1 cup pulverized dried bananas
• ½ tsp baking soda
• 1 ½ cups milk (for rehydrating)
• ¼ tsp salt
• ½ cup margarine
• ½ cup nuts (chopped)
• 1 cup sugar
• 2 eggs
• 2 cups flour (can use 1 cup whole wheat and 1 cup white or all whole wheat flour)
Combine pulverized bananas and milk. Let sit 10 minutes. Cream margarine
and sugar. Add eggs and beat. Sift dry ingredients. Alternately add portions of
the reconstituted bananas and flour mixture. Beating after each addition. Stir
in nuts. Pour into well-greased loaf pan(s). Let batter sit in pans 10 minutes
before baking. Bake 50-60 minutes at 350° F or until toothpick inserted in the
center comes out clean. Cool before removing from pan. Makes 1-2 loaves
(depending on size of pan).
Blueberry Pancakes
• 1 cup dried blueberries
• 1 tsp salt
• 1 cup grape juice
• 2 cups milk
• 2 cups flour
• ½ cup oil
• 3 tsp baking powder
Soak blueberries in grape juice for at least 1 hour. Overnight soaking is best.
In a small bowl sift together flour, baking powder, and salt. In another bowl mix
egg, milk, and oil. Add to flour mixture, stirring lightly. Do not over mix. Batter
will be lumpy. Drain blueberries and add to batter. Put in greased muffin pan.
Bake in 400° F oven 25 minutes or until golden brown. Makes 12 muffins.
28
Recipes - Jams
Apricot Jam
Jams
•
1 ½ cups coarsely diced dried
• 1 tsp grated lemon peel or ½ tsp
apricots
powdered dried lemon peel
• 1 cup water
• ½ cup chopped walnuts or pecans
• ¾ cup honey
(optional)
In a small saucepan combine apricots and water. Bring to a boil. Remove from
heat, cover, and let stand 30 minutes. Add honey and powdered dried lemon
peel or dried lemon peel. Bring to a second boil. Boil gently, uncovered, over
medium heat for 10 minutes or until jam is desired consistency. Stir in nuts.
Pour into sterile jars and seal. Cool. Makes 2 cups.
Fresh Peach Jam (An alternate drying procedure)
• 7 cups peeled and sliced fresh peaches
• 4 Tbsp lemon juice
• ½ - 1 cup honey
Puree peaches and lemon juice in blender. Add honey to taste. Spread mixture
3/8” thick on leather sheets. Place in dehydrator and dry 3 to 3 ½ hours. Stir and
re-spread jam about once each hour. When mixture is consistency of jam, pour
into a glass jar and refrigerate or freeze (allow room for expansion). Makes 1
cup.
Substitution: Almost any fruit or berry can be substituted for peaches.
29
EXPANDABLE 528
D E H Y D R AT O R
Owner’s Manual User Guide
Recipes - Desserts
Spicy Carrot Cookies
Desserts
• 1 cup dried grated carrots
• 1 tsp salt
• ½ cup hot water
• ½ tsp baking soda
• ¾ cup butter or margarine
• ½ tsp cinnamon
• 1 egg
• ¼ tsp nutmeg
• 2 Tbsp water
• 6 oz. chocolate chips (optional)
• 1 tsp vanilla
Combine dried grated carrots and ½ cup hot water. Let sit 30 minutes, stirring
twice. Beat together butter or margarine, brown sugar, egg, 2 Tbsp water, and
vanilla until creamy. Stir together flour, salt, baking soda, cinnamon, and nutmeg.
Add to creamed mixture. Fold in carrots. Drop by teaspoonfuls onto slightly
greased baking sheets. Bake in 350° F oven for 15-18 minutes or until lightly
browned. Makes 4 dozen.
Barb’s Carrot Cake - Recipe by Barb Lockert
• 2 ½ tsp cinnamon
• 1 ½ cups oil*
• Dash nutmeg
• 3 eggs
• 1 cup dehydrated carrots, rehydrated
• 1 ½ cups sugar
• 1 cup walnuts, chopped
• 2 cups whole wheat flour
• 1 cup (14 oz.) drained, crushed
• 2 tsp baking soda
pineapple*
• ½ tsp sea salt
Rehydrate 1 cup dehydrated carrots in 1 cup warm water for 30 minutes. Do
not drain. Preheat oven to 350° F.
In a BOSCH bowl with batter whisks or cookie paddles, beat oil, eggs and sugar.
Add remaining ingredients. Mix together. Pour into greased and floured 10”
tube pan, bundt pan, or a 10” springform pan. Bake 1 hour. Cake tester should
come out clean before removing from oven. Cool 5 to 10 minutes in pan. Invert
pan to remove cake. Cool completely
Cream Cheese Icing
on a cooling rack. Frost with cream
•
2 - 8 oz. packages cream cheese softened
cheese icing.
•
1 cup powdered sugar
*Oil may be replaced with ¾ cup oil • 1 tsp vanilla
Cream ingredients. Frost cooled cake. Sprinkle
and ¾ cup applesauce.
with ¾ cup shredded coconut.
*Drained pineapple juice may be
reserved for icing or as part of the oil measurement.
30
Recipes - Desserts
Apple Pie
Desserts
• 5 cups dried sliced apples
• ½ tsp cinnamon
• 3 cups boiling water
• Dash nutmeg
• ½ cup sugar
• Pastry for 9-inch 2-crust pie
• 2 Tbsp cornstarch
• Sugar and cinnamon
Combine apples and boiling water. Let stand 15 minutes. Drain liquid into
saucepan. Stir together sugar and cornstarch. Add to liquid. Add cinnamon
and nutmeg. Cook over medium heat, stirring constantly, until mixture boils.
Add apples. Pour into pastry lined pie plate. Top with remaining pastry. Seal
edges. Bake in 425° F oven 45 minutes or until apples are tender. Makes one
9” pie.
Variations:
Apple Cobbler:
Prepare pie filling. Add ½ cup dark raisins, optional. Pour into baking dish. (To
prevent bubbling over, baking dish should be at least one inch deeper than
filling). Combine 2/3 cup granola, 2 Tbsp brown sugar and 2 Tbsp soft butter.
Sprinkle over filling. Bake in 350° F for 45 minutes or until apples are tender.
Apple Turnovers:
Thaw 6 frozen pastry shells. Prepare ½ recipe pie filling. Roll out pasty shells,
one at a time, on lightly floured board, to about a 7-inch square. Spoon filling
into center of each. Brush edges with lightly beaten egg. Fold over one half of
the square to form a triangle. Seal edges with fork. Brush tops with beaten egg.
Sprinkle with sugar. Cut 2 air vents in each. Transfer to ungreased baking sheet
with spatula. Bake in 435° F for 20 minutes or until browned. Makes 6.
Nectarine Angel Cake
• 1 angel food cake
• 2 Tbsp apricot nectar or orange juice
• 2 cups dried nectarine slices • 1 cup whipping cream
• 2 cups water or fruit juice
• 1 tsp vanilla
• 1 tsp cinnamon
• 1 tsp sugar
• ¼ cup sugar
In saucepan soak dried nectarine slices in water or fruit juice for 1 hour. Add
cinnamon and bring to a boil. Cook until most of the liquid has been absorbed,
approximately 10 minutes. Stir often. Place fruit in blender and puree. Add
¼ cup sugar and apricot nectar or orange juice. Mix well. Chill. In small bowl
whip whipping cream until soft peaks form. Flavor with vanilla and 1 tsp sugar.
Gently fold chilled nectarine puree into whipped cream. Slice angel food cake
into 2-3 horizontal layers. Spread filling between each layer and chill before
serving.
31
EXPANDABLE 528
D E H Y D R AT O R
Owner’s Manual User Guide
Recipes - Desserts
Desserts
Apple-Raisin Cookies
1 cup coarsely chopped dried • 1 tsp vanilla
• 1 cup unsifted all-purpose or
apples
unbleached white flour
• 2 Tbsp hot water
• 1 tsp salt
• ¾ cup butter
• ½ tsp baking soda
• 1 cup firmly packed light
• 3 cups granola
brown sugar
• 2/3 cup raisins
• 1 egg
• 2 Tbsp water
Preheat oven to 350° F. Combine dried apples and hot water. Set aside. Beat
butter, brown sugar, egg, 2 Tbsp water and vanilla together until creamy. Stir
together flour, salt and baking soda. Add to creamy mixture. Blend well. Stir
in apples (undrained), granola and raisins. Drop by teaspoonfuls onto greased
baking sheets. Bake 15-18 minutes until lightly browned. Makes 5 dozen.
Variations:
Pineapple-Coconut Cookies:
Substitute 1 cup coarsely chopped dried pineapple for dried apples. Decrease
granola to 2 cups. Add 1 cup flaked coconut. Omit raisins.
Banana-Nut Cookies:
Substitute 1 cup chopped dried bananas for dried apples. Increase flour to
1½ cups. Omit raisins and granola. Add 1 cup uncooked oatmeal and 1 cup
chopped nuts.
•
32
Recipes - Fruit Leather
Fruit Leather
Crunchy Cantaloupe Leather
• 1 cup diced cantaloupe (about 1/3 small melon)
• 3 Tbsp slivered almonds
• 1/3 cup applesauce
• Dash cinnamon
• 2 Tbsp flaked coconut
Puree diced cantaloupe. Combine with applesauce, flaked coconut, slivered
almonds and a dash of cinnamon. Pour onto two fruit leather sheets. Place on
two separate dehydrating trays, placing on alternate sides of the dehydrator.
Cherry-Rhubarb Leather
• 1 can (21 oz.) cherry pie filling
• 1 cup raw diced rhubarb
Combine cherry pie filling and rhubarb in saucepan. Simmer about 10 minutes
until rhubarb is tender. Cool. Puree mixture. Pour onto fruit leather sheets. Fills
five sheets. Place on separate dehydrating trays, placing on alternate sides of
the dehydrator.
33
EXPANDABLE 528
D E H Y D R AT O R
Owner’s Manual User Guide
Recipes - Soups/Sauces
Vegetable Soup
Soups/Sauces
• 3 Tbsp dried green peas
• ½ cup dried sliced potatoes
• 1 heaping Tbsp dried Okra, optional
• ¼ cup dried green beans
• 1 Tbsp dried parsley
• ¼ cup dried sliced carrots
• ½ tsp dried thyme
• 2 Tbsp dried chopped onion
• ½ tsp salt
• 4 cups water
• ¼ tsp pepper
• 5 dried tomato slices
Combine potatoes, green beans, carrots and onion with water in heavy pot.
Bring to a boil. Remove from heat. Cover and let stand 3 hours or overnight.
Simmer 30 minutes. Add remaining vegetables and additional water if needed.
Continue to cook until vegetables are tender, about 30 minutes. Add seasonings.
Simmer 10 minutes longer. Makes 5 cups.
Variations:
Minestrone:
Substitute ½ cup dried kidney beans, navy beans or chickpeas for potatoes.
Increase tomato slices to 10 and add ¼ cup dried sliced zucchini. Add ¼ cup
of shredded cabbage and ½ cup dried spinach. Add ½ tsp dried oregano to
remaining seasonings. Increase final cooking to 20 minutes or until vegetables
are tender. Season to taste with additional salt, pepper and ½ tsp worcestershire
sauce. Makes about 7 cups.
Beef or Chicken Stew:
Prepare Vegetable Soup as directed, adding 2 cups cubed dried beef or
chicken to vegetables before soaking. Increase dried potatoes to 1½ cups. To
thicken, stir together 2 Tbsp flour and ½ cup cold water. Pour into stew, stirring
constantly, until thickened. Cover. Simmer 5 minutes. Makes about 7 cups.
34
Recipes - Soups/Sauces
Soups/Sauces
Spaghetti Sauce
• ¾ cup dried mushroom pieces
• 3 cloves fresh garlic
• 1 tsp salt
• 2 Tbsp olive oil
• ½ - 1 tsp pepper
• 1 tsp dried oregano
• ½ tsp sugar
• ½ - 1 tsp dried basil
• 1 can (18 oz.) tomato paste
• 1 lb. hamburger
• 4½ cups water
• 2 Tbsp dried bell pepper
• 2 stalks fresh celery, chopped
• 3 Tbsp dried onion
• Parmesan cheese
• 1 dried bay leaf
• Cooked spaghetti noodles
• 1 cup dried tomato slices
Chop garlic and place in skillet with olive oil, dried oregano, and dried basil.
Fry lightly. Add hamburger and cook until browned. Remove from heat. Add
dried bell pepper, onion, bay leaf, tomato slices, mushroom pieces, plus salt,
pepper and sugar. Stir in tomato paste and water. Let sit 2 to 3 hours. Cook
over medium heat until vegetables are tender, approximately 20-30 minutes.
Add chopped celery 10 minutes before serving. Serve over noodles and top
with Parmesan cheese. Serves 4-6.
Sweet and Sour Sauce
• ¼ cup vinegar
• ¼ cup dried pineapple pieces
• ¼ tsp dried ginger
• ¾ cup water
• 2 Tbsp sugar
• 3 Tbsp cooking oil
• 1 tsp cornstarch
• 1 Tbsp soy sauce
Combine the first seven ingredients in a small saucepan. Cook until pineapple
softens. Place in blender and puree. Add cornstarch, and blend again. Return
to pan and cook over medium heat until mixture thickens.
35
EXPANDABLE 528
D E H Y D R AT O R
Owner’s Manual User Guide
Recipes - Snacks
Trail Mix:
Snacks
Combine bite-sized pieces of dried fruits, such as apple, pear, pineapple, or
grapes with flaked coconut and unsalted nuts. Great for hiking!
Dusted Pineapple:
Sprinkle dried pineapple pieces with confectioner’s sugar.
Apple Treats:
• Pkg of Jello (any flavor)
• Lemon Juice
Slice apples in uniform thickness. Dip slices in lemon juice and then dip in jello
powder. Make sure both sides are coated. Dehydrate until desired consistency.
Sweet Potato Chips:
• Sweet Potatoes
• Sea Salt
• 1 Tbsp olive oil
Use mandolin slicer to cut sweet potatoes into very thin, uniform slices. Put in a
bowl. Drizzle olive oil over sweet potatoes and sprinkle with sea salt. By hand
mix potatoes, oil and salt so slices are evenly coated. Place slices on trays and
dehydrate until desired consistency.
Variation:
“Sweet” Sweet Potato Chips:
Slice sweet potatoes (as described above). Put in bowl and drizzle with olive
oil. Then sprinkle with cinnamon and brown sugar to coat slices. Place on
trays and dehydrate.
36
Recipes - Vegetables
Cous Cous Creation:
Vegetables
*Suggested vegetables: beans, peas, carrots, parsnips, broccoli, brussels
sprouts, cauliflower, or combinations of above.
Combine dried vegetables with boiling water. Cover. Let stand 1 to 2 hours.
(If desired, use cold water and reconstitute overnight in refrigerator). Simmer
until tender, add more liquid if necessary. Drain liquid from vegetables. Pour
into a measuring cup. Add enough milk or liquid to equal 1 cup. Melt butter
in separate saucepan. Add flour. Stir until bubbly and smooth. Remove from
heat. Stir in 1 cup milk/water (from reconstitution). Add bay leaf. Cook, stirring
constantly, until thickened. Add drained vegetables and simmer 5 minutes.
Remove bay leaf. Season with salt and pepper. Makes 6 servings.
Variation:
Au Gratin Vegetables:
Prepare creamed vegetables, omitting bay leaf. Add ¾ cup grated cheddar
cheese and ¼ tsp dry mustard. Pour into greased 2-quart baking dish. Combine
½ cup dry bread crumbs and 3 Tbsp melted butter. Sprinkle over vegetables.
Bake in 350° F for 30-35 minutes until browned.
Scalloped Potatoes:
• 2 cups dried potato slices or diced potatoes
• ¼ cup dried onion (can use fresh chopped)
• 1 13 oz. can evaporated milk
• 1 8 oz. sour cream
• 1 10 ¾ oz. can cream of chicken soup
• 1 ½ cups grated cheddar or jack cheese (less may be used)
• ¼ cup melted butter (optional)
• Milk (optional)
Soak dried potatoes and onions in evaporated milk for 1 hour. Drain potatoes,
reserving any evaporated milk. Mix potatoes, 1 cup cheese, sour cream, soup
and evaporated milk. If mixture is too thick add a little bit of regular milk. Put
ingredients in greased 9x13 pan or casserole dish. Top with ¼ cup melted
butter and cheese. Cover with aluminum foil and bake at 350° F for 30 minutes
or until cheese has melted and potato mixture is thoroughly cooked. Foil may
be removed last 5 minutes so the top browns.
37
EXPANDABLE 528
D E H Y D R AT O R
Owner’s Manual User Guide
Accessories
ACCESSORIES
Fruit Leather Sheets
L’EQUIP Fruit Leather Sheets fit perfectly in the
drying trays and prevent spilling. Remember,
use only one sheet per tray, alternating sides of
the tray. 10 per pkg.
Must be hand washed.
Extra Trays
Available in packs of two regular trays with two
mesh tray inserts.
We recommend hand washing.
Mesh Tray Inserts
Used for herbs and smaller diced fruits and
vegetables. Prevents them from falling through
the trays. Allows sticky foods to be removed
easily keeping trays cleaner. 2 per pkg.
We recommend hand washing.
All accessories available from your local L’EQUIP dealer.
38
Warranty
WARRANTY
L’CHEF L.L.C., dba L‘EQUIP warrants the L’EQUIP Expandable 528
Dehydrator, to the original purchaser, to be free of manufacturing defects in
materials and workmanship for a period of 10 years. Defective product will
be repaired or replaced with a comparable model at our sole discretion, upon
receiving the defective product.
This warranty applies only to the original noncommercial purchaser. Since an
unauthorized dealer is an original purchaser, the warranty does not apply to
consumers purchasing from unauthorized dealers. It also does not apply to
damage resulting from accident, misuse, shipping, normal wear, commercial
use, neglect, incidental or consequential damages, or from damage caused
by any foreign objects getting into the appliance.
Implied warranties of merchantability and fitness for a particular purpose
and all other warranties express or implied, other than the limited warranty
described on this page, are excluded. The only remedy for damage covered
by the limited warranty is repair or replacement. L’EQUIP will not refund the
purchase price or provide any other remedy.
This warranty applies to products purchased and operated in the U.S.A. and
Canada, only. Transportation, handling, and/or shipping costs are not included
in this warranty.
Read the instructions before attempting to use the product.
This product contains no user serviceable parts. Any attempt to repair it will
void the warranty. If you have a problem with your Expandable Dehydrator
and to obtain performance of this warranty, return it securely packed, along
with a dated proof of purchase:
L’EQUIP Attn: Service Dept.
3505 West California Ave. Suite #100
Salt Lake City, UT 84104
For your convenience, there is a (Request Warranty Service Form) located at
www.lequip.com under the warranty tab. For more information email customer
service at [email protected] or call 1.877.267.2434.
To insure prompt service, include a statement with the product, giving specific
reasons for the return, along with your information.
KEEP DATED SALES RECEIPT FOR WARRANTY SERVICE
39
528 Dehydrator
Owner’s Manual User Guide
188 N Bluff St, St George, UT 84770
© 2012 All Rights Reserved
V 2.11
www.lequip.com