1
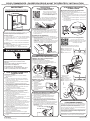
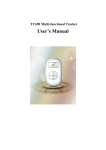
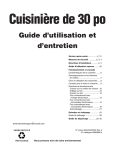
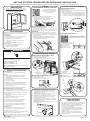
GETTING
STARTED
GETTING STARTED: REVIEW
BEFORE
BEGINNING INSTALLATION
SAVE
THESE
INSTRUCTIONS!
more
details
andadditional
additionalimportant
important information,
information, see
refrigerator.
SAVE
THESE
ANDAND
ALLALL
INSTRUCTIONS!
ForFor
more
details
and
see the
the other
otherinstructions
instructionsprovided
providedinside
insideyour
your
refrigerator.
TOOLS REQUIRED
IMPORTANT
If doorsonneed
to beofremoved
installation,
Depending
the width
the doorduring
opening,
the following tools
may remove/replace
be required to remove,
replace,
doors at
90º toand
the align
unit. the
Seerefrigerator
the
doors.
“Remove and Replace Doors” section for further
instructions and for troubleshooting.
Tools Needed:
ICE&MAKER
ON/OFF
SWITCH
DOOR
DRAWER
ALIGNMENT
LEVELING AND
DOOR ALIGNMENT
LEVELING
(AFTER
MOVINGTO
TO FINAL
FINAL LOCATION)
(AFTER
MOVING
LOCATION)
To view an animated video about
the leveling and door alignment
To
view anscan
animated
videoatabout
the
process,
the code
left with
leveling andyour
doormobile
alignment
process, scan
device.
the code at left with your mobile device.
� #2 Phillips screwdriver – Top hinge cover screws
Align Refrigerator
Models
with Ice StorageDoors
Bin on Door
✔If doors are uneven.
Keepthe
both
refrigerator
doorsdoor.
closed. Open the drawer
left-hand
refrigerator
❏❑❑Open
directly
under
the doors.
Open
the
ice
storage
bin
door.
❏
❑❑ Insert 1/8" hex key (D) wrench into the bottom hinge pin
the ice maker switch on left wall of bin area.
❏ Locate
(A) located
at the bottom of the right-hand refrigerator door.
❑❑ Turn key to the right (B) to raise the refrigerator door.
� ³⁄₁₆" Hex key wrench – Top hinge screws
� #2 Square bit – Center hinge screws
✔To
ToSteady
SteadyororAdjust
Adjust
refrigerator,
thethe
tilttilt
of of
thethe
refrigerator,
you must first
✔
� ¹⁄₄" Hex nut or socket driver – Drawer screws and brake feet
❑❑ Grasp the base grille firmly and pull it toward
� ³⁄₈" Socket – Brake feet bracket screws
❑❑ Turn key to the left (C) to lower the refrigerator door.
thefirst
base
grille. the base grille.
remove
you must
remove
Grasp
the baseOpen
grille the
firmly
and pull
it toward you to
❏you
to remove.
freezer
drawer.
remove. Open the freezer drawer.
Tools Provided:
� ¹⁄₈" Hex key – Handle setscrews and door alignment screw
90°
Steady the Refrigerator
a ¹⁄₄" hex nut driver to turn both brake feet clockwise
❏ Use Tilt
Adjust
same amount
until
snug
against
the open.
floor.
✔If thethe
refrigerator
doors
dothey
not are
close
easily
or pop
❑❑ Use a ¼" hex nut or socket driver to turn both brake
Adjust
Tilt
feet clockwise
the same amount. This will raise the front
of the refrigerator.
the refrigerator doors do not close easily, or pop open.
✔ IfNOTE:
Having someone push against the top of
the
refrigerator
the both
brakebrake
feet,feet
Use
a
¹⁄₄" hextakes
nut orsome
socketweight
driver off
to turn
❏
clockwise
the same
amount.
This will raise the front of the
making
it easier
to turn
the feet.
refrigerator.
NOTE: Having someone push against the top of the
refrigerator takes some weight off the brake feet, making it
¹⁄₄"
easier to turn the feet.
¹⁄₄"
✔Electrical Power
Plug refrigerator into a grounded 3 prong outlet
Electrical Shock Hazard
Doors seal completely
Plug into
a grounded
3 prong
outlet.
Refrigerator
is level
(Remove
base grille and adjust leveling
feet so they are snug against the floor)
Do not remove ground prong.
Doors are even across the top (Use door alignment feature
Do not
use an adapter.
if necessary)
Do not use an extension cord.
Base grille is properly attached to the refrigerator
Failure to follow these instructions can result in death,
fire, or electrical shock.
✔Ice and Water System (on some models)
Connect refrigerator to a cold water supply with adequate
water pressure, as specified in the instructions
INSTALLATION CHECKLIST
Make sure
the household water supply is connected and
✔Electrical
Power
turned on
❑❑ Plug refrigerator into a grounded 3 prong outlet.
Check that the water supply line behind refrigerator is not
✔Doors
kinked
❑❑ If doors need to be removed during installation,
supply
tubing
only asinspecified in
seeUse
therecommended
“Remove andwater
Replace
Doors”
section
the instructions
the instructions.
Install
water
filter according
toand
the instructions
❑❑ Check
that
handles
are secure
installed according
to the
instructions.
Flush
water system according to instructions
❑❑ Doors seal completely.
Check for water leaks at all connections
❑❑ Refrigerator is level (Remove base grille and adjust
Turn on
icesomaker
if refrigerator
is connected
leveling
feet
they are
snug against
the floor).to water
supply (If not connected to water supply, turn off ice maker)
❑❑ Doors are even across the top (Use door alignment
feature if necessary).
Checks
❑✔Final
❑ Base grille
is properly attached to the refrigerator.
to instructions.
A
Models
with Ice Storage Bin on Door
Align Refrigerator Doors
❑❑ Open the left-hand refrigerator door.
❑❑ Open the ice storage bin door.
✔ If doors are uneven.
❑❑ Locate the ice maker switch on left wall of bin area.
❏ Keep both refrigerator doors closed. Open the drawer
directly under the doors.
❏ Insert ¹⁄₈" hex key wrench into the bottom hinge pin located
at the bottom of the right-hand refrigerator door.
� Turn key to the right to raise the refrigerator door.
� Turn key to the left to lower the refrigerator door.
AIR FILTER INSTALLATION
A
A. Ice storage bin
release latch
❏ Install the air filter behind the vented door on the rear wall of
A
refrigerator
compartment.
❑❑the
Adjust
drawers
Raise
side-to-side
the bubble on the back of the indicator to activate.
❏ Pop
Step
1: indicator
Press and
C beneath the air filter (on some
Place
in hold
notches
❏
B
Models with Ice Storage Bin in Freezer
Lower
❑❑ Open the freezer drawer.
❑❑ Locate the wire shutoff
arm. hinge pin
A. Bottom
❑❑ Arm lowered – ON,B.
Arm
– OFF
¹⁄₈" raised
Hex key
wrench
WATER FILTER INSTALLATION
the refrigerator ceiling. Push upward on compartment door to
open.
❏ Align the arrow on the water filter label with the cutout notch in
the filter housing and insert filter.
❑❑ Check that the water supply line behind refrigerator
NOTE: If the filter is not installed correctly, water will not be
notch in the filter housing and insert filter.
dispensed.
as specified in the instructions.
❑❑ Install water filter according to the instructions.
❑❑ Flush water system according to instructions.
❑❑ Check for water leaks at all connections.
❑❑ Turn on ice maker if refrigerator is connected to
water supply (If not connected to water supply,
turn off ice maker).
✔Final Checks
❑❑ Install air filter and Produce Preserver according
to instructions in corresponding packaging.
❑❑ Remove all shipping material.
❑W10325092C
❑ Set temperature controls to the recommended setting.
© 2013. All rights reserved.
❑❑ Save instructions and other literature.
❑❑ Send in Registration Card or register your product online.
W10772354A
© 2015. All rights reserved.
models)
visible
Step
2: LiftorDinoff
E area (models without notches).
Step 3: Reposition D on E
D
A
❏ Locate the water filter compartment in the right-hand side of
❏ Once the filter is inserted, turn the filter clockwise 90° (1⁄4 turn),
is not kinked.
A
B
IRRITANT
ATTENTION
ICE MAKERA.ON/OFF
Brake foot SWITCH
Remove
all System
shipping (on
material
✔Ice and
Water
some models)
❑❑ Connect
refrigerator
to
a cold
water
supply withsetting
Set temperature controls
to the
recommended
adequate water pressure, as specified in the instructions.
Save instructions and other literature
❑❑ Make sure the household water supply is connected
andSend
turned
on.
in Registration
Card or register your product online
❑❑ Use recommended water supply tubing only
✔If refrigerated drawers are uneven.
❑❑ Adjust drawers up/down
Step 1: Loosen screw A
Step 2: Turn screw B
to raise/lower drawer
PRODUCE PRESERVER INSTALLATION
Step 3: Tighten screw A
(on some models)
IRRITANT
Check that handles are secure and installed according to
the instructions.
To view an animated video about the
drawer alignment process, scan the
code at the left with your mobile device.
CAUTION
If doors need to be removed during installation, see the
“Remove and Replace Doors” section in the instructions.
❏ Open the freezer drawer.
Align Refrigerator Drawers
❏ Locate the wire shutoff arm.
❏ Arm lowered – ON, Arm up – OFF
✔ Install Produce Preserver(s) and status indicator(s) according
A. Brake foot
A
Models with Ice Storage Bin in Freezer
ers.
Lisez des prudences sur le rev
WARNING
A. Ice storage bin releaseD latch
Read cautions on back.
✔Doors
C
✔If
the refrigerator
seems unsteady or rolls when the door(s) Steady
the Refrigerator
or drawer(s) are pulled open.
1
❑✔
❑ If
Use
/4" hex nutseems
driverunsteady
to turn both
brake
feet
thearefrigerator
or rolls
when
theclockwise
door(s) or
drawer(s)
pulleduntil
open.
the same are
amount
they are snug against the floor.
REPLACE
TOOLS REQUIRED
Depending on the width of the door opening, the following
Electrical
Shock
Hazard
tools may be required
to remove,
replace,
and align the
refrigerator
doors.
Plug into
a grounded 3 prong outlet.
Tools Needed:
Do not remove ground prong.
❑❑ #2 Phillips screwdriver – Top hinge cover screws
Do not use an adapter.
❑❑ 3/16" Hex key wrench – Top hinge screws
DoSquare
not usebit
an– extension
cord.
❑❑ #2
Center hinge
screws
1
❑❑ Failure
/4" Hexto
nut
or socket
– Drawer
screws
follow
thesedriver
instructions
can
result in death,
and
feet shock.
fire,brake
or electrical
❑❑ 3/8" Socket – Brake feet bracket screws
Tools Provided:
INSTALLATION
CHECKLIST
❑❑ 3/32" Hex
key or 1/8" hex key (depending
on model) - Handle setscrews
❑❑ 1/8" Hex key - Door alignment
A
B
MONTHS
WARNING
A
until it locks into the housing. Lift filter into compartment and
close door.
WATER FILTER INSTALLATION
❑❑ Flush
Locate
water
filter to
compartment
thewater
right-line and to
thethe
water
system
clear air frominthe
❏
handthe
side
of the refrigerator
ceiling.
on
keep
dispenser
from dripping
and/orPush
avoidupward
decreased
dispenser
flow. door to open.
compartment
❑❑ Align the arrow on the water filter label with the cutout
❑❑ Once the filter is inserted, turn the filter clockwise 90°
(¼ turn), until it locks into the housing. Lift filter into
compartment and close door.
❑❑ Flush the water system to clear air from the water line
and to keep the dispenser from dripping and/or avoid
decreased dispenser flow.
NOTE: If the filter is not installed correctly, water will
not be dispensed.
D
B
E
C
D
E
A. Status indicator window
B. Air filter status indicator
C. Notches
D. Air filter
C
ENERGY AND NORMAL OPERATING SOUNDS
Your new French Door Bottom Mount refrigerator has been
designed to optimize energy efficiency, and better regulate
temperatures to match cooling demand.
ENERGY AND NORMAL
OPERATING SOUNDS
You may notice that it operates differently from your previously
owned refrigerator.
Your new French Door Bottom Mount refrigerator has
designed
optimize energy
efficiency
andforbetter
It isbeen
normal
for the to
high-efficiency
compressor
to run
regulate
temperatures
matchspeeds
coolingindemand.
extended
periods
of time attovarying
order to consume
only the energy necessary for optimum efficiency.
You may notice that it operates differently from your
previously owned refrigerator.
In addition, during various stages of the cooling cycle, you may
hear
operating
sounds that are compressor
unfamiliar to to
you.
It isnormal
normal
for the high-efficiency
run for extended periods of time at varying speeds
in order to consume only the energy necessary for
optimum efficiency.
5/13
In addition, during various stages of the cooling
Printed in U.S.A.
cycle, you may hear normal operating sounds that
are unfamiliar to you.
02/15
Printed in U.S.A.
POUR COMMENCER : PASSER EN
REVUESTARTED
AVANT DE DÉBUTER L’INSTALLATION
GETTING
CONSERVER TOUTES LES INSTRUCTIONS! Pour plus de détails ainsi que des informations supplémentaires importantes, se rapporter aux autres instructions fournies à l’intérieur du réfrigérateur.
SAVE THESE AND ALL INSTRUCTIONS! For more details and additional important information, see the other instructions provided inside your refrigerator.
IMPORTANT
TOOLS REQUIRED
Si les portes doivent être retirées lors de l’installation,
retirer/replacer
portes
90º par
rapport
l’appareil.tools
Depending
on the les
width
of theà door
opening,
theà following
Se be
reporter
à latosection
replacer
lesrefrigerator
portes »
may
required
remove,« Retirer et
replace, and
align the
doors.
pour de plus amples informations et aux fins de
ALIGNEMENT DES PORTES
ICE ET
MAKER
ON/OFF
SWITCH
DES
TIROIRS
MISE À NIVEAU
LEVELING
AND
DOOR ALIGNMENT
(SUITE AU
DÉPLACEMENT
À
(AFTER MOVING TO FINAL LOCATION)
L’EMPLACEMENT FINAL)
Models
with Ice des
Storage
Bin on
Alignement
portes
duDoor
réfrigérateur
Pour voir un film interactif sur le
processus
de mise
à niveau
To view
an animated
video
aboutet
the
d’alignement
portes,process,
il suffit scan
de
leveling
and door des
alignment
scanner
le
code
situé
à
gauche
avec
the code at left with your mobile device.
votre téléphone mobile.
dépannage.
Tools Needed:
� #2 Phillips screwdriver – Top hinge cover screws
les the
portes
ne sont
pas biendoor.
alignées.
Open
left-hand
refrigerator
❏✔Si
❑❑ Garder les portes du réfrigérateur fermées. Ouvrir le tiroir
the ice storage
binportes.
door.
❏ Open
directement
sous les
1
theune
iceclé
maker
switch
on left wall
Insérer
à tête
hexagonale
(D)ofdebin
/8area.
" dans l’axe de
❏❑❑Locate
charnière inférieure (A) situé au bas de la porte de droite
du réfrigérateur.
❑❑ Pour soulever la porte du réfrigérateur, tourner la clé
vers la droite (B).
❑❑ Pour abaisser la porte du réfrigérateur, tourner la clé
vers la gauche (C).
� ³⁄₁₆" Hex key wrench – Top hinge screws
� #2 Square bit – Center hinge screws
✔To
P
our
stabiliser
ou régler
du réfrigérateur,
il
Steady
or Adjust
the tilt l’inclinaison
of the refrigerator,
you must first
✔
� ¹⁄₄" Hex nut or socket driver – Drawer screws and brake feet
❑❑ Saisir la grille de la base fermement et la tirer vers soi
� ³⁄₈" Socket – Brake feet bracket screws
remove
the basede
grille.
est nécessaire
retirer au préalable la grille de la base.
Grasp
the base
grillelefirmly
pull it toward you to
❏pour
la retirer.
Ouvrir
tiroirand
du congélateur.
remove. Open the freezer drawer.
Tools Provided:
90°
� ¹⁄₈" Hex key – Handle setscrews and door alignment screw
Ajustement de l’inclinaison
✔
Si les portes
Adjust
Tilt du réfrigérateur se ferment difficilement ou
s’ouvrent toutes seules
❑✔
❑ IfUtiliser
un tourne-écrou
poureasily,
tourner
les deux
the refrigerator
doors dode
not¼»
close
or pop
open.pieds
de stabilisation du même nombre de tours dans le sens
Use aCela
¹⁄₄" hex
nut orl’avant
socket du
driver
to turn both brake feet
❏
horaire.
soulève
réfrigérateur.
clockwise the same amount. This will raise the front of the
REMARQUE :
refrigerator. Si quelqu’un exerce une pression contre le
sommet du réfrigérateur, le poids appliqué aux pieds de
NOTE: Having
someone
push
against
thepivotement.
top of the
stabilisation
est allégé,
ce qui
facilite
leur
refrigerator takes some weight off the brake feet, making it
easier to turn the feet.
¹⁄₄"
AVERTISSEMENT
Plug refrigerator into a grounded 3 prong outlet
Risque
de choc électrique
Doors seal
completely
A. Pied de stabilisation
Étape 1 : Desserrer la vis A
PRODUCE
PRESERVER
INSTALLATION
Étape 2 :
Tourner la vis
B
(on
some
models)
pour soulever/abaisser le
tiroir
✔ Install Produce Preserver(s) and status indicator(s) according
Étape
3 : Serrer la vis A
to instructions.
A
IRRITANT
ATTENTION
Modèles avec bac d’entreposage à
uneven.
glaçons
sur
la porte
✔ If doors are
❑❑ Ouvrir la porte gauche du réfrigérateur.
Keeplaboth
refrigerator
doors closed. Open
the drawer
❑❑ ❏
Ouvrir
porte
du bac d’entreposage
à glaçons.
directly under the doors.
❑❑ Repérer le commutateur de la machine à glaçons sur
Ne pas
enlever
la across
broche
à laalignment
terre. feature
Doors
are even
thede
topliaison
(Use door
at the bottom of the right-hand refrigerator door.
Base
grille isun
properly
to the refrigerator
Ne pas
utiliser
câbleattached
de rallonge.
Pour voir un film interactif sur le
processus d’alignement du tiroir, il suffit
de scanner le code situé à gauche avec
votre téléphone mobile.
MACHINEA.ÀBrake
GLAÇONS
–
foot
COMMUTATEUR MARCHE/ARRÊT
Align Refrigerator Doors
Brancher
sur une
prise
à 3 alvéoles
reliée
Refrigerator
is level
(Remove
base grille
and adjust leveling
à la terre.
feet so they are snug against the floor)
if necessary)
Ne pas
utiliser un adaptateur.
❏ Locate the wire shutoff arm.
des
tiroirs
du réfrigérateur
Arm lowered – ON,
Arm
up – OFF
❏Alignement
A
B
IRRITANT
Check that handles are secure and installed according to
the instructions.
D
❏ Open the freezer drawer.
CAUTION
If doors need to be removed during installation, see the
“Remove and Replace Doors” section in the instructions.
Models with Ice Storage Bin in Freezer
ers.
Lisez des prudences sur le rev
✔Electrical Power
A
C
A. Ice storage bin release latch
✔Si les tiroirs du réfrigérateur sont inégaux.
❑❑ Ajuster les tiroirs vers le haut/vers le bas
¹⁄₄"
✔Doors
A
B
Read cautions on back.
En fonction de la largeur de l’ouverture de la porte, les outils
suivants s’avèreront peut-être nécessaires pour retirer,
réinstaller et aligner les portes du réfrigérateur.
Electrical Shock Hazard
Outillage nécessaire :
Plug into Phillips
a grounded
prong
outlet.
❑❑ Tournevis
n° 2 –3 Vis
de couvre-charnière
supérieur
3
❑❑ Clé
tête
hexagonale
deprong.
/16" – Vis de charnière supérieure
Do ànot
remove
ground
❑❑ Douille
à
pointe
carrée
n°
2
- Vis de couvre-charnière
Do not use an adapter.
central
Do not use an extension cord.
❑❑ Tourne-écrou de 1/4" – Vis du tiroir et pied de stabilisation
Failurede
to 3follow
instructions
can result
in death,
❑❑ Douille
/8"– Visthese
des supports
de pieds
de stabilisation
fire, or electrical shock.
Outillage fourni :
❑❑ Clé à tête hexagonale de 3/32" ou clé à tête hexagonale de
1
/8" (selon le modèle) - Vis de réglage
INSTALLATION CHECKLIST
❑❑ Clé à tête hexagonale de 1/8" - Alignement de la porte
✔
Si le réfrigérateur
semble instable ou qu’il roule lorsqu’on
Steady
the Refrigerator
ouvre la/les porte(s) ou le tiroir.
❑✔
❑ If
Utiliser
un tourne-écrou
à tête hexagonale
de the
¼" door(s)
pour or
the refrigerator
seems unsteady
or rolls when
drawer(s)
pulled
open.
tourner lesare
deux
pieds
de stabilisation du même nombre
de tours dans le sens horaire, jusqu’à ce qu’ils soient en
Use aavec
¹⁄₄" hex
nut driver to turn both brake feet clockwise
❏
contact
le sol.
the same amount until they are snug against the floor.
REPLACE
OUTILS REQUIS
Stabilisation du réfrigérateur
MONTHS
WARNING
A
Insert gauche
¹⁄₈" hex key
wrench
intobac.
the bottom hinge pin located
la paroi
de la
zone du
❏
� Turn key to the right to raise the refrigerator door.
� Turn key to the left to lower the refrigerator door.
Le non-respect de ces instructions peut causer
un
décès,
incendie
ou un(on
choc
électrique.
✔Ice
andunWater
System
some
models)
Connect refrigerator to a cold water supply with adequate
water pressure, as specified in the instructions
AIR FILTER INSTALLATION
LISTE DE VÉRIFICATION POUR
Make sure L’INSTALLATION
the household water supply is connected and
turned on
✔Alimentation électrique
❑❑ Brancher
le réfrigérateur
sur une
à 3 refrigerator
alvéoles is not
Check that
the water supply
lineprise
behind
kinked
reliée
à la terre.
✔Portes
Use recommended water supply tubing only as specified in
❑❑ Si les
doivent être retirées lors de l’installation,
the portes
instructions
se reporter à la section « Retirer et replacer les portes »
contenue
dans filter
les instructions.
Install water
according to the instructions
❑❑ S’assurer que les poignées sont bien fixées et installées
Flush
system according to instructions
selon
leswater
instructions.
❑❑ LesCheck
portesforferment
complètement
hermétiquement.
water leaks
at all connections
❑❑ Le réfrigérateur est de niveau (retirer la grille de la base et
Turn les
on pieds
ice maker
if refrigerator
connected
to water
ajuster
de nivellement
deisfaçon
à ce qu’ils
soient
not connected
to water supply, turn off ice maker)
en supply
contact(Ifavec
le plancher).
❑❑ Les portes sont alignées au sommet (utiliser la fonction
d’ajustement de la porte au besoin).
✔Final Checks
❑❑ La grille de la base est convenablement fixée au
réfrigérateur.
Remove all shipping material
✔Système de glaçons et d’eau (sur certains modèles)
Set temperature
controlsàto
thecanalisation
recommended setting
❑❑ Raccorder
le réfrigérateur
une
d’alimentation en eau froide avec pression adéquate tel
Save instructions and other literature
que spécifié dans les instructions.
❑❑ S’assurer
l’alimentation
eau courante
est
Send inque
Registration
Card en
or register
your product
online
raccordée et OUVERTE.
❑❑ S’assurer que la canalisation d’alimentation en eau, située
derrière le réfrigérateur, n’est pas déformée.
❑❑ Utiliser la canalisation d’alimentation en eau recommandée
conformément aux instructions.
❑❑ Installer le filtre à eau conformément aux instructions.
❑❑ Vidanger le système d’eau conformément aux instructions.
❑❑ Vérifier l’absence de fuites au niveau de chaque raccord.
❑❑ Mettre sous tension la machine à glaçons si le
réfrigérateur est relié à l’alimentation en eau (si tel n’est
pas le cas, mettez la la machine à glaçons hors tension).
✔Dernières vérifications
❑❑ Installer le(s) filtre(s) à air et/ou le(s) conservateur(s) pour
produits frais conformément aux instructions dans les
emballages correspondants.
❑❑ Retirer tout l’emballage d’expédition.
❑❑ Régler les commandes de température aux réglages
recommandés.
❑W10325092C
❑ Conserver les instructions et autres documents éventuels.
All rights
reserved.
❑©❑ 2013.
Envoyer
la carte
d’enregistrement ou enregistrer le produit
en ligne.
W10772354A
© 2015. Tous droits réservés.
A
A
A. Loquet de
déverrouillage du bac
d’entreposage à glaçons
❏ Install the air filter behind the vented door on the rear wall of
the refrigerator compartment.
Raise
B
Lower
Modèles avec bac
d’entreposage à glaçons
A. Bottom hinge pin
dans le congélateur
B. ¹⁄₈" Hex key wrench
❑❑ Ouvrir le tiroir du
congélateur.
❑❑ Repérer le WATER
bras de
FILTER INSTALLATION
commande d’arrêt
the water filter compartment in the right-hand side of
❏ Locate
métallique.
the
refrigerator ceiling. Push upward on compartment door to
❑❑ open.
Bras de commande abaissé
ON (marche); Bras de
the arrow
on the -water filter label with the cutout notch in
❏ Align
commande
redressé
the filter housing and insert filter.
OFF (arrêt).
❏ Once the filter is inserted, turn the filter clockwise 90° (1⁄4 turn),
until it locks into the housing. Lift filter into compartment and
close door.
INSTALLATION
DU FILTRE À EAU
Flush the water system to clear air from the water line and to
❑❏
❑ Repérer le compartiment du filtre à eau sur le côté
keep du
theplafond
dispenser
dripping and/or
avoid
decreased
droit
dufrom
réfrigérateur.
Pousser
la porte
du
dispenser flow.
compartiment
vers le haut pour l’ouvrir.
❑NOTE:
❑ Aligner
la flèche
du filtre water
à eau will
avec
If the
filter issur
notl’étiquette
installed correctly,
not be
l’encoche du logement du filtre et insérer le filtre
dispensed.
dans le logement.
❑❑ Après l’avoir inséré, tourner le filtre dans le sens
horaire de 90° (¼ tour) jusqu’à ce qu’il s’emboîte dans
le logement. Soulever le filtre pour le placer dans le
compartiment et fermer la porte.
❑❑ Rincer le système de distribution d’eau pour évacuer l’air
de la canalisation d’eau et pour empêcher le distributeur
de goutter et/ou de diminuer le débit du distributeur.
REMARQUE : Si le filtre n’est pas correctement installé,
l’eau ne coulera pas.
❏ Pop the bubble on the back of the indicator to activate.
❑❑ Ajuster les tiroirs
indicator in notches beneath the air filter (on some
❏ Place
latéralement
models) or in visible area (models without notches).
Étape 1 : Appuyer sur C
et maintenir enfoncé
Étape 2 : Soulever D de E
Étape 3 : Replacer D sur E
A
D
B
D
E
C
D
A. Status indicator window
B. Air filter status indicator
C. Notches
D. Air filter
E
ENERGY AND C
NORMAL OPERATING SOUNDS
Your new French Door Bottom Mount refrigerator has been
designed to optimize energy efficiency, and better regulate
temperatures to match cooling demand.
CONSOMMATION D’ÉNERGIE ET BRUITS DE
FONCTIONNEMENT
NORMAUX
You may notice
that it operates differently
from your previously
owned
refrigerator.
Votre nouveau
réfrigérateur avec porte à double battant et
congélateur en bas est conçu pour un niveau éconergique
et une
régulation
de la température
plus
Itoptimal
is normal
for the
high-efficiency
compressor to
runefficace
for
extended
periods
time at varying
speeds in order to consume
afin de pallier
auxofbesoins
de refroidissement.
only the energy necessary for optimum efficiency.
Vous remarquerez peut-être qu’il fonctionne différemment
de votre réfrigérateur précédent.
In addition, during various stages of the cooling cycle, you may
Il estnormal
normaloperating
que le compresseur
haute
efficacité
fonctionne
hear
sounds that are
unfamiliar
to you.
à vitesse variable pendant une durée prolongée et ce, afin
de consommer uniquement le niveau d’énergie nécessaire
à une efficacité maximale.
D’autre part, au cours de différentes étapes du programme
5/13
de refroidissement, vous entendrez peut-être Printed
des bruits
de
in U.S.A.
fonctionnement normaux qui ne vous sont pas familiers.
02/15
Imprimé aux É.-U.