1
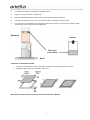
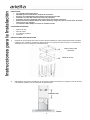
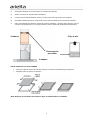
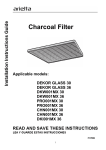
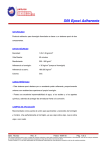
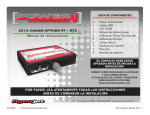
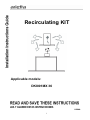
Recirculating KIT
Applicable models:
DKI001MX 36
LI294A
1
WARNING:
•
Read and Save These Instructions.
•
Approved for Residential Appliances only.
•
PLEASE READ ENTIRE INSTRUCTIONS BEFORE PROCEEDING.
•
INSTALLER: Please leave these Instructions with this unit for the owner.
•
OWNER: Please retain these instructions for future reference.
•
Turn off power circuit at service panel and lock out panel before installing this kit to the appliance.
•
Installation must comply with all local codes.
PACKAGING CONTENTS
•
•
•
•
Air deflector
Charcoal Filter
2 Assembly screws
4 Springs
INSTALLATION INSTRUCTIONS
1)
After the duct cover bracket has been installed on the ceiling (Refer to Installation Instructions in the Hood
Manual), assemble the air deflector to the duct cover bracket with 2 assembly screws, as is shown in the
following image.
Duct cover bracket
Air deflector
2)
Measure from the bottom of the air deflector to the bottom of the hood outlet, as is shown in the following image.
Cut the ductwork at the measured dimension.
2
3)
Uninstall the air deflector removing the 2 assembly screws.
4)
Slip the duct onto the bottom of the deflector.
5)
Place the assembled deflector and duct work over the exhaust outlet from the hood.
6)
Assemble the air deflector to the duct cover bracket, with the 2 assembly screws provided.
7)
Use duct tape to seal the deflector and the exhaust outlet from the hood, as is shown in the following image.
The duct tape must be approved for this application.
Ductwork
Airflow
Duct tape
over seams
Hood
CHARCOAL FILTER INSTALLATION
•
•
Position the charcoal filter over the grease filter and insert the 4 springs (to prevent movement).
Reinstall the grease filter onto the bottom of the hood.
Note: After 120 functional hours the charcoal filter must be replaced.
3
PRECAUCIÓN:
•
Lea y guarde estas instrucciones.
•
Aprobado para electrodoméstico residencial únicamente.
•
Por favor lea completamente estas instrucciones antes de proceder.
•
Instalador: Por favor deje estas instrucciones al propietario.
•
Propietario: Por favor mantenga estas instrucciones para futuras referencias.
•
Desconecte esta unidad del tablero de control eléctrico y asegure el panel de control antes de instalar
este accesorio a la campana.
•
La instalación debe cumplir con todos los estatutos locales.
CONTENIDO EN EMPAQUE
•
•
•
•
Deflector de aire
Filtro de carbón
2 Tornillos de ensamble
4 Resortes
INSTRUCCIONES PARA INSTALACIÓN
1)
Después de que el soporte para cubre conductos ha sido instalado en el techo (Haga referencia al manual de
instalación de la campana), ensamble el deflector de aire en el soporte de cubre conductos, con 2 tornillos de
ensamble, tal y como se muestra en la siguiente figura.
Soporte para cubre
conductos
Deflector de aire
2)
Mida desde la parte inferior del deflector de aire a la parte inferior del escape en la campana. Corte el conducto
a la dimensión medida, como se muestra en la siguiente figura.
4
3)
Desinstale el deflector de aire removiendo los 2 tornillos de ensamble.
4)
Deslice el conducto en la parte inferior del deflector.
5)
Posicione el ensamble del deflector de aire y conducto sobre el escape de aire en la campana.
6)
Ensamble el deflector de aire en el soporte de cubre conductos utilizando los 2 tornillos de ensamble.
7)
Utilice cinta especial para sellar las uniones del conducto al deflector y al escape de la campana, como se
muestra en la siguiente figura. La cinta para sellar el conducto deber estar aprobada para la aplicación.
Conducto
Flujo de aire
Cinta especial
para sellar
Campana
INSTALACIÓN DEL FILTRO DE CARBÓN
•
•
Posicione el filtro de carbón sobre el filtro de grasa, e inserte las 4 abrazaderas (para sujetarlo).
Reinstale el filtro de grasa en la campana.
Nota: Después de 120 horas funcionales el filtro de carbón debe ser cambiado.
5