1
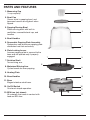
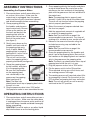
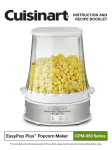
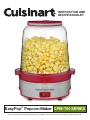
INSTRUCTION AND
RECIPE BOOKLET
EasyPop® Popcorn Maker CPM-700 SERIES
For your safety and continued enjoyment of this product, always read the instruction book carefully before using.
IMPORTANT
SAFEGUARDS
15.Never steam food in the popping plate.
16.A popper that is plugged into an outlet should not be left unattended.
17.CAUTION – a burn can result from misuse of this product. Read instruction manual
for proper operating procedure.
18.caution – Extreme caution must be used when unloading popcorn. Always turn the unit over a countertop so that residual hot oil or water running out will not cause burns.
When using an electrical appliance, basic safety
precautions should always be followed, including
the following:
1.
Read all instructions.
2. Unplug from outlet when not in use and before cleaning. Allow to cool before
putting on or taking off parts, and before cleaning the appliance.
3. To protect against electric shock, do not immerse cord, plugs, or this appliance in water or other liquid. Only the detachable popping plate, bowl cap, and popping bowl have been designed for immersion into water. Never submerge any other portion of this unit.
4. Do not touch hot surfaces. Use handles or knobs.
5. Avoid coming into contact with moving parts.
6.Close supervision is necessary when any appliance is used by or near children.
7. Do not operate any appliance with a
damaged cord or plug, or after the appli-
ance has malfunctioned or has been dropped or damaged in any way or is not operating properly. Return the appliance to the nearest Cuisinart Repair Center for examination, repair, or mechanical or
electrical adjustment.
8. The use of attachments or accessories not recommended by Cuisinart may cause fire, electrical shock, or risk of injury.
9. Do not use outdoors.
10. Do not let cord hang over edge of table or counter, or touch hot surfaces.
11.Do not place on or near a hot gas or electric burner, or in a heated oven.
12.Extreme caution must be used when moving an appliance containing hot oil or other hot liquids.
13.To disconnect, turn any control to off, then remove plug from wall outlet.
14.Do not use appliance for other than intended household use.
19.Do not operate your appliance in an
appliance garage or under a wall cabinet. When storing in an appliance garage always unplug the unit from the electrical outlet. Not doing so could create a risk of fire, especially if the appliance touches the walls of the garage or the door touches the unit as it closes.
SAVE THESE
INSTRUCTIONS
FOR HOUSEHOLD
USE ONLY
SPECIAL CORDSET
INSTRUCTIONS
A short power supply cord is provided to reduce
the risk of becoming entangled in or tripping over
a long cord.
Extension cords may be used if care is exercised
in their use. If an extension cord is used, the
marked electrical rating of the extension cord
should be at least as great as the electrical rating
of the appliance.
The longer cord should be arranged so that it will
not drape over the countertop or tabletop where
it can be pulled on by children or tripped over.
2
NOTICE
This appliance has a polarized plug (one blade is
wider than the other). To reduce the risk of
electric shock, this plug is intended to fit into a
polarized outlet only one way. If the plug does not
fit fully into the outlet, reverse the plug. If it still
does not fit, contact a qualified electrician.
Do not attempt to modify the plug in any way.
CONTENTS
Important Safeguards . . . . . . . . . . . . . . 2
Unpacking Instructions. . . . . . . . . . . . . . 3
Parts and Features . . . . . . . . . . . . . . . 4
Assembly Instructions . . . . . . . . . . . . . . 5
Operating Instructions . . . . . . . . . . . . . . 5
Tips and Hints. . . . . . . . . . . . . . . . . . 6
Seasoning Suggestions. . . . . . . . . . . . . 7
Cleaning and Maintenance . . . . . . . . . . . 7
Recipes . . . . . . . . . . . . . . . . . . . . . 8
Warranty . . . . . . . . . . . . . . . . . . . . 13
UNPACKING
INSTRUCTIONS
1. Place the box on a large, sturdy, flat surface.
2. Open the box and remove the instruction book
and any other literature.
3. Slide the packing materials, popcorn maker
and accessories out of the box.
4. Remove all other parts packed in pulp mold
and remove packing materials surrounding
those parts. Be sure to check all packing
materials for all parts listed in the Parts
and Features section on page 4 before
discarding.
5. Remove any protective or promotional labels
from your popcorn maker and all accessories.
3
PARTS AND FEATURES
1.Measuring Cup
½-cup capacity
1
2. Bowl Cap
Covers vents in popping bowl, and
becomes base of serving bowl when flipped.
2
3.Popping/Serving Bowl
Plastic serving bowl with built-in
ventilation, removable bowl cap, and
handles.
3
4.Bowl Handles
5.Removable Popping Plate Assembly
Dishwasher-safe aluminum popping plate distributes heat fast and evenly.
4
6.Plate Locking Levers
Assures popping plate is secured to the base and will operate only if properly
engaged.
7
5
7.Rotation Shaft
Turns stirring arm.
8.Motorized Stirring Arm
Cycles kernels for even popping.
8
6
9.Heating Plate
9
10.Base Handles
11.Base
Elegant stainless steel base.
10
12.On/Off Switch
One-touch simple operation.
11
13.BPA free (not shown)
All materials that come in contact with
food are BPA free.
12
4
ASSEMBLY INSTRUCTIONS
2. Grasp popping plate by the handles and place
on top of motor base. Be sure to line up the
notches on the front and back of the popping
plate with the grooves on the front and back of
the motor base.
Note: The popping plate is properly positioned if it rests flat on top of the motor base.
The unit will not function unless the popping
plate is properly positioned.
3. Select the amount of popcorn desired from
the chart on page 6.
4. Add the approximate amount of vegetable oil
or canola oil to popping plate.
Note: See Tips and Hints on page 6 for
recommended measurements. Any form of
cooking oil is suitable for use, except olive oil.
5. Measure the amount of kernels using the
included measuring cup and add to the
popping plate.
Note: See Tips and Hints on page 6 for
recommended measurements.
6. Grasp the popping bowl by the handles and
place it on to the popping plate. Be sure that
the handles on the popping bowl rest comfortably in the grooves on the popping plate.
Note: The bowl cap should never be on top of
popping bowl while the unit is in use.
7. Plug the popcorn maker into a 120V outlet.
8. Flip the power switch to the ON position.
The motorized stirring arm will activate, and
the cooking process will begin.
9. The cooking process will conclude when little
to no popping is heard. Flip the switch to the
OFF position and unplug unit from wall outlet.
Note: The unit will remain on until manually
switched to the OFF position.
Assembling the Popcorn Maker
1. Place motor base and all removable parts on a clean, flat surface. Make sure the motor base is unplugged from the power outlet and that all parts have been cleaned and dried thoroughly before assembling.
2. Grasp popping plate by
the handles and place on
top of motor base. Be sure
to line up the notches on
the front and back of the
popping plate with the
Fig. 1
grooves on the front and
back of the motor base
(see figure 1).
3. Gently press down on the
handles until each side of
the popping plate rests
firmly in place. Note: The
popping plate is properly
positioned if it rests flat on
top of the motor base.
Fig. 2
The unit will not function
unless the popping plate is
properly positioned (see figure 2).
4. Grasp the popping bowl
by the handles, and place
it on the popping plate.
Be sure that the handles
on the popping bowl
rest comfortably in the
grooves on the popping
Fig. 3
plate (see figure 3).
Note: The bowl cap
should never be on top of popping bowl while
the unit is in use.
5. Plug the popcorn maker into a 120V outlet.
Your popcorn maker is now assembled for use.
OPERATING INSTRUCTIONS
1. Place motor base and all removable parts on a
clean, flat surface. Make sure the motor base
is unplugged from the power outlet and that all
parts have been cleaned and dried thoroughly
before assembling.
CAUTION: Do not let water or any other liquid
drip into the base or on the heating plate.
5
TIPS AND HINTS
USING THE SERVING BOWL
1. Place bowl cap on top of
serving bowl before adding
any seasonings
(see figure 4).
2. Grasp the locking levers
on each side of the popping plate, as well as the
handles of the serving
bowl and pinch together
(see figure 5).
Note: When pinching
together, gently squeeze
the locking levers by pulling up. The popping plate
and serving bowl will lift
from the motor base (see
figure 6).
3. Turn over and place the
bottom of the serving bowl
on a flat surface (see figure
7). Note: To avoid burning
popcorn, flip bowl as soon
as cooking process
is complete.
4. Once serving bowl is
properly positioned, lift the
popping plate away from
the serving bowl and return
to motor base.
POPCORN AMOUNTS
Fig. 4
Kernels
Vegetable
Oil
Popped
Popcorn
¼ cup
1½ teaspoons
Approximately
8 cups popped
popcorn
2 teaspoons
Approximately
10-12 cups
popped
popcorn
1 tablespoon
Approximately
12-14 cups
popped
popcorn
1
⁄3 cup
½ cup
Fig. 5
Note: Premium popcorns yield less, by about 2
cups.
The seasoning possibilities for popcorn are endless. Just add melted butter and your favorite
seasonings to a bowl of popcorn.
Fig. 6
With toppings added, popped popcorn will
become much crisper and the flavors become
more intense if it is heated with desired toppings
in a 300°F oven for about 15 to 20 minutes before
serving. For best results, heat it on a baking
sheet that you have lined with foil and sprayed
with cooking oil.
Fig. 7
Note: Serving bowl should not be put
into oven.
It is very important to use fresh popcorn. If
your popcorn is old, the kernels will not fully
pop and/or it may take a long time for them to
pop.
CAUTION: POPPING PLATE HANDLES ARE
EXTREMELY HOT AFTER USE.
CAUTION: After popping, the plate is
EXTREMELY HOT. Do not put fingers near
the plate. After turning the bowl over to
serve, simply return popping plate directly
to the base. A slight odor or smoke may be
evident as materials used in manufacturing are burned off internal parts. This is
normal.
6
SEASONING SUGGESTIONS
Butter/Seasoning ratios for popcorn
2 tablespoons melted butter for ¼ cup
unpopped kernels, and a minimum of 1
teaspoon of seasoning
2 to 3 tablespoons melted butter for 1 ⁄3 cup
unpopped kernels, and a minimum of 2
teaspoons of seasoning
3 to 4 tablespoons melted butter for ½ cup
unpopped kernels, and a minimum of 2½
teaspoons to a tablespoon of seasoning
The amount of seasoning depends on the
intensity of the ingredients you are using –
it is important to let your taste be your guide.
The following is a list of seasoning ideas for
your popcorn.
Cheese
Taco seasoning
Chili powders
Hot sauce
Packaged sauces (i.e. Alfredo)
Soy sauce
Italian seasoning and herbs
CLEANING AND
MAINTENANCE
Clean your popcorn maker after every use.
Never immerse the base of the unit in water
or let water drip inside. Do not use benzene,
scrubbing brushes or chemical cleaners, as these
will damage the unit. Use only a damp cloth to
clean exterior of the base.
Serving bowl and bowl cap – The serving bowl
and bowl cap are fully immersible and dishwasher-safe. Do not clean plastic serving bowl or bowl
cap with the scourer side of a sponge.
Popping plate – Popping plate is fully
immersible and dishwasher safe. Do not use
metal utensils as these will damage the
surface. The popping plate and stirring
rod stay assembled for cleaning.
Do not put the popping plate in the dishwasher
until it’s cool.
Any other servicing should be performed by an
authorized service representative.
7
RECIPES
2. When the kernels have finished popping, turn
power switch to OFF. Put bowl cap on bowl.
Unlock and turn bowl over onto a flat surface.
Remove the base from the bowl.
Traditional Popcorn
3. Stir the salt into the olive oil, pour evenly over
the popcorn, and mix to fully coat.
The perfect balance between butter and salt.
For those who are salt sensitive adjust the
amount of salt to taste.
Nutritional information per 1-cup serving:
Calories 49 (54% from fat) • carb. 6g • pro. 1g • fat 3g
• sat. fat 0g • chol. 0mg • sod. 81mg • calc. 0mg • fiber 1g
Makes about 14 cups
1
tablespoon vegetable or
grapeseed oil
½
cup popcorn kernels
½ to ¾ teaspoon kosher salt
3
tablespoons unsalted butter, melted
Pesto Popcorn
A fun and delicious way to use up
some leftover pesto.
Makes about 12 cups
1. Evenly distribute the vegetable oil on the
popping plate of the Popcorn Maker. Add the
popcorn kernels. Place the inverted bowl on
top of the popping plate. Turn the power switch
to ON.
1
½
3
2 to 3
2. When the kernels have finished popping, turn
power switch to OFF. Put bowl cap on bowl.
Unlock and turn bowl over onto a flat surface.
Remove the base from the bowl.
1. Evenly distribute the vegetable oil on the
popping plate of the Popcorn Maker. Add the
popcorn kernels. Put the inverted bowl on top
of the popping plate. Turn the power switch to
ON.
3. Stir the salt into the melted butter, and pour
evenly over the popcorn and mix to fully coat.
Nutritional information per 1-cup serving:
Calories 46 (50% from fat) • carb. 6g • pro. 1g • fat 3g
• sat. fat 1g• chol. 4mg • sod. 81mg • calc. 0mg • fiber 1g
2. When the kernels have finished popping, turn
power switch to OFF. Put bowl cap on bowl.
Unlock and turn bowl over onto a flat surface.
Remove the base from the bowl.
Olive Oil Popcorn
3. Stir the pesto and olive oil together until fully
combined. Pour evenly over the popcorn and
stir to combine. Serve immediately.
Use olive oil as a healthier alternative to butter –
plus, it gives the popcorn that delicious
olive oil flavor.
Nutritional information per 1-cup serving:
Calories 93 (67% from fat) • carb. 7g • pro. 2g • fat 7g
• sat. fat 1g • chol. 1mg • sod. 70mg • calc. 19mg • fiber 1g
Makes about 14 cups
1
½
½ to ¾
2 to 3
tablespoon vegetable or
grapeseed oil
cup popcorn kernels
tablespoons prepared pesto
tablespoons extra virgin olive oil
(depending on the consistency of the pesto that you are using)
tablespoon vegetable or grapeseed oil
cup popcorn kernels
teaspoon kosher salt
tablespoons extra virgin olive oil
1. Evenly distribute the vegetable oil on the popping plate of the Popcorn Maker. Add the popcorn kernels. Put the inverted bowl on top of
the popping plate. Turn the power switch to ON.
8
Parmesan Popcorn
of the popping plate. Turn the power switch to
ON.
2. When the kernels have finished popping, turn
power switch to OFF. Put bowl cap on bowl.
Unlock and turn bowl over onto a flat surface.
Remove the base from the bowl.
Parmesan gives this popcorn a great cheesy
and tangy flavor.
Makes about 14 cups
1
½
3
½
tablespoon vegetable or
grapeseed oil
cup popcorn kernels
tablespoons extra virgin olive oil
cup grated Parmesan
pinch kosher salt
3. Stir the butter/oil, hot sauce, vinegar and salt
together until combined. Pour evenly over the
popcorn and mix to combine. Serve immediately.
Nutritional information per 1-cup serving:
Calories 77 (65% from fat) • carb. 6g • pro. 1g • fat 6g
• sat. fat 1g • chol. 0mg • sod. 27mg • calc. 0mg • fiber 1g
1. Evenly distribute the vegetable oil on the
popping plate of the Popcorn Maker. Add the
popcorn kernels. Put the inverted bowl on top
of the popping plate. Turn the power switch to
ON.
Asian Style Popcorn
2. When the kernels have finished popping, turn
power switch to OFF. Put bowl cap on bowl.
Unlock and turn bowl over onto a flat surface.
Remove the base from the bowl.
The flavors of soy and sesame give this popcorn
a different yet delicious flavor.
Makes about 12 cups
3. Evenly pour the olive oil over the popcorn,
tossing to combine. Add the Parmesan and
salt and mix until fully combined. Serve immediately.
1
tablespoon vegetable or
grapeseed oil
½
cup popcorn kernels
4
tablespoons grapeseed oil
2
tablespoons soy sauce, reduced sodium
½
teaspoon hot sauce
½
teaspoon sesame oil
1
tablespoon sesame seeds (white or black)
Nutritional information per 1-cup serving:
Calories 104 (61% from fat) • carb. 8g • pro. 3g
• fat 8g • sat. fat 2g • chol. 6mg • sod. 116mg
• calc. 72mg • fiber 2g
1. Evenly distribute the 1 tablespoon of vegetable
oil on the popping plate of the Popcorn Maker.
Add the popcorn kernels. Put the inverted bowl
on top of the popping plate. Turn the power
switch to ON.
Buffalo Style Popcorn
Spice up your popcorn with a little hot sauce!
Make about 12 cups
1
½
4
2
¼
2. When the kernels have finished popping, turn
power switch to OFF. Put bowl cap on bowl.
Unlock and turn bowl over onto a flat surface.
Remove the base from the bowl.
tablespoon vegetable or
grapeseed oil
cup popcorn kernels
tablespoons melted butter or
vegetable/grapeseed oil
tablespoons hot sauce
teaspoon cider vinegar
pinch kosher salt
3. Stir together the grapeseed oil, soy sauce, hot
sauce and sesame oil. Pour evenly over the
popcorn and mix to combine. Sprinkle with the
sesame seeds and serve immediately.
1. Evenly distribute the vegetable oil on the
popping plate of the Popcorn Maker. Add the
popcorn kernels. Put the inverted bowl on top
Nutritional information per 1-cup serving:
Calories 42 (32% from fat) • carb. 7g • pro. 1g • fat 2g
• sat. fat 0g • chol. 0mg • sod. 85mg • calc. 0mg • fiber 2g
9
Curry Popcorn
¼
1
⁄8
½
If you love Indian spices, this will be
a favorite for sure!
Makes about 12 cups
1
½
4
2
½
¼ to ½
tablespoon vegetable or
grapeseed oil
cup popcorn kernels
tablespoons melted unsalted butter or vegetable/grapeseed oil
teaspoons curry powder
teaspoon turmeric
pinch cayenne pepper
teaspoon kosher salt
1. Evenly distribute the vegetable oil on the
popping plate of the Popcorn Maker. Add the
popcorn kernels. Put the inverted bowl on top
of the popping plate. Turn the power switch to
ON.
2. When the kernels have finished popping, turn
power switch to OFF. Put bowl cap on bowl.
Unlock and turn bowl over onto a flat surface.
Remove the base from the bowl.
1. Evenly distribute the vegetable oil on the
popping plate of the Popcorn Maker. Add the
popcorn kernels. Put the inverted bowl on top
of the popping plate. Turn the power switch to
ON.
3. Stir together the butter/oil, spices, salt and lime
juice. Pour evenly over the popcorn and mix to
combine. Serve immediately.
Nutritional information per 1-cup serving:
Calories 67 (64% from fat) • carb. 6g • pro. 1g • fat 5g
• sat. fat 0g• chol. 0mg • sod. 85mg • calc. 1mg • fiber 1g
2. When the kernels have finished popping, turn
power switch to OFF. Put bowl cap on bowl.
Unlock and turn bowl over onto a flat surface.
Remove the base from the bowl.
Popcorn Snack Mix
3. Stir together the butter/oil, spices and salt.
Pour evenly over the popcorn and mix to combine. Serve immediately.
A healthier version of the store-bought mixes.
Make it for your next party and it will be a hit.
Nutritional information per 1-cup serving:
Calories 78 (64% from fat) • carb. 7g • pro. 1g • fat 6g
• sat. fat 1g • chol. 0mg • sod. 45mg • calc. 2mg • fiber 1g
Makes about 16 cups
1
½
4
½
¼
¼
½
¼
1
1½
Southwestern Popcorn
All of your favorite Southwest flavors make for a
delicious treat when paired with popcorn. Throw
in some toasted pepitas for an extra crunch.
Makes about 14 cups
1
½
4
1
1
¼
teaspoon granulated garlic (you may substitute garlic powder if you can
not locate the granulated variety)
teaspoon cayenne pepper
teaspoon kosher salt
juice of half a lime
tablespoon vegetable or
grapeseed oil
cup popcorn kernels
tablespoons melted, unsalted butter or vegetable/grapeseed oil
teaspoon chili powder
teaspoon paprika
teaspoon dried oregano
10
nonstick cooking spray
tablespoon vegetable or
grapeseed oil
cup popcorn kernels
tablespoons melted, unsalted butter or vegetable/grapeseed oil
teaspoon paprika
teaspoon dried oregano
teaspoon granulated garlic (you may substitute garlic powder if you can
not locate the granulated variety)
teaspoon Worcestershire sauce
dash hot sauce
teaspoon kosher salt
cup mini pretzels or pretzel sticks (broken into ½-inch pieces)
cups roasted mixed nuts
2. When the kernels have finished popping, turn
power switch to OFF. Put bowl cap on bowl.
Unlock and turn bowl over onto a flat surface.
Remove the base from the bowl.
1. Preheat oven to 300°F. Line a rimmed baking
sheet with foil and lightly coat the foil with the
cooking spray.
2. Evenly distribute the 1 tablespoon of oil on the
popping plate of the Popcorn Maker. Add the
popcorn kernels. Put the inverted bowl on top
of the popping plate. Turn the power switch to
ON.
3. Pour the butter/oil evenly over the popcorn and
toss to mix. Add the sugar, cinnamon and salt
and toss to evenly combine. Serve immediately.
3. When the kernels have finished popping, turn
power switch to OFF. Put bowl cap on bowl.
Unlock and turn bowl over onto a flat surface.
Remove the base from the bowl.
Nutritional information per 1-cup serving:
Calories 73 (59% from fat) • carb. 7g • pro. 1g • fat 5g
• sat. fat 0g • chol. 0mg • sod. 10mg • calc. 0mg • fiber 1g
4. Stir together the butter/oil, spices, Worcestershire, hot sauce and salt. Pour evenly over the
popcorn and mix to combine.
Caramel Popcorn
5. Pour mixture onto the prepared baking sheet.
Add the pretzels and mixed nuts and toss to
fully coat.
This caramel corn has a buttery toffee flavor.
See our variation to turn this into yummy
popcorn balls.
6. Bake for about 20 minutes, stirring occasionally to combine flavors. Serve immediately.
Makes about ten cups
2
1
⁄3 4
½
2½ 1½ ¼
½
Nutritional information per 1-cup serving:
Calories 143 (66% from fat) • carb. 10g • pro. 3g • fat 11g
• sat. fat 1g • chol. 0mg • sod. 45mg • calc. 9mg • fiber 2g
Cinnamon Sugar Popcorn
This classic combination of butter paired with
cinnamon sugar makes a delicious popcorn treat!
Makes about 14 cups
1
tablespoon vegetable or
grapeseed oil
½
cup popcorn kernels
4
tablespoons melted, unsalted butter or vegetable/grapeseed oil
2
tablespoons granulated sugar
¼
teaspoon ground cinnamon (add an extra pinch if you are a big cinnamon lover!)
pinch kosher salt
1. Evenly distribute the 1 tablespoon of oil on the
popping plate of the Popcorn Maker. Add the
popcorn kernels. Put the inverted bowl on top
of the popping plate. Turn the power switch to
ON.
teaspoons vegetable or
grapeseed oil
cup popping kernels
tablespoons unsalted butter
cup packed light brown sugar
tablespoons light corn syrup
tablespoons water
teaspoon kosher salt
teaspoon baking soda
1. Evenly distribute the 1 tablespoon of oil on the
popping plate of the Popcorn Maker. Add the
popcorn kernels. Put the inverted bowl on top
of the popping plate. Turn the power switch to
ON.
2. When the kernels have finished popping, turn
power switch to OFF. Put bowl cap on bowl.
Unlock and turn bowl over onto a flat surface.
Remove the base from the bowl.
3. While the corn is popping, put the butter,
brown sugar, corn syrup, water and salt into a
small, heavy-bottom saucepan. Stir to break
up the brown sugar and set over medium-high
heat to bring mixture to a boil.
4. Watch the caramel mixture on the stove
closely. Using a candy thermometer, monitor the temperature of the caramel. It should
be between 240°F and 260°F, not exceeding
11
Kettle Corn
260°F. Once it is boiling and turning golden
brown, about 6 to 8 minutes, it should start to
thicken slightly.
Classic kettle corn right at home. For a savory
twist, stir in some crumbled bacon into the
buttery/sugar mixture before tossing over the
popcorn (if you do this, the ½ teaspoon of salt is
not necessary).
5.Once the caramel is thick and has reached the
proper temperature, carefully whisk in the
baking soda.
6.Drizzle the caramel sauce on top of the popped
corn and mix* to fully coat. Sprinkle with salt
and serve immediately.
Makes about 14 cups
1
tablespoon vegetable or grapeseed oil
½
cup popcorn kernels
½
teaspoon kosher salt
1
⁄3
cup granulated sugar
2
tablespoons water
6
tablespoons unsalted butter, cut into small cubes
*To make whisking and stirring easier, lightly
coat the whisk and spatula with nonstick cooking spray to prevent the caramel and popcorn
from sticking to the tools.
Note: Stir in 1 cup of mixed nuts to the caramel
corn for another great version of this delicious
snack!
Variation: This popcorn recipe also makes
delicious popcorn balls. Line a tray or pan with
aluminum foil. Lightly coat the foil and a one-cup
measure with nonstick cooking spray. Lightly rub
some of the spray on your hands as well. Using
the oiled measuring cup, scoop out 1 cup of the
caramel corn at a time and form into balls; put
onto the oiled foil. Repeat with remaining popcorn – recipe should yield about 8 to 10 popcorn
balls. If not serving immediately, wrap in waxed
paper.
1. Evenly distribute the 1 tablespoon of oil on the
popping plate of the Popcorn Maker. Add the
popcorn kernels. Put the inverted bowl on top
of the popping plate. Turn the power switch to
ON.
2. When the kernels have finished popping, turn
power switch to OFF. Put bowl cap on bowl.
Unlock and turn bowl over onto a flat surface.
Remove the base from the bowl.
3. While the corn is popping, put the sugar and
water into a heavy-bottom saucepan (the mixture should look like wet sand) and place over
medium heat. Allow to cook, without stirring,
until the sugar has dissolved but has picked up
no color. Once the sugar has achieved a liquid
consistency, whisk the butter into the saucepan a little at a time until all is incorporated.
The mixture should be smooth and glossy.
Nutritional information per 1-cup serving:
Calories 124 (41% from fat) • carb. 19g • pro. 1g • fat 6g
• sat. fat 3g • chol. 12mg • sod. 124mg
• calc. 0mg • fiber 1g
4. Very carefully pour the hot sugar/butter mixture
and salt over the popcorn and stir to fully
combine. Serve immediately.
Nutritional information per 1-cup serving:
Calories 93 (55% from fat) • carb. 10g • pro. 1g • fat 6g
• sat. fat 3g • chol. 13mg • sod. 82mg • calc. 0mg • fiber 1g
12
WARRANTY
less the amount directly attributable to the consumer’s
prior usage of the product. If the above two options do
not result in the appropriate relief to the consumer, the
consumer may then take the product to an independent
repair facility if service or repair can be economically
accomplished. Cuisinart and not the consumer will be
responsible for the reasonable cost of such service, repair,
replacement, or refund for nonconforming products under
warranty.
California residents may also, according to their
preference, return nonconforming products directly to
Cuisinart for repair, or if necessary, replacement, by calling
our Consumer Service Center toll-free at 1-800-726-0190.
Cuisinart will be responsible for the cost of the repair,
replacement, and shipping and handling for such products
under warranty.
LIMITED THREE-YEAR
WARRANTY
This warranty is available to consumers only. You are
a consumer if you own a Cuisinart® EasyPop® Popcorn
Maker that was purchased at retail for personal, family
or household use. Except as otherwise required under
applicable law, this warranty is not available to retailers or
other commercial purchasers or owners.
We warrant that your Cuisinart® EasyPop® Popcorn Maker
will be free of defects in materials and workmanship under
normal home use for 3 years from the date of original
purchase.
We recommend that you visit our website,
www.cuisinart.com for a fast, efficient way to complete
your product registration. However, product registration
does not eliminate the need for the consumer to maintain
the original proof of purchase in order to obtain the
warranty benefits. In the event that you do not have proof
of purchase date, the purchase date for purposes of this
warranty will be the date of manufacture.
If your Cuisinart® EasyPop® Popcorn Maker should prove
to be defective within the warranty period, we will repair
it, or if we think necessary, replace it. To obtain warranty
service, simply call our toll-free number 1-800-726-0190
for additional information from our Customer Service
Representatives, or send the defective product to Customer
Service at Cuisinart, 7811 North Glen Harbor Blvd.,
Glendale, AZ 85307.
To facilitate the speed and accuracy of your return, please
enclose $10.00 for shipping and handling of the product.
Please pay by check or money order (California residents
need only supply proof of purchase and should call 1-800726-0190 for shipping instructions).
NOTE: For added protection and secure handling of any
Cuisinart product that is being returned, we recommend
you use a traceable, insured delivery service. Cuisinart
cannot be held responsible for in-transit damage or
for packages that are not delivered to us. Lost and/or
damaged products are not covered under warranty. Please
be sure to include your return address, daytime phone
number, description of the product defect, product model
number (located on bottom of product), original date
of purchase, and any other information pertinent to the
product’s return.
CALIFORNIA RESIDENTS ONLY:
California law provides that for In-Warranty Service,
California residents have the option of returning a
nonconforming product (A) to the store where it was
purchased or (B) to another retail store which sells
Cuisinart products of the same type.
The retail store shall then, at its discretion, either repair
the product, refer the consumer to an independent repair
facility, replace the product, or refund the purchase price
Before returning your
cuisinart® product
If you are experiencing problems with your Cuisinart product, we suggest that you call our Cuisinart Service Center
at 1-800-726-0190 before returning the product serviced.
If servicing is needed, a representative can confirm whether
the product is under warranty and direct you to the nearest
service location.
Your Cuisinart® EasyPop® Popcorn Maker has been
manufactured to the strictest specifications and has been
designed for use only in 120-volt outlets and only with
authorized accessories and replacement parts. This warranty expressly excludes any defects or damages caused
by attempted use of this unit with a converter, as well as by
use with accessories, replacement parts or repair service
other than those authorized by Cuisinart. This warranty
does not cover any damage caused by accident, misuse,
shipment or other than ordinary household use. This warranty excludes all incidental or consequential damages.
Some states do not allow the exclusion or limitation of
these damages, so these exclusions may not apply to you.
You may also have other rights, which vary from state to
state.
Important: If the nonconforming product is to be serviced
by someone other than Cuisinart’s Authorized Service
Center, please remind the servicer to call our Consumer
Service Center at 1-800-726-0190 to ensure that the
problem is properly diagnosed, the product is serviced with
the correct parts, and the product is still under warranty.
13
NOTES:
14
NOTES:
15
Food
Processors
Blenders
Griddler
Cookware
Tools and
Gadgets
Cuisinart offers an extensive assortment of top quality products
to make life in the kitchen easier than ever. Try some of our other countertop
appliances, cookware, tools and gadgets.
www.cuisinart.com
©2012 Cuisinart
150 Milford Road
East Windsor, NJ 08520
Printed in China
12CE133210
Any other trademarks or service marks referred to herein are
the trademarks or service marks of their respective owners.
G IB-11439
Version no : IB-11439 IB
Fold Size: 203X152MM Saddle Stitched 16 pp
Material (Cover): 157gsm matt artpaper
(Inside): 120gsm gloss artpaper
Coating: Gloss Varnishing in cover
Color (Cover): 4C(CMYK)+1C(BK)
(Inside): 1C(BK)+1(BK)
Co-ordinator: Scias Liu
Date: AUG-4-2011
Hugo Description
PDF version : CPM700 Manual IB-11439(0,0) Book
Hugo Code : LEP0043IB-1-1
Color Series: Non
Remark: Quality request (1)
17
Operator : WangWei