1
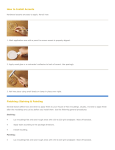
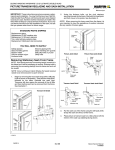
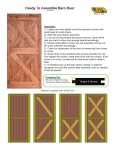
HOW TO CUT A PICTURE FRAME
Instructions:
Measure the length and width of the picture you are going to frame. Establish the length of
each piece of molding you will need by using the following formula:
Length or width of the picture plus two times the width of the molding.
Check the mitre saw to be sure the blade is perpendicular to the bed of the saw and that a
90-degree cut is exactly 90 degrees. Make adjustments if needed according to manufacturer
instructions.
Cut the molding into the four lengths you have calculated using a 90 degree angle on the
mitre saw.
Turn the blade 45 degrees to the right and lock it in position. Place the outside edge of the
molding (the side without the rabbet) against the fence of the saw with the molded surface
facing up. Position the molding to the right of the blade and make the cut. Repeat with the
other three pieces, positioning the molding exactly the same as the first one.
Reverse the 45-degree angle so it is facing to the left. Slide the molding to the other end so it
is now on the left side of the blade. The outside edge should be against the fence and the
molded surface up. Make the cut. Repeat with the remaining boards.
Dry fit the pieces together using the variable-angle strap corner clamp. Put the picture in to
check the fit. The frame will be too big because of the width of the rabbet. Measure the width
of the rabbet. The standard width is 1/4 inch. (Multiple it by two). This sum will be
subtracted from the original lengths you cut for each board.
Measure the length of each board starting at one corner of the outer edge. Run
the tape measure the full length of the board and mark where it is 1/2-inch less than your
original measurement. The 1/2 inch is based on the 1/4-inch standard rabbet. If you made
one a different width, then you must use double that width.
Position the board with the outside against the fence and cut the 45-degree angle so the
mark is just visible after the cut. If you cut on the wrong side of the mark, then the board
will be too short because of the blade thickness. Repeat this with the remaining boards.
Dry fit the frame again and place the picture in it. There should be a 1/16-inch space around
the picture. Fine tune the fit by take very thin slivers off the mitre until the fit is correct.
Each opposing side of the frame must be exactly the same length, so trim carefully and
measure frequently. This is the hardest part of the procedure and is what makes the frame
look profession.
Glue up the joints and secure them with the strap clamp. Allow them to dry for 24 hours
undisturbed. Use small brads to increase the strength of the joint once it is dry.
HOW TO CUT A PICTURE FRAME