1
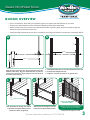
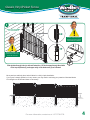
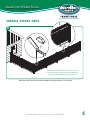
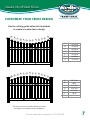
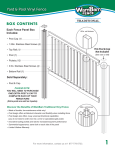
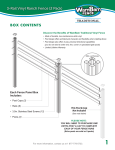
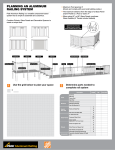
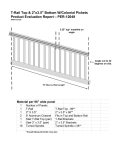
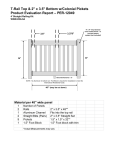
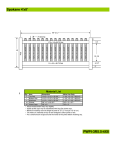
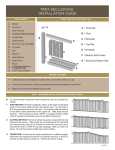
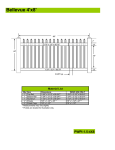
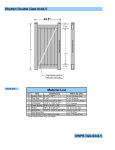
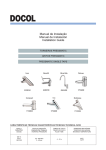
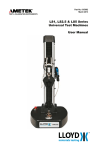
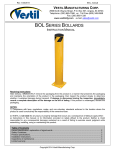
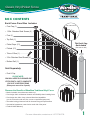
Classic Vinyl Picket Fence BOX CONTENTS Each Fence Panel Box Includes: .055in. wall thickness • Post Cap (1) 7/8in. • 1.25in. Stainless Steel Screws (4) 3in. • Post (1) • Top Rail (1) This Post & Cap Not Included • Picket Caps (13) (See note on left) • Pickets (13) • Tube of Glue (1) • 3.5in. Stainless Steel Screws (4) • Bottom Rail (1) Sold Separately: • Post & Cap PLEASE NOTE: YOU WILL NEED TO PURCHASE ONE EXTRA POST & CAP TO COMPLETE EACH OF YOUR FENCE RUNS (Extra posts are sold as 2-packs) .090in. wall thickness Discover the Benefits of WamBam Traditional Vinyl Fence • Made of durable, low-maintenance white vinyl • Post design offers architectural character and flexibility when installing fence • Post design also offers 4-way universal directional capabilities (you do not need to order end, line, corner or specialized gate posts) • Innovative locking pickets and rails for increased long-term performance • Symmetrical appearance; same look on each side of the panel • Limited Lifetime Warranty For more information, contact us at 1 877-778-5733. 1 Classic Vinyl Picket Fence Top View 4.5in. PRODUCT SPECIFICATIONS 4.5in. This fence can be trimmed down both in width and height to accommodate custom applications. 3.5in. Screw 3in. 2.9in. 1.5in. 6in. 3.5in. 72in. 48in. 3.5in. .090in. Wall Thickness 32in. 1.5in. 2in. 4.5in. 4.5in. Concrete Footing 2in. 79.5in. Ground .090in. Wall Thickness 22.5in. 36in. 10in. For more information, contact us at 1 877-778-5733. 2 Classic Vinyl Picket Fence QUICKIE OVERVIEW • Prior to construction, check with your regulatory agency for special code requirements in your area. • Contact your utility supplier to locate and mark underground lines before excavation. • Sketch out the layout of your fence and calculate the number of panels, gates and posts required (order one extra post & cap to finish each fence run). • Careful planning & measuring of your fence is essential, as moving posts after the concrete sets is extremely difficult. B A 10in. 79.5in. 84in. o.c. 36in. After stringing your fence line, dig your first post hole 10in. diameter x 36in. deep. Dig your second hole 84in. on center to your first hole, and so on. Dig only three or four holes at a time to ensure proper spacing. C 1 - Add approximately 18in. of concrete to the bottom of the hole. 2 - Install posts straight and level. 3 - Add more concrete to within 2in. of ground level. D E Temporary Spacers Picket end withTABS are inserted first. Slide the bottom rail through the channel in the post into approximate position (about 2in. above the ground). Slide the top rail through the channel in the post into approximate position. Warning: Pickets once inserted into bottom rail cannot be removed. Slide pickets through holes in rails. For more information, contact us at 1 877-778-5733. 3 Classic Vinyl Picket Fence F Picket end withTABS are inserted first. Screws must be inserted into the correct area of the rails/pickets as indicated. Warning: Pickets once inserted into bottom rail cannot be removed. Slide pickets through holes in rails and fasten four 1.25 inch screws through the middle of the top rail/pickets (2), and upper cavity of the bottom rail (2) as indicated. Most yards are relatively level and will allow for a fairly simple installation. If your yard is steeply pitched or is very uneven you may need to stair step your panels as illustrated below. Post heights can be trimmed down as necessary. Ground For more information, contact us at 1 877-778-5733. 4 Classic Vinyl Picket Fence INSTALL PICKET CAPS G Being able to moderately adjust the height of your fence to level at this stage is another perk that a WamBam vinyl fence offers that most traditional vinyl fences do not. Glue picket caps onto top of pickets and adjust the height of the fence as necessary. For more information, contact us at 1 877-778-5733. 5 Classic Vinyl Picket Fence SCREW PANELS TO POSTS G VERY IMPORTANT Screws must be inserted straight and into the correct area of the post/rail as indicated. CORRECT Do not overtighten screws as it will cause the vinyl to dimple. TOP VIEW Line up and insert screws along edge of rounded corner radius as shown. Fasten a 3.5 inch screw through the posts into the rails. H WRONG This will ensure that your fence rails will never fall out of your posts like traditional vinyl fence rails sometimes do. WRONG Screw has not been lined up nor inserted into the post correctly and has missed the rail entirely. Repeat in each corner for a total of four per panel. For more information, contact us at 1 877-778-5733. 6 Classic Vinyl Picket Fence CUSTOMIZE YOUR FENCE DESIGN Use the cutting guide below to trim pickets to create a custom fence design. A A B B C C D D E E F F G G F F E E D C D C B B A A B C D E F G 44 1/4 in. 42 3/8 in. 40 7/8 in. 39 3/4 in. 38 7/8 in. 38 3/8 in. 38 1/4 in. A B C D E F G 38 1/4 in. 40 in. 41 1/2 in. 42 3/4 in. 43 1/2 in. 44 in. 44 1/4 in. A This fence can also be trimmed down both in width and height to accomodate custom applications. For more information, contact us at 1 877-778-5733. 7