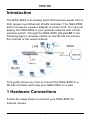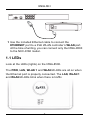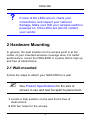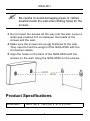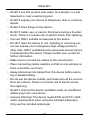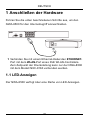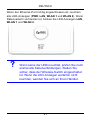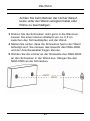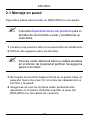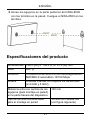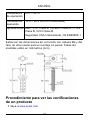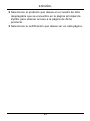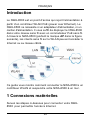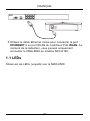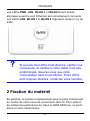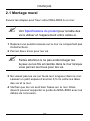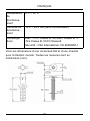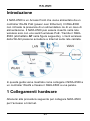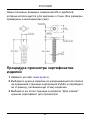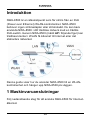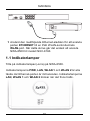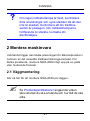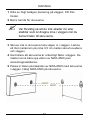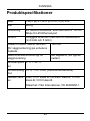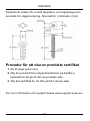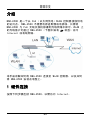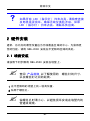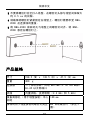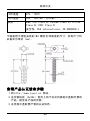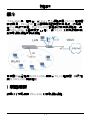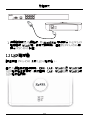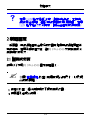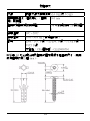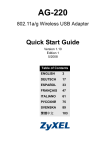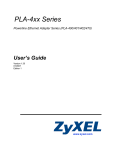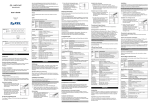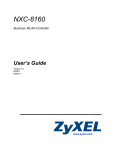
1
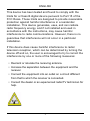
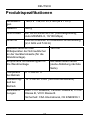
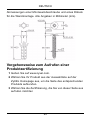
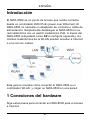
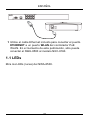
NWA-8500
802.11a/g Ultra Thin Wireless Business
Access Point
Quick Start Guide
Version 1.00
6/2007
Edition 1
CONTENTS
ENGLISH
1
DEUTSCH
19
ESPAÑOL
27
FRANÇAIS
35
ITALIANO
43
РУССКИЙ
51
SVENSKA
59
简体中文
65
繁體中文
71
Copyright © 2007. All rights reserved
ENGLISH
Introduction
The NWA-8500 is an access point that receives power from a
PoE (power over Ethernet) WLAN controller. The NWA-8500
does not require a power adapter or power cord. You can just
deploy the NWA-8500 in your wireless network with a PoE
wireless switch. Through the NWA-8500 (labeled AP in the
following figure), wireless clients on the WLAN can access
the Internet or the wired network.
This guide shows you how to connect the NWA-8500 to a
WLAN controller and hang your NWA-8500 on a wall.
1 Hardware Connections
Follow the steps below to connect your NWA-8500 for
Internet access.
1
ENGLISH
1 Use the included Ethernet cable to connect the
ETHERNET port to a PoE WLAN controller’s WLAN port.
At the time of writing, you can connect only the NWA-8500
to the NXC-8160 model.
1.1 LEDs
Look at the LEDs (lights) on the NWA-8500.
The PWR, LAN, WLAN 1 and WLAN 2 LEDs are all on when
the Ethernet port is properly connected. The LAN, WLAN 1
and WLAN 2 LEDs blink when there is traffic.
2
ENGLISH
V
If none of the LEDs are on, check your
connections, and inspect your cable for
damage. Make sure that your wireless switch is
powered on. If the LEDs are still off, contact
your vendor.
2 Hardware Mounting
In general, the best location for the access point is at the
center of your intended wireless coverage area. For better
performance, mount the NWA-8500 in a place that is high up
and free of obstructions.
2.1 Wall-mounted
Follow the steps to attach your NWA-8500 to a wall.
"
See Product Specifications for the size of
screws to use and how far apart to place them.
1 Locate a high position on the wall that is free of
obstructions.
2 Drill two holes for the screws.
3
ENGLISH
"
Be careful to avoid damaging pipes or cables
located inside the wall when drilling holes for the
screws.
3 Do not insert the screws all the way into the wall. Leave a
small gap of about 0.5 cm between the heads of the
screws and the wall.
4 Make sure the screws are snugly fastened to the wall.
They need to hold the weight of the NWA-8500 with the
connection cables.
5 Align the holes on the back of the NWA-8500 with the
screws on the wall. Hang the NWA-8500 on the screws.
Product Specifications
Dimension
198.5 (W) x 138.5 (D) x 47.5 (H) mm
4
ENGLISH
Weight
400 g
Connector
One auto-negotiating, auto MDI/MDI-X 10/100
Mbps RJ-45 Ethernet port
Antenna
Internal antennas with dual-band support (2.4
GHz and 5 GHz)
Distance between the centers of
the holes (for wall mounting) on
the device’s back.
140 mm
Recommended type of screws for
wall-mounting
M4 Tap Screw (see the
figure below)
Operating
Temperature
0º C ~ 50º C
Operating
Humidity
10% ~ 90% RH (non-condensing)
Approvals
EMC: FCC Class B, CE-EMC Class B, C-Tick
Class B, VCCI Class B
Safety: CSA International, CE EN60950-1
5
ENGLISH
The following are dimensions of an M4 tap screw and
masonry plug used for wall mounting. All measurements are
in millimeters (mm).
Certifications
Federal Communications Commission (FCC)
Interference Statement
The device complies with Part 15 of FCC rules. Operation is
subject to the following two conditions:
• This device may not cause harmful interference.
• This device must accept any interference received, including
interference that may cause undesired operations.
6
ENGLISH
This device has been tested and found to comply with the
limits for a Class B digital device pursuant to Part 15 of the
FCC Rules. These limits are designed to provide reasonable
protection against harmful interference in a residential
installation. This device generates, uses, and can radiate
radio frequency energy, and if not installed and used in
accordance with the instructions, may cause harmful
interference to radio communications. However, there is no
guarantee that interference will not occur in a particular
installation.
If this device does cause harmful interference to radio/
television reception, which can be determined by turning the
device off and on, the user is encouraged to try to correct the
interference by one or more of the following measures:
• Reorient or relocate the receiving antenna.
• Increase the separation between the equipment and the
receiver.
• Connect the equipment into an outlet on a circuit different
from that to which the receiver is connected.
• Consult the dealer or an experienced radio/TV technician for
help.
7
ENGLISH
FCC Radiation Exposure Statement
• This transmitter must not be co-located or operating in conjunction with any other antenna or transmitter.
• For operation within 5.15 ~ 5.25GHz frequency range, it is
restricted to indoor environment.
• IEEE 802.11b or 802.11g operation of this product in the
U.S.A. is firmware-limited to channels 1 through 11.
• To comply with FCC RF exposure compliance requirements,
a separation distance of at least 20 cm must be maintained
between the antenna of this device and all persons.
注意 !
依據
低功率電波輻射性電機管理辦法
第十二條 經型式認證合格之低功率射頻電機,非經許
可,公司、商號或使用者均不得擅自變更頻率、加大功率
或變更原設計之特性及功能。
第十四條 低功率射頻電機之使用不得影響飛航安全及
干擾合法通信;經發現有干擾現象時,應立即停用,並改
善至無干擾時方得繼續使用。
前項合法通信,指依電信規定作業之無線電信。低功率
射頻電機須忍受合法通信或工業、科學及醫療用電波輻射
性電機設備之干擾。
在 5250MHz~5350MHz 頻帶內操作之無線資訊傳輸設備,
限於室內使用。
8
ENGLISH
Notices
Changes or modifications not expressly approved by the party
responsible for compliance could void the user's authority to
operate the equipment.
This device has been designed for the WLAN 2.4 GHz and 5
GHz networks throughout the EC region and Switzerland,
with restrictions in France.
This Class B digital apparatus complies with Canadian ICES003.
Cet appareil numérique de la classe B est conforme à la
norme NMB-003 du Canada.
Viewing Certifications
1 Go to http://www.zyxel.com.
2 Select your product on the ZyXEL home page to go to that
product's page.
3 Select the certification you wish to view from this page.
Safety Warnings
"
For your safety, be sure to read and follow all
warning notices and instructions.
9
ENGLISH
• Do NOT use this product near water, for example, in a wet
basement or near a swimming pool.
• Do NOT expose your device to dampness, dust or corrosive
liquids.
• Do NOT store things on the device.
• Do NOT install, use, or service this device during a thunderstorm. There is a remote risk of electric shock from lightning.
• Connect ONLY suitable accessories to the device.
• Do NOT open the device or unit. Opening or removing covers can expose you to dangerous high voltage points or
other risks. ONLY qualified service personnel should service
or disassemble this device. Please contact your vendor for
further information.
• Make sure to connect the cables to the correct ports.
• Place connecting cables carefully so that no one will step on
them or stumble over them.
• Always disconnect all cables from this device before servicing or disassembling.
• Do not use the device outside, and make sure all the connections are indoors. There is a remote risk of electric shock
from lightning.
• Do NOT obstruct the device ventilation slots, as insufficient
airflow may harm your device.
• Antenna Warning! This device meets ETSI and FCC certification requirements when using the included antenna(s).
Only use the included antenna(s).
10
ENGLISH
• If you wall mount your device, make sure that no electrical
lines, gas or water pipes will be damaged.
• The PoE (Power over Ethernet) devices that supply or
receive power and their connected Ethernet cables must all
be completely indoors.
This product is recyclable. Dispose of it properly.
Warranty
ZyXEL Limited Warranty
ZyXEL warrants to the original end user (purchaser) that this
product is free from any defects in materials or workmanship
for a period of up to two years from the date of purchase.
During the warranty period, and upon proof of purchase,
should the product have indications of failure due to faulty
workmanship and/or materials, ZyXEL will, at its discretion,
repair or replace the defective products or components
without charge for either parts or labor, and to whatever
extent it shall deem necessary to restore the product or
11
ENGLISH
components to proper operating condition. Any replacement
will consist of a new or re-manufactured functionally
equivalent product of equal or higher value, and will be solely
at the discretion of ZyXEL. This warranty shall not apply if the
product has been modified, misused, tampered with,
damaged by an act of God, or subjected to abnormal working
conditions.
Note
Repair or replacement, as provided under this warranty, is the
exclusive remedy of the purchaser. This warranty is in lieu of
all other warranties, express or implied, including any implied
warranty of merchantability or fitness for a particular use or
purpose. ZyXEL shall in no event be held liable for indirect or
consequential damages of any kind to the purchaser.
To obtain the services of this warranty, contact ZyXEL's
Service Center for your Return Material Authorization number
(RMA). Products must be returned Postage Prepaid. It is
recommended that the unit be insured when shipped. Any
returned products without proof of purchase or those with an
out-dated warranty will be repaired or replaced (at the
discretion of ZyXEL) and the customer will be billed for parts
and labor. All repaired or replaced products will be shipped by
ZyXEL to the corresponding return address, Postage Paid.
This warranty gives you specific legal rights, and you may
also have other rights that vary from country to country.
Related Documentation
Please go to http://www.zyxel.com for product news, firmware, documentation,
12
ENGLISH
and other support materials.
Registration
Register your product online to receive e-mail notices of firmware upgrades and
information at www.zyxel.com for global products, or at www.us.zyxel.com for
North American products.
User Guide Feedback
Help us help you. E-mail all User Guide-related comments, questions or
suggestions for improvement to [email protected] or send regular mail
to The Technical Writing Team, ZyXEL Communications Corp., 6 Innovation
Road II, Science-Based Industrial Park, Hsinchu, 300, Taiwan. Thank you.
Copyright
Copyright © 2007 by ZyXEL Communications Corporation.
The contents of this publication may not be reproduced in any part or as a
whole, transcribed, stored in a retrieval system, translated into any language, or
transmitted in any form or by any means, electronic, mechanical, magnetic,
optical, chemical, photocopying, manual, or otherwise, without the prior written
permission of ZyXEL Communications Corporation.
Published by ZyXEL Communications Corporation. All rights reserved.
Disclaimer
ZyXEL does not assume any liability arising out of the application or use of any
products, or software described herein. Neither does it convey any license
under its patent rights nor the patent rights of others. ZyXEL further reserves
the right to make changes in any products described herein without notice. This
publication is subject to change without notice.
Trademarks
ZyNOS (ZyXEL Network Operating System) is a registered trademark of ZyXEL
Communications, Inc. Other trademarks mentioned in this publication are used
for identification purposes only and may be properties of their respective
owners.
Customer Support
Please have the following information ready when you contact customer
support.
• Product model and serial number.
13
ENGLISH
•
•
•
“+”
Warranty Information.
Date that you received your device.
Brief description of the problem and the steps you took to solve it.
is the (prefix) number you dial to make an international telephone call.
Corporate Headquarters (Worldwide)
•
•
•
•
•
•
•
Support E-mail: [email protected]
Sales E-mail: [email protected]
Telephone: +886-3-578-3942
Fax: +886-3-578-2439
Web: www.zyxel.com, www.europe.zyxel.com
FTP: ftp.zyxel.com, ftp.europe.zyxel.com
Regular Mail: ZyXEL Communications Corp., 6 Innovation Road II, Science
Park, Hsinchu 300, Taiwan
Costa Rica
•
•
•
•
•
•
•
Support E-mail: [email protected]
Sales E-mail: [email protected]
Telephone: +506-2017878
Fax: +506-2015098
Web: www.zyxel.co.cr
FTP: ftp.zyxel.co.cr
Regular Mail: ZyXEL Costa Rica, Plaza Roble Escazú, Etapa El Patio, Tercer
Piso, San José, Costa Rica
Czech Republic
•
•
•
•
•
E-mail: [email protected]
Telephone: +420-241-091-350
Fax: +420-241-091-359
Web: www.zyxel.cz
Regular Mail: ZyXEL Communications, Czech s.r.o., Modranská 621, 143 01
Praha 4 - Modrany, Ceská Republika
Denmark
•
•
•
•
•
•
Support E-mail: [email protected]
Sales E-mail: [email protected]
Telephone: +45-39-55-07-00
Fax: +45-39-55-07-07
Web: www.zyxel.dk
Regular Mail: ZyXEL Communications A/S, Columbusvej, 2860 Soeborg,
Denmark
Finland
• Support E-mail: [email protected]
• Sales E-mail: [email protected]
• Telephone: +358-9-4780-8411
14
ENGLISH
• Fax: +358-9-4780-8448
• Web: www.zyxel.fi
• Regular Mail: ZyXEL Communications Oy, Malminkaari 10, 00700 Helsinki,
Finland
France
•
•
•
•
•
E-mail: [email protected]
Telephone: +33-4-72-52-97-97
Fax: +33-4-72-52-19-20
Web: www.zyxel.fr
Regular Mail: ZyXEL France, 1 rue des Vergers, Bat. 1 / C, 69760 Limonest,
France
Germany
•
•
•
•
•
•
Support E-mail: [email protected]
Sales E-mail: [email protected]
Telephone: +49-2405-6909-69
Fax: +49-2405-6909-99
Web: www.zyxel.de
Regular Mail: ZyXEL Deutschland GmbH., Adenauerstr. 20/A2 D-52146,
Wuerselen, Germany
Hungary
•
•
•
•
•
•
Support E-mail: [email protected]
Sales E-mail: [email protected]
Telephone: +36-1-3361649
Fax: +36-1-3259100
Web: www.zyxel.hu
Regular Mail: ZyXEL Hungary, 48, Zoldlomb Str., H-1025, Budapest, Hungary
India
•
•
•
•
•
•
Support E-mail: [email protected]
Sales E-mail: [email protected]
Telephone: +91-11-30888144 to +91-11-30888153
Fax: +91-11-30888149, +91-11-26810715
Web: http://www.zyxel.in
Regular Mail: India - ZyXEL Technology India Pvt Ltd., II-Floor, F2/9 Okhla
Phase -1, New Delhi 110020, India
Japan
•
•
•
•
•
•
Support E-mail: [email protected]
Sales E-mail: [email protected]
Telephone: +81-3-6847-3700
Fax: +81-3-6847-3705
Web: www.zyxel.co.jp
Regular Mail: ZyXEL Japan, 3F, Office T&U, 1-10-10 Higashi-Gotanda, Shina-
15
ENGLISH
gawa-ku, Tokyo 141-0022, Japan
Kazakhstan
•
•
•
•
•
•
Support: http://zyxel.kz/support
Sales E-mail: [email protected]
Telephone: +7-3272-590-698
Fax: +7-3272-590-689
Web: www.zyxel.kz
Regular Mail: ZyXEL Kazakhstan, 43 Dostyk Ave., Office 414, Dostyk Business Centre, 050010 Almaty, Republic of Kazakhstan
Malaysia
•
•
•
•
•
•
Support E-mail: [email protected]
Sales E-mail: [email protected]
Telephone: +603-8076-9933
Fax: +603-8076-9833
Web: http://www.zyxel.com.my
Regular Mail: ZyXEL Malaysia Sdn Bhd., 1-02 & 1-03, Jalan Kenari 17F, Bandar Puchong Jaya, 47100 Puchong, Selangor Darul Ehsan, Malaysia
North America
•
•
•
•
•
•
•
Support E-mail: [email protected]
Sales E-mail: [email protected]
Telephone: +1-800-255-4101, +1-714-632-0882
Fax: +1-714-632-0858
Web: www.us.zyxel.com
FTP: ftp.us.zyxel.com
Regular Mail: ZyXEL Communications Inc., 1130 N. Miller St., Anaheim, CA
92806-2001, U.S.A.
Norway
•
•
•
•
•
•
Support E-mail: [email protected]
Sales E-mail: [email protected]
Telephone: +47-22-80-61-80
Fax: +47-22-80-61-81
Web: www.zyxel.no
Regular Mail: ZyXEL Communications A/S, Nils Hansens vei 13, 0667 Oslo,
Norway
Poland
•
•
•
•
•
E-mail: [email protected]
Telephone: +48-22-333 8250
Fax: +48-22-333 8251
Web: www.pl.zyxel.com
Regular Mail: ZyXEL Communications, ul. Okrzei 1A, 03-715 Warszawa,
Poland
16
ENGLISH
Russia
•
•
•
•
•
•
Support: http://zyxel.ru/support
Sales E-mail: [email protected]
Telephone: +7-095-542-89-29
Fax: +7-095-542-89-25
Web: www.zyxel.ru
Regular Mail: ZyXEL Russia, Ostrovityanova 37a Str., Moscow 117279, Russia
Singapore
•
•
•
•
•
•
Support E-mail: [email protected]
Sales E-mail: [email protected]
Telephone: +65-6899-6678
Fax: +65-6899-8887
Web: http://www.zyxel.com.sg
Regular Mail: ZyXEL Singapore Pte Ltd., No. 2 International Business Park,
The Strategry #03-28, Singapore 609930
Spain
•
•
•
•
•
•
Support E-mail: [email protected]
Sales E-mail: [email protected]
Telephone: +34-902-195-420
Fax: +34-913-005-345
Web: www.zyxel.es
Regular Mail: ZyXEL Communications, Arte, 21 5ª planta, 28033 Madrid,
Spain
Sweden
•
•
•
•
•
•
Support E-mail: [email protected]
Sales E-mail: [email protected]
Telephone: +46-31-744-7700
Fax: +46-31-744-7701
Web: www.zyxel.se
Regular Mail: ZyXEL Communications A/S, Sjöporten 4, 41764 Göteborg,
Sweden
Thailand
•
•
•
•
•
•
Support E-mail: [email protected]
Sales E-mail: [email protected]
Telephone: +662-831-5315
Fax: +662-831-5395
Web: http://www.zyxel.co.th
Regular Mail: ZyXEL Thailand Co., Ltd., 1/1 Moo 2, Ratchaphruk Road, Bangrak-Noi, Muang, Nonthaburi 11000, Thailand.
17
ENGLISH
Ukraine
•
•
•
•
•
•
Support E-mail: [email protected]
Sales E-mail: [email protected]
Telephone: +380-44-247-69-78
Fax: +380-44-494-49-32
Web: www.ua.zyxel.com
Regular Mail: ZyXEL Ukraine, 13, Pimonenko Str., Kiev 04050, Ukraine
United Kingdom
•
•
•
•
•
•
•
Support E-mail: [email protected]
Sales E-mail: [email protected]
Telephone: +44-1344-303044, 08707-555779 (UK only)
Fax: +44-1344-303034
Web: www.zyxel.co.uk
FTP: ftp.zyxel.co.uk
Regular Mail: ZyXEL Communications UK Ltd., 11 The Courtyard, Eastern
Road, Bracknell, Berkshire RG12 2XB, United Kingdom (UK)
18
DEUTSCH
Einführung
Der NWA-8500 ist ein Access-Point (AP), der über einen PoE
(Power-over-Ethernet) WLAN-Controller mit Strom versorgt
wird. Der NWA-8500 erfordert keinen Netzadapter oder
Stromkabel. Sie können den NWA-8500 in Ihrem
Drahtlosnetzwerk einfach mit einem PoE-Wireless-Switch
verwenden. Mit dem NWA-8500 (in der folgenden Abbildung
AP bezeichnet) können Wireless-Clients im WLAN auf das
Internet oder auf das Drahtlosnetzwerk zugreifen.
In dieser Anleitung wird beschrieben, wie der NWA-8500 an
einen WLAN-Controller angeschlossen wird und wie der
NWA-8500 an einer Wand montiert wird.
19
DEUTSCH
1 Anschließen der Hardware
Führen Sie die unten beschriebenen Schritte aus, um den
NWA-8500 für den Internetzugriff anzuschließen.
1 Verbinden Sie mit einem Ethernet-Kabel den ETHERNETPort mit dem WLAN-Port eines PoE WLAN-Controllers.
Zum Zeitpunkt der Druckstellung kann nur der NWA-8500
mit dem Modell NXC-8160 verbunden werden.
1.1 LED-Anzeigen
Der NWA-8500 verfügt über eine Reihe von LED-Anzeigen.
20
DEUTSCH
Wenn der Ethernet-Port richtig angeschlossen ist, leuchten
alle LED-Anzeigen (PWR, LAN, WLAN 1 und WLAN 2). Wenn
Datenverkehr vorhanden ist, blinken die LED-Anzeigen LAN,
WLAN 1 und WLAN 2.
V
Wenn keine der LEDs leuchtet, prüfen Sie noch
einmal alle Kabelverbindungen. Stellen Sie
sicher, dass der Wireless-Switch eingeschaltet
ist. Wenn die LED-Anzeigen weiterhin nicht
leuchten, wenden Sie sich an Ihren Händler.
21
DEUTSCH
2 Aufstellen/Montieren der Hardware
Die günstigste Position für den AP ist im allgemeinen der
Mittelpunkt des Bereichs, der für die Drahtlosverbindungen
vorgesehen ist. Eine bessere Reichweite wird erzielt, wenn
Sie den NWA-8500 an einem höher gelegenen Ort montieren,
der frei von Hindernissen zu den anderen Geräten ist.
2.1 An einer Wand montiert
Führen Sie die nachfolgenden Schritte aus, um den NWA8500 an einer Wand zu montieren.
Eine Angabe der zu verwendenden Schrauben
und des Schraubabstands finden Sie in den
Produktspezifikationen.
1 Verwenden Sie eine Stelle an einer Wand, die sehr hoch
liegt und an der die Datenübertragung nicht durch
Hindernisse gestört werden kann.
2 Bohren Sie die zwei Löcher für die Schrauben.
22
DEUTSCH
Achten Sie beim Bohren der Löcher darauf,
keine unter der Wand verlegten Kabel oder
Rohre zu beschädigen.
3 Drehen Sie die Schrauben nicht ganz in die Wand ein.
Lassen Sie einen kleinen Abstand von ca. 0,5 cm
zwischen den Schraubköpfen und der Wand.
4 Stellen Sie sicher, dass die Schrauben fest in der Wand
befestigt sind. Sie müssen das Gewicht des NWA-8500
und der Anschlusskabel tragen können.
5 Richten Sie die Löcher an der Rückseite des NWA-8500
an den Schrauben in der Wand aus. Hängen Sie den
NWA-8500 an die Schrauben.
23
DEUTSCH
Produktspezifikationen
Abmessungen
198,5 x 138,5 x 47,5 mm (B x T x H)
Gewicht
400 g
Anschlüsse
Ein RJ-45-Ethernet-Port (Auto-Negotiating,
Auto MDI/MDI-X, 10/100 Mbps)
Antenne
Interne Antennen mit Dualband-Unterstützung
(2,4 GHz und 5 GHz)
Abstand zwischen den
Mittelpunkten der Schraublöcher
an der Geräterückseite (für die
Wandmontage).
140 mm
Empfohlene Schraubentypen für
die Wandmontage
M4-Gewindeschraube
(siehe Abbildung nächste
Seite)
Temperatur
bei Betrieb
0 °C bis 50 °C
Luftfeuchtigkeit bei
Betrieb
10 % bis 90 % RH (nicht-kondensierend)
Kennzeichnungen
EMC: FCC Klasse B, CE-EMC Klasse B, C-Tick
Klasse B, VCCI Klasse B
Sicherheit: CSA International, CE EN60950-1
24
DEUTSCH
Abmessungen einer M4-Gewindeschraube und eines Dübels
für die Wandmontage. Alle Angaben in Millimeter (mm).
Vorgehensweise zum Aufrufen einer
Produktzertifizierung
1 Gehen Sie auf www.zyxel.com.
2 Wählen Sie Ihr Produkt aus der Auswahlliste auf der
ZyXEL Homepage aus, um die Seite des entsprechenden
Produkts aufzurufen.
3 Wählen Sie die Zertifizierung, die Sie von dieser Seite aus
aufrufen möchten
25
DEUTSCH
26
ESPAÑOL
Introducción
El NWA-8500 es un punto de acceso que recibe corriente
desde un controlador WAN PoE (power over Ethernet). El
NWA-8500 no necesita un adaptador de corriente o cable de
alimentación. Simplemente despliegue el NWA-8500 en su
red inalámbrica con un switch inalámbrico PoE. A través del
NWA-8500 (etiquetado como AP en la figura siguiente), los
clientes inalámbricos de la WLAN pueden acceder a Internet
o a la red con cables.
Esta guía le muestra cómo conectar el NWA-8500 a un
controlador WLAN y colgar su NWA-8500 en una pared.
1 Conexiones del hardware
Siga estos pasos para conectar su NWA-8500 para el acceso
a Internet.
27
ESPAÑOL
1 Utilice el cable Ethernet incluido para conectar el puerto
ETHERNET a un puerto WLAN del controlador PoE
WLAN. En el momento de esta publicación, sólo puede
conectar el NWA-8500 al modelo NXC-8160.
1.1 LEDs
Mire los LEDs (luces) del NWA-8500.
28
ESPAÑOL
Los LEDs PWR, LAN, WLAN 1 y WLAN 2 están todos
encendidos cuando el puerto Ethernet está correctamente
conectado. Los LEDs LAN, WLAN 1 y WLAN 2 parpadean
cuando hay tráfico.
V
Si ninguno de los LEDs está encendido,
verifique sus conexiones y compruebe si el
cable está dañado. Asegúrese de que el switch
inalámbrico esté encendido. Si los LEDs
continúan apagados, contacte con su vendedor.
2 Montaje del hardware
En general, la mejor ubicación para el punto de acceso es en
el centro del área de cobertura. Para un mejor rendimiento,
monte el NWA-8500 en un lugar bien alto y libre de
obstáculos.
29
ESPAÑOL
2.1 Montaje en pared
Siga estos pasos para montar su NWA-8500 en una pared.
"
Consulte Especificaciones del producto para el
tamaño de los tornillos a usar y la distancia al
colocarlos.
1 Localice una posición alta en la pared libre de obstáculos.
2 Perfore dos agujeros para los tornillos.
"
Procure evitar dañar los tubos o cables situados
en el interior de la pared al perforar los agujeros
para los tornillos.
3 No inserte los tornillos hasta el fondo en la pared. Deje un
pequeño hueco de unos 0,5 cm entre las cabezas de los
tornillos y la pared.
4 Asegúrese de que los tornillos estén perfectamente
apretados en la pared. Deberán soportar el peso del
NWA-8500 con los cables de conexión.
30
ESPAÑOL
5 Alinee los agujeros en la parte posterior del NWA-8500
con los tornillos en la pared. Cuelgue el NWA-8500 en los
tornillos.
Especificaciones del producto
Dimensiones
198.5 (An) x 138.5 (F) x 47.5 (Al) mm
Peso
400 g
Conector
Un puerto Ethernet RJ-45 con autonegociación,
MDI/MDI-X automático 10/100 Mbps
Antena
Antenas internas con soporte de banda dual
(2.4 GHz y 5 GHz)
Distancia entre los centros de los
agujeros (para montaje en pared)
en la parte trasera del dispositivo.
140 mm
Tipo de tornillos recomendado
para el montaje en pared
Tornillo con cabeza M4
(ver figura siguiente)
31
ESPAÑOL
Temperatura
de operación
0?C ~ 50?C
Humedad de
operación
10% ~ 90% RH (no condensada)
Aprobaciones EMC: FCC Clase B, CE-EMC Clase B, C-Tick
Clase B, VCCI Clase B
Seguridad: CSA Internacional, CE EN60950-1
Estas son las dimensiones de un tornillo con cabeza M4 y del
taco de obra usado para el montaje en pared. Todas las
medidas están en milímetros (mm).
Procedimiento para ver las certificaciones
de un producto
1 Vaya a www.zyxel.com.
32
ESPAÑOL
2 Seleccione el producto que desea en el cuadro de lista
desplegable que se encuentra en la página principal de
ZyXEL para obtener acceso a la página de dicho
producto.
3 Seleccione la certificación que desea ver en esta página.
33
ESPAÑOL
34
FRANÇAIS
Introduction
Le NWA-8500 est un point d’accès qui reçoit l’alimentation à
partir d’un contrôleur WLAN PoE (power over Ethernet). Le
NWA-8500 ne nécessite ni un adaptateur d'alimentation, ni un
cordon d'alimentation. Il vous suffit de déployer le NWA-8500
dans votre réseau sans fil avec un commutateur PoE sans fil.
A travers le NWA-8500 (portant la marque AP dans la figure
suivante), les clients sans fil sur le WLAN peuvent accéder à
Internet ou au réseau câblé.
Ce guide vous montre comment connecter le NWA-8500 à un
contrôleur WLAN et suspendre votre NWA-8500 à un mur.
1 Connexions matérielles
Suivez les étapes ci-dessous pour connecter votre NWA8500 pour permettre l’accès à Internet.
35
FRANÇAIS
1 Utilisez le câble Ethernet inclus pour connecter le port
ETHERNET à un port WLAN du contrôleur PoE WLAN. Au
moment de la rédaction, vous pouvez uniquement
connecter le NWA-8500 au modèle NXC-8160.
1.1 LEDs
Observez les LEDs (voyants) sur le NWA-8500.
36
FRANÇAIS
Les LEDs PWR, LAN, WLAN 1 et WLAN 2 sont toutes
allumées quand le port Ethernet est correctement connecté.
Les LEDs LAN, WLAN 1 et WLAN 2 clignotent lorsqu’il y a du
trafic.
V
Si aucune des LEDs n'est allumée, vérifiez vos
connexions, et vérifiez si votre câble n’est pas
endommagé. Assurez-vous que votre
commutateur sans fil est allumé. Si les LEDs
sont toujours éteintes, contactez votre vendeur.
2 Fixation du matériel
En général, le meilleur emplacement pour le point d’accès est
au centre de votre zone de couverture sans fil. Pour obtenir
de meilleures performances, fixez le NWA-8500 sur un point
élevé et sans obstructions.
37
FRANÇAIS
2.1 Montage mural
Suivez les étapes pour fixer votre NWA-8500 à un mur.
"
Voir Spécifications du produit pour la taille des
vis à utiliser et l’espacement entre celles-ci.
1 Repérez une position élevée sur le mur ne comportant pas
d’obstructions.
2 Percez deux trous pour les vis.
"
Faites attention à ne pas endommager les
tuyaux ou les fils encastrés dans le mur lorsque
vous percez les trous pour les vis.
3 Ne vissez pas les vis sur toute leur longueur dans le mur.
Laissez un petit espace d’environ 0,5 cm entre les têtes
des vis et le mur.
4 Vérifiez que les vis sont bien fixées sur le mur. Elles
doivent pouvoir supporter le poids du NWA-8500 avec les
câbles de connexion.
38
FRANÇAIS
5 Alignez les trous au dos du NWA-8500 avec les vis sur le
mur. Suspendez le NWA-8500 aux vis.
Spécifications du produit
Dimensions
198,5(l) x 138,5(P) x 47,5(H) mm
Poids
400 g
Connecteur
Un port Ethernet RJ-45 en auto-négociation,
auto MDI/MDI-X 10/100 Mbps
Antenne
Antennes internes avec support double bande
(2,4 GHz et 5 GHz)
Distance entre les centres des
trous (pour la fixation murale) au
dos de l’appareil.
140 mm
Type de vis recommandé pour la
fixation murale
Vis-taraud M4 (voir la
figure ci-dessous).
39
FRANÇAIS
Température
de
fonctionnement
0°C ~ 50°C
Humidité de
fonctionnement
10% ~ 90% RH (sans condensation)
Homologations
EMC : FCC Classe B, CE-EMC Classe B, CTick Classe B, VCCI Classe B
Sécurité : CSA International, CE EN60950-1
Voici les dimensions d’une vis-taraud M4 et d'une cheville
pour la fixation murale. Toutes les mesures sont en
millimètres (mm).
40
FRANÇAIS
Procédure permettant de consulter une(les)
Certification(s) du Produit
1 Connectez vous sur www.zyxel.com.
2 Sélectionnez votre produit dans la liste déroulante se
trouvant sur la page d'accueil ZyXEL pour accéder à la
page du produit concerné.
3 Sélectionnez sur cette page la certification que vous
voulez consulter.
41
FRANÇAIS
42
ITALIANO
Introduzione
Il NWA-8500 è un Access Point che viene alimentato da un
controller WLAN PoE (power over Ethernet). Il NWA-8500
non richiede la presenza di un alimentatore né di un cavo di
alimentazione. Il NWA-8500 può essere inserito nella rete
wireless solo con uno switch wireless PoE. Tramite il NWA8500 (etichettato AP nella figura seguente), i client wireless
della WLAN possono accedere a Internet sulla rete cablata.
In questa guida viene mostrato come collegare il NWA-8500 a
un controller WLAN e fissare il NWA-8500 a una parete.
1 Collegamenti hardware
Attenersi alla procedura seguente per collegare NWA-8500
per l'accesso a Internet.
43
ITALIANO
1 Utilizzare il cavo Ethernet fornito a corredo per collegare
la porta ETHERNET alla porta WLAN di un controller
WLAN PoE. Nel momento della scrittura di questo
documento è possibile collegare il NWA-8500 solo al
modello NXC-8160.
1.1 LED
Osservare i LED (spie) presenti sul NWA-8500.
44
ITALIANO
I LED PWR, LAN, WLAN 1 e WLAN 2 sono tutti accesi
quando la porta Ethernet è collegata correttamente. I LED
LAN, WLAN 1 e WLAN 2 lampeggiano quando c'è traffico.
V
Se nessuno dei LED è acceso, verificare i
collegamenti e controllare che il cavo non
presenti alcun danno. Verificare che lo switch
wireless sia acceso. Se i LED restano ancora
spenti, contattare il rivenditore.
2 Montaggio dell'hardware
In generale, la posizione migliore per il punto di accesso è al
centro dell’area di copertura wireless. Per prestazioni ottimali,
montare il dispositivo in posizione soprelevata, senza
ostacoli. Per prestazioni ottimali, montare il NWA-8500 in
posizione sopraelevata, senza ostacoli.
45
ITALIANO
2.1 Montaggio a muro
Seguire i seguenti punti per applicare ZyAIR NWA-8500 ad
una parete.
"
Vedere Caratteristiche tecniche del prodotto per
le dimensioni delle viti del da utilizzare e per
come distanziarle.
1 Individuare una posizione elevata sul muro che sia esente
da ostacoli.
2 Praticare due fori per le viti.
"
Fare attenzione a non danneggiare tubazioni o
cavi che si trovano nel muro quando si
eseguono i fori per le viti con il trapano.
3 Non inserire le viti fino in fondo nella parete. Lasciare un
piccolo spazio di circa 0,5 cm tra la testa delle viti e il
muro.
4 Verificare che le viti siano fissate alla parete in modo
sicuro. Esse devono sostenere il peso del NWA-8500
insieme ai cavi di collegamento.
46
ITALIANO
5 Allineare i fori presso la parte posteriore di ZyAIR NWA8500 con le viti sulla parete. Appendere il NWA-8500 sulle
viti.
Caratteristiche tecniche del prodotto
Dimensione
198,5 (lungh.) x 138,5 (largh.) x 47,5 (alt.) mm
Peso
400 g
Connettore
Una porta Ethernet RJ-45, auto MDI/MDI-X 10/
100 Mbps, auto-negoziante
Antenna
Antenne interne con supporto per dual-band
(2,4 GHz e 5 GHz)
Distanza tra i centri dei fori (per il
montaggio a muro) sul retro del
dispositivo.
140 mm
Tipo di viti consigliate per il
montaggio a muro
Tasselli M4 (vedere la
figura sotto)
47
ITALIANO
Temperatura
d'esercizio
Da 0°C a 50°C
Umidità
d'esercizio
Dal 10% al 90% di umidità relativa (senza
formazione di condensa)
Certificazioni
EMC: FCC Classe B, CE-EMC Classe B, CTick Classe B, VCCI Classe B
Sicurezza: CSA International, CE EN60950-1
Le seguenti sono le dimensioni di un tassello M4 e del tappo
da parete utilizzato per il montaggio a muro. Tutte le
misurazioni sono espresse in millimetri.
Procedura per visualizzare le certificazioni di
un prodotto
1 Andare alla pagina www.zyxel.com.
48
ITALIANO
2 Nel sito ZyXEL, selezionare il proprio prodotto dall’elenco
a discesa per andare alla pagina di quel prodotto.
3 Da questa pagina selezionare la certificazione che si
vuole vedere.
49
ITALIANO
50
РУССКИЙ
Вступление
NWA-8500 является точкой доступа, которая получает
питание через контроллер БЛВС с функцией PoE (питание
через Ethernet). NWA-8500 не требует использования
сетевого адаптера или шнура питания. Вы можете просто
подключить NWA-8500 к вашей беспроводной сети с
беспроводным маршрутизатором с функцией PoE. Через
NWA-8500 (отмеченный как AP на следующем рисунке),
беспроводные клиенты БЛВС могут получить к сети
Интернет или проводной сети.
Это руководство покажет, как нужно подключать NWA8500 к контроллеру БЛВС и закреплять ваш NWA-8500 на
стене.
51
РУССКИЙ
1 Подключение оборудования
Ниже приведены инструкции по настройке NWA-8500 для
получения доступа к сети Интернет.
1 С помощью кабеля Ethernet подключите порт
ETHERNET к порту WLAN контроллера БЛВС с
функцией PoE. На момент написания руководства
NWA-8500 можно подключить только к модели NXC8160.
1.1 Светодиодные индикаторы
Посмотрите на индикаторы на NWA-8500.
52
РУССКИЙ
Индикаторы PWR, LAN, WLAN 1 и WLAN 2 должны
включаться при правильном подключении к порту
Ethernet. При передаче данных индикаторы LAN, WLAN 1
и WLAN 2 будут мигать.
V
Если ни один из индикаторов не загорается,
проверьте надежность подключений и
состояние кабеля. Убедитесь, что ваш
беспроводной маршрутизатор включен в
сеть. Если индикаторы все еще не горят, то
обратитесь к продавцу.
53
РУССКИЙ
2 Монтаж оборудования
В общем, наилучшей точкой установки точки входа
является центр зоны, в которой нужно обеспечить
покрытие беспроводной сети. Для достижения наилучшей
производительности установите NWA-8500 повыше, в
свободном от препятствий месте.
2.1 Крепление на стену
Ниже приведены инструкции по креплению NWA-8500 к
стене.
"
Смотрите Характеристики изделия, где
приведены размеры используемых винтов и
расстояния между ними.
1 Расположите в верхней части стены, в свободном от
преград месте.
2 Просверлите два отверстия для винтов.
"
Будьте внимательны: не повредите кабели и
трубы внутри стены при просверливании
отверстий.
54
РУССКИЙ
3 Не вкручивайте винты в стену полностью. Оставьте
небольшой промежуток в 0,5 см между головкой винта
и стеной.
4 Убедитесь, что винты плотно вошли в стену. Они
должны выдерживать вес NWA-8500 с
соединительными кабелями.
5 Совместите отверстия на задней поверхности NWA8500 с винтами на стене. Подвесьте NWA-8500 на
винтах.
Характеристики изделия
Размеры
198.5 (Ш) x 138.5 (Г) x 47.5 (В) мм
Вес
400 г
Разъем
Один Ethernet порт 10/100 Мбс RJ-45 с
разъемом MDI/MDI-X и автосогласованием
Антенна
Внутренние антенны с поддержкой двух
полос (2.4 ГГц и 5 ГГц)
55
РУССКИЙ
Расстояние между центрами
отверстий (для крепежа на
стену) на задней панели
устройства.
140 мм
Рекомендуемый тип винтов для
крепежа на стену
M4 Саморез (см. рисунок
внизу)
Рабочая
0 C ~ 50 C
температура
Рабочая
влажность
10% ~ 90% относительной влажности (без
конденсата)
Утверждено
EMC: FCC Class B, CE-EMC Class B, C-Tick
Class B, VCCI Class B
Безопасность: CSA International, CE
EN60950-1
56
РУССКИЙ
Ниже показаны размеры саморезов M4 и дюбелей,
которые используются для крепежа к стене. Все размеры
приведены в миллиметрах (мм).
Процедура просмотра сертификатов
изделий
1 Зайдите на сайт www.zyxel.ru.
2 Выберите нужное изделие из раскрывающегося списка
на домашней странице корпорации ZyXEL и перейдите
на страницу, посвященную этому изделию.
3 Выберите на этой странице в разделе "Для заказа"
нужный сертификат для просмотра.
57
РУССКИЙ
58
SVENSKA
Introduktion
NWA-8500 är en åtkomstpunkt som får ström från en PoE
(Power over Ethernet) WLAN-kontrollenhet. NWA-8500
behöver ingen strömadapter eller strömsladd. Du kan bara
använda NWA-8500 i ditt trådlösa nätverk med en trådlös
PoE-switch. Genom NWA-8500 (märkt AP i följande figur) kan
trådlösa klienter i WLAN få åtkomst till Internet eller det
stationära nätverket.
Denna guide visar hur du ansluter NWA-8500 till en WLANkontrollenhet och hänger upp NWA-8500 på väggen.
1 Maskinvaruanslutningar
Följ nedanstående steg för att ansluta NWA-8500 för Internetåtkomst.
59
SVENSKA
1 Använd den medföljande Ethernet-sladden för att ansluta
porten ETHERNET till en PoE WLAN-kontrollenhets
WLAN-port. När detta skrivs går det endast att ansluta
NWA-8500 till modell NXC-8160.
1.1 Indikatorlampor
Titta på indikatorlampan(-orna) på NWA-8500.
Indikatorlamporna PWR, LAN, WLAN 1 och WLAN 2 är alla
tända när Ethernet-porten är rätt ansluten. Indikatorlamporna
LAN, WLAN 1 och WLAN 2 blinkar när det finns trafik.
60
SVENSKA
V
Om ingen indikatorlampa är tänd, kontrollera
dina anslutningar och syna sladden då att den
inte är skadad. Kontrollera att din trådlösa
switch är påslagen. Om indikatorlamporna
fortfarande är släckta, kontakta din
återförsäljare.
2 Montera maskinvara
I allmänhet ligger den bästa placeringen för åtkomstpunkten i
centrum av det avsedda trådlösa täckningsområdet. För
bättre prestanda, montera NWA-8500 högt upp på en plats
utan hindrande föremål.
2.1 Väggmontering
Gör så här för att montera NWA-8500 på väggen.
"
Se Produktspecifikationer angående vilken
skruvstorlek du ska använda och hur tätt de ska
sitta.
61
SVENSKA
1 Hitta en högt belägen placering på väggen, fritt från
hinder.
2 Borra två hål för skruvarna.
"
Var försiktig så att du inte skadar rör eller
sladdar som är dragna inne i väggen när du
borrar hålen till skruvarna.
3 Skruva inte in skruvarna hela vägen in i väggen. Lämna
ett litet mellanrum på cirka 0,5 cm mellan skruvhuvudena
och väggen.
4 Kontrollera att skruvarna är ordentligt fästa i väggen. De
måste kunna bära upp vikten av NWA-8500 plus
anslutningssladdarna.
5 Passa in hålen på baksidan av NWA-8500 med skruvarna
i väggen. Häng NWA-8500 på skruvarna.
62
SVENSKA
Produktspecifikationer
Mått
198,5 (B) x 138,5 (D) x 47,5 (H) mm
Vikt
400 g
Anslutning
En autoförhandlande, auto-MDI/MDI-X 10/100
Mbps RJ-45 Ethernet-port
Antenn
Inbyggda antenner med stöd för dubbelband
(2,4 GHz och 5 GHz)
Avstånd mellan hålens centrum
(för väggmontering) på enhetens
baksida.
140 mm
Rekommenderad skruvtyp för
väggmontering
M4 tappskruv (se figuren
nedan)
Driftstempera 0º C ~ 50º C
tur
Driftsluftfuktig 10 % ~ 90 % RH (icke-kondenserande)
het
Godkännand
en
EMC: FCC klass B, CE-EMC klass B, C-Tick
klass B, VCCI klass B
Säkerhet: CSA International, CE EN60950-1
63
SVENSKA
Följande är måtten för en M4 tappskruv och tegelplugg som
används för väggmontering. Alla mått är i millimeter (mm).
Procedur för att visa en produkts certifikat
1 Gå till www.zyxel.com.
2 Välj din produkt från rullgardinslistrutan på ZyXEL:s
hemsida för att gå till denna produkts sida.
3 Välj det certifikat du vill titta på från denna sida.
För mer information och support besök www.support.zyxel.se.
64
简体中文
介绍
NWA-8500 是一个从 PoE (以太网供电)WLAN 控制器接收供电
的访问点。 NWA-8500 不需要电源适配器或电源线。只需将
NWA-8500 与 PoE 无线交换机部署到无线网络中即可。WLAN 上
的无线客户可通过 NWA-8500 (下图中贴有 AP 标签)访问
Internet 或有线网络。
本手册讲解如何将 NWA-8500 连接至 WLAN 控制器,以及如何
将 NWA-8500 安装在墙壁上。
1 硬件连接
按照下列步骤连接 NWA-8500,以便访问 Internet。
65
简体中文
1 使用附送的 Ethernet ( 以太网 ) 电缆将 ETHERNET 端口连
接到 PoE WLAN 控制器的 WLAN 端口。至本手册编写时为
止,只能将 NWA-8500 连接到 NXC-8160 型号。
1.1 LED ( 指示灯 )
查看 NWA-8500 上的 LED ( 指示灯 )。
正确连接至 Ethernet ( 以太网 ) 端口时,PWR、LAN、WLAN 1
和 WLAN 2 LED ( 指示灯 ) 点亮。通信时,LAN、WLAN 1 和
WLAN 2 LED ( 指示灯 ) 闪烁。
66
简体中文
V
如果所有 LED ( 指示灯 ) 均未点亮,请检查连接
及电缆是否损坏。确保无线交换机开启。如果
LED ( 指示灯 ) 仍未点亮,请联系供应商。
2 硬件安装
通常,访问点的最佳位置应为无线覆盖区域的中心。为获得更
佳的性能,请将 NWA-8500 安装在不受阻碍区域的高处。
2.1 墙面安装
请按照下列步骤将 NWA-8500 安装在墙壁上。
"
查阅 产品规格 以了解使用的
以及螺丝钉之间的距离。
螺丝钉的尺寸,
1 在不受阻碍的墙壁上找一较高位置。
2 钻两个螺丝孔。
"
钻螺丝孔时请小心,以避免损坏安装在墙壁内的
管道或线缆。
67
简体中文
3 不要将螺丝钉完全拧入墙壁。在螺丝钉头部与墙壁间保留大
约 0.5 cm 的间隙。
4 请确保将螺丝钉紧紧固定在墙壁上。螺丝钉需要承受 NWA8500 及连接线的重量。
5 将 NWA-8500 背后的孔与墙壁上的螺丝钉对齐。将 NWA8500 悬挂在螺丝钉上。
产品规格
尺寸
198.5 (W) x
138.5 (D) x 47.5 (H) mm
重量
400
连接器
一个自动协商、自动 MDI/MDI-X 10/100 Mbps
RJ-45 以太网端口
天线
内置天线,支持双频 (2.4 GHz 和 5 GHz)
g
设备背部孔 (用于墙壁安装)中心 140 mm
间距
推荐的用于墙壁安装的螺丝钉类型
68
M4 自攻螺丝钉 (参见下
图)
简体中文
工作温度
0?C ~ 50?C
工作湿度
10% ~ 90% RH (无冷凝)
认证
EMC:FCC Class B、CE-EMC Class B、C-Tick
Class B、VCCI Class B
安全性:CSA International、CE EN60950-1
下面是用于墙壁安装的 M4 螺丝钉和胀塞的尺寸。所有尺寸均
以毫米为单位 (mm)。
查看产品认证信息步骤
1 到 http://www.zyxel.cn 网站。
2 在合勤科技 (ZyXEL) 首页上的下拉式列表框中选取所要的
产品,跳至该产品的页面。
3 在页面中选取要产看的认证信息。
69
简体中文
70
繁體中文
簡介
NWA-8500 為一基地台,從 PoE ( 乙太網路供電 ) WLAN 控制器
接收電源。 NWA-8500 並不需要電源配接器或電源線。您可用一
台 PoE 無線交換器,將 NWA-8500 部署在您的無線網路中。透
過 NWA-8500 ( 下圖中標示 AP 者 ),在 WLAN 上的無線用戶就
能接取網際網路或有線網路。
本手冊將介紹如何將 NWA-8500 連接至 WLAN 控制器,以及如
何將 NWA-8500 掛在牆上。
1 硬體連接
依照以下步驟連接 NWA-8500 以接取網際網路。
71
繁體中文
1 使用隨附的乙太網路線,將 ETHERNET 埠連接至 PoE WLAN
控制器的 WLAN 埠。在本文撰寫時,僅能將 NWA-8500 連
接至 NXC-8160 機型。
1.1 LED 指示燈
請注意看 NWA-8500 上的 LED ( 指示燈 )。
當乙太網路埠正確連接時,PWR、LAN、WLAN 1 及 WLAN 2 的
LED 指示燈全都亮起。有流量時,LAN、WLAN 1 及 WLAN 2 的
LED 指示燈閃爍。
72
繁體中文
V
如果 LED 指示燈都沒亮,請檢查連線,並檢查
纜線是否損壞。確認無線開關的電源開啟。如果
LED 指示燈仍然沒有亮,請聯絡當地的供應商。
2 硬體固定
一般而言,無線網路基地台最好的放置地點是無線網路覆蓋區
域的中央。若要發揮較佳效能,請將 NWA-8500 安裝在高處沒
有障礙物的地方。
2.1 壁掛式安裝
依照以下步驟將 NWA-8500 固定在牆面上。
"
參閱 產品規格 找出 所用的螺絲釘尺寸,以及螺
絲釘的間距。
1 在牆上找出一個沒有障礙物干擾的高處位置。
2 鑽兩個孔給螺絲釘用。
73
繁體中文
"
在鑽螺絲孔時,請小心勿損傷到牆內的管線或纜
線。
3 不要把螺絲釘全部旋入牆中, 螺絲頭與牆面之間須留一小段
大約 0.5 cm 的空隙。
4 確認螺絲釘已緊密的固定在牆上。它們必須支撐住 NWA8500 及連接纜線的重量。
5 使 NWA-8500 背面的孔洞對齊牆面上的螺絲釘。將 NWA8500 掛在螺絲釘上。
產品規格
尺寸
198.5 (W) x 138.5 (D) x 47.5 (H) mm
重量
400 g
連接器
一個自動協調、自動跳接 (auto MDI/MDI-X) 的
10/100 Mbps RJ-45 乙太網路埠
74
繁體中文
天線
內部天線支援雙波域 (2.4 GHz 及 5 GHz)
在裝置背面上,圓孔中心 (壁掛
用)的間距。
140 mm
壁掛式建議的螺絲釘類型
M4 攻絲螺絲釘 ( 參閱下圖
)
作業溫度
0?C ~ 50?C
作業溼度
10% ~ 90% RH ( 非凝結狀態 )
認可
EMC:FCC B 級、CE-EMC B 級、C-Tick B 級、
VCCI B 級
安全性:CSA 國際部、CE EN60950-1
以下為 M4 攻絲螺絲釘及壁掛式固定用泥水柱塞的尺寸。所有
的測量單位是公厘 (mm)。
75
繁體中文
檢視產品檢定資訊步驟
1 到 http://www.zyxel.com.tw/ 網站。
2 在合勤科技 (ZyXEL) 首頁上的下拉式清單方塊中選取所要
的產品,移至該產品的頁面。
3 在頁面中選取要檢視的檢定資訊。
76