1
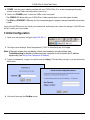
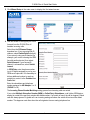
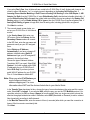
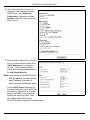
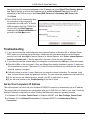
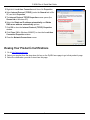
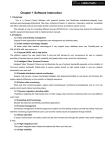
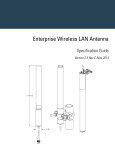
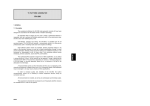
P-202H Plus v2
ISDN Internet Access Router
Quick Start Guide
Version 3.40
6/2006
Edition 1
P-202H Plus v2 Quick Start Guide
Overview
The P-202H Plus v2 is an ISDN router with a four-port built-in switch. It is equipped with two integrated phone
ports for connecting analog phones and/or fax devices. It also provides advanced calling features, such as call
waiting, three-way calling, call transferring and forwarding.
See your User’s Guide for background information on all features.
1 Requirements
Make sure you have the following things before you set up your P-202H Plus v2.
• Internet access - account information provided by your ISP, such as user name, password, and so on.
• Internet Explorer 6.0 or later or Netscape Navigator 7.0 or later, with JavaScript enabled.
2 Hardware Connections
1 PHONE 1-2: Use a telephone cable (and any telephone adaptors provided with your P-202H Plus v2) to
connect your telephones to these ports. If you only have one telephone, you should only use one port.
2 ISDN: Use the included ISDN cable to connect your P-202H Plus v2’s ISDN port to the ISDN wall jack.
3 ETHERNET: Use an Ethernet cable to connect a computer to the ETHERNET port for initial configuration
and/or Internet access.
2
P-202H Plus v2 Quick Start Guide
4 POWER: Use the power adaptor provided with your P-202H Plus v2 to connect an appropriate power
source to this port. Make sure the power source is on.
5 Push in the POWER button. Look at the LEDs on the front panel.
• The POWER LED blinks while your P-202H Plus v2 starts up and stays on once the system is ready.
• The ISDN and ETHERNET LEDs stay on if the corresponding port is properly connected and blinks when there
is traffic.
If any of these LEDs are not on, check your connections, and inspect your cables for damage. If the LEDs are
still off, contact your local vendor.
3 Initial Configuration
1 Open your web browser, and go to http://192.168.1.1.
2 The login screen displays. Enter the password (“1234” is the default) and click Login.
Note: If the login screen does not display, check your browser’s security settings (see
Troubleshooting for details) or make sure your computer is set to receive an IP address
dynamically (see Set Up Your Computer’s IP Address).
3 Type a new password, re-type it to confirm, and click Apply. (The next time you log in, you should not see
this screen.
4 You should now see the Site Map screen.
3
P-202H Plus v2 Quick Start Guide
5 Click Wizard Setup in the main menu to display the first wizard screen.
6 Use this screen to configure your ISDN
line and how the P-202H Plus v2
handles incoming calls.
Select from the B Channel Usage
dropdown box. If you are using both B
channes, select Switch/Switch (default).
If you are only using one B channel (for
example, your router is sharing the ISDN
line with another device), then select
Switch/Unused. If your second B
channel is a leased line, select Switch/
Leased.
In ISDN Data, enter the phone number
(up to 25 digits) assigned to you by your
ISDN service provider. If it's necessary to
dial an additional number to reach an
outside line, enter it in the Outside Line
Prefix field.
Enter the subaddress and telephone
number assigned to A/B Adapter 1 or 2
(PHONE 1 or 2).
The Incoming Phone Number Matching setting governs how incoming calls are routed.
If you select Multiple Subscriber Number (MSN) or Called Party Subaddress, a call (either ISDN data or
analog) is routed to the port that matches the dialed number; if no match is found, the call is dropped. Global
calls are always ignored. A global call is an incoming analog call where the switch did not send the dialed
number. This happens most often when the call originates from an analog telephone line.
4
P-202H Plus v2 Quick Start Guide
If you select Don't Care, then all data calls are routed to the P-202H Plus v2 itself. Analog calls, however, are
routed to either A/B adapter 1 or 2, or simply ignored, depending on the Analog Call Routing field. If
Incoming Phone Number Matching is Don't Care and Analog Call Routing is either A/B Adapter 1, A/B
Adapter 2 or Both, then the P-202H Plus v2 uses Global Analog Call to decide how to handle global calls. If
you set Global Analog Call to Accept, then global calls are routed to the port according to the Analog Call
Routing setting; if you set Global Analog Call to Ignore, then the P-202H Plus v2 ignores all global calls. If
Analog Call Routing is Ignore to begin with, then all analog calls, including global calls, are ignored.
Click Next to continue.
7 The second wizard screen helps you
set up your P-202H Plus v2 for Internet
access.
In the Service Name field, enter your
ISP's name. Enter the Primary and the
Secondary Phone numbers to connect
to the ISP. Next, enter the user name and
password exactly as your ISP assigned
them.
Select Obtain an IP Address
Automatically if you have a dynamic IP
address; otherwise select Static IP
Address and type your ISP assigned IP
address in the text box below.
Choose the type of Network Address
Translation (NAT) you need. Select Full
Feature if you have multiple public WAN
IP addresses for your P-202H Plus v2.
Select SUA Only if you have just one
public WAN IP address for your P-202H
Plus v2. Select None to disable NAT.
Note: When you select Full Feature you
must configure at least one
address mapping set. For more
information about NAT and the choices listed refer to your User's Guide.
In the Transfer Type drop-down list box, choose the type of connection between the router and this remote
node. Select 64K, or Leased. If you selected 64K, select the way you use the PPP Multilink protocol. You
can either select not to (Off) or always (Always) to bundle multiple links in a single connection to boost the
effective throughput between two nodes. Otherwise, select BOD (Bandwidth on Demand) to add or subtract
links dynamically according to traffic demand.
In the Max Idle Timeout field, enter the amount of time (in seconds) after which you want the connection to
timeout if the line remains consistently idle.
Click Next.
5
P-202H Plus v2 Quick Start Guide
8 Verify the settings in the screen. To
change the LAN information on the P202H Plus v2, click Change LAN
Configuration. Otherwise click Save
Settings to save the configuration and
skip to step 10.
9 Enter the LAN IP address of your P-202H
Plus v2 in dotted decimal notation in the
LAN IP Address field. For example,
192.168.1.1 (factory default). Enter a
subnet mask in dotted decimal notation in
the LAN Subnet Mask field.
Note: If you change the P-202H Plus v2's
LAN IP address, you must use the
new IP address if you want to
access the web configurator again.
From the DHCP Server drop-down list
box, select On to allow your P-202H Plus
v2 to assign IP addresses, an IP default
gateway and DNS servers to computer
systems that support the DHCP client.
Select Off to disable DHCP server.
When DHCP server is used, set the following items:
6
P-202H Plus v2 Quick Start Guide
Specify the first of the contiguous addresses in the IP address pool in the Client IP Pool Starting Address
field. Specify the size or count of the IP address pool in the Size of Client IP Pool field. Enter the IP
address(es) of the DNS server(s) in the Primary DNS Server and/or Secondary DNS Server fields.
Click Finish.
10 The P-202H Plus v2 automatically tests
the connection to the computer(s)
connected to the LAN ports. To test the
WAN connection from the P-202H Plus
v2 to the ISP, click Start Diagnose.
Otherwise click Return to Main Menu to
go back to the Site Map screen.
Troubleshooting
1 If you cannot access the web configurator using Internet Explorer in Windows XP or Windows Server
2003, make sure you allow pop-up windows, JavaScripts and Java permissions or set the Internet
security level lower than High in Internet Explorer (in Internet Explorer, click Tools > Internet Options >
Security > Custom Level...). See the appendix in the User’s Guide for more information.
2 If you cannot access the Internet when your computer is connected to the LAN port, follow these steps.
A) Check the LEDs on the front panel. If they are different than what is described in section 2, make sure
the connections are correct. (See section 2.) If the LEDs are still different, turn off the device, wait a few
seconds, and turn it on again.
B) Follow the steps in section 3 again. Make sure you enter the correct information. For example, make
sure you type the user name and password correctly. The user name and password are case sensitive.
C) If you are using a new Internet account, contact your ISP to make sure it is active.
D) If you still have problems, see Troubleshooting in the User’s Guide.
Set Up Your Computer’s IP Address
This section shows you how to set your Windows NT/2000/XP computer to automatically get an IP address.
This ensures that your computer can communicate with your P-202H Plus v2. Refer to your User’s Guide for
detailed IP address configuration for other Windows and Macintosh computer operating systems.
1 In Windows XP, click start, Control Panel. In Windows 2000/NT, click Start, Settings, Control Panel.
2 In Windows XP, click Network Connections. In Windows 2000/NT, click Network and Dial-up
Connections.
7
P-202H Plus v2 Quick Start Guide
3 Right-click Local Area Connection and then click Properties.
4 Select Internet Protocol (TCP/IP) (under the General tab in Win
XP) and click Properties.
5 The Internet Protocol TCP/IP Properties screen opens (the
General tab in Windows XP).
6 Select the Obtain an IP address automatically and Obtain
DNS server address automatically options.
7 Click OK to close the Internet Protocol (TCP/IP) Properties
window.
8 Click Close (OK in Windows 2000/NT) to close the Local Area
Connection Properties window.
9 Close the Network Connections screen.
Viewing Your Product’s Certifications
1 Go to http://www.zyxel.com.
2 Select your product from the drop-down list box on the ZyXEL home page to go to that product's page.
3 Select the certification you wish to view from this page.
8