1
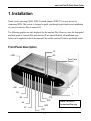
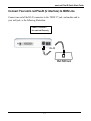
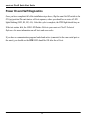
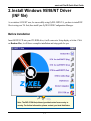
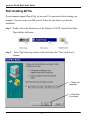
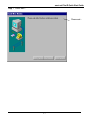
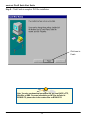
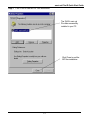
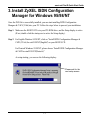
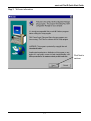
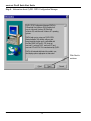
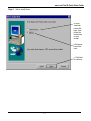
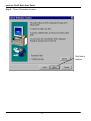
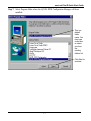
ZyXEL
TOTAL INTERNET A CCESS S OLUTION
omni.net Plus/D
ISDN Terminal Adapter
Quick Start Guide
GUI Configuration Manager l 3Way Conference l Call Waiting
Call Forwarding l Call Hold/Retrieve l Multiple Subscriber Number
Advice of Charge l Caller ID Support l Quick Dial l Intercom
omni.net Plus/D Quick Start Guide
Table of Contents
1.
Installation _____________________________________________________ 1-1
Front Panel Description ________________________________________________1-1
Back Panel Description and Connections (S/T Interface) ________________________1-4
Connect Your omni.net Plus/D (U interface) to ISDN Line _______________________1-5
Power On and Self Diagnostics___________________________________________1-6
2.
Install Windows 95/98/NT Driver (INF file) _________________________ 2-1
Before Installation ____________________________________________________2-1
Start Installing INF file ________________________________________________2-2
3.
Install ZyXEL ISDN Configuration Manager for Windows 95/98/NT ______ 3-1
4.
Setup ZyXEL ISDN Configuration Manager for Windows 3.x ____________ 4-1
Customer Support____________________________________________________ 4-2
i
omni.net Plus/D Quick Start Guide
1. Installation
Thank you for choosing ZyXEL ISDN Terminal Adapter (ISDN TA) as your device for
connecting ISDN. This section is designed to guide you through a quick and correct installation
of your new omni.net Plus or omni.net D.
The following graphics are only displayed for the omni.net Plus. However, since the front panel
and back panel of omni.net Plus and omni.net D are almost identical, all installation steps
below can be applied to both of the omni.net Plus and the omni.net D unless specifically noted.
Front Panel Description
TX
RX
PWR
Front Panel
Switch
2
LNK
B1
1
B2
CTS
RTS
AA
DSR
CP
DTR
1-1
Phone 1 & Phone 2
for omni.net Plus only
omni.net Plus/D Quick Start Guide
Front Panel LEDs
LED
Function
Active
Description
PWR
Power LED
On
When the power is turned ON.
LNK
Link LED
On
W h e n the link with the local ISDN switch is active.
Blinking
When attempting to make a connection.
B1
B1 Channel
On
When the B1 channel is established.
B2
B2 Channel
On
When the B2 channel is established.
AA
Auto - A n s w e r
On
When your ISDN TA is in Auto Answer m o d e .
Blinking
When your TA rings.
CP
Compression
On
When Data Compression is being used over one or more
of the B Channels. Compression types are Hi/fn LZS
(formerly Stac) for PPP connections, and V.42bis for
V.120 or X.75 connections.
DTR
Data Terminal
Ready
On
When the DTE or computer connected to the DTE
port signals that it is ready for communication by
establishing the RS- 2 3 2 l i n k .
DSR
Data Set
Ready
On
When the modem is ready for communication with the
DTE.
RTS
Request To Send
On
When the DTE has data to be sent to the remote modem.
The RTS signal is used in Hardware Handshaking.
CTS
Clear To Send
On
When the modem is ready to receive data from the
remote modem. The CTS signal is used in Hardware
Handshaking.
TX
Transmit Data
Blinking
W h e n t h e D T E / C o m puter transmits data to the
DTE port.
RX
Receive Data
On
When the DTE/Computer receives data from the
DTE port.
Phone 1
(for omni.net
Plus only)
On
When the POTS port 1 telephone/handset is off-hook.
Phone 2
(for omni.net
Plus only)
On
When the POTS port 2 telephone/handset is off-hook.
1-2
omni.net Plus/D Quick Start Guide
Front Panel Switch
When the TA is in command state, pressing the front panel button causes it to dial the default
phone number pre-stored in the NVRAM. The default number pointer to the telephone
directory is assigned by the AT*Dn command.
When the TA is on-line, pressing the button will tear down the connection and bring it into
command state.
1-3
omni.net Plus/D Quick Start Guide
Back Panel Description and Connections (S/T Interface)
Phone 1 & Phone 2
for omni.net Plus only
Power ON/OFF
Switch
Power
Outlet
Power
Adapter
Power
Input
To DTE
ISDN
Phone 1
Phone 2
Tel
Tel
Fax
Fax
NT-1 Device
Computer
Back Panel Switch and Connectors
ON/OFF
Power ON/OFF switch
POWER
Input terminal for power adapter.
To DTE
Serial port DB-25 female connector for connection to the serial port of a DTE
(computer/terminal).
ISDN
ISDN RJ-45 terminal jack; connects to a S/T interface or a U interface..
PHONE 1
RJ-11 terminal jack for analog adapter 1; for connecting to analog equipment. (phone,
fax, answering machine, etc.)
PHONE 2
RJ-11 terminal jack for analog adapter 2; for connecting to analog equipment. (phone,
fax, answering machine, etc.)
1-4
omni.net Plus/D Quick Start Guide
Connect Your omni.net Plus/D (U interface) to ISDN Line
Connect one end of the RJ-45 connectors to the “ISDN U” jack, and another end to
your wall jack, as the following illustration:
Phone 1 & Phone 2
for omni.net Plus only
RJ-45
1-5
omni.net Plus/D Quick Start Guide
Power On and Self Diagnostics
Once you have completed all of the installation steps above, flip the omni On/Off switch to the
ON (up) position.The unit starts a self-test sequence, where you should see a series of LED
lights blinking (LED, B1, B2, AA). After this cycle is complete, the PWR light should stay on.
If the test routine fails, the LNK LED flashes. Refer to your omni.net Plus/D Technical
Reference for more information on self-tests and error codes.
If you have a communication program loaded and active (connected to the same serial port as
the omni), you should see the DTR LED should be ON after the self-test.
1-6
omni.net Plus/D Quick Start Guide
2. Install Windows 95/98/NT Driver
(INF file)
As a windows 95/98/NT user, for successfully us ing ZyXEL ISDN TA, you have to install INF
files to setup your TA first, then install your ZyXEL ISDN Configuration Manager.
Before Installation
Insert BONUS CD into your CD-ROM drive, it will come out a Setup display as below. Click
on Readme files, it will show a complete installation and setup guide for you.
Note: The RVS-COM Lite(software) provided varies from country to
country. For further information, please contact your local distributor.
2-1
omni.net Plus/D Quick Start Guide
Start Installing INF file
If your computer supports Plug & Play, be sure your TA is powered on before starting your
computer. If you are using a non-PnP protocol, follow the steps below to perform the
installation:
Step 1. Double-click on the Modems icon in the Windows 95/98/NT Control Panel folder.
Then click the Add button.
Step 2.
Select "Don't detect my modem; I will select form a list." Then, click Next to
continue.
1. Select this
checkbox.
2. Click Next
to continue.
2-2
omni.net Plus/D Quick Start Guide
Step 3. Click Have Disk, then follow the instructions on the following illustrations:
Click here to
continue.
3. Use Browse to
find the location of
the updated INF
file.
2-3
omni.net Plus/D Quick Start Guide
4. Select your CD-ROM drive (here is D: ),
then you will see the next display.
5. Select INF folder, it
will come out a list of
INF files in the left
column.
(For Windows NT3.51
user, please select
winnt3.51 folder.)
6. Don’t make any
selection here. Click
OK to go to the next
screen.
Step 4. Click OK to install INF files from your BONUS CD.
Click OK to continue.
2-4
omni.net Plus/D Quick Start Guide
Step 5. Use the scroll bar to locate the model name of your ZyXEL ISDN TA, then click once
on the new device 'ZyXEL omni.net PLUS" or "ZyXEL omni.net D."
Click here for
you new
omni.net Plus.
For omni.net D,
you have to
select 'ZyXEL
omni.net D.'
2-5
omni.net Plus/D Quick Start Guide
Step 6. Select the COM port your omni.net PLUS/D is connected.
1. Click the
right COM
port (COM 1,
2, 3 or 4)
2. Click Next
to continue
2-6
omni.net Plus/D Quick Start Guide
Step 7. Please wait…
Please wait…
2-7
omni.net Plus/D Quick Start Guide
Step 8. Click Finish to complete INF files installation.
Click here to
Finish.
Note: You also can download an updated INF file from ZyXEL's FTP,
Web Site, or BBS. For more information on INF files included in
BONUS CD, please refer to the readme files on BONUS CD.
2-8
omni.net Plus/D Quick Start Guide
Step 9. Click Close to end the INF files installation.
The ZyXEL omni.net
Plus has successfully
installed in your PC.
Click Close to end the
INF files installation.
2-9
omni.net Plus/D Quick Start Guide
3. Install ZyXEL ISDN Configuration
Manager for Windows 95/98/NT
Once the INF file is successfully installed, you can start installing ISDN Configuration
Mangaer & CAPI (32-bit) into your PC. Follow the steps below to proceed your installation:
Step 1. Make sure the BONUS CD is in your CD-ROM drive, and the Setup display is active.
(If not, double -click the startup.exe to active the Setup display.)
Step 2. For English Windows 95/98/NT, click on "I nstall ISDN Configuration Manager &
CAPI (32-bit) for win95/98/NT(Englsih)" on your BONUS CD.
For Deutsch Windows 95/98/NT, please choose "Install ISDN Configuration Manager
& CAPI for win95/98/NT(Deutsch)."
As setup starting, you can see the following display:
Please wait for the
next setup screen.
3-1
omni.net Plus/D Quick Start Guide
2. Please
wait for the
next
screen.
3-2
omni.net Plus/D Quick Start Guide
Step 3. Welcome information:
Click Next to
continue.
3-3
omni.net Plus/D Quick Start Guide
Step 4. Information about ZyXEL ISDN Configuration Manager:
Click Next to
continue.
3-4
omni.net Plus/D Quick Start Guide
Step 5. Select install item:
a. North
American
users click
here, then
follow the
instructions
on your
screen.
b.European
users click
here.
c. Click Next
to continue.
3-5
omni.net Plus/D Quick Start Guide
Step 6. Choose Destination Location :
Click Next to
continue.
3-6
omni.net Plus/D Quick Start Guide
Step 7. Select Program folder where the ZyXEL ISDN Configuration Manager will been
installed.:
This is a
default
folder
name. You
may type
a new one
or select
one from
the
existing
folders list.
Click Next to
continue.
3-7
omni.net Plus/D Quick Start Guide
Step 8. Start copying files to the following directory:
Click Next to
continue.
3-8
omni.net Plus/D Quick Start Guide
Step 9. Click OK to finish the installation of ZyXEL ISDN Configuration Manager.
Click Ok to finish
the installation.
Once the installation is completed, it will create the program group of ZyXEL ISDN
Configuration Manager on your start menu. Now, you can start to use the ZyXEL ISDN
Configuration Manager.
3-9
omni.net Plus/D Quick Start Guide
4. Setup ZyXEL ISDN Configuration
Manager for Windows 3.x
Step 1. Make sure the BONUS CD is in your CD-ROM device.
Step 2. Use File Manager to view the file list of D: (repla ce D: with the drive letter of your
CD-ROM drive)
Step 3. You will find the directory of ICM_win3x under D:\. Click on setup.exe to start running
setup program.
Step 4. Follow the setup wizard to go through the installation.
Once the installation is completed, it will create the program group of ZyXEL ISDN
Configuration Manager on your start menu. Now, you can start to use the ZyXEL ISDN
Configuration Manager.
For more information on using your ZyXEL ISDN Configuratin Manager, 16-bit CAPI driver,
and configuring ISDN parameters; please refer to "ISDN Configuration Manager & CAPI
(16-bit) for win 95/98/NT (English) " on readme files of your BONUS CD.
4-1
omni.net Plus/D Quick Start Guide
Customer Support
ZyXEL ISDN Terminal Adapter
If you have any questions about your ZyXEL product or desire customer assistance, contact
ZyXEL in one of the following ways.
Contact ZyXEL
E-mail
Technical Support
[email protected] in North America
Support@zyxel .com.tw oustide of the US.
E-mail
Sales
[email protected] in North America
[email protected] oustide of the US.
Web Site
Product Information www.zyxel.com ZyXEL's Internet site.
Phone
North America
Outside North
America
North America
Oustide North
America
North America
Europe
Fax
FTP File
Downloads
(714)- 632-0882 (8:00 to 5:00 PM PST)
+886-3-5782439 Ext.:266 (8:00 to 5:00 PM local)
(714) 632-0858
+886-3-5782439
ftp.zyxel.com (Software and ROM upgrades)
ftp.zyxel.co.at (Software and ROM upgrades)
Postal Service
ZyXEL Communications Corporation
ZyXEL Communications, Inc.
6, Innovation Road II
Science-Based Industrial Park
Hsinchu, Taiwan 300, R.O.C.
Tel: 886-3-578-3942; Fax: 886-3-578-2439
E-mail: [email protected]
1650 Miraloma Ave,
Placentia, CA 92870
U.S.A.
Tel: 1-714-632-0882
Fax: 1-714-632-0858
http://www.zyxel.com
[email protected]
ZyXEL
T OTAL IN T E R N E T AC C E S S S OLUTION
4-2