1
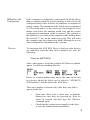
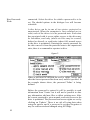
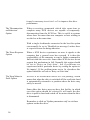
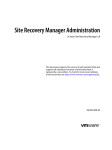
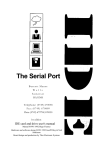
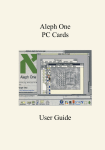
SCSI User Guide
SCSI User Guide
written by
Pippa Furlonger
THIS DOCUMENT WAS PRODUCED ON AN ARCHIMEDES A ?OM FITTED WITH 20Mb IDE HARD DRIVE,
LASER EXPRESS AND ETHERNET INTERNAL MICROPODULES
Index
Section
page
Configuration
Using SCS1 !Mgr
Passwording
Formatting
Partitioning
1
7
9
13
17
Configuration
Configuration
Commands
For the HCCS SCSI drive to operate in the correct manner the
computer must be configured with various parameters which
control how it interacts with the SCS1 devices connected to it.
From DeskTop press the FI2 key and a small asterisk will
appear in the bottom left hand corner of the display. This
space, into which commands can be typed, is referred to as
Supervisor Mode. To configure the computer enter the
Supervisor Mode and type in the following commands;
[RETURN]
*Configure SCSIFSDrive 4 [RETURN]
*Configure SCSIFSDelay 32 [RETURN]
- *Configure SCSIFSDriCache 32K [RETURN]
*Configure SCSIFSPreDelay 0 [RETURN] [
CTRL] + [BREAK]
*Configure SCSIFSDiscs 1
This completes the configuration if one SCSI device is to be
added to the machine. The drive should be ready to use,
although some new drives may need formatting: Turn to '
Using !SCS1 Mgr'. If the attachment of further SCSI devices
or partitions are required please refer to the detailed
explanation of the configuration commands that follows:
SCS1FSDiscs
The SCSI filing system must be told how many logical hard
disc drives are available. When the computer is reset or
switched on the SCSI filing system checks that this number of
drives are present. The use of the term logical hard disc
drives is important: If SCSIMgr has been used to partition a
disc drive this will be seen as multiple logical drives, each of
which counts as a separate hard disc drive for the purposes of
this command. A single physical drive, eonfigured as two
logical drives (partitioned), would require the user to enter the
Supervisor Mode and type the following command;
*Configure SCSIFSDiscs
[CTRL] + [BREAK]
2 [RETURN]
1
Please note that it is important to take into account the
number of SCS] Devices that are already present when
altering the configuration. SCSIFSDiscs = (Hard Drive ] x
partitions) + (Hard Drive 2 x partitions).
After the computer is reset the logical SCSI disc drives
which are connected will be numbered in the following way:
:4
:5
:6
:7
:0
:1
:2
:3
The lowest number hard disc which is connected
to the computer.
The next lowest numbered hard disc.
The third lowest numbered hard disc.
The fourth lowest numbered hard disc.
The lowest numbered removable disc drive.
The second lowest numbered removable drive.
The third lowest numbered removable drive.
The fourth lowest numbered removable drive.
For example, if there were two normal hard discs with SCSI
device numbers 3 and 6 respectively and one removable
SCSI disc drive with device number 5 the following
relationship would exist between SCSI device number and
SCSIFS disc drive number:
SCSI Device
Drive Number
3
:4
6
5
:5
:0
SCSIFSDrive
This command allows the user to choose which drive will be
the 'current' or 'default' drive when the computer starts up.
For example, if there is a single hard disc drive it will become
drive :4 on startup.
The default drive is particularly important if there is a !Boot
file to be executed when the computer resets; the !Boot file
must reside on the default drive. The drive requested in this
command is therefore dependant on the positioning of such
files. For example, if three logical drives are present,
numbered :4, :5 and :6 in relation to the device number, and
the !Boot file is stored on drive :5, that drive should be
selected by entering the following command;
*Configure SCSIFSDrive 5
SCSIFSDeIay
After being switched on, it can take some time for a disc drive
to be ready to access. The SCSI filing system will scan the
available disc drives until as many drives as have been
configured have been recognised or until the time specified
by this parameter has elapsed. This time should be
configured to be slightly longer than the time taken for the
slowest drive present to become ready after switch on. For
example, to configure a delay of 30 seconds (which is a
reasonable guess for many drives) the following command
should be used;
*Configure SCSIFSDelay 30
Note that the time is stored in units of 4 seconds, so any value
used will be rounded up to the nearest 4 seeonds.
SCSIFSPreDelay
This command forces the SCSI Interface not to activate the
SCSI BUS for a specified number of seconds after switch on.
This feature has been introduced because accessing of some
SCSI devices imediately after power-on can cause them to
hang and so malfunction until a hard reset is given.
3
HCCS does not usually supply this type of device, but
should these symptoms occur please try setting a PreDelay of
four seconds with the following command;
*Configure SCSIFSPreDelay 4 [RETURN]
SCSIFSDirCache
The names of files on a hard disc are stored in directories.
Each disc may contain many hundreds of directories, access
to which is slowed down if a directory has to be loaded from
disc each time it is needed.
The SCSI filing system sets aside an area of memory which
is large enough to hold a few directories, normally those
which have been accessed most recently. Each directory
occupies about 2k of memory. so a 32k buffer can hold about
16 directories at any one time.
The size of the area of memory is specified by this
command. For example, to reserve 32k use the command;
*Configure SCSIFSDirCache 32K
The SCSI filing system may be asked to choose a default
value, based on the amount of memory fitted to the
computer, using the command;
*Configure SCSIFSDirCache OK
The amount chosen should be 8k for 1 Mbyte machines, 16k for
2 Mbyte machines and 32k for machines with 4 or more
megabytes of RAM.
4
DIfficulties with
Configuration
•Devices
If the computer is configured to expect more SCSI disc drives
than are actually fitted (or at least working) it will wait for the
configured delay before it allows the computer to complete its
startup routine. The maximum delay whieh can be eonfigured
is 128 seconds and so. in the worst ease, there might be a two
minute wait before the machine would reset and the correct
configuration commands could be entered. The solution to
this problem is to switch on the computer while holding down
the asterisk "*" key on the numeric keypad. This will make
the computer start up in Supervisor Mode allowing the user to
enter configuration commands at the * prompt.
To interogate the SCSI BUS Drive to find out what devices
are connected, and what their device numbers are, type the
following;
*Devices [RETURN]
After a short pause a list of the available SCSI devices should
appear. It will look something like this:
Device or revision numbers may not be the same but at least
two devices should be listed, one of which is "AW/HCCS
SCSI Interface" and the other is the SCSI drive.
There are a number of reasons why a disc drive may fail to
appear on this list:
•
•
Some disc drives take a short time to initialise
themselves once they are powered up. Wait for
about 30 seconds and then type the *Devices
command again.
Check that the separate power supply for the drive
is correctly connected and switched on.
5
•
•
6
Check all connections on external drives (
including mains power).
It may be that it has the same device number as
another device present.
Using !SCSI Mgr
SCSI Manager
The SCSI Manager utility is used to set passwords, partitions
and format new SCSI discs.
Warning
Before loading SCSIMgr it is important to be aware of the
possible hazards that may be encountered. SCSIMgr can
erase the entire contents of a hard disc in a few moments. It
does give a warning before it does so, but great care is still
required. Use SCSI Mgr with caution making sure that it is
stored in a place where it can not be used in error.
Functions
SCSIMgr combines into one program a number of important,
but seldom used, housekeeping functions. Using SCSIMgr
can perform the following functions;
•
•
•
•
Running SCSI
Mangaer
Format new SCSI hard discs (and reformat existing
ones).
Define various operating parameters for hard disc
drives
Partition hard discs to appear as multiple devices
and set the specific characteristics of those
partitions
Set passwords to be used for each drive and the
access rights associated with them.
SCSIMgr is run by double clicking on its icon. Once it is
loaded it installs its icon on the icon bar. Its functions are
accessed from a menu. While it is a powerful and potentially
destructive program it does provide comprehensive warnings
before it destroys any data.
7
8
Passwording
Setting Passwords
An important and unique feature of HCCS SCSI is the ability
to protect the contents of a disc drive from unauthorized
access using a password. While the password protection
system does not encrypt data stored on the disc, it does
prevent files on the disc from being tampered with until the
correct password is given.
A password may be up to 8 characters long and should be
composed of alphabetic characters and numeric digits. If the
protection is to be effective a password should be chosen
which will not be obvious to others. When the password is
entered differences between upper and lower case letters are
ignored.
Warning
Access to the SCSI Mgr allows access to the selected
password. It is therefore not advisable to store the SCSI Mgr
on the Hard Disc, but to keep it on a floppy disc in a safe
place.
Click the middle (menu) button over the SCSI Mgr on the
icon bar and select the 'Passwords' option from the SCSIMgr
menu. A dialogue box like this will appear;
figure 1
Click the menu button over the arrow to the right of the
'Drive' field (see pointer in figure 1) and a menu should
appear containing a list of the names of all the drives
9
How Passwords
Work
connected. Select the drive for which a password is to be
set. The shaded options in the dialogue box will beeome
selectable.
A disc drive can be in one of two states: protected or
unprotected. When the computer is first switched on (or
reset) each of the drives is in its protected state. Each state
has associated with it access rights; aecess to the drive may
be forbidden, read only (where no files may be created,
deleted or altered), or read/write (where full, normal access
to the drive is permitted). Entering the correct password for
the drive moves it from the protected state to the unprotected
state; there is a command to reprotect a drive.
figure 2
When a password is defined the access rights, before and
after the eorrect password has been used, must be specified. In
the example shown above, the password 'Feline' is being
defined.
Before the password is entered it will be possible to read
information from 'Venice' but it will not be possible to alter
any information, add new files or delete existing ones. After
the correct password is given normal read/write access to the
drive is permitted. The password and access rights are set by
clicking on 'Update'. There is no risk of losing data when
using the option, and if a password is set then forgotten it
may be rediscovered and changed using SCSIMgr.
10
Occasional
Passwording
It is possible to have a disc drive, which is normally freely
accessible, but which can be protected to reduce the risk of
viral infection. This can be done by making the access rights
more restrictive after a password is entered.
It is rarely necessary to perform a low level format on a SCSI
hard disc drive. If a drive has been used on a computer
system with a different disc format, or if the disc has become
badly corrupted, it is only necessary to write the disc's
catalogue information.
11
12
Formatting
Formatting a Disc
Formatting may be necessary if a disc develops a large
number of defects, or has a fault in a place which prevents the
SCSI filing system from using it. During the formatting
process the drive will find defects and effectively remove
them from the disc.
To select the disc drive to be formatted, click the menu button
over the SCSI Mgr icon on the icon bar and select the '
Format' option. A window will appear as shown in figure 7.
figure 7
Click the menu button over the right arrow, which appears to
the side of the 'Device' box. A list of the available hard discs
will appear from which one may be selected.
The 'Format' dialogue box contains a number of options
which represent configuration information which is stored in
a special area of the disc known as the 'boot block'. These
options allow the SCSI filing system to tailor it's behaviour to
the special needs of a particular dise drive. The meaning of
these options is as follows;
The 'Sector
Interleave' Option
This option only has an effect when a low level format is
performed. Normally it should be set to zero, which will
cause the drive to select its own default, but in extreme cases
13
it may be necessary to set it to 1 or 2 to improve disc drive
performance.
The 'Disconnection
on Behaviour'
Option
When executing commands which take some time to
complete many SCSI devices are capable of temporarily
disconnecting from the SCSI bus. This is useful in systems
where there are more than one computer or host wishing to
use the bus at the same time.
With a single Archimedes connected to the bus this option
can normally be set to 'Disabled (no message)' unless there
is a special reason for doing otherwise.
The 'Error Response
Option
When a SCSI device experiences an error it signals to the
computer that a general error has occurred. It is then the
responsibility of the computer to send a further command to
find out what the error was. Some older SCSI devices do not
support this mechanism in full. Normally this option should
be set to 'Retry on Unit Attn.', but if problems are
experienced with a particular device try setting the option to '
No inquiry'. If the problem turns out to lie elsewhere this
option should be set back to 'Retry on Unit Attn.'
The 'Stop Motor to
Park' Option
All HCCS SCSI hard disc drives are 'self parking', which
means that when the drive is switched off the read/write head
is automatically returned to a position where the drive may
safely be moved.
Some older disc drives may not have this facility, in which
case this option should be selected. It will cause the disc
drive to park its head and switch off its motor when the drive
is dismounted.
Remember to click on 'Update parameters only' to set these
options on the disc drive.
14
Low Level
Formatting
In addition to setting these parameters, low level formatting
issues a SCSI format command to the disc drive in question.
The exact effect of this command depends on the drive, but it
is the most fundamental way of erasing the contents of a disc.
Low level formatting should rarely be necessary, but if a large
number of disc errors are experienced it may, as a last resort,
cure them. Remember: All of the files on the disc will be
irretrievably lost.
15
16
Partitioning
Partitioning a Disc
It is often useful to be able to split a single physical disc drive
into a number of logical drives. If you have a drive which is
larger than 512 Mbytes it will be the only way of using all of
it: FileCore, the Acorn program which SCSIFS uses to access
discs, places a limit of 512Mb on the size of an individual
drive.
Another reason for partitioning a disc is to provide different
levels of password protection to different groups of files.
Warning
Partitioning also has disadvantages and the splitting up of a
disc drive into partitions should be carefully planned:
•
•
•
Once set, the size of a partition cannot be changed
without erasing the data in both that partition and
one of its neighbours.
The more partitions there are, the more new icons
will appear in the limited space on the icon bar.
There may be the maximum of four logical dise
drives allowed. If the first physical drive is
partitioned into four logical drives, reorganization
will be nessecary before another physical drive can
be added.
The size of partitions created should be carefully considered,
remembering that files on a disc take more space than their
combined size. Using the 'Count' command on a selection of
files does not accurately indicate how much space they will
use on disc).
Select the'Partition' option from the SCSIMgr menu, then
select the device to be partitioned by clicking the menu button
over the right arrow next to the 'Device' field.
17
figure 4
Once a device has been selected the dialogue box will show
how the device is currently partitioned. In the case shown in
figure 4 the disc has a single partition called 'Venice'.
Initially all the partitions are 'locked'. In order to add a new
partition the last of the current partitions must be unlocked,
allowing its size to be changed.
To add a new partition, unlock 'Venice' then click on the up
arrow in the line 'Device has ... partitions'. The number will
increase to 2 and a new partition will appear in the 'Size
control' slider. Initially the size of the new partition will be
1Mb: this may be changed by moving the pointer over the '
Size control' slider as shown. As the pointer is dragged
along the slider the relative sizes of the two partitions will be
adjusted.
Once the correct size has been set, and the new partition has
been given a suitable name the partitions may be written to
disc by clicking on 'Update all partitions': note that this
18
destroys all data in both partitions.
figure 5
The size of the allocation unit for a partition is selected
automatically by SCSIMgr, and can normally be left as set.
Occasionally though, it can be beneficial to manually adjust
this value. For example, if it is known that a partition is to
contain a large number of very small files it is worth making
the allocation unit smaller by one or two steps. This will
make the usage of the disc more space efficient at the expense
of slower access. In the same way if a partition is to contain
relatively few large files a larger allocation unit may be more
appropriate.
If a size is selected which cannot be used with a particular
partition an error message will be given.
19
HCCS ASSOCIATES LTD
575~583 DURHAM ROAD GATESHE
AD
TYNE AND WEAR NE9 5JJ
TEL: 091 487 0760 FAX: 091 491
0431