1
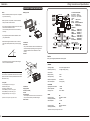
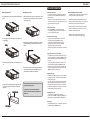
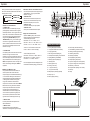
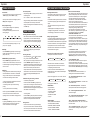
ENTER
SEL
VOL
LOUD
VOL
BAND
MUTE
PTY
AF
TA
EON
D-AUD
EQ
ST
MONO
D-DIR
ME/CR
PAUSE
SCAN
RPT
SHF
1
2
3
4
REG
AF
TA
FUNC
S-CDP
TP
LOUD
APS
DISP
MP3
0
PTY
LOC
MODE
TUNE
5
6
7
TUNE
8
9
M2090/M2095
RDS AM/FM Stereo
MP3 with ID3/CD-RW/CD-R/CD Player
Secure Fold Down
Detachable Panel
Inside Covers - Blank
Trouble Shooting
Index
Before going through the check list, check wiring connection. If any of the problem persist after check list had been made,
consult your nearest service dealer.
Symptom
Cause
Solution
No power
The car ignition is not on.
If the power supply is properly
connected to the car accessory
terminal, switch the ignition key to
"ACC".
Installation
Din-Front Mounting (Method A)
Din-Rear Mounting (Method B)
Using the Detachable Panel Unit
2
3
4
Operation
Operating Controls
General Operation
Radio Operation
RDS (Radio Data System) Operation
CD and CDC Operation
MP3 Operation
5
6
6
7
9
10
The fuse is blown.
Replace the fuse
Presence of CD disc inside the player.
Remove the disc in the player, then put
a new one.
Inserting the disc in reverse direction.
Insert the compact disc with the label
facing upward.
Wiring Connection and Specifications
11
Compact disc is extremely dirty or
detective disc.
Clean the disc or try to play a new one.
Trouble Shooting
12
Temperature inside the car is too high.
Cool off or until the amblent
temperature return to normal.
Service / Warranty
12
Condensation.
Leave the player to off for an hour or
so, then try again.
Volume is in minimum.
Adjust volume to a desired level.
Wiring is not properly connected.
Check wiring connection.
The operation keys do
not work.
The built-in microcomputer is not
operating properly due to noise.
Press the RESET button.
Front panel is not properly fixed into its
place.
Sound skips.
The installation angle is not more than
30degrees.
Adjust the installation angle to less
than 30 degrees.
The disc is extremely dirty or defective
disc.
Clean the compact disc. Then try to
play a new one.
The antenna cable is not connected.
Insert the antenna cable firmly.
The signals are too weak.
Select a station manually.
Disc cannot be loaded
or ejected.
No sound.
The radio does not
work. The radio
station automatic
selection does not
work.
Service / Warranty
Under www.yamakawa.de you can find service and warranty information for this
product in the service/support section.
If necessary you can also use our hotline (phone and email) for further support. You
can find the hotline numbers in the service/support section of www.yamakawa.de
Installation
Wiring Connection and Specifications
DIN-FRONT MOUNTING (METHOD A)
Notes:
• Select an installation position so that you are not impeded
by the unit while driving.
12 VOLTS NEGATIVE GROUND
Installing the unit
Black Front
(U.S. & Others)
AM 530-1710 kHz
FM 87.5-108 MHZ
Gray Rear
(POWER)
RED
BLACK
YELLOW
- TURN ON +ACC
- GROUND
- MUST BE CONNECTED
BATTERY +B
BLUE
- POWER ANTENNA
(SPEAKERS)
WHITE
- FRONT LEFT (+)
WHITE/BLACK - FRONT LEFT (-)
GREEN
- REAR LEFT (+)
GREEN/BLACK - REAR LEFT (-)
GRAY
- FRONT RIGHT (+)
GRAY/BLACK
- FRONT RIGHT (-)
VIOLET
- REAR RIGHT (+)
VIOLET/BLACK - REAR RIGHT (-)
• Before you fix the unit in position, connect the cables up
briefly and check that the unit works!
• Only use the parts that are supplied with the unit in order to
ensure that the installation is correct.
The use of other parts can result in the unit functioning
incorrectly.
SEL
• If you experience problems with the installation, refer to
your specialist dealer.
• Make sure the angle of installation is max. 30º from the
horizontal, otherwise problems may occur when playing
CDs.
30º
6
5
4
3
2
1
LINE OUT ( Optional)
GRAY WHITE-LEFT RCA
RED-RIGHT RCA
1. Dashboard
2. The holder
After you have inserted the frame in the dashboard, you
can bend the clamps depending on the strength of the
dashboard material in order to fasten the car radio
securely.
3. Screws
Black WHITE-LEFT RCA
RED-RIGHT RCA
Caution
Never ground negative speaker leads to chassis ground.
• Avoid exposing the unit to extreme heat, direct sunlight,
dust, dirt or excessive vibrations.
GENERAL
Mounting frame
This unit can be mounted either from the front or from inside
(install in the shaft and use the prefabricated screw holes on
the side of the unit).
List of parts:
1. Punched plate (144 x 14 mm) x1pc
2. Removal Key x 2pcs
3. Screws (4 x 20 B/A) x 2pcs
4. Plain Washer (4.2 x 9.0 x 0.8 T) x 2pcs
5. Plain Washer (5.0 x 12.0 x 0.6T) x 1pc
6. Spring Washer (5.3 x 9.6 x 1.4T) x 1pc
*Specifications are subject to change without notice.
SEL
Operating Voltage
Dimensions (W x H x D)
:DC 12 Volts, Negative Ground
:178 (W) x 180 (D) x 50 (H)
Sound Control
Bass (at 100 Hz)
Treble (at 10 Khz)
:10dB
:10dB
Maximum Output Power
Power Consumption
: 45 Watts x 4
: 15 amps (max)
CD PLAYER
Signal/signal-to-noise Ratio
Channel Separation
Frequency Echo
: > 60 dB
: > 60 dB
: 20 Hz - 20kHz
6
5
4
3
2
1
1. Dashboard
2. Spring washer
3. Screw (4 x 20 mm)
4. Screw
5. Punched plate
Use the hoop to fix the back of the unit in the shaft. The
hoop can be bent manually to the desired angle.
6. Plain washer
(Europe)
AM 522-1620 kHz
FM 87.5-108.0 MHZ
RADIO
Frequency Range
Sensitivity (S/N=30dB)
Stereo Separation
FM
:87.5MHz to 108 Mhz
:3 uV
:> 30 dB
Frequency Range
Sensitivity (S/N=20dB)
MW
:522 kHz to 1620 kHz
:35 dB
*Specifications are subject to change without notice.
REAR
FRONT
Installation
Operation
DIN-REAR MOUNTING (METHOD B)
MP3 OPERATION
• Playing an MP3 Disc
Insert your MP3 and all tracks will be played
consecutively or you can move forward to the next track,
or backwards, repeat, shuffle, or scan each track on the
disc with the keys provided.
• Searching Tracks on an MP3 Disc
Three search methods are available to find the track
required on a digital MP3 disc. As a large number of
tracks can be stored on a single MP3 Disc, the search
can be complicated to perform if the tracks are not
numbered and stored in a logical directory structure and
order on the disc.
WARNING. To avoid distraction you must not attempt to
perform searches while driving a vehicle.
The search mode is initiated by pressing the "APS" Key
either once, twice , or three times, to enter one of the
search methods described below. Use the following table
to find key assignment. Alternatively use volume up /
down during text search to select desired text letters.
For example
• While in text search mode, to enter the text letter "R"
press the M6 button three times.
• While in numerical search mode, to enter the number
37 press "M3" followed by "mode".
• Method 1 - By Numerical Track Number
• Press "APS" (#18) Once
• Then from the key assignment list (Table 1) enter the 1,
2 or 3 digit track number consecutively
• Press "BAND" (#13) or wait a few seconds and the
selected track will play.
• Method 2 - By Alphabetical Directory or Track Name
• Press "APS" (#18) Twice
• Then enter one or more letters of the name using the
key assignment list (Table 1). After each letter is entered
press the "SEL" (#10) key to move to the next letter.
• Press "BAND" (#13) once all desired letters have been
entered.
• Every directory, artist name or track on the disc that
contains the letter or letters entered in your search will
be displayed in a list that can be scrolled or moved
through using the " “ (#16) or " “ keys (#17) , and
the "BAND" Key (#13) to accept the displayed entry to
begin playing immediately, or move to the next level if
the result of the search was another Directory.
• If the “ `` “ Symbol is shown you have arrived at the
next directory so again scroll using the " “ (#16) or
“ “ (#17) keys, and the "BAND" (#13) Key to Accept
the track or again move to the next level if the result is a
directory.
Removing the unit
Use the screw holes on the side of the unit during
installation.
SEL
1
2
3
4
5
6
SEL
6
5
4
3
2
1
Key Assigned in Searching Mode (Table 1)
APS
BAND
M1
M2
M3
M4
M5
M6
MODE
TUNE
TUNEæ¦
SEL
DISP
VOL + VOL-
Mode Select
ENTER
A, B, C, 1
D, E, F, 2
G, H, I, 3
J, K, L, 4
M, N, O, 5
10 TRACK DOWN
P, Q, R, 6
10 TRACK UP
S, T, U, 7
Y, Z, SPACE, 9
V, W, X, 8
CHARACTER
SHIFT RIGHT
_, -, +, 0
CHARACTER SELECT
(A, B 8, 9, 0)
Insert the MP3 disc and wait for it to load before
beginning a search.
Note: The more letter used, the more exact the result
listed. For example, searching on ‘E’ in the song ‘Eleven
o’clock’ will bring up every name with an ‘E’ in the title,
so try to use more unique letters where possible to limit
results, say using ‘VE’ instead of ‘E’.
• Method 3 - By Alphabetical Directory Structure
(The directory structure is how the tracks are grouped in
folders or directories on the disc. The directory "name" is
the name that was given when the disc was recorded. It
may be any text string. )
Mount the unit on the holes prefabricated by the
manufacturer.
1. Preparations
Before you remove the frame, operate the OPEN key
(#7) to take out the operating unit.
2+3. Distance frame
Next, pull out the distance frame.
1. Preparations
Choose a position where the screw holes of the angle
support line up with the holes on the unit. Fasten the
screws on two holes on each side.
2. The screw holes
• Press "APS" (#18) Three times.
• Scroll the result by using the " “ (#16) or " " (#17)
keys, and the "BAND" Key (#13) to Accept the track or
to move to the next level if the result is a directory.
• At any time the directory indicator “ `` “ is displayed
use the " " (#16) or " “ (#17) keys to scroll or the
"BAND" (#13) Key to move back up one directory.
Note: Searching by folder (or directory) can be used to
quickly get to the desired group of songs.
• ID3 Tag (Optional Feature)
Press the “DISP” Key (#15) to display the ID3 Tag
information.
4. Using the removal key
After you have removed the frame of the radio, lower the
operating unit again.
Now apply the key at the sides of the radio as shown in
the figure and pull it out.
3. Fastening tracks of the unit manufacturer
4. Dashboard or console
NOTE: The mounting frame, cover frame and punched
plate are not required for Method B.
Using the Detachable Panel Unit
Operation
CD and CDC OPERATION
Removing the panel unit
Inserting the panel unit
1. Press the OPEN key (#7) to open the front panel will fold
down.
1. When the bracket mounting is in the open position, insert
the panel unit into the mounting. Push the cover closed
until you hear a click.
• Selecting music tracks
In CD or CDC mode, the “ ” and “ ” keys (#16 and
#17) allow you to switch between the individual music
tracks on the CD.
When one of the keys is kept pressed down, then the
unit “winds” forward or back. These jumps can be ended
again by releasing the keys again.
• Pausing music tracks
Press the “PAUSE” key (#19) to pause the track
currently playing. When you want to continue with the
music , then press this key again.
SEL
1
2
3
4
5
6
SEL
1
2
3
4
5
6
2. To fix the panel unit in position again, press it against the
car radio again.
2. If the bracket mounting is closed, the panel unit can also
be inserted sideways. Proceed as shown in the figure
below.
SEL
1
2
3
4
5
6
SEL
1
2
3
4
3. When the face panel goes down, it can be pulled up and
out.
5
6
3. If some keys no longer function properly after the panel
unit has been inserted, press the OPEN key (#7) and
insert the panel unit back into the mounting.
SEL
1
2
3
4
5
6
4. In order to protect the display from damage after it has
been removed, place it in the leather case provided.
(Optional)
Please always take the panel unit with you when
you park and leave your car.
In this way you can prevent theft with little
effort, as the radio cannot be used without the
panel unit!
• Automatic repeat of songs
When you are in CD (MP3) mode, you can repeat a
song continuously using the “RPT” key (#21).
In CDC mode a track can be repeated by simply
operating the key and all songs of the CD can be
repeated by keeping the key held down.
When the key is pressed again, repeat mode is switched
off.
• Playing the first few seconds of tracks
In CD (MP3) mode, the first few seconds of all songs on
the CD can be played by pressing the “SCAN” key (#20).
After this time the CD player automatically jumps to th
next track.
In CDC mode, the first few seconds of all tracks on the
CD can be played by pressing the “SCAN” key (#20)
briefly. If you are using a CD changer and want to play
all tracks on all the CDs, then press and hold down the
“SCAN” key (#20) for a few seconds.
• Random track play
By operating the “SHF” key (#22), the tracks are played
at random in CD (MP3), This function is deactivated by
pressing the key again.
If you are in CDC mode, all tracks of the current CD are
played at random by simply pressing this key. After you
have pressed the key for a few seconds, then all tracks
on all CDs will be played (for CD changer). This function
is deactivated by pressing the key again.
• Selecting another CD
(only for version with CD changer connection)
In CDC mode, the “D.DN” key (#23) and the “D.UP” key
(#24) allow you to change between the individual CDs.
• Ejecting CD
If the operating unit is open, i.e. folded down, the CD can
be ejected using the “EJECT” key (#4).
NOTES ON BLANK CD-Rs AND CD-RWs
• With this car radio, you can listen to back-up copies of
your favourite CDs on CD-Rs and CD-RWs.
•Because burning methods are often different and CD
blanks often feature different coatings, it can happen that
some blanks cannot be played by the CD player.
•Never stick paper or other materials with an adhesive
surface on the writable side of a blank CD! This can
damage the unit as well as the CD.
•Make sure that the CDs are reasonably free of
scratches in order to guarantee loss-free playing.
Operation
Operation
When you press and hold down the “SEL” (#10) key for a
few secounds, the following RDS functions will be shown in
the display and can be used.
TA SEEK or ALARM
PI SOUND or MUTE
MASK DPI or ALL
RETUNE L or S
BEEP 2'nd, ALL or OFF
• “TA SEEK” and “TA ALARM” modes
• “TA SEEK” mode
If the station tuned to is not broadcasting a TP signal
(traffic programme), another station with a TP signal is
automatically searched for. If the TP signal of the current
station is lost, the unit searches for another station with a
TIP signal and the same PI (programme identification).
Using the settings “RETUNE LONG” (90 sec.) and
“RETUNE SHORT” (30 sec.), you can set how long the
unit waits for a TP signal before it searches for a new
station. If no station with the same PI can be found after
one pass, the unit automatically switches to the next
station with a TP signal.
• “TA ALARM” mode
In this operating mode, the automatic search for another
station with a TP signal or the same PI can be
suppressed. If no TP signal is available from a station (or
when it is interrupted), 2 beep tones will be heard. If the
newly tuned station does not have an RDS signal, “PI
SEEK” will be suppressed for a while. If the newly tuned
station is not transmitting an RDS signal, “PI SEEK” is
suppressed.
• “MASK DPI” and “MASK ALL” mode
During automatic search for alternative stations, no
attention is paid for a few minutes to alternative
frequencies (AF) which have different identifications (PI)
or do not transmit an RDS signal. In the cases where
alternative frequencies have different identifications or
no RDS signal, but nevertheless have a high field
strength, the unit searches for other alternative
frequencies. For this reason, the radio offers the “MASK
DPI” function. Here, during the search for alternative
frequencies any station that does not have an RDS
signal but does have a high field strength is not
masked/considered. In this mode it can happen that
incorrect content is reproduced or long delays occur
when the station in question does not have an RDS
signal but does have a field strength that is too high.
• “BEEP 2ND”, “BEEP ALL” and “BEEP OFF” function
The volume of the beep tones can be changed using the
“AUDIO CONTROL +” key (#11) and the “AUDIO
CONTROL –“ key (#12).
• “BEEP 2ND” mode
When this function is activated, a beep tone can be
heard when one of the double function keys is kept
pressed down. Example keys: #13, #14, #18.
• “BEEP ALL” mode
A tone can be heard every time a key is pressed.
• “BEEP OFF” mode
The key tones can be deactivated with this option.
• Displays of the received information
Operate the “DISP” key (#15) in order to have the
following information from the station displayed:
• When an RDS signal is received:
Radio mode: –> PS –> CT –> FREQ. –> PTY –>
CDC mode: –> CDC –> CT –> PS –>FREQ. –> PTY –>
CD mode: –> CD –> CT –> PS –>FREQ. –> PTY –>
• When no CT or PTY information is received, “NO
CLOCK” or “NO PTY” is shown in the display.
• When no RDS signal is received:
Radio mode: –> NO CLOCK –> FREQ. –> NO PTY –>
CDC mode: CDC –> CT –>FREQ. –> NO PTY –>
CD mode: CD –> CT –>FREQ. –> NO PTY –>
Each of the displayed value remains displayed for a few
seconds before automatically changing to the first value.
3
7
8
10
12
11
13
9
ENTER
SEL
VOL
LOUD
VOL
BAND
MUTE
27
1
PTY
AF
TA
EON
D-AUD
EQ
28
2
ST
MONO
D-DIR
ME/CR
PAUSE
SCAN
RPT
SHF
1
2
3
4
20
21
19
REG
AF
TA
FUNC
S-CDP
TP
LOUD
APS
DISP
MP3
0
22
LOC
MODE
7
6
23
15
PTY
TUNE
5
18
24
6
TUNE
8
9
17
16
14
OPERATING CONTROLS
1.
2.
3.
4.
5.
6.
7.
8.
9.
10.
11.
12.
13.
14.
15.
PTY Key (RDS programme selection)
TA Key (traffic alert/traffic announcements)
AF Key (regional mode)
EJECT Key (behind the operating unit)
CD shaft (behind the operating unit) slot entrance
Operating MODE key (radio/CD/MP3)
OPEN Key (opens the operating unit)
LCD display board
PWR Key (power on/off)
SEL Key (sound control)
“+” Key (sound control up)
“–“ Key (sound control down)
BAND (frequency selector) Key (AM/FM)
Memory Keys 1-6
DISP Key (display mode key)
16.
17.
18.
19.
20.
21.
22.
23.
24.
25.
26.
27.
28.
TUNE UP Key (radio station search up)
TUNE DOWN Key (radio station search down)
APS Key (automatic programme search)
PAUSE Key (CD operation)
SCAN Key (CD operation)
RPT (Repeat) Key (CD operation)
SHF (Shuffle) Key (CD operation)
Only for CD changer control version (optional)
Only for CD changer control version (optional)
RESET Key, to reset the unit
LED (flashes when operating unit is removed)
MUTE Key
EQ Key
5
5
• “MASK DPI” mode
Exclusively masks all alternative frequencies with
different identifications.
• “MASK ALL” mode
Masks all alternative frequencies with different
identifications, no RDS signal and a high field strength.
26
25
4
Operation
Operation
RDS (RADIO DATA SYSTEM) OPERATION
GENERAL OPERATION
• On/Off switch
You can switch on the unit with any key! (Except for the
“OPEN” Key (#7) and the “EJECT” key (#4).
When you want to switch the unit off again, press the
PWR (power on/off) (#9) once.
• Music playback settings
The music playback settings can be operated by
pressing the SEL key (#10).
The sequence of the settings can be seen in the
following diagram:
Vol
(Volume)
BAS
TRE
BAL
FAD
(Bass)
(Treble)
(Balance)
(Fader)
The volume can be adjusted by pressing the “+” key
(#11) or the “–“ key (#12).
• MODE Key
Press the “MODE” key (#6) briefly in order to change
between the modes that can be set (e.g. radio to CD
(MP3) to CDC, etc.).
• SUBWOOFER Key (Optional feature)
Keep the “MODE” key (#6) pressed down for a few
seconds to switch on the bass output. This function can
be switched off again by pressing and holding this key
down once more.
• RESET Key
This key (#25) can be reached when the operating unit
has been folded down. This button can be activated
using a pen with a sharp nib or another metal object.
The reasons for activating this button include:
• setting all values back to standard when the unit has
been newly installed and cabled
• the remaining function keys are not functioning
properly
• an error symbol can be seen in the display.
NOTE: If you operate the “RESET” key and the unit does
not react, then clean the base on the back of the
operating unit with a cloth soaked in isopropyl alcohol.
• The MUTE Key
By pressing the “MUTE” key (#27) once, the volume is
reduced by 60 dB. If you press this key again, the
volume is increased to the old value again.
• Electronic equaliser
After pressing the “EQ” key (#28), you access control of
the following menu:
FLAT – CLASSIC – POP M – ROCK M – DSP OFF
Using these settings, the bass and treble of the playback
can be adjusted to the music style. Each of these
settings can be changed from the standard values using
the “E.VOL” key.
RADIO OPERATION
• Selecting the band wave/frequency
When the radio function has been selected, the “BAND”
key (#13) allows you to switch between frequency
bands. The sequence of the frequencies that can be
switched through is set out in the following diagram:
FM1
FM2
FM3
MW
LW
Note: Frequency display may vary and subject to
different country
• Selecting the station
By briefly pressing the “ ” and “ ” keys (#16 and
#17), you can activate the automatic search.
When you keep one of the keys pressed down for a few
seconds, “MANUAL” appears in the display. This
signifies that manual search has been activated. Using
these keys you can now search by hand for a station
that has not been found by automatic search for
example. When neither of the two keys are pressed in
manual search for a few seconds, the unit switches back
to automatic mode again. “AUTO” appears in the
display.
• Activating the RDS function
Use the “AF” key (#3) to switch this function on and off.
When this function is activated, “AF” appears in the
display.
Provided that a station supports the function, the station
name and the song being played should appear in the
display.
“AF” begins to flash when the signal from a station
weakens.
“ALARM” appears in the display when important
messages are being broadcast. The volume is also
increased slightly if it has been set to a minimum.
• Setting regional programmes
This mode is activated and deactivated when you keep
the “AF” key (#3) pressed down for a little bit longer.
Some radio stations also broadcast over a regional area.
If this mode is switched on, then a regional transmitter
will be preferred on account of the better reception.
When this function is switched off, the unit switches to
and fro between the two signals.
• Using the “PTY” key (#1) to select the station
The sequence of this function is as follows:
PTY Music group
PTY SPEECH group
PTY off
When this function is activated, the unit searches
through all frequencies one after the other until the
corresponding value has been found.
If there is no result after several attempts to find a
suitable station, then the unit switches automatically to
normal search mode.
Notes: Various groups exist in “PTY” mode. These are:
• Automatic storing and scanning of stations
• Automatically storing stations
Press and hold down the “APS” key (#18) for a few
seconds. The unit now begins to search for stations on
the set band wave. After one pass, the 6 strongest
stations are recorded in the programme memory and are
now available on the 6 station keys.
• Scanning stations
Press the “APS” key (#18) briefly and the unit will begin
to search for stations. If the strength of the station is
sufficient, it will be reproduced for a few seconds.
• Storing stations
Press one of the station memory keys M1-M6 (#14)
when you want to store a station. Press and hold down
one of the keys for a few seconds. Once a second beep
tone has been heard, the station has been stored.
PTY Music group
PTY SPEECH group
These groups are divided into:
MUSIC GROUP
• POP M, ROCK M
• EASY M, LIGHT M
• CLASSICS, OTHER M
• JAZZ, COUNTRY
• NATIONAL M, OLDIES
• FOLK M
SPEECH GROUP
• NEWS, CURRENT AFFAIRS, INFO
• SPORT, EDUCATION, VARIED
• WEATHER, FINANCE, CHILDREN
• SOCIAL, RELIGION, PHONE-IN
• TRAVEL, LEISURE, DOCUMENT
• Traffic announcement mode (TA)
When the “TA” key (#2) (traffic announcement) has been
pressed, the CD (MP3) or CDC mode is active, then the
unit switches automatically over to a radio programme
when news and traffic announcements are being
transmitted. Here, a station with EON is searched for
and the volume is increased if it is too low.
As soon as the traffic announcements have finished, the
unit automatically switches back to the previous mode.
The current news or the traffic announcement can be
interrupted by pressing the “TA” key briefly.
The “TA” mode is not switched off here, however.
When the “TA” key is pressed down for a long time, the
unit automatically switches over to “EON TA
LOCAL/EON TA DISTANCE” mode.
This function has been implemented in order to prevent
an incorrect switch over to EON stations.
It can happen that the unit receives an “EON TA” signal
and switches to the corresponding station but this is too
far from the radio. Here, the unit switches automatically
to the original station. When this function is not activated
and a station is too far away, it may be that nothing can
be heard.
• “ EON TA LOCAL” mode
In this mode the unit switches to the other station if it
offers a better reception than the station that was
previously tuned to. When this function is activated,
“EON TA LO” appears for a few seconds in the display.
• “EON TA DISTANCE” mode
When this mode is activated, the unit tries to stay with
the current station during news or traffic
announcements. A search for local stations with possibly
better reception does not take place. When this function
has been activated, “EON TA DX” appears in the display.
• Transmitted RDS data
When the RDS function has been switched on, the
following data can be received from the station:
“PI”: “Programme Identification Code” – code for
identifying the programme
PTY off
“PS”: “Programme Service Name” – the station name
is transmitted with this
“AF”: “Alternative Frequencies” – transmission of
other frequencies that transmit the same programme
“TP”: “Traffic Programme Identification” – traffic
announcement signal
“TA”: “Traffic Announcement Identification” – signals
the transmission of a traffic announcement.
“EON”: “Enhanced Other Network Information” –
transmitted data such as “PI”, “PS”, “AF”, etc., refer here
to the other station.
“PTY”: “Programme Type Code” – shows the content
of the transmission, including the musical style of the
current item.