1
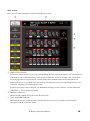
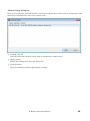
R Remote
Operation Manual
Thank you for choosing a Yamaha product.
This operation manual explains setup and use of "R Remote," a Windows application that lets you
make head amp (subsequently "HA") settings for the Rio3224-D/Rio1608-D/Ri8-D (subsequently "R
series") units.
One computer can make head amp settings for up to eight R series units.
■ Precautions(Please be sure to read this section first!)
・ Yamaha Corporation owns exclusive copyrights for the R Remote, and the operation manual.
・ It is prohibited to duplicate or modify the firmware, software or manuals, in part or in their
entirety, without permission from the copyright owner.
・ The screen shots in this guide are for use with this update procedure only and may be different
from the actual screen shots.
・ This software was not produced with the intention to support touch-panel operation in Windows 8
/ Windows 8.1, so we cannot guarantee operation if a touch-panel is used.
・ Dante is a registered trademark of Audinate.
・ Windows is a registered trademark of Microsoft ® Corporation in the United States and other
countries.
・ The company names and product names in this document are the trademarks or registered
trademarks of their respective companies.
R Remote Operation Manual
1
Contents
■ System Requirements...............................................................................................................................3
■ Setup ..........................................................................................................................................................3
Installing the R Remote .............................................................................................................................4
Settings on the R series units ....................................................................................................................5
Connect the computer and R series units .................................................................................................6
Power-on the R series units .......................................................................................................................6
Accessing the Control Panel ......................................................................................................................6
Windows 7................................................................................................................................................6
Windows 8 / Windows 8.1 .......................................................................................................................6
TCP/IP Settings ..........................................................................................................................................7
Use Dante Controller or the CL series console to specify the routing....................................................8
■Operating R Remote ...................................................................................................................................9
Menu bar .....................................................................................................................................................9
Main screen ...............................................................................................................................................10
HA display area ..................................................................................................................................... 11
“I/O Device Edit” dialog box .....................................................................................................................12
“Network Setup” dialog box .....................................................................................................................13
“R Series Information” dialog box ...........................................................................................................14
■Uninstalling the software(Removing the application) ...........................................................................15
■Troubleshooting ........................................................................................................................................16
R Remote Operation Manual
2
■ System Requirements
In order to use R Remote, you'll need the following items.
● A Windows computer equipped with the following conditions:
OS
Windows 7 SP1 Home Premium or later, Windows 8, Windows 8.1
CPU
Intel Core i3/i5 or higher
HDD
120MB or more
Connector
An Ethernet connector (1000BASE-T or higher recommended.)
Others
Dante Controller and Bonjour must be installed(*)
(*)Download the Dante Controller and Bonjour from the following URL:
http://www.yamahaproaudio.com/
● Ethernet cable (CAT5e or better)
● Network switch (with gigabit Ethernet support)
● R series units (up to 8 units) with firmware V1.70 or later
The Ro8-D is also displayed, but its settings cannot be edited. Since this will impose a network load, we
recommend that you use the "R Series Information" dialog box to set the connection status to Disconnect.
■ Setup
The setup workflow is shown below.
Installing the R Remote
↓
Settings on the R series units
↓
Connect the computer and R series units
↓
Power-on the R series units
↓
Accessing the Control Panel
↓
TCP/IP Settings
↓
Use Dante Controller or the CL series console to specify the routing
R Remote Operation Manual
3
Installing the R Remote
The installation procedure is as follows.
1.
Logon to Windows with administer account.
2.
After decompressing the downloaded file, double-click “setup.exe” in the decompressed file
location.
The R Remote setup wizard will appear.
・ The “User Account Control” dialog box may appear. Click [Continue] or [Yes].
・ If the computer you’re using does not have Bonjour installed, a screen asking you to install Bonjour will
appear during the installation. If you are asked to install Bonjour, download Bonjour from the Yamaha Pro
Audio website, and install it. Then install R Remote again.
http://www.yamahaproaudio.com/
3.
Proceed with the installation as directed by the instructions in the screen.
R Remote Operation Manual
4
Settings on the R series units
When using R Remote to operate an R series unit, set the DIP switches and [UNIT ID] rotary switch of
the unit, taking note of the following settings.
・ Set the UNIT ID in the range of 1 to 8. R Remote will not detect units with a setting of 0 or 9 or
higher.
・ Set the DIP switches to one of the following states, depending on the connection type and the
START UP MODE.
Connection
START UP MODE
DAISY CHAIN
REFRESH
Dip switch
(↑↑↑↑↑↑↑↑)
RESUME
(↑↑↑↑↑↑↓↑)
REDUNDANT
REFRESH
(↑↑↑↓↑↑↑↑)
RESUME
(↑↑↑↓↑↑↓↑)
If a CL series unit is not connected, we recommend that you set START UP MODE to RESUME. If this is set to
REFRESH, settings must be transmitted from R Remote and Dante Controller each time the R series unit is
restarted. Also, if the REFRESH setting is used and R Remote is connected earlier than the CL series unit, the
orange [SYNC] indicator will be lit.
R Remote Operation Manual
5
Connect the computer and R series units
Use an Ethernet cable to connect the computer and the R series units.
If you selected DAISY CHAIN in “Settings on the R series units" on the previous page, connect the
Dante connectors of the R series units in a daisy chain to the computer.
If you selected REDUNDANT in "Settings on the R series units" on the previous page, connect the
computer to the network switch that is connected to the Dante [PRIMARY] connector.
Power-on the R series units
Power-on the R series units. If you power-on before making "Settings on the R series units", the
settings will not be applied.
Accessing the Control Panel
The way to access the Control Panel will depend on your operating system.
Windows 7
Select [Start] → [Control Panel].
Windows 8 / Windows 8.1
1.
In the Start screen, click [Desktop].
The desktop will appear.
2.
Move the cursor to the upper right or lower right corner of the desktop.
The Charms bar will appear.
3.
Select [Settings] → [Control Panel].
R Remote Operation Manual
6
TCP/IP Settings
Make TCP/IP settings for the computer as follows.
1.
Access the Control Panel, then click or double-click [Network and Sharing Center] or [View
network status and tasks].
The “Network and Sharing Center” is displayed.
2.
Click [Manage network connection] or [Change adapter settings] from the “Tasks” list located in
the left side of “Network and Shearing Center” window, then double-click [Local Area
Connection].
The “Local Area Connection Status” dialog box will be displayed.
・The “User Account Control” dialog box may appear. Click [Continue] or [Yes].
・If the “Local Area Connection properties” dialog box appears, skip ahead to step 4.
3.
Click [Properties].
「The “Local Area Connection properties” dialog box will be displayed.
The “User Account Control” dialog box may appear. Click [Continue] or [Yes].
4.
Select [Internet Protocol Version 4(TCP/IPv4)], then click [Properties].
The “Internet Protocol Version 4(TCP/IPv4) Protocol” dialog box will be displayed.
5.
Click [Obtain an IP address automatically].
6.
Click [OK].
R Remote Operation Manual
7
Use Dante Controller or the CL series console to specify the routing
You'll use Dante Controller or the CL series console to specify the routing.
If you're using Dante Controller to specify the routing, refer to "Dante Controller User’s Guide."
If you're using a CL series console to specify the routing, refer to "CL5/CL3/CL1 Reference Manual."
This completes the setup.
R Remote Operation Manual
8
■Operating R Remote
When you start R Remote, the "Network Setup" dialog box may appear, allowing you to select the
computer's network card that will be used for communication with the R series units. If this appears,
click the network card that is connected to the R series unit, and then click the [Apply] button.
When you're finished using R Remote, click the [x] button in the upper right to close the application.
For R Remote for Windows 8 / Windows 8.1, depending upon user access privileges, the software's "Tile(icon)" may not
appear on the "Start screen". In such cases, you can find the software icon in "Apps" by the following steps:
1. Right-click anywhere on Start screen.
2. Click "All apps" button at the bottom right side of Start screen.
Menu bar
The commands that can be executed by R Remote can be found here, grouped by category.
Click here to see a list of commands.
Menu
Command
Summary
Dialog box that appears
[File]
[Open]
Opens a previously-saved file (RRM
“Open File” dialog box
format).
If you open the file when R series units are
connected, the settings will be applied to the
R series units. Be aware that if a CL series
console is also connected, its settings will be
overwritten.
[Save As]
Saves the file. It will have a file name
“Save File” dialog box
extension of RRM, and will be usable
only by R Remote.
[Network Setup]
Selects the computer’s network
adapter that will be used to
”Network Setup” dialog
box
communicate with the R series.
[R Series Information]
Displays information about the R
series units that are connected. You
”R Series Information”
dialog box
can also disconnect R series units that
you don't want to control from R
Remote.
[About]
[About R Remote]
Displays details such as the software
“About R Remote”
version of R Remote.
dialog box
R Remote Operation Manual
9
Main screen
Here you can make settings for the HA of the R series units.
① Display select buttons
Click one of these buttons to view the corresponding R series unit at the right. Up to two instances
of R Remote can be simultaneously connected to an R series unit. For example, this would allow
the main operator to operate the CL console while two assistants make small adjustments in
different locations. If you hold down this button, all indicators of the corresponding R series unit
will blink, allowing you to identify that unit.
If the R series unit is not connected, the Rio3224-D settings screen is shown, and the indication
"VIRTUAL" is shown below the button.
② ID/Name indication
Shows the ID number and name of the R series unit.
③ [+48V MASTER] indicator
Indicates the master phantom power on/off status for the R series unit (the on/off setting is
switched on the R series unit itself).
R Remote Operation Manual
10
④ [SYSTEM] indicator/[SYNC] indicator
Indicates the status of the R series unit or the Dante status. For more about this indication, refer
to "Messages" in the owner’s manual of R series.
⑤ Connector index
Indicates the range of connector numbers corresponding to the HA settings shown at right. Click
this to access the "I/O Device Edit" dialog box .
HA display area
Here you can view and edit HA settings for the R series unit.
⑥ [+48V] button
Turns phantom power on/off for each channel.
⑦ GAIN knob
Specifies the analog gain for the HA of the R series unit. The current setting is shown in the
numeric box located below the knob. The level meter located at the immediate right of the knob
indicates the input level of the corresponding port.
⑧ [HPF] button
This is an on/off switch for the high-pass filter that is built into the HA of the R series unit. To
specify the cutoff frequency, make settings in the "I/O Device Edit" dialog box.
R Remote Operation Manual
11
“I/O Device Edit” dialog box
Here you can view and edit detailed HA settings for the R series unit. This appears when you click a
connector index in the main screen. The toolbar also shows the UNIT ID of the R series unit. To close
the dialog box, click the [x] button located in the upper right.
① Connector index
Indicates the connector number of the R series unit. If you click this, the indicator of the
corresponding connector of the R series unit will light.
② [+48V] button
Turns the phantom power on/off.
③ [A.GAIN] knob
Specifies the analog gain for the HA of the R series unit. The current setting is shown in the
numeric box located below the knob. The level meter located at the immediate right of the knob
indicates the input level of the corresponding port.
④ [GC] button
Switches on/off the gain compensation that regularizes the signal level on the audio network. If
this is on, the gain value fixed by gain compensation is displayed, and subsequent changes to
analog gain is compensated by the compensation gain within the R series unit; audio is
transmitted to the Dante network at the gain value that was fixed immediately before this was
enabled.
⑤ [FREQ] knob/[HPF] button
Switches on/off the high-pass filter that is built into the HA of the R series unit, and adjusts the
cutoff frequency. The current setting is shown in the numeric box located below the knob.
R Remote Operation Manual
12
“Network Setup” dialog box
Here you can select the network interface card of the computer that will be used to communicate with
the R series (subsequently called “the network card”).
① Network card list
Select the network card that will be used to communicate with R series.
② [Apply] button
Update the settings and closes the dialog box.
③ [Cancel] button
Close the dialog box without updating the settings.
R Remote Operation Manual
13
“R Series Information” dialog box
This displays information about the R series units that are connected. Here you can also change the
connection status of each R series unit.
① [ID] list
Click the UNIT ID of the R series unit whose information you want to view.
② [Information] display area
Shows information about the R series unit that is selected in the [ID] list. If a device is not
connected, no information is shown.
③ [Disconnect]/[Connect] button
Switches the connection status between the R series unit and the computer. If an Ro8-D is
connected, it will load the network, so we recommend that you disconnect it.
④ [OK] button
Close the dialog box.
R Remote Operation Manual
14
■Uninstalling the software(Removing the application)
Use “Control Panel” to uninstall the software.
In Control Panel, click [Programs and functions] or [Uninstall a program], then select the item you
want to uninstall, and click [Uninstall or change].
A dialog box will appear; follow the instructions in the screen to uninstall the software.
If the “User Account Control” dialog box appears, click [Continue] or [Yes].
R Remote Operation Manual
15
■ Troubleshooting
Problem
Possible cause
Action
R series unit is not detected
The R series unit's power switch
Turn the power switch on.
is not on
The R series unit's DIP switch
Make the same settings as
settings are incorrect
shown in one of the DIP switch
setting examples of "Settings on
the R series unit".
The UNIT ID of the R series
Set the UNIT ID in the range of
unit is set to something other
1 to 8.
than 1 through 8
The cables are not connected
If the right side of the [SYNC]
properly
indicator is blinking, a cable is
broken or not connected
correctly. Connect the cables
properly.
If you're using REDUNDANT
mode, connect to the network
switch that is connected to the
[PRIMARY] connector.
TCP/IP settings are incorrect
Set the computer's TCP/IP
setting to [Obtain IP address
automatically (O)].
Network card selection is
In the "Network Setup" dialog
incorrect
box, select the network card
that communicates with the R
series unit.
Firmware is old
R Remote Operation Manual
Use V1.70 or later firmware.
16
Audio is not input / Input level
HA gain is not at an appropriate
Set the HA gain to an
is low
level
appropriate level.
The external device is not
Output a signal from the source
outputting a signal
device and make sure that the
SIG indicators on the
appropriate channels will light.
A condenser microphone is
Turn the [+48V MASTER]
connected
switch on.
Turn phantom power on for the
corresponding channel.
REFRESH mode is selected
Select RESUME mode.
with the CL not connected
Adjusting the HA gain does not
Gain compensation is on
change the audio level
If you don't need gain
compensation, Turn gain
compensation off.
[UNIT ID] rotary switch and
The settings were changed
Turn off the power before
DIP switch settings are not
while the power was on
changing the settings.
The orange [SYNC] indicator
In REFRESH mode, R Remote
If R Remote is connected first,
lights (the system enters a state
was connected before the CL
this is the normal state; simply
of synchronization in progress)
series console
use R Remote to control the
applied
system.
C.S.G., PA Development Division
© 2014 Yamaha Corporation
A1
R Remote Operation Manual
17