1
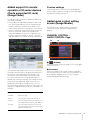
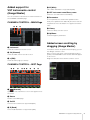
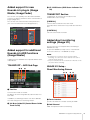
NUAGE MASTER NUAGE FADER NUAGE I/O CONTROL SURFACE Ncs500-CT CONTROL SURFACE Ncs500-FD AUDIO INTERFACE Nio500-D16/A16/A8D8 V1.5 Supplementary Manual This supplementary manual explains features and functions that have been added or changed in NUAGE V1.5. Please read it together with other related NUAGE manuals. Main changes • Added support for remote operation of R series devices (Dante supported I/O rack) (Nuage Fader) page 2 • Added quick control setting screen (Nuage Master) page 2 • Added support for VST instruments control (Nuage Master) page 3 • Added screen scrolling by dragging (Nuage Master) page 3 • Added support for track visibility configuration function (Nuage Master) page 4 • Added super fine mode (Nuage Master, Nuage Fader) page 4 • Added support for send panning (Nuage Master) page 4 • Added support for new Nuendo 6.5 plug-in (Nuage Master, Nuage Fader) page 5 • Added support for additional Nuendo 6.5 ADR functions (Nuage Master) page 5 • Added direct monitoring settings (Nuage I/O) page 5 • Added selection function for Ethernet port to use with Avid Pro Tools (NUAGE PT Bridge) page 6 • Added other various functions (Nuage Master) page 7 EN Added support for remote operation of R series devices (Dante supported I/O rack) (Nuage Fader) The HA gain of R series devices (Rio3224-D, Ri8-D, etc.) can now be controlled. • Press [PRE] in the SECTION CONTROL section, and then press [Sub parameter 2] to use a [Multi function knob] to control the “HA GAIN” and “HA GC” on the input channel where the R series device is connected. • Press [e] (edit) on the input channel where the R series device is connected, and then press [PRE] in the SECTION CONTROL section to use a [Multi function knob] to control the “HA GAIN”, “HA GC”, “HA HPF”, and “HA +48V” on the channel where [e] was pressed. R series settings In the Nuendo menu, select “Devices” “NUAGE HA Remote Setup” to open the settings screen and configure the Dante Accelerator you will use. Added quick control setting screen (Nuage Master) The parameters for “Quick Controls” assigned to a channel can now be edited on the [Multi Function Display]. CHANNEL CONTROL – QUICK CONTROL Page 1 1 2 (Nuendo) Opens the Nuendo “Channel Settings” screen. Click again to close the screen. 2 Parameters If an input bus with multiple channels (such as stereo or surround channels) has been assigned, the parameters for the bus channel appearing first in Nuendo’s “VST Connections” (“Left” for a stereo channel) are shown. Shows the parameters for “Quick Controls” assigned to the selected channel. The values for each parameter can be changed by dragging on the screen or using the corresponding [Multi function knob]. The values that have been set with Nuage Fader are applied to all channels on that bus. (The settings for “Left” (channel) are also applied to “Right” (channel), even though that channel does not appear on the screen.) If the values for all channels on a bus are not the same, an asterisk (*) is added after the parameter. (“HA GAIN*”, for example) Operation Function “HA GAIN” Adjusts the gain. “HA GC” Turns the gain compensation on and off. “HA HPF” Turns the high pass filter on and off. You can also adjust the filter frequency (20 – 600 Hz). “HA +48V” Turns +48 V phantom power on and off. To turn on phantom power, press and hold down [Multi function button A]. NUAGE V1.5 Supplementary Manual 2 Added support for VST instruments control (Nuage Master) 5 W (Write) Turns “Write Automation” on (lit) and off (dark). 6 VST instrument name/library name Shows the selected instrument and library. You can control VST instruments on instrument tracks on the CHANNEL CONTROL page. 7 Parameters CHANNEL CONTROL – MAIN Page Touch a parameter to control it with a [Multi function knob]. Press [Multi function button B] to lock the value for the parameter. Press the button once again to unlock the value. 1 2 3 8 Library Shows the library selection screen. 9 Up/Down Scrolls through the parameters. Added screen scrolling by dragging (Nuage Master) 1 Instrument Shows the instrument selection screen. If a list does not fit on the [Multi Function Display], you can now drag to scroll the screen. 2 Ch (Channel) Shows the MIDI channel selection screen. When a screen that can be scrolled is displayed, press [CTRL] in the MODIFIER section and an arrow will appear on the screen. 3 e (Edit) Drag in the direction of the arrow to scroll the screen. Shows the INST page (see below). CHANNEL CONTROL – INST Page 1 2 1 3 4 5 6 7 8 9 (Nuendo) Opens the “VST Instruments” screen. Click again to close the screen. 2 Return Returns to the MAIN page. 3 On/Off Turns the VST instrument on (lit) and off (dark). 4 R (Read) Turns “Read Automation” on (lit) and off (dark). NUAGE V1.5 Supplementary Manual 3 Added support for track visibility configuration function (Nuage Master) Added support for send panning (Nuage Master) Channel “Sends” can now be panned. You can now use the “track visibility control” function of Nuendo 6.5. This can greatly improve work efficiency on large-scale projects. CHANNEL CONTROL – SENDS Page TRACK LIST Page – Track Visibility View 1 1 2 2 3 4 1 LP (Link Panners) Turns “Link Panners” on (lit) and off (dark). 1 Track Visibility Switches to the Track Visibility view. 2 Filter Track Types Use filters to select only the track types you want to display. 3 Track Visibility Agents 2 SENDS PAN Shows the SENDS PAN page (see below) for the corresponding slot. CHANNEL CONTROL – SENDS PAN Page Shows the command list for the track visibility configuration function. 1 2 3 4 5 4 Track Shows (light color) or hides (dark color) tracks. Hidden tracks cannot be operated in the views on the TRACK LIST page. Added super fine mode (Nuage Master, Nuage Fader) 1 (Nuendo) Super fine mode allows finer adjustments of the parameters on the CHANNEL STRIP. Opens the Nuendo “Channel Settings” screen. Click again to close the screen. If you press [SHIFT] in the MODIFIER SECTION while pressing a [Multi function knob] (fine mode), super fine mode is enabled as long as [SHIFT] is pressed. 2 Return In super fine mode, you can make finer adjustments (using a [Multi function knob]) than when in fine mode. 3 Output destination When [SHIFT] is released, you return to fine mode. Returns to the SENDS page. Shows the slot number and output destination. 4 BYP (Bypass) Turns the “Bypass” on (lit) and off (dark). 5 Library Shows the library selection screen. NUAGE V1.5 Supplementary Manual 4 Added support for new Nuendo 6.5 plug-in (Nuage Master, Nuage Fader) 3 U7: ADR Status (ADR Status Indicator On/ You can now select [DYN] in the SECTION CONTROL section to control the parameters of the new Nuendo 6.5 plug-in (Magneto II). In ADR mode, the functions of the buttons in the TRANSPORT section change. You can also now control the Noise Gate parameters. (The screen shown below is from Nuage Master. ) Off) TRANSPORT Section [PREROLL] Turns Pre Roll on and off in Free Run mode. This button does not function in any mode other than Free Run. [POSTROLL] Turns Free Run mode on and off. Added direct monitoring settings (Nuage I/O) You can now select an output for direct monitoring in NUAGE I/O Setup. Added support for additional Nuendo 6.5 ADR functions (Nuage Master) Support has been added for the improved ADR functions in Nuendo 6.5. TRANSPORT – ADR Sub Page 2 3 1 To open the NUAGE I/O Setup screen, in the Nuendo menu select “Devices” “NUAGE I/O Setup”. NOTE • A maximum of 16 channels can be selected for direct monitoring. You cannot select a bus that has more than 16 channels already assigned. • Only one monitor bus for the Control Room in Nuendo can be selected for direct monitoring. NUAGE I/O Setup – Direct Monitoring Screen 1 2 3 5 4 6 7 1 Free Run Turns Free Run mode on and off. For ADR on the User Assignable tab, U8 is fixed to Free Run mode. In addition, the following functions have been added to the initial settings for the UserAssign button. 2 U3: Mute Guide CR (Control Room Guide Track On/Off) 1 Dante Interface Specifies the Dante Accelerator used by the DAW. 2 Add Channel Adds an output bus for direct monitoring. NUAGE V1.5 Supplementary Manual 5 3 Identify Searches for the Dante Accelerator specified with “Dante Interface”. When “Identify” is clicked, all LEDs for the specified Dante Accelerator flash for a few seconds simultaneously, and then stops automatically. 4 Refresh Refreshes the direct monitoring channel list. 5 +/- (Show/Hide Channel) Shows (+) or hides (-) the channels assigned to the bus. 6 Number of channels available for direct monitoring Shows the number of channels available for direct monitoring. 7 Direct monitoring channel list Added selection function for Ethernet port to use with Avid Pro Tools (NUAGE PT Bridge) To use the Nuage controller as a control surface for Avid Pro Tools, you must first configure NUAGE PT Bridge. In previous versions, the Ethernet port for NUAGE PT Bridge to communicate with the Nuage controller was always selected automatically. In some cases, this resulted in wireless LAN being selected. In this version, manual selection has been added so that it is easier to select the Ethernet port on the computer. To select the Ethernet port, on the computer select [System Preferences] [NUAGE PT Bridge]. Network Screen Shows the “Bus Name”, “Bus Type”, and “Device Port” of buses selected for direct monitoring. “Bus Type” shows if the channel selected for direct monitoring is assigned to Output or Studio (Control Room). You can remove a bus by selecting it under “Bus Name”, right clicking, and then selecting [Delete] from the context menu. 1 2 NOTE See the following website for more information and cautions to observe when using direct monitoring. http://www.yamahaproaudio.com/ 1 Configure Set “Network Interface” to either “Automatically” or “Manually”. 2 Network Interface Select the port for connecting NUAGE series devices. This option becomes available when “Configure” is set to “Manually”. About Screen Shows the information for NUAGE PT Bridge. NUAGE V1.5 Supplementary Manual 6 Added other various functions (Nuage Master) PAGE 3 SETUP Page SETUP page is divided into three pages since the number of configurable settings has been increased. PAGE 1 3 3 MUTE Button Behavior Switches the behavior of [MUTE] on the channel strip. When set to Continuous, pressing and holding [MUTE] on one channel while pressing [MUTE] on another channel will simultaneously turn on and off all “mute” functions for every channel between those two channels. When set to Toggle, “mute” is turned on and off only for the channel on which [MUTE] is pressed. PAGE 2 1 2 For the buttons used to adjust the pressing time for Smart Switch Delay, the [TALK BACK] button and other buttons can now be configured separately. In addition, you can now select “Momentary” for configurable parameters. When set to Momentary, the parameter is on as long as the button is pressed, regardless of the pressing time. 1 Talk Back Switches the behavior of [TALK BACK] in the COMMUNICATION section. 2 Others Switches the behavior of [SHUTTLE], [SCROLL], [SELECT], [ZOOM], [MOVE], or [VOLUME]. Notes regarding the information in this manual • The illustrations and images in this manual are provided to explain the operations and functions of this device. Details might vary depending on the actual specifications of your device. • The company names and product names used in this manual are trademarks and/or registered trademarks of each company. • In the interest of product improvement, the specifications and design of this unit are subject to change without notice. NUAGE V1.5 Supplementary Manual 7 Yamaha Pro Audio global web site: http://www.yamahaproaudio.com/ Yamaha Manual Library http://www.yamaha.co.jp/manual/ C.S.G., PA Development Division © 2014 Yamaha Corporation 405MW-A1