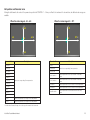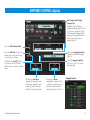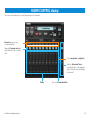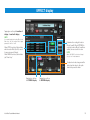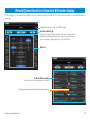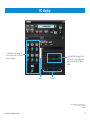
1
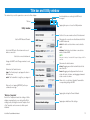
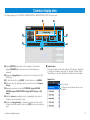
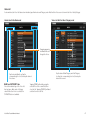
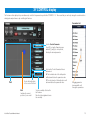
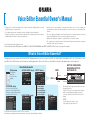
Voice Editor Essential Owner’s Manual
• The software and this owner’s manual are exclusive copyrights of Yamaha Corporation.
• Yamaha makes no representations or warranties with regard to the use of the software and
documentation and cannot be held responsible for the results of the use of this manual and the
software.
• Copying of the software or reproduction of this manual in whole or in part by any means is expressly
forbidden without the written consent of the manufacturer.
• The screen displays as illustrated in this Owner’s Manual are for instructional purposes, and may
appear somewhat different from the screens which appear on your devicer.
• Copying of the commercially available music sequence data and/or digital audio files is strictly
prohibited except for your personal use.
• Apple, iPad are trademarks of Apple Inc., registered in the U.S. and other countries.
• The company names and product names in this Owner’s Manual are the trademarks or registered
trademarks of their respective companies.
© 2011 Yamaha Corporation. All rights reserved.
For information about the MIDI settings of the MOTIF XF, S90XS/S70XS, MOX6/MOX8, and MOTIF XS, MOTIF-RACK XS, refer to the respective manuals.
What is Voice Editor Essential?
This application lets you edit the ARP/FADER/EFFECT/MEQ parameters in the Voice mode of the MOTIF XF, S90XS/S70XS, MOX6/MOX8, MOTIF XS, MOTIF-RACK XS from
your iPad. Select a Performance on the instrument, edit the parameters of the selected Voice on the iPad, then store the edited parameters on the instrument.
Voice Editor Essential
Utility window
For setting the
parameters
common to all the
displays
ARP/KBD CONTROL display
iMX-1
EFFECT display
MIDI OUT
MIDI IN
iPad
MIDI IN
XY CONTROL display
Lets you control the specified
parameter change and MIDI Control
Change messages simultaneously by
dragging in the XY Pad area.
MOTIF XF, S90XS/S70XS,
MOX6/MOX8, MOTIF XS,
MOTIF-RACK XS
FADER CONTROL display
Chorus display
Reverb display
Insertion A display
Insertion B display
Vocoder display*
EQ display
MIDI OUT
By using MIDI cables and a Yamaha i-MX1, connect the
instrument to an iPad.
The MOTIF XF can be connected via wireless Network
MIDI. For details about wireless MIDI connectivity,
refer to the “New Functions in MOTIF XF Version 1.20”
Manual.
NOTE
• Before editing, enter the Voice mode.
• After editing, store the edited Voice.
The instructions in this manual use the MOTIF XF as an example.
Depending on your particular musical instrument, there may not be equivalent displays or buttons.
Title bar and Utility window
This window lets you set the parameters common to all the displays.
Each lamp flashes according to the MIDI in/out
messages.
Title bar
Tapping this opens or closes the Utility window.
Utility window
Set this to the same number as that of the instrument.
Sets the MIDI Transmit Channel.
Selects the MIDI port of the instrument in case of
wireless connection.
Selects the connected instrument.
Assigns the MIDI Control Change numbers to each
controller.
Determines the Fader behavior.
jump: The Fader jumps to any tapped location in
the Fader area.
catch: The Fader will be “caught” as you drag on it.
Determines the connection method between the iPad
and MIDI instrument.
cable: Should be selected when connected via the
i-MX1.
wireless: Should be selected when connected via
wireless Network MIDI.
NOTE
When set to “wireless,” make the Wi-Fi setup in Settings > Wi-Fi in
your iPad.
Determines the knob behavior.
rotary: Dragging around the knob will rotate it in the
same direction.
linear: Dragging vertically upward from the knob
rotates the knob clockwise, and dragging downward
rotates counter-clockwise.
When set to on, selecting a Template* transmits the
corresponding settings via MIDI.
When set to on, tapping [RECEIVE] calls up a
confirmation message.
*What is a Template?
Each of the Templates includes the settings of all the
displays, meaning that you can call up all the Effect
settings just by selecting the desired Template. Each
of the Templates can be renamed, called up and
initialized.
Voice Editor Essential Owner’s Manual
Tapping this calls up the Owner’s Manual.
Tapping here initializes all the settings.
2
Common display area
The displays upper part of XY CONTROL, ARP/KBD CONTROL, FADER CONTROL, EFFECT, EQ are the same.
8
7
1
6
2
5
34
1 Tapping [RECEIVE] starts reception of the settings from the instrument.
Tapping [TRANSMIT] starts transmission of the current settings to the
instrument.
2 Changes the Arpeggio type of the current Part. This is equivalent to the [SF1] –
[SF5] buttons.
3 To edit the Normal Voice, tap [VOICE]. To edit the Drum Voice, tap [DRUM].
4 Calls up the Voice list. Tapping the desired voice in the list executes Program
Change.
5 Tapping here alternately calls up the XY CONTROL display, ARP/KBD
CONTROL display, FADER CONTROL display, EFFECT display and EQ
display.
6 Adjust the volume by operating the knob, or by tapping the volume value to
call up the slider for adjusting the volume.
7 Indicates the Arpeggio tempo. To change the tempo, tap the Tempo value to
call up the slider then operate the slider, or tap [TAP] three times at the desired
tempo.
Voice Editor Essential Owner’s Manual
8 Template Name
Selecting a Template calls up all the settings of all the displays. Tapping [+]/
[-] changes the Template in single steps. To change the Template, tap the
Template Name to call up the Template list, then tap the desired Template.
Template List
Closes the list.
Calls up the Rename window with on-screen
keyboard.
3
Voice List
As shown below, the Voice List features two indication types: Bank order and Category order. Note that User Voices are not shown in the Voice List by Category.
Voice List with the Bank order
Voice List with the Voice Category order
Dragging upward or
downward will scroll
through the Voices.
Tap the desired Bank to call up the
corresponding Voice List, then tap the desired
Voice name.
BANK and CATEGORY tabs
Selects the indication type of the Voice List
from two types: Bank order or Category
order. When a User Voice is selected, the
CATEGORY tab is not available.
Voice Editor Essential Owner’s Manual
Tap the desired Main Category and Sub Category
to call up the corresponding Voice List, then tap the
desired Voice name.
Tapping [DONE] will actually assign the
selected Voice to the current Part, then
close the List. Tapping [CANCEL] will abort
selection then close the List.
4
XY CONTROL display
The Pad area on this display lets you simultaneously control the five parameters specified for CONTROL 1 – 5. This means that you can freely change the sound in real time
during keyboard performance by controlling the Pad area.
Parameter List
Sets the Control Parameter.
Tap [+]/[-], or tap the Parameter name
between [-] and [+] to call up the list,
then tap the desired parameter.
Resets the ball position
to the center of the Pad.
Pad
Ball
Indicates the current
position of your control.
Voice Editor Essential Owner’s Manual
Sets how the Control Parameter Value is
determined.
X: The horizontal value of the ball position
will be transmitted as the parameter value.
Y: The vertical value of the ball position will
be transmitted as the parameter value.
Dragging upward or
downward will scroll
through the parameters.
Sets the sensitivity of the ball in
the Pad area.
Move the slider rightward to raise
the sensitivity.
5
Ball position and Parameter value
Moving the ball transmits the values of the parameters specified for CONTROL 1 – 5 from your iPad to the instrument. As shown below, two different value ranges are
available.
When the value range is -64 – +64:
When the value range is 0 – 127:
Y
Y
+63
-64
±0
127
+63 X
127
-64
Parameter Name
Descriptions
127
Parameter Name
AEG Attack
Volume
AEG Decay
Reverb Send
AEG Sustain
Chorus Send
AEG Release
Controls the corresponding Common parameter.
FEG Release
FEG Depth
Controls the corresponding Common parameter.
Controls the parameter set to Foot Controller 1 in the Utility
window.
Foot Controller 2
Controls the parameter set to Foot Controller 2 in the Utility
window.
A.Function 1
Controls the parameter set to A.Function 1 in the Utility window.
A.Function 2
Controls the parameter set to A.Function 2 in the Utility window.
Breath Controller
Controls the parameter set to Breath Controller in the Utility
window.
Cutoff
Resonance
Descriptions
Foot Controller 1
FEG Attack
FEG Decay
127 X
0
Pan
Assign 1
Controls the parameter set to Assign 1 in the Utility window.
Assign 2
Controls the parameter set to Assign 2 in the Utility window.
For details about Parameter Change, refer to the respective manuals of the instruments.
Voice Editor Essential Owner’s Manual
6
ARP/KBD CONTROL display
Main Category, Sub Category,
Arpeggio Type
Tapping the [-]/[+] of Category
changes the Arpeggio Type to the first
one of the new . Tapping the [-]/[+] of
TYPE changes the Arpeggio Type in
single steps. Tapping the indications
between [-] and [+] calls up the
Arpeggio Type List.
Turns on/off ARP Common Switch
Turns on/off ARP Hold. The blue color
indicates the on status while the gray
color indicates the off status.
Indicates the Arpeggio Type Name.
Tapping here calls up the Arpeggio
Type List.
Sets ARP Hold to Sync Off. The blue
color indicates the Sync Off status
while the gray color indicates a different
status.
Selects the Arpeggio Type Bank
form “Pre” or “User.” The selected
Bank lamp lights.
Determines the Transpose.
Tapping [-]/[+] changes the value
in single steps. Tapping the value
between [-] and [+] calls up the
slider which lets you set the value.
Voice Editor Essential Owner’s Manual
Determines the Octave.
Tapping [-]/[+] changes the value
in single steps. Tapping the value
between [-] and [+] calls up the
slider which lets you set the value.
Arpeggio Type List
7
FADER CONTROL display
The Faders on this display lets you control the parameters of the instrument.
Parameter assigned to each
corresponding Fader.
Tapping the Parameter value calls
up the slider which lets you set the
value.
Selects monophonic or polyphonic.
Adjust the Portamento Time by
operating the Fader, or by tapping the
value to call up the slider for adjusting
the time value.
Faders
Voice Editor Essential Owner’s Manual
Turns on/off Portamento Switch.
8
EFFECT display
Tapping here calls up the Insertion A
display or Insertion B display.
NOTE
If you want to apply the Insertion Effect to the
Drum Keys, set the Insertion Effect Output
parameter to “ins A” or “ins B.”
Determines the routing for Insertion
Effects A and B. When VOCODER is
selected, Insertion Effects A and B are
unified, then used as the Vocoder.
NOTE
When VOICE is selected, this indicates
which Insertion Effect (A or B) is used
for processing each Element.
When DRUM is selected, this indicates
just “Drum Keys.”
When “VOCODER” is selected, set Output
Select to “Ins L” in the instrument.
To adjust each value, drag around the
knob or tap the value to call up the
slider then operate the slider.
Tapping here calls up
the CHORUS display.
Voice Editor Essential Owner’s Manual
Tapping here calls up
the REVERB display.
9
Reverb/Chorus/Insertion A/Insertion B/Vocoder display
From these displays, you can make the Effect settings for the Voice currently selected on the instrument. This section covers the operations on these displays having the
same design
Tapping here returns the screen to the EFFECT display.
To select an Effect Type:
Tap [+]/[-] in this area. Or tap the indicators in this area to call up the Effect
list, tap the desired Category, tap the desired Type, then tap the desired
Preset setting. After selecting, tap [Done] to close the Effect list.
Effect List
To edit the Effect parameter:
Drag the slider of the desired parameter, or tap [+]/[-].
Dragging upward or downward will scroll through the parameters.
Voice Editor Essential Owner’s Manual
10
EQ display
To edit the parameter, operate the
knob or tap the value to call up the
slider for adjusting.
To edit the EQ setting, drag the dot
with the color corresponding to that
of the desired band (LOW, MID or
HIGH).
Gain
Frequency
U.R.G., Digital Musical Instruments Division
© 2011 Yamaha Corporation
106MW-B0
Voice Editor Essential Owner’s Manual
11