Transcript
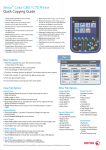
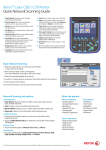
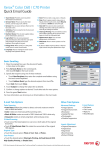
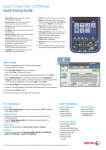
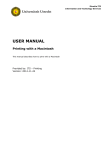
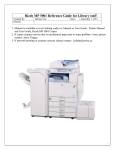
Xerox WorkCentre 7500 Series
Quick Copying Guide
®
®
1. Touch Screen: Provides access to printer
information and functions.
2. Services Home: Press to access the main
services, such as copy, scan, and fax.
3. Services: Press to access Services Home or the
last used screen.
4. Job Status: Press to view the list of active and
completed jobs.
5. Machine Status: Press to view supplies status,
printer information, and so on.
6. Log In/Out: Press to access passwordprotected features, then enter the user name
and password using the touch screen
keyboard. Press again to log out.
7. Help: Press for information about the current
selection or service.
8. Language: Press to change the touch screen
language and keyboard settings.
9. Energy Saver: When printer is in low power
mode, press to enter normal mode.
Press while the printer is in normal mode to
enter low power mode.
2
1
6
7
ABC
3
14
4
5
16
8
1
2
3
GHI
JKL
MNO
4
5
6
PQRS
TUV
WXYZ
7
8
9
0
#
–
15
9
DEF
12
13
11
10
C
10. Start: Press to start a copy, scan, or fax job.
14. Alphanumeric Keys: Press to enter
alphanumeric information.
11. Stop: Press to pause a print, copy, scan, or fax
job. On the touch screen, touch Resume to
15. C: Press to delete numeric values or the last digit
continue or Delete to cancel the job.
entered using the alphanumeric keys.
12. Clear All: Press once to clear current job
16. Dial Pause: Press to insert a pause in a fax
settings. Press twice and touch confirm to
number.
reset all job settings to default.
13. Interrupt Printing: Press to hold the current
job to allow a priority job to process. Press
again to finish the interrupted job.
Basic Copying
1. Place the originals face up in the document feeder,
or face down on the glass.
2. Press Services Home on the control panel,
then touch Copy on the touch screen.
Ready to scan your job.
Copy
Output Color
Guest
Paper Supply
4. Select the number of copies with the alphanumeric keys.
Output Format
2-Sided Copying
Job Assembly
Copy Output
3
Auto Detect
3. Confirm or change Copy tab options as desired, such as Output Color,
and Paper Supply. Also touch other tabs for more options.
Layout
Adjustment
Image Quality
Auto Select
2
3
1
2
1
1 – 1 Sided
Collated
Black & White
1 8.5 x 11”
Plain
1 – 2 Sided
1 Staple
(Portrait)
More...
2 8.5 x 11”
Plain
2 – 2 Sided
1 Staple
(Landscape)
3 8.5 x 11”
Plain
2 – 1 Sided
Folding...
Rotate Side 2
More...
Reduce / Enlarge
5. Press the green Start button.
More...
More...
For more information, see Copying in the User Guide.
Copy Tab Options
Other Tab Options
Output Color
• Auto Detect allows the printer to detect and copy in color or
black and white.
• Black & White copies in black and white only.
• Touch More for more options.
Image Quality
• Original Type
• Image Options
• Image Enhancement
• Color Presets
• Color Balance
Output Format
• Booklet Creation
• Special Pages
• Annotations
• Transparency Separators
• Page Layout
Layout Adjustment
• Original Orientation
• Original Size
• Book Copying
• Image Shift
• Edge Erase
• Invert Image
Job Assembly
• Build Job
• Sample Job
• Save Current Settings
• Retrieve Saved Settings
Reduce/Enlarge
• Touch the minus (–) or plus (+) button to change the copy size
proportionally.
• Touch More for more options.
Paper Supply
• Auto Select allows the printer to select trays with the correct paper size.
• Touch one of the trays displayed to select a tray manually.
• Touch More for more information about tray settings.
2-Sided Copying
• Touch one of the listed options to copy one or two sides
of the original to one or two sides of the output.
• Touch Rotate Side 2 to rotate the second side of copies 180 degrees.
Copy Output
• Touch the desired options for collation and stapling.
The list will vary depending on the finisher configuration.
• Touch More for more options.
128E01610 © 2010 Xerox Corporation. All rights reserved.