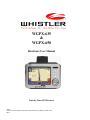
1
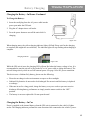
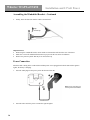
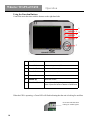
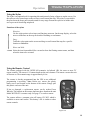
Whistler WGPX-635/650
WGPX-635
&
WGPX-650
Hardware User Manual
Turn-by-Turn GPS Receiver
Note
Contents of this manual and product specifications can change without notice.
Rev 2
1
Whistler WGPX-635/650
Introduction
If you have any questions concerning the operation of this Whistler product please call:
Whistler Customer Service
1-800-531-0004
Hours: Monday – Friday
8:00 am to 5:00 pm CT
or visit
www.whistlergroup.com
Please keep the receipt in a safe place. You may register your WGPX online at:
www.whistlergroup.com. If the unit is returned without a dated store receipt, an out of warranty
service charge applies.
Note: Your warranty period begins at the time of purchase. The warranty is validated only by a
copy of the original store receipt. Now is the time to record the serial number of the unit in the
space provided in the warranty section of the manual.
2
Enjoy
Whistler WGPX-635/650
Dear Whistler Owner,
Thank you for purchasing the Whistler Turn-By-Turn (TBT) GPS Receiver. Please take some
time to read both this hardware manual and the GPS mapping software manual in order to
understand and maximize the operating features. There is no better way to experience what’s near
you or how to get there than by using a Whistler WGPX series GPS. Both the WGPX and wMap
Mapping software were designed for ease of use to make your experience a pleasant one.
Both manuals and our Whistler Customer Service Representatives are here to assist you. For more
general GPS information or frequently asked questions, please see our FAQ page at
www.whistlergroup.com or call customer service 800-531-004 M-F 8AM to 5PM CST.
Before using the WGPX for the first time make sure that you read the important Safety
Information in the sections that follow.
Enjoy the WGPX. Please drive safely.
Sincerely,
The Whistler Group, Inc.
3
Whistler WGPX-635/650
Table of Contents
Contents
Introduction ........................................................................................................2-3
Safety Information................................................................................................. 5
Software ............................................................................................................... 6
FCC ...................................................................................................................... 7
Components.......................................................................................................... 8
Features ...........................................................................................................9-11
Front View .............................................................................................................................. 9
Rear View ............................................................................................................................. 10
Left View .............................................................................................................................. 10
Top View .............................................................................................................................. 11
Bottom View ......................................................................................................................... 11
Right View ............................................................................................................................ 11
Main Power Switch ...............................................................................................12
Battery Charging ..................................................................................................12
Charging the Battery—In Home ......................................................................................... 12-13
Charging the Battery—In Car.................................................................................................. 13
Secure Digital (SD) Card Information .....................................................................14
Inserting the SD card............................................................................................................. 14
Removing the SD card ........................................................................................................... 14
Installation......................................................................................................15-16
Assembling the Windshield Bracket.................................................................................... 15-16
Power Connection ................................................................................................................. 16
Operation........................................................................................................ 17-29
Startup ................................................................................................................................. 17
Shutdown ............................................................................................................................. 17
Using the Function Buttons .................................................................................................... 18
Using the Stylus .................................................................................................................... 19
Functions of the Stylus ...................................................................................................... 19
Using the Remote Control.................................................................................................. 19-20
System Reset......................................................................................................................... 21
Care, Maintenance and Storage .............................................................................22
Troubleshooting ...................................................................................................23
Warranty Information ...................................................................................... 24-25
Specifications .......................................................................................................26
Accessories ..........................................................................................................27
4
Safety Information
Whistler WGPX-635/650
Important Safety Information
WARNING: It is the user’s responsibility to use this product prudently and maintain safe-driving
practices at all times. This GPS should be used only by someone able to clearly understand the
instructions and able to operate the controls. For proper safety we recommend that a passenger
operate the GPS unit. However, in cases where you are alone, it is recommended that you pull
over to make any adjustments to the GPS unit. It is also important to make sure that the unit is
secure, does not block the driver’s field of vision, and will not become a hazard in case of an
accident. Do not mount or place the GPS unit on an air bag equipped steering wheel or passenger
area. In case of an accident this can be deadly.
X Do not block
driver’s view
X Do not secure in
front of airbag
X Do not loosely place
on dashboard
X Do not secure in
front of airbag
The Global Positioning System (GPS) is operated by the government of the United States, which
is solely responsible for its accuracy and maintenance. The system is subject to changes which
could affect the accuracy and performance of all GPS equipment.
5
Whistler WGPX-635/650
Software
The detailed mapping software is provided by NAVTEQ and Netropa. The detailed mapping
software is as accurate and detailed as possible. Whenever maps are digitized, there is still a
possibility that some inaccurate or incomplete data can be found. It is because of these
inaccuracies that the WGPX is a travel aid and is not intended for precise measurement in
navigation or aircraft use.
Differences between manufactured and shipped versions of the software may be present; this
software may be updated frequently. If the descriptions in this manual are different from your
software version, please follow the software version currently on hand.
Software Use Terms
Copyright laws protect the WGPX’s operating system and internal mapping software. Whistler’s
wMap mapping software is copyrighted by their respective owners. Please carefully review the
software agreement information enclosed in the Whistler’s wMap Mapping Software User’s
Guide.
Note: By opening the DVD package you accept the terms and conditions listed in the agreement.
Once opened, the DVD package cannot be returned to the place of purchase.
6
FCC Compliance
Whistler WGPX-635/650
This device complies with Part 15 of the FCC Rules. Operation is subject to the following two
conditions:
(1) This device may not cause harmful interference, and
(2) this device must accept any interference received, including interference that may cause
undesired operation.
This equipment has been tested and found to comply with the limits for a Class B digital device,
pursuant to part 15 of the FCC Rules. These limits are designed to provide reasonable protection
against harmful interference in a residential installation. This equipment generates, uses and can
radiate radio frequency energy and, if not installed and used in accordance with the instructions,
may cause harmful interference to radio communications. However, there is no guarantee that
interference will not occur in a particular installation. If this equipment does cause harmful
interference to radio or television reception, which can be determined by turning the equipment
off and on, the user is encouraged to try to correct the interference by one or more of the following
measures:
• Reorient or relocate the receiving antenna.
• Increase the separation between the equipment and receiver.
Changes and modifications not expressly approved by the Whistler Group, Inc., may void the
warranty. Repairs should be made only by an authorized Whistler Repair Center.
7
Whistler WGPX-635/650
Components
Contents :
2
1
3
4
5
6
7
8
9
10
11
1
WGPX Unit
7
SD Memory Card
2
Windshield Mount
8
DVD
3
Mounting Cradle
9
Quick Start Guide
4
DC Power Cord
10
Stylus
5
AC Power Cord (2 pcs)
11
Remote (WGPX-650 only)
6
USB/Power Cable
Note: Actual
accessory
appearances may
differ from the
drawings pictured.
WGPX Feature Highlights
• SD Card—Preloaded
with detailed maps.
8
• Cradle - accepts the windshield
bracket.
• Whistler Mapping Software
on DVD includes maps of the
United States and Canada.
• WGPX with color TFT
LCD touch screen display.
Features
Whistler WGPX-635/650
1
2
4
Front View
6
3
5
7
8
10
9
1
GPS and Battery
Charge Indicators
Green LED indicates GPS search. Yellow LED
indicates battery charging—turns Red when
battery is low
2
IR Window
Window for optional remote control
(Remote included with model WGPX-650)
3
Menu Button
Returns to the Menu window
4
Power Button
Switches the power on/off
5
Zoom Out Button
Zooms out of the map view
6
Zoom In Button
Zooms in on the map view
7
Volume Down
Lowers the volume
8
Volume Up
Raises the volume
9
Directional Button
Press up/down/left/right keys to change page
views or press the center of button to select items
Touch Screen
Displays system status. Use stylus to directly input
data or select items on the screen
10
(Anti Glare)
Note: The unit has a protective plastic layer over the display screen. Remove this layer before use.
9
Whistler WGPX-635/650
Rear View
Features
1
2
3
5
Note: Remember
to flip up antenna
for best
performance.
4
1
Retractable Flip
up Antenna
Receives satellite signals– flip up 90
degrees to use
2
External
Antenna
Connector
For connection of an external antenna (MMCX type)
3
Speaker
Audio output
4
Main Power
Switch
Disconnects power to the unit
5
Master Reset
Clears unit’s memory and resets it
1
Left View
2
3
10
1
SD/MMC Card
Slot
Location for the preloaded SD memory card.
The maps are saved on this memory card.
Do not remove this card while in use.
2
Headphone
Jack
Connection to external headphones.
3
USB Connection
Allows connection to a PC.
Whistler WGPX-635/650
Features
1
Top View
2
1
Light Sensor
Controls backlight
2
Stylus
Remove to access touch screen menus
Do Not Open!
Bottom View
2
1
1
Power
Connection
Allows connection to the 12 volt power
cord.
2
Keyboard Lock
Switch
Prevents accidental button presses when
switched on. Switch to “Unlock” before
use!
1
2
Right View
1
Stylus
Use Stylus to directly input data or select
items on the screen.
2
External
Antenna
Connector
For connection of an external antenna (MMCX type).
11
Whistler WGPX-635/650
Main Power - Battery Charging
Using the Main Power Switch
When the GPS unit is shipped from the factory or when the unit is stored for long period of time,
the main power switch should be in the “off” position.
Turn the main power switch to the ON
position.
Note: Make sure that the HOLD switch is in
the “unlock” position before use! See page 11,
bottom view, for hold switch location.
Figure 12A
When the position is changed to “on” the touch screen calibration screen is displayed. Follow the
instructions on the screen until completed.
When the calibration is done successfully tap the
screen to complete the calibration then the unit will
start to load the map program. Follow the on screen
instructions and warnings to begin using the unit for
travel.
Figure 12B
Note: The calibration screen will only appear when
the main power switch is changed from “off” to
“on”. If the touch screen appears not to function,
make sure that the HOLD button is in the “unlock”
position.
Charging the Battery - In Home
Before using the GPS for the first time, we strongly suggest you fully charge the battery. Before
the unit can be charged it must first be manually turned on. See Figure 12A. This switch connects
the battery.
Assemble the AC adapter:
The AC adapter needs to be assembled prior to
use. Follow the diagram in figure 12C to insert
the plug section to the main adapter body.
Figure 12C
12
Battery Charging
Whistler WGPX-635/650
Charging the Battery - In Home -Continued
To Charge the Battery:
2
1. Insert the small plug from the AC power cable into the
power port under the GPS unit.
2. Plug the AC adapter into a wall outlet.
3. Press the power button to turn off the unit while it’s
charging.
1
Figure 13A
When charging starts, the yellow charging indicator light will flash. Please wait for the charging
to complete (this might take several hours). The indicator light will stop flashing when charging is
complete.
Charging Indicator
Figure 13B
While the GPS unit is in use the charging LED will turn Red when the battery voltage is low. It is
recommended to turn the unit off or plug in the DC or AC power cable to charge the battery! The
unit will charge slowly while in use with external power. See page 16 for DC power connection.
This device uses a Lithium-Poly battery, please note the following:
•
•
•
•
Please do not charge in a hot environment or expose to direct sunlight.
Lithium-Poly batteries do not need to be discharged. Do not wait until the battery is depleted
to recharge.
When not in use for a long period, charge the battery every two weeks to prevent excessive
discharge affecting battery performance or simply turn the master switch to the “OFF”
position.
The battery is not user replaceable. Do not open the unit!
Charging the Battery - In Car
Power is supplied to the internal battery when the GPS unit is connected to the vehicle’s lighter
socket. The charging indicator performs the same function while connected to the vehicle’s power.
13
Whistler WGPX-635/650
Secure Digital Card (SD) Info.
Secure Digital (SD) Card
Inserting the SD card:
Note: The SD card may already be inserted into the unit and the following step may not be
required.
Insert the memory card as shown below: With the metal contacts of the memory card facing back,
insert the card into the slot on the left side of the unit (as shown below). Gently press until it locks
in place.
Note: Remove SD card
with unit off and the
power cord unplugged.
Removing the SD card:
1. Gently press the top of the memory card, and the card will
eject automatically.
Figures shown for explanation only - not representative of the actual unit!
Standard SD/MMC
type memory card.
2. Then gently pull the memory card to remove.
Note:
• The included memory card contains the digital map files
that are required for the GPS navigation data. Please do
not delete.
• When removing the memory card, please make sure the
card is not reading data, or it will cause a system crash.
• Do not set the SD memory card as write protected (locked)
or the system will not operate properly.
14
SD shown
unlocked
Installation
Whistler WGPX-635/650
Assembling the Windshield Bracket
The included windshield bracket set can be securely placed on the front windshield. This device will effectively
secure the GPS unit to the vehicle’s windshield. Note: Not recommended for motorcycle use with supplied bracket.
Follow the procedures below to secure the bracket:
1.
Follow the indicated directions and insert component B into slot on cradle A, slide in the direction indicated by
the arrows to secure.
2.
Once the cradle is secure, bend the bracket arm as shown below. Remove the protective plastic that may be
covering the suction cup. The bracket may not adhere to the windshield with this plastic on the suction cup.
Windshield mount pictured may be
different than what was packaged
with the unit. The bracket is bendable.
3.
Press the locking tab toward the windshield to secure the suction cup to the windshield as shown below.
1 Release Button Shown
4.
To remove bracket from windshield, simply press in on the two release “buttons” on the locking tab and move
the tab away from the suction cup.
15
Whistler WGPX-635/650
Installation and 12 Volt Power
Assembling the Windshield Bracket—Continued
5.
Finally, insert the GPS unit onto the cradle as shown below.
Flip
antenna up
Important notes:
• When using the windshield bracket, do not install in a location that will block the view of the driver.
• Make sure to clean the windshield and suction cup to provide the best surface for adhesion.
• Remove the protective plastic that may be on the suction cup
Power Connection
While the GPS is sitting in the cradle and the included power cord is plugged into both the unit and the cigarette
lighter, the battery is charging.
1.
Insert the small plug into the power jack on the bottom of the unit.
Note: Power cord may not
look as pictured in manual.
2.
16
Insert the other end of the power cord into the cigarette lighter.
Operation
Whistler WGPX-635/650
First Time Use
The unit has a protective plastic layer over the display screen. Remove this layer before use.
Startup
Press and hold the power button to turn on the power. A warning page is displayed followed by
the map page. Note: If unit does not power on, make sure that the main power switch is in the
“on” position and that the hold button is in the “unlock” position. See page 12 for information on
the main power switch.
Power Button
Shutdown
Press the power button to turn the unit off.
17
Whistler WGPX-635/650
Operation
Using the Function Buttons
Control the main functions with the buttons on the right hand side.
1
2
4
3
5
6
7
1
Menu Button
Returns to the Menu window
2
Power Button
Switches the power on/off
3
Zoom Out Button
Zooms out of the map view
4
Zoom In Button
Zooms in on the map view
5
Volume Down
Lowers the volume
6
Volume Up
Raises the volume
7
Directional Button
Press up/down/left/right keys to change page
views or press the center of button to select items
When the GPS is operating, a Green LED will flash indicating that the unit is looking for satellites.
Green LED will flash when
looking for satellite signals.
18
Operation
Whistler WGPX-635/650
Using the Stylus
The stylus is an optional tool for operating this unit instead of using a finger to tap the screen. Use
the stylus to select icons/items on the screen or scroll around the map. The stylus is concealed in
the pen slot on the front; pull out and extend for easy usage. Return the stylus to its holder after
use to prevent it from being misplaced.
Functions of the stylus:
Selection:
Use the stylus point to select items and functions onscreen. On the map display, select the
street or indicators on the map for details of building or road names.
Drag:
Touch the stylus point on the screen and drag to scroll around the map for a specific
location or landmarks.
Select and hold:
Select the item/icon and hold for a second to show the floating context menu, and then
select the item to be executed.
Using the Remote Control
The remote packaged with the WGPX-650 transmits via Infrared (IR), the same as most TV
remote controls. The remote’s 11 buttons duplicate the unit’s buttons. The remote can turn the unit
off but not on. The transmit range is approximately 4 feet.
The remote is already programmed into the GPS so no additional
programming is necessary. Note: Before use, remove the plastic
battery saver card located on the bottom of the remote. Simply pull
this plastic card out of the unit.
If lost or damaged, a replacement remote can be ordered from
Whistler. The buttons on the remote duplicate those found on the unit.
Model WGPX-635 is remote ready. See page 27 to order a remote.
The remote utilizes a common coin cell battery CR 2025 which is
available at most retail outlets. This battery’s life is similar to other
remote controls.
Figure 19A
19
Whistler WGPX-635/650
Operation
Using the Remote Control - Continued
Replacing the Remote Battery
The remote control is powered by a 3 volt coin cell battery, model CR 2025.
To replace the battery, follow these steps:
1. Slide the locking tab to the right.
Figure 20A
1
2. While holding the tab to the right, carefully slide out the battery tray.
2
Figure 20B
Pull battery tray out
to remove battery.
3
3. The battery should slide out from its holder. Make note of the correct polarity. Positive (+)
side of the battery is on the same side of the battery tray that has the “+” marking.
4. Insert the new battery, being mindful of the correct polarity.
5. Slide the battery tray back into the remote.
20
Operation
Whistler WGPX-635/650
System Reset
In only three circumstances will it be required to reboot or reset the system. Reset the unit if any
of the following situations occur:
•
•
•
Heavy lag experienced with screen refresh or operations, resulting in an inoperable system.
Cannot turn off the system with power button.
No response with any selection on the screen.
Use the tip of the stylus and insert into the reset switch on back of the unit.
Use stylus to press the reset
button.
The system will immediately reset and reboot going to the touch screen calibration page. When
this page is completed successfully, the GPS warning page will be displayed. Once the warning
page is accepted, the unit is ready to use.
21
Whistler WGPX-635/650
Care, Maintenance and Storage
Normal Care and Maintenance
To ensure the unit’s normal operation and extended life span, please note the following while
using and storing:
Keep dry
This product is not waterproof. If it comes into contact with water spray or is submerged, it will
seriously damage the components, resulting in irreversible damage and void the warranty.
Do not drop the unit
If violently impacted or shocked, serious damage may be caused.
Avoid sudden temperature changes
Condensation may occur when entering a warm room on a cold day. To prevent condensation
from damaging the unit, please place into an airtight plastic bag before sudden temperature
changes.
Keep away from strong magnetic fields
When using or storing, please keep away from strong electromagnetic/radioactive or magnetic
field equipment.
Operating temperature
The unit’s operating temperature is between 32°(0°C) and 113°F (45°C). Please do not operate
under extreme temperatures.
Avoid exposure to sunlight
Please avoid long periods of sunlight or high temperature exposure.
Using the stylus
The LCD screen is easily scratched; please use only the stylus for operation. Do not use any
other sharp objects on the screen to avoid damaging the LCD screen.
Cleaning the screen
Using a soft clean cloth to wipe the screen is recommended; do not use ordinary tissue to wipe
the screen.
Do not disassemble
Please do not disassemble the product, this will void the warranty and may damage the unit.
Storage
When the product is not being used for a long period, set the main power switch to the OFF
position and store in a cool and dry place. For long-term storage, keeping the unit in a dry box is
recommended.
Please do not keep the product in the following environments:
• Unventilated and humid locations
• In a car window that is exposed to excessive amounts of sunlight
• Where humidity is over 60%
22
Troubleshooting
Whistler WGPX-635/650
Quick Troubleshooting
Power
Cannot startup or
will power up but
turn itself off.
1. Insufficient battery charge. Please connect to
the power cord and restart system.
Screen
No screen
displayed.
After powering up, if the system does not
respond, try the following:
1. Connect cord, restart system.
2. Reset system.
Display speed is
too slow.
1. Check if the battery is low on power.
2. Reset system.
Screen has no
response.
1. Reset system.
2. Move the Hold button to the “Unlock”
position.
SD card error
displayed
1. Remove and reinstall SD card
2. Make sure SD card is installed
GPS cannot
display my current
location.
1. Make sure your current location is not
obstructed by buildings or other
interference.
2. Make sure that the antenna is flipped up.
3. Make sure you are not in Panning Mode.
See Software manual for info on Panning
mode.
Navigation
Takes More Than 10 Minutes To Get A Position Fix:
1. If there are any obstacles nearby or overhead, move to a new location.
2. Make sure that the antenna is pointing up, has a clear view of the sky and is a reasonable
distance away from any metal.
3. Check Satellite Status screen to see if the receiver is acquiring data.
Position On Map Is Not Exactly On The Road.
It could be caused by distance shifts to the digitized map. Possibly a weak signal or not enough
satellites overhead to provide accurate position.
Windshield Bracket Does Not Stick On Window.
1. Remove protective plastic from the suction cup.
2. Clean the suction cup and area on the windshield with window cleaner and retry.
If you do not see your question listed, please visit our GPS FAQ page of our website
www.whistlergroup.com
or call
Whistler Customer Service
(800) 531-0004
Available Monday through Friday 8am to 5pm CT.
23
Whistler WGPX-635/650
Warranty Information
Consumer Warranty
This Whistler GPS unit is warranted to the original purchaser for a period of one year from date of
original purchase against all defects in materials and workmanship. If the unit is replaced, it is still
warranted ONLY from the date of original purchase, not one (1) year from the date of
replacement.
This limited warranty is void if the unit is abused or modified, if the housing has been removed, or
if the serial number is missing. There are no express warranties covering this product other than
those set forth in this warranty. All express or implied warranties for this product are limited to
one year. Whistler is not liable for damages arising from the use, misuse, or operation of this
product.
NOTE: Any damage to the remote battery, battery leakage, water damage or any physical damage
is not covered under the warranty. Check with the battery manufacturer about this
warranty.
Service Under Warranty
During the warranty period, defective units will be repaired without charge to the purchaser when
returned with a dated store receipt to the address below. Units returned without a dated store
receipt will be handled as described in section “Service Out Of Warranty.” Due to the specialized
equipment necessary for testing GPS units, there are no authorized service stations for Whistler
products other than Whistler.
When returning a unit for service under warranty, please follow these instructions:
1. Ship the unit in the original carton or in a suitable sturdy equivalent, fully insured, with return
receipt requested to:
Whistler Repair Department
1201 North Dixieland Road
Rogers, AR 72756
IMPORTANT: Whistler will not assume responsibility for loss or damage incurred in shipping.
Therefore, please ship your unit insured with return receipt requested. COD’s will not be
accepted!
2. Include with your unit the following information, clearly printed:
❏ Your Name
❏ Street Address
(NO P.O. Boxes Please)
❏ Daytime Telephone Number
❏ An e-mail Address (if applicable)
❏ A detailed description of the problem
(e.g., “Unit does not receive satellites).
❏ A copy of a dated store receipt or bill of sale
24
Warranty Information
Whistler WGPX-635/650
Service Under Warranty—Continued
3. Be certain your unit is returned with its serial number. For reference, please write your units
serial number in the following space:
S/N: ________________
wMap software Release Version (Located in the About page): _______________________
Units without serial numbers are not covered under warranty.
IMPORTANT: To validate that the unit is within the warranty period, make sure to keep a
copy of the dated store receipt. You may register the warranty online at
www.whistlergroup.com. For warranty verification purposes, a copy of your dated store
receipt must accompany any unit sent in for warranty work.
Service Out Of Warranty
Units will be repaired at “out of warranty” service rates when:
• The unit’s original warranty has expired.
• A dated store receipt is not supplied.
• The unit has been returned without its serial number.
• The unit has been abused, modified, or had its housing removed.
The minimum out of warranty service fee is $160.00 (U.S.). If you require out of warranty service,
please return your unit as outlined in the section “Service Under Warranty” along with a certified
check or money order for $160.00 (U.S.). Payment may also be made by MasterCard, VISA or
American Express; personal checks are not accepted. In the event repairs cannot be covered by
the minimum service fee, you will be contacted by a Whistler technical service specialist who will
outline options available to you.
IMPORTANT: When returning your unit for service, be certain to include a daytime telephone
number, and an email address (if applicable).
25
Whistler WGPX-635/650
Specifications
Specifications
Integrated GPS Receiver
20 parallel channels
Acquisition Time
‧Reacquisition : 0.1 sec.
‧Hot start : 2 sec.
‧Warm start : 35 sec.
‧Cold start : 45 sec.
26
Accuracy
Position: 10 m. for 90%
Velocity: 0.1 m/s
Processor
Samsung Processor at 266 MHz.
Operating System
Microsoft Windows CE.Net 4.2
Internal Memory
32 MB flash memory and 64MB SDRAM memory for
operating system and embedded applications
Weight
7.3 oz
Size
4.625”x 3.25”x .75”
Car Holder / Charger
Input voltage: 11V. ~ 28V.
Output voltage: 5.1V. ± 0.3V.
Battery
Rechargeable 1350 mAh. Li-poly
8 hours battery life when backlight is inactive
3 hours to fully charge
Extension Slot
SD
Display
Anti-glare 3.5" high-brightness & contrast ratio
transflective TFT LCD (262k colors) with 240 x 320
(QVGA) resolution
LEDs
Yellow/Red LED for battery charging status and
Green LED for GPS signal reception
Audio
Built-in 30 mm speaker and stereo earphone jack
Operation Temperature
32° ~113°F (0°~45°C)
Storage Temperature
-4°~149°F (-20°~65°C)
Special Keys and Buttons
5-way directional pad (up, down, left, right, enter);
Four quick-launch application buttons
Whistler WGPX-635/650
Accessories
Accessories
These and other accessories can be ordered directly from Whistler by calling Customer Service at
(800) 531-0004 or visiting our online store at www.whistlergroup.com.
WGPX Accessories
P/N
506509
203000
506507
506511
506502
506512
506510
506510-3
Item
12 Volt Power Cord
Carrying Pouch
AC Power Cord
Windshield Bracket Kit - Includes cradle
USB Cable
Remote Control
Stylus
Stylus 3 pack
Price
$15.95
$ 5.95
$12.95
$22.95
$ 5.95
$14.95
$ 3.95
$ 9.95
27