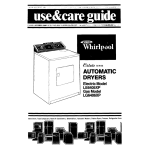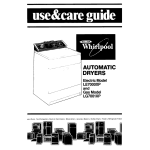
1
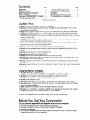
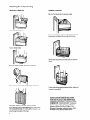
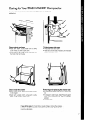
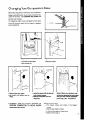
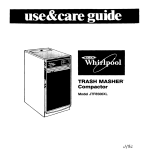
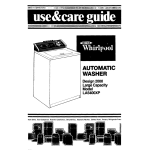
TRASH MASHER”;
Compactor
Built-h Model
TU4000 Series
‘~~
dim
‘rash Compactors. Room AH Condltloners
*
_.-
Ii
d
..-a’
Oehumldlflers. Automallc Washers, Clothes Dryers. Freezers, Relrlgerator-Freezers,
Ice Makers. DIshwashers. BullI-In Ovens and Surface Units. Range
Contents
Safety First ............................
Installation Safety ......................
Before You Use Your Compactor
........
Parts and Features .....................
Using yourTRASH
MASHER=“- Compactor
How the Compactor Works .............
Page
2
2
2
3
4
5
c 1984 Whirlpool
Replacing the Compactor Bag
Caring for Your TRASH MASHER d
Compactor
_...,
_.......,
.,
Changing Your Compactor’s
Color
If You Need Service or Assistance
Page
6
7
9
10
Corporation
Safety First
l
l
l
l
l
l
l
l
l
l
l
l
l
l
Read all instructions
before using your compactor.
Do not let children operate or play with your compactor.
Anything
placed in the unit will
be crushed or compacted.
Keep the compactor
locked when it’s not in use. Remove the key knob to a safe place.
Always place glass bottles, etc., on their sides in the center of the drawer so the wastepaper below and beside the bottle can help keep broken glass near the center of the bag,
away from bag sides.
Always handle a filled compactor
bag with care. Never lift it by the sides. Broken glass or
other sharp objects in the bag can cause injury.
Always carry a filled compactor
bag by the folded top or a bag carrier. Watch out for
glass that may have cut through
the bag sides.
Always use the compactor
only for the purpose it was designed to do.
Do not use the compactor
as a counter for electrical
cooking appliances
nor as a cutting
board.
Do not set hot pans, etc., on the compactor
top.
Do not spill any liquids on compactor
top.
Always wipe off any broken glass before touching the ram cover.
Do not shove items down into the compactor
with hands or feet. To avoid berng cut, let
the compactor
do the compacting
Do not compact
any container
or material which might contain poisonous
or explosive
products.
Do not compact
cloths or cans containing
paint Ilqurds. thinners.
etc. which could create
a fire hazard.
Installation Safety
.
l
l
l
l
l
l
l
ALL GOVERNING ELkCTRtCAL CODES AND ORDINANCES.
Be sure your compactor
is electrically
grounded
in an approved
manner.
Do not remove the power supply cord ground prong.
OBSERVE
Do not use an extension
cord.
Use care when leveling your compactor,
so that the unit does not drop on your hand.
Use care when changing
front panels. As with any cut metal edges, they could cause
injury if handled carelessly.
Never operate the compactor
when the drawer handle is removed.
Be sure your compactor
is properly
installed
in an appropriate
level area and a place
suitable for the size, function and protection
of the compactor.
. SAVE THE INSTALLATION
INSTRUCTIONS
FOR FUTURE REFERENCE.
Before You Use Your Compactor
It is your personal
responsibility
and obligation
to be sure your compactor:
Has been installed where it is protected
from the elements.
l
Has been installed on a floor strong enough to support
its weight.
0 Is properly maintained.
l
Has not been installed where flammable
materials are stored or used. Fumes
materials may result in a fire or explosion.
l
from these
Your TRASHMASHER@Compactor
Parts and Features
Restart Light
Key-Knob
4 Start-Off Switch
Drawer Handle-
Air Freshener
Compartment
Model and Serial
Number Plate
II
P-Color
Front Panel !
Lever-Action
Adjustable
Toe Plate h
fill In the spaces below. You WIII need this
Now is the time...to
Information
if you call for service or assistance.
Record all letters
and numbers.
There
Model
Purchase
Sewce
is no warranty
registration
card to be returned.
No
Date
Company
Telephone
NO
SAVE THESE INSTRUCTIONS
Lack
Using your TRASHMASHER”Compactor
1. Open the drawer.
Lift and pull the handle to open the drawer.
2. Put in the trash.
l
l
l
Load almost any kind of trash.
Wrap or cover wet or messy trash.
Load bottles or cans on their sides in the center of the drawer.
DO NOT compact:
Any container or aerosol cans which might contain poisonous or explosive
products.
l Cloths or cans containing
parnt liquids, thinners, etc. which would create a
fire hazard.
l Items that may develop
offensive odors such as raw meat, fish, grapefrurt
rinds, disposable drapers, or personal hygiene items
l
NOTE: Your TRASH MASHER”
only.
Compactor
IS deslgned for household use
3. Close the drawer; turn the key-knob to START; let the
knob go.
l
l
l
l
I /
AESTART
The compactor will stop at the end of the cycle.
To remove the key-knob, turn it to LOCK/OFF.
Remove and store in safe place out of children’s reach.
To stop the compactor during a cycle, turn the key-knob to LOCK/OFF.
Then turn It to ON. The compacting ram will rise. When It stops rising, you
can open the drawer.
The RESTART Light wilt glow and the compactor wilt shut off if a can
or bottle wedges the drawer open slightly. The ram will be in a partly down
position.
To raise the ram:
l Push and hold the
l Turn the key-knob
l After the ram rises
the load.
l If compactor
stops
drawer shut.
to START; let it go.
and the compactor stops, open the drawer; rearrange
before the light goes out, repeat.
Air Fresheners
The Air Freshener Control is designed to help control odors that might develop In the trash
There are many solid air fresheners available on the market.
Put “adjustable” air freshener in
compartment.
l Adjust according
to directions.
Check air freshener occasionally.
It should last 4 to 6 weeks.
l
How the compactor
works
The compacting ram does not go to
the drawer bottom. You will not see
compacting of the first few ‘oadings.
Compactron starts after the drawer is
about % full. You may hear a noise
when glass breaks. Strong glass bottles may not break at all.
The trash in a full compactor bag will
be about ‘/4 the size of its original
bulk.
5
Replacing
Removing
the compactor
bag
a filled bag
Installing
a new bag
Be sure the drawer side is securely locked.
Pull all four bag cuffs up
Put unopened bag in drawer as shown. Spread front
bag corners and slide cuff over right-front corner.
Tuck in slotted sides
Spread rear bag corners and slide cuff over left-rear
corner.
Bnng top edges together and fold to close bag
Push side-lock lever down and tilt drawer srde open.
Press inside of bag against drawer bottom, sides and
corners for smooth fit.
*
Using both hands on the fold, remove the bag.
Carry the bag only by the folded top. Be careful when
removing and carrying the filled bag. Bits of glass may
stick through the sides of the bag.
6
.-
.,,~_“,
”
_A
I
..
DO NOT USE ANY KIND OF BAG OTHER
THAN THE PLASTIC-LINED
PAPER BAGS
DESIGNED ESPECIALLY FOR USE IN YOUR
COMPACTOR. TRASH MASHER” Compactor
bags may be purchased from your Whirlpool
Appliance Dealer (Part No. 675186) or from
Whirlpool Corporation, LaPorte Division, 1900
Whirlpool Drive, LaPorte, Indiana 46350.
.,
i
,
1
Caring for Your TRASHMASHER”Compactor
As IS true of most appliances
satisfaction.
Clean exterior
l
l
proper care is needed to give you continued
Clean inside the drawer
l
l
Tilt the drawer side open
surfaces
Wipe with warm, sudsy water and a damp
cloth Rinse. Dry with a soft cloth.
Wipe up spills right away. Some foods can mar
the finish if left on the top
Wear rubber gloves. There may be bits of glass
in the drawer.
Wash with a damp cloth using warm, sudsy
water. Rinse Dry with a soft cloth.
l
l
Press side-lock latch down.
Hold latch and tilt side of drawer until the latch
clears the drawer front.
Removing
l
l
l
and replacing
the drawer side
To remove the drawer side, tilt it out. Then lift it
out
To replace it, slide it back, tilted Press the latch
down while pushing the side to upright
position.
Lock the latch.
If you will be away for more than a couple of days, remove the compac- ,
tor bag. Lock the compactor and remove the key-knob. Store the key- -,
knob in a safe place.
To remove and replace the air freshener compartment.
l
l
To clean inside the cabinet,
drawer
l
l
l
To remove, pull top of compartment until it snaps free.
To replace, set in the bottom first, then snap in the top.
remove the
Pull the drawer out until it stops
Note the tracks in which the drawer
move.
Lrft the front to clear the drawer stops
l
l
l
Grasp the drawer on the sides.
Pull it out the rest of the way.
Set it down gently.
rollers
Wipe off the ram cover
. WEAR RUBBER GLOVES.
l Wipe glass particles
off ram cover with a cloth
or paper towels.
l Use warm sudsy water to remove foods. Rinse.
Dry with soft cloth.
Clean inside the cabinet
. WEAR RUBBER GLOVES.
Vacuum inside of cabinet.
l Wash, rinse and dry inside.
l Replace drawer.
l
Changing Your Compactor’s Color
Behind the color panel on the front of your compactor’s
drawer is one other color, so you have a choice of two
colors for the front. The Consumer Buy Guide label
lists the color choices.
2 SPACERS
To change the color of your compactor’s
front panel,
follow the directions below. All you need is a mediumsized screwdriver
l
Slide
out drawer
2~ SIDED
:OLOR PANEL
DRAWER
until it stops.
0 Lift front to clear stops.
l Pull straight
out.
l
l
l
Remove the color panel.
Be careful, the edges may be
sharp.
l
l
l
Remove
two screws
l
Remove
handle.
Install the panel with the desired
color facing forward.
Make sure the panel is all the
way down.
WARNING: REPLACE
HANDLE
BEFORE
OPERATING COMPACTOR
TO AVOID INJURY
FROM MOVING PARTS.
l
TRIM
shown.
lption: Match your kitchen’s color
scheme by replacing the color panel
with your own creation (wallpaper,
panelling).
See“lnstallation
Instructions.”
Replace the drawer:
-Put
drawer
rollers over stops in the drawer
guides.
-Slide
drawer back to stops.
-Lift
front of drawer to clear stops.
-Slide
it all the way in.
9
If You Need Service or
Assistance, we suggest
follow these four
steps:
you
1. Before calling for assistance...
Performance problems often result from little
things you can find and fix yourself without tools
of any kind.
If the compactor
won’t
l
Is the electric
.
Have you checked
breaker box?
l
Is the key-knob turned
before it is released?
l
all the way to START
operation:
compaction
or force:
Compacting
works best when only a few
Items are loaded. Use the compacting
cycle frequently.
don’t
break:
Not all bottles will break every time,
depending
upon trash load below it.
Drawer won’t open:
Drawer will open only when ram is all the
way up.
l To raise the ram, push drawer
in firmly;
turn key- knob to START; release key-knob
l Open drawer;
lay cans and bottles flat In
center of drawer.
l Start compactor
again.
l
FSP 1s a regrstered
trademark
of Whirlpool
Corporahon
for
quality parts Look for thts
FSP
symbol of quality whenever
R you need a replacement
part
for your Whirlpool
appliance.
FSP replacement
parts
wrll frt rrght and work right. because
they are
made to the same exacting
specifications
used to burld every new Whirlpool
appliance
0
IO
7iicMGw?E
FRANCHISED
SERVICE
3. If you need service’...
Whirlpool has a nationwide network of franchised TECH-CARE’ Service Companies.
TECH-CARE service technicians are trained to
fulfill the product warranty and provide after-warranty service, anywhere in the United States. To
locate TECH-CARE service in your area, call our
COOL-LINE service assistance telephone number
(see Step 2) or look in your telephone directory
Yellow Pages under.
APPLIANCES-HOUSEHOLDMAJOR-SERVICE
8 REPAIR
WHIRLPOOL APPLIANCES
FRANCHISED
TECH-CARE
Drawer must be at least ‘13 full to see
compaction.
Bottles
l
during
closed?
not compacted:
Not enough
l
in?
Is the RESTART ltght on? Push drawer in
while turning key-knob to start. Repeat if
necessary. Rearrange
trash load-do
not
load rigid items at front of drawer.
Trash
l
completely
stops
plugged
the main fuse or circuit
Is the drawer
If compactor
operate:
cord securely
l
2. If you need assistance*...
Call Whirlpool
COOL-LINE”
service
assistance telephone numbers. Dial free from:
Continental U.S. . . . . . . . . . . . (800) 253-1301
Michigan . . . . . . . . . . . . . . . . . . (800) 832-2243
Alaska & Hawaii . . . . . . . . . . . (800) 2531121
and talk with one of our trained Consultants. The
Consultant can instruct you in how to obtain satisfactory operation from your appliance or, if service
is necessary, recommend a qualified service company in your area.
SERVICE
XYZ SERVICE CO
123 Maple
SERVICE
COMPANIES
9999999
OR
ELECTRICALAPPLIANCESMAJOR-REPAIRING
8 PARlS
WHIRLPOOL APPLIANCES
FRANCHISED
TECH-CARE
SERVICE
XYZ SERVICE CO
123 Maple
SERVICE
COMPANIES
9999939
OR
WASHING MACHINES. DRYERS
8 IRONERS-SERVICING
WHIRLPOOLAPPLIANCES
FRANCHISED
TECH-CARE
SERVICE
XYZ SERVICE CO
123 Maple
SERVICE
COMPANIES
9999993
4. If you have a problem*...
Call our COOL-LINE service
assistance telephone number (see
Step 2) and talk with one of our
Consultants, or if you prefer, write
to:
Mr. Robert F. Gunts, Vice President
Whirlpool Corporation
Administrative Center
2000 US-33 North
Benton Harbor, MI 49022
*If you must call or write, please
provide: model number, serial
number, date of purchase, and a
complete descnption of the
problem. This information is
needed in order to better respond
to your request for assistance.
Notes
Making your world a little easier
Part No. 780335
~‘1984 Whirlpool
I.,
-
Printed
in U.S.A.
Corporation
“..d’
actors. Room Atr Condltmners. Dehumldbers,
Automatx Washers, Clothes Dryers, Freezers. Relngerator-Freezers.
Ice Makers, DIshwashers. Built-In Ovens and Surface Units, Ranges. Mlcrowa