1
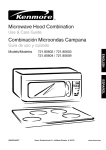
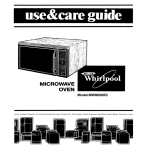
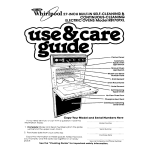
Tkrlpool
C;jkP@KATION
~~m~c~owflvemoven
USEandCARE
GUIDE
MODEL RJM 7700
RJM 1870
OVEN CAVITY
._
._
in,
~.
.._
SAFETYPRECAUTIONSTO
AVOIDPOSSIBLEEXPOSURE
~ TOEXCESSIVEMICROWAVE
~ ENERGY
Do not attempt
to operate
this oven with the door open stnce
open-door
operation
can result In harmful exposure
to mlcrowave
energy
It IS Important
not to defeat or tamper
with the safety
Interlocks
Do not place any object between the oven front face and the door or
allow so11 or cleaner residue to accumulate
on sealing surfaces
Do not operate the oven If It IS damaged
It IS particularly
important
that the oven door close properly and that there IS no damage to the
(1) Door (bent). (2) hinges and latches (broken or loosened),
(3) door
seals and sealing surfaces
The oven should not be adjusted
or repatred
by anyone except
properly qualifled service personnel
The oven should be checked
for microwave
leakage by quaIltied
personnel
after a repair IS made
Do not operate
Do not oDerate
the oven if the door glass IS broken
the microwave
oven with the outer cabinet
removed
Do not attempt
to cook eggs in the shell in the microwave
oven. Steam build-up
within the egg will cause it to burst.
Damage to the oven or injury to the user may result.
Before YouUse Your
Microwave Oven
Whirlpool
Microwave
Ovens are built to last. It is up to you to make
sure your microwave
oven is properly
installed,
used and maintained.
You have to be sure that your Whirlpool
Microwave
Oven is,
. installed
according
. installed
where
to installation
it is protected
instructions.
from the weather
installed
on a counter,
or shelf strong enough
7700).
. connected
to an electrical
circuit
according
instructions.
l
. grounded
to the installation
to
the
of a home
microwave
. not used by children
it properly.
who might
not understand
. serviced
or others
and in good
or repaired
installation
oven
repair.
only by qualified
(RJM
instructions.
. used only for the job expected
. kept clean
2
according
for its weight
service
technicians.
how to use
Contents
Introduction
.._,...,....,,......,,..........,....,..,.....,..
You Use Your Microwave
Installation
Oven
............
(RJM 7700) ................
Instructions
How a Microwave
Oven Works .................................
4 5
..........................
5 5
How to Use Your Microwave
Oven
........................................
l
Using
l
Cooking
l
Defrosting
l
Using
l
To Check.
l
To Stop the Oven
l
Cookrng
With Temperature
Bi-Level
Oven
l
3 2
..............................
Safety Precautions
Before
Page g
n
the Controls
..........................................
With Time
7 \
..’
the Control
as a Minute
Change
or Cancel
2
v)
6
7
0
8;
Timer
8;
Instructions
Rack
Yips on Microwave
Oven Use
2
10 c
l
Do’s, Don’ts
and Hints
l
Replacing
l
Care and Cleantng
11
l
Before Calling
l
If you need service
12 g
12 sb
the Oven
Light
-11
Bulb
for Service
;
E
:
0
22
Fist
please read this guide all the way through.
Save it for future
when you may wish to look up some helpful fact or suggestion.
use
Now
~
is a good trme to fill in the spaces
below.
You will need this
information
if you call for service
or to ask questions
about your
microwave
oven. Model and serial numbers
are located
behind
the
door of the microwave
oven, as illustrated
Be sure to record all letters
and numbers.
MODEL
AND SERIAL
MODEL
NO.
SERIAL
NO.
PURCHASE
SERVICE
NUMBER
PLATE
DATE
COMPANY
TELEPHONE
NO.
3
lnstallation Instructions
(RJM 7700’
First: Take everything
out of the oven. Wipe out the inside
with a damp
cloth.
Second:
Put
has enough
between
the
top. They are
the microwave
oven on a counter,
table or shelf which
strength
to hold it. For ventilation,
leave two inches
back of the oven and the wall. Do not block the vents on
needed for air flow and even cookrng.
This oven can be built into a wall or cabinet.
Kits RCK703 and RCK707
are available
from your dealer for recessed
installation.
It can also be
installed,
with those kits, above Whirlpool
RDE, REE and RGE series
single ovens, or Hardwick
7200 single gas ovens. Follow the manufacturer’s installation
instructions.
The RCK 710, RCK 711 and RCK 713
kits can be used for surface
mounting
on a wall. The MICRO SHELF’
Hood, Model RJH 3330, is available
for mounting
the microwave
oven
above a range or cooktop.
Third:
For your safety, this oven must be grounded.
Its
3-prong
grounding
plug. DO NOT CUT THE ROUND
PRONG FROM THE PLUG. If the wall receptacle
doesn’t
plug-in,
or If the plug-in
isn’t grounded
according
to
Electncal
Code and local codes or ordinances,
you
qualified
electrrctan
put in the right outlet.
cord has the
GROUNDING
have the right
the National
must have a
Fourth:
The outlet must supply 120 volts, 60 Hz., A.C. The microwave
oven will use about 1450 watts when it is operating,
so no other major
household
appliance
should share the circuit.
Fifth: Fill a glass container
with about one cup (250 mL) of cold water
and put it in the oven. Turn the oven on full power for 1 to IV2 minutes
(see page 7). When the time is up, the water should be heated.
Sixth:
If the microwave
may run slower
than
temperature.
oven has been stored in a cool
usual
until the oven warms
room. the fan
up to room
‘Tmk.
How a Microwave Oven Works
Microwaves
are lrke radio waves or radar waves. They will pass
glass, plastic, paper and most other types of containers
that
are not metal. Microwaves
bounce off metal and are absorbed by food.
ON When food absorbs
microwaves,
heal is created
because
Water
molecules
in the food are disturbed
and bounce around colliding
with
each other. Heat IS created
by this bouncing
and collidrng
like
when you warm your hands by rubbing
them together.
through
When all safety systems
are secure
(door shut completely
and the
START button
pushed),
electric
current
IS allowed
to reach
the
magnetron
tube. The magnetron
tube uses electricity
to create
microwaves.
They pass through
a metal tunnel called the waveguide,
past the wavetuner,
into the oven cavity.
Just at the point where the microwaves
are about to go Into the oven
cavity, Whirlpool
Microwave
Ovens use a mode mixer (a slow-moving
metal fan) to scatter
them. If all the microwaves
went in the same
direction,
they’d all bounce
In the same direction,
like water from a
How a MicrowaveOvenWork (cont’d)
hose. Some parts of the food wouldn’t
be touched.
The mode mixer
works like a sprinkler
to spread microwaves
all around.
:.
$&gg,
_o
,
The walls, top and bottom of the oven cavity are metal.
bounce around inside the oven until they are absorbed
Mtcrowaves
by food.
E
6
2
will
:
The food container
rests on a sealed-in shelf above the metal bottom of
the oven cavity.
Because
the food is above
the metal
bottom,
microwaves
can get under it, through
the shelf, to bounce up from the
bottom into the food.
The screen in the door is designed
allow you to see inside.
”
,.e
SHeu:
/
‘. &FT&
MICROWAVESBOUNCE UP FROM
THE BOTTOM
to keep microwaves
in the oven, yet
g
5
switches.
How to Use
YourMicrowave Oven
DISPLAY AND
INDICATORS\
“Cycle 1”
“Cycle 2”
“Defrost”
“Cook Temp”
“Cook Power”
NUMBER SELECT ‘ORS
“Minutes”
“Seconds”
COOK SELECTOR IS “Cycle 1”
“Cycle 2”
“Defrost”
“Cancel”
“Cook Power”
“Cook Temp”
“ON”
INDICATOR
START BUTTON c
Before you set the microwave
oven controls
open the door.
Two dots 1:] WIII show In the display
Put the food in the oven and
close the door When these dots are on. you can set your mrcrowave
oven to cook. The dots will glow when the door IS open. when the oven
is set, and for 1 minute
after the door
is closed
or after the cycle
2
b
it
z
There are three safety interlock
switches
designed
to make sure that
the microwave
oven will not operate
unless the door is closed and
microwaves
are sealed inside.
Do not tamper with any of these interlock
A
I
ends.
5
READ THIS CHARTTO DECIDEWHICHCONTROLSTOUSE
Control
Use
for:
What
happens:
button.
The display
ress start. The disp
he Cycle 1 indicate
countdown.
At the e
buzz once and cook
indicator will glow an
Cycle 2 cook time. At the end
ht IS the temperature
6 is-about
7 IS about
6 IS about
9 IS about
150
160
165
185
F
F
F
F
to coo% al a power level
other than HIGH
Power Level
Settings
Lit
60
70
Cookbook
Description
High or full power
Cook Power 9
Cook Power 6
Cook Power ?
or Medium High (7)
(66
(71
(74
(65
C)
C)
C)
C)
Cook Temp setting
8
*-:
After setting a cook time or temperature,
you can a&the
oven to cook at a power level other than H4Gt-i. Many recipes.. .
:’
call for lower power level setting. The oven will automaffMf&
i 1,
cook on HIGH unless you push the Cook Power button and
select a different power level
.“. _>i’
Push and hold the Cook Power button until the p&&r
you want shows on the left side of the display.
60
50
40
30
Push once until “1” shows
Push and hold until “2” shows
Push and hold until “3” shows
checkmg
the oven as It
setting’e
I
_
,?...
‘.,
_ _.,
Setting Your
Microwave OvenControls
To turn on the control
l
panel,
open
the door
can set Defrost
Cycle 1 and Cycle 2 In any order
start the mlcrowave
oven it WIII automatlcally
go through
In order (Defrost - tiold - 1 - 2)
l
The
l
l
l
oven
WIII cook on HIGH
POWER level or DEFROST setting
unless
If you set two rnstructlons
~istructlons
erase the first
for
you
set
Fl
N
When you
;he cycles
YOU
a dlffererlt
COOK
tne
second
0
E
z
5
the
same
cycle
:
s
$
g
The oven WIII buzz once between
Held and Cycle
1 and once
between
Cycles 1 and 2 You can use this sIgnal as a reminder
to stir
or turn food or to add lngredlenis
<
To Cook With Time
Cycle 1
1, Put the food
2. Push Cycle
into the microwave
oven and shut the door
1 button.
3. Set cooking
time. Push and hold the Minutes
below the number you want to set (see page 6).
or Seconds
button
4. Set Cook Power, If desired. Push and hold Cook Power button
the power you want shows In the display. See page 6 for power
settings.
5. Push START button.
buzz four times.
At the end of the cooking
cycle.
the oven
until
level
will
Cycle 1 and 2
1. Put the food
2. Push Cycle
oven and shut the door
1 button.
3. Set cooking
4. Set Cook
into the mlcrowave
time.
Power.
5. Push Cycle
if desired
2 button.
6. Set Cycle
2 cooking
7. Set Cook
Power,
time.
if desired.
8. Push START button. The oven will buzz once between
At the end of Cycle 2, the oven will buzz four times.
Cycle
1 and 2
Defrost
1. Put the food into the microwave
2. Push Defrost
3. Set defrost
oven and shut the door.
button.
time.
4. Push START button.
sound four times.
At the end of the defrost
cycle,
a buzzer
will
NOTE: The Defrost
setting is 30% of power. If you want to defrost foods
faster (may cause cooking
on outside
of food before the inside IS
defrosted)
or slower, use Cycle 1 and set a lower or higher cook power
level (209/o or 40%). Hold time (standing
time) is usually necessary
for
complete
thawing
of foods before cooking.
7
ToCookWith Time(cont’d)
Defrost and Cook
1. Put the food into the microwave
2. Push Defrost
button.
3. Set defrost
time
4. Push Cycie
1 button
5. Set Cycle
1 cooking
6. Set Cook
Power,
7. Push Cycle
oven and shut the door.
t/me.
if desired.
2 button
8. Set Cycle
2 cook/ng
9. Set Cook
Power,
(if desired)
t/me.
if desired
10. Push START button
At the end of the Defrost time, the oven will hold (no cooking)
for the
same time as the Defrost time. The oven will buzz once after the hold
time and once after Cycle 1. At the end of Cycle 2, the oven will buzz
four times.
To check instructions..
l
.
Touch
the button
for the setting
you want to check.
For
example,
to check the Cycle 2 cook time, push the Cycle 2
button. To check the Cycle 2 Cook Power, push Cycle 2 then
Cnnk
Pnwer
To change
or cancel
instructions..
.
After the oven has started, push Cancel. All instructions
will be
erased. You may reset the instructions
immediately,
if desired.
. Before the oven has started, push the button for the setting you
want to change. (Example:
To change Cycle 1 cook time, push
the Cycle 1 button and reset the time.)
l
I
To stop oven -. .
l
l
Push Cancel
or
Onen
the
(instructions
will be erased).
dnnr
To restart oven . . .
l
Close
l
If the oven
the oven door.
l
If you pushed
is set, push
Cancel,
START
button.
reset the oven and push START
button.
I
Minute Timer
You can use the microwave
oven
you to turn off another appliance,
1. Open
the door
2. Push Cycle
3. Set timer
to turn on the power
1 button
time
control as a Minute
make a call, etc.
to the control.
Timer
to remind
Close
the door.
4. Push and hold Cook Power button until
of the display (0% power - no cooking).
5. Press START
four times.
button.
“00”
shows
At the end of the set time,
E
s
on the left side
the oven
2
c
will buzz
ToCook With Temperature
PLUG
c
\
1. Put the temperature
sensing
end of the MEAL SENSOR*
Temperature probe into the food you are heating or cooking.
It is important
to
place l/3 of the probe in the center of the thickest
part of the food. The
oven may turn off too fast or too slow when using the probe if the
probe is placed near a bone, in fat, in an air pocket or away from the
center of the food. It may be necessary
to relocate the probe and restart
the oven.
2. Place the food and the probe into the mlcrowave
oven. Plug the
probe Into the side of the oven. Close the door.
5
3
2
B
3. Push and hold the Cook Temp button
2
2
shows
the setting
you
2
0
want
on the left of the display
4. Set Cook
Power,
if desired.
5. Push START button. The temperature
will show on the right of the display.
When the probe senses
the oven will turn off.
4
until
z
Remove
the food
setting
the final temperature.
and probe
from
sensed
a buzzer
the mlcrowave
by the probe
will sound,
and
oven.
Probe Use Hints
DO:
l
Do use hot pads when removing
oven after cooking.
the MEAL
SENSOR’
probe
from
the
mlcrowave
l
Do stir foods when recommended
during
cooking
so they will
more evenly Relocate
the probe In center of dish after stirring.
l
Do stir soups,
l
Do let roasts stand,
Remove
foil before
cooklng
1s needed
casseroles,
and drinks
covered
returning
before
cook
serving
with foil (shiny side
roast to microwave
in). after cooklng.
oven if additional
DON’T:
l
Don’t
use metal
l
Don‘t let MEAL SENSOR’
Interior when In operation.
l
Don’t
using
use paper,
the probe
cooking
plastic
utensils.
probe
wrap,
touch
or plastic
l
Don’t use probe In conventlonal
l
Don t force
probe
Into frozen
food.
Don’\
MEAL
SENSOR’
probe
l
use
sides,
bottom.
containers
or door
in the oven
of oven
when
oven
for
foods
llke
stews
that
require
simmering
l
Don’t let foil touch the probe. (Do keep foil at least ‘14 inch (6mm) away
from probe
Secure
foil
with wooden
picks.
Remove
loll if arcing
occurs )
Don’t let the cable of the MEAL SENSOR’
temperature
the plastic mode mixer cover in the top of the oven.
l
l
Don’t
store
the probe
probe touch
‘Tmk
in the oven
9
B-Level OvenRack
See BI-LEVEL
COOKING
GUIDE that was provided
with the rack. lke
the BI-LEVEL
OVEN RACK when cooking
more than one food. The
rack has two positions.
If dishes don’t fit properly,
turn rack over for
more space.
CLEANING
THE OVEN RACK
Wash in the top rack of dishwasher
detergent
and a non-abrasive
plastic
harsh abrasives
or scouring
pads
or wash by hand using a mild
scrubber
or sponge. Avoid using
CAUTIONS
The
l
BI-LEVEL
OVEN
RACK
is designed
for
microwave
oven
use
ONLY.
Do not use in conventional
l
ovens
. Do not use in microwave
or under
oven without
l
Do not use with browning
dish.
l
Do not allow
on rack to touch
l
Use only when
. Do not store
food,
placed
cooking
the top of the oven
more than one food at a time.
rack in oven.
Use the BI-LEVEL
l
broiler.
food
OVEN
RACK only
in your
microwave
oven.
Some Do’s, Don’ts, and Hints
DO:
l
l
Plug the mlcrowave oven tnto a separate 15 ampere clrcult. Use only an electncally grounded 3-pronged wall
outlet (RJM 7700).
Remove metal ties from plastic bags before placing them In the oven to avold arcing and possible
oven
damage.
Check
carryout
l
Use your microwave
l
Slice
l
For cooking
use. (Some
l
Follow
utensil
whole
food
containers
for metal
oven only for cooklng.
eggs before
reheating
to avoid
a steam
times longer than four minutes.
plastics may get hot and melt )
rectpe InstructIons
or oven
before
reheating
avoid
to stir. turn or add foods
reheating
foods
In them.
and defrosting
buildup
using
and possible
paper
between
bursting.
containers
cooking
and be careful
cycles
to avoid
of the
possible
PlaStlCS
damage
you
to the
DON’TS:
l
Your microwave
oven
uses 1450 wdts
at full power
It can’t
share
an outlet
wllh
another
appliance
operallng
(RJM 7700).
l
Be careful
l
Harsh
l
Don’t use dishes or utensils with metal?rlm,
Metals
l
l
that food
abrasives
should
or utensils
may scratch
do not push
the oven
not be used In the oven
against
the plastic
Scorched
or burned foods
them to flame.
especially
l
Don’t
operate
oven
unless
START
cover
Don’t
remove
the cover.
staples. closures or liners
especially
directed
are overcooked
Continued
potatoes.
corn-on-the-cob
by holding
mixer
flnlsh
Always have food In the microwave oven before operating
Store nothing In the microwave
oven
l
mode
butlon
tn the MICRO
It 10 avold possible
cooking
can only
and snacks
MENUS’
damage
burn
them
Cookbook
lo Ihe oven
further
and may
Cause
down
HINTS:
1 Most
of the oven’s
7700).
2. INDICATORS
weight
may flicker
IS
when
on one stde (the side with
the mlcrowave
oven
IS
on
the controls)
and
II
may be awkward
This IS normal
‘Tmk
10
lo move
(RJM
3 If your lrne voltage IS low (less lhan 120 volts). heatrng and cookrng
times may have to be longer.
4 When using recipes other than those from the MICRO MENUS’ Cookbook, you may have to experiment with
cooking
hmes and power
level settrngs
Cook foods accordrng
to the times and quantities
given In the
Whirlpool
cookbook
As In conventronal
cooktng,
over-cookrng
can burn food and may flame. Shorten cooking
time for smaller quantilies
5 Popcorn
should be made only In a popper desrgned
for mrcrowave
use Follow Instructions
recerved wrth the
popper
The results are lhe responsrbrlrty
of the popcorn
popper manufacturer
6 Lrqurds heated In certain containers
may overheat
and flash Into vapor. Water can splash out of the Container
and make a loud noise Thus IS not dangerous
and WIII not harm the oven You may wish to avoid using such
containers
for heating ltqurds again
7 DO NOT OVERCOOK POTATOES. At the end ot the recommended
cooking
trme, the potatoes
should
be
jltghtly
firm Wrap potatoes
In foil and set aside tor live minutes
Potatoes
WIII ftntsh cooking
while standmg.
Some potato varrelres
may cook faster than others
Overcookrng
may result In poor flavor and texture and
potatoes
may scorch or flame
8 Do not store utensils In the oven
some utensils can be hot
9 Use hot pads
10 Do not block the vents Normal exhaust
from cooking
1s vented out the top and back on RJM 7700 and out
the lop front on RJM1870
Depending
on the food, exhaust
may be hot.
11 The inner door liner may appear wavy after tire microwave
oven has been opel-aied
for a tong i.rTc Th!s rs
normal
‘Tmk
HOW TOREPLACE
OVEN1lGHTBULB(RIM 7700)
1 Unplug
2 Remove
the oven power
screw
cord
and access
panel
shown
3. Replace bulb with a 40 watt appliance
with the access panel removed.)
4 Replace the access panel
tabs In the top of the opening
in place
5 Replace
In IIIustratIon.
bulb
only. (Bulb
can be seen
The panel has tabs at the top Insert the
(behind the enclosure)
to hold the panel
the screw
LIGHT BULB
CLEANING
YOURMICROWAVEOVEN
Your microwave
oven is designed
for easy cleaning.
Most soils require
only wiping with warm sudsy water. For cooked-on
or other stubborn
soils. boil a cup of water (250 ml) in the oven for 2 or 3 minutes. The
steam will condense
and soften the soils. They should be less stubborn
after this treatment.
Do not operate the microwave oven with soil or any other objects
between the door and the oven frame.
Do not
microwave
use
abrasive
oven interior
cleansers
or inside
or scouring
of the door.
pads
to
clean
the
11
If you need service or help, we suggest you
follow these three steps:
1. Before calling
for service
...
Performance
problems
are sometlmes
caused
by little
things
you can correct
without
tools, Before
you call for service,
check this list.
A. If the oven lights and display won’t turn
on at all:
l
Is the unit plugged
into the outlet
firmly (RJM 7700)7
. Have you checked
to be sure a fuse or
circuit
breaker
is not open?
B. If microwave
power won’t come on
l
Are all the controls
set properly?
l
Have you pressed
the START button?
l
Do not hold the START button
In.
l
Is the door firmly closed?
C. If the cooklng
times seem too long:
l
Is the line voltage
to your home low or
lower than normal?
The public
utility
in your area may be able to tell you if
the voltage
IS low.
l
Are you allowlng
more cooklng
time
when
you increase
the quantity
(or
number)
of food being cooked
in the
microwave
oven?
l
Is the Cook Power set at the desired
power?
D. If the display
shows
a time counting
down but the oven is not cooking..
l
Is the oven door closed completely?
E. If the oven turns off too fast or 100 slow
when using the probe:
9 Is the sensing end of the probe (first 113)
placed
age?
l
l
l
l
in the
center
of the food
or bever-
In meats, IS the probe placed tn the center
of the largest
muscle
(meat
area),
not
touching
bone or fat and have you allowed
for standing
time? (It may be necessary
to
relocate
the probe and restart the oven.)
Is the Cook
Power
set at the desired
number?
Is the probe plugged
securely
into the side
of the oven?
Has the proper
Cook
Temp been set7
Whirlpool
Home
Ap~hances
Quality. Our way of life.
Benlon Harbor. hllchlgan Aulomallc Washers Clothes Dryers.
Freezers. Relrlgerator-Freezers.
Ice Makers. Dishwashers.
Built-In Ovens and Surlace Umts Ranges MIcrowave Ovens
Compaclors. Room Air Condtlloners. Dehumldlllers.
Central
Heating and Air Condltlonlng Systems
2. If you need service*:
If your
WHIRLPOOL”
appliance
ever needs service
anywhere
In the
0
Unlted States,
help IS just
a phone
call away.
to
TECM-CARE
your
nearest
WhIrlpool
“I,
franchised
TECH-CARE”
s
CQ
selvlce
representative.
SYMBOL
WhIrlpool
maintains
a
OF QUALITY
nationwide
network
of
SERVICE
franchised
TECH-CARE
service
companies
to fulfill your
warranty
and provide
after-warranty
service
and
maintenance
to keep
your
WHIRLPOOL
appliance
in peak condltlon.
You’ll
find your nearest
TECH-CARE
service
company
listed
In your
local telephone
book
Yellow
Pages
under
APPLIANCESHOUSEHOLD-MAJOR
SERVICE
& REPAIR
Should you not find a listing, dial free, the
Whirlpool
COOL-LINE”
service
assistance
telephone
number.
When calling from:
(800) 632-2243
Michigan
_. .
..
Alaska 8 Hawaii .
. . . (800) 253-1121
(800) 253-1301
All other states
_.
sure
that
your
If you move..
. To make
IS correctly
Installed
and to Insure its
appliance
continued
satisfactory
operation,
please
telephone your nearest
TECH-CARE”
service
company for Installation
or to get the name of a
quaIlfled
installer
(Installation
cost
will,
of
course,
be paid by you.)
Helpful hints..
You can help your TECH-CARE
seriice
representative
give you faster service
if
you Include
the model and serial number
of your
appliance
when requesting
service.
Also, retain
your
sales
slip and warranty
to verify
your
warranty
status.
Remember..
Your TECH-CARE
service
representative
IS specially
trained
in the expert
repairing
and servlclng
of your
WHIRLPOOL
appliances.
He can help you maintain
the quality
orlglnally
built Into your WHIRLPOOL
appliance.
So why not take the ttme, now, to look up his
telephone
number
and jot it down in the space
provided
on the cover.
3. If you have a problem*:
Call WhIrlpool
Corporation
In Benton
the COOL-LINE
service
assistance
number
(see Step 2) or write:
Mr. Guy Turner,
Vice President
Whirlpool
Corporation
AdmInIstrative
Center
2000 U.S. 33 North
Benton
Harbor,
Mlchlgan
49022
Harbor
at
telephone
FSP IS o regIstered trademark
of WhIriF
corporafion for
quality porls Look for this
FSP symbol of quality whenever
you need a replacemenl
part
a
for your WhIrlpool appliance
FSP replacemenl
ports
WIII Rt right and wok nghl. because they are
mode to the same exacting speciflcolions
used to bulld every new Whirlpool appliance
0
‘If you must call or write,
brand, model,
problem
This
Parr No.
311489
please provide,
your name, address,
telephone
number.
type of appliance.
serial number,
date of purchase,
the dealer’s
name, and a complete
description
of the
information
IS needed
in order to better respond
to your request
for assistance
rrlntea
in u.b.A.