1
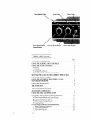
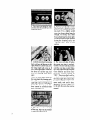
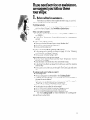
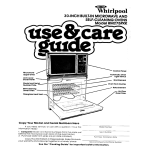
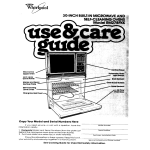
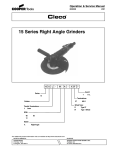
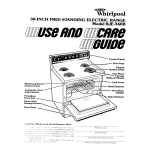
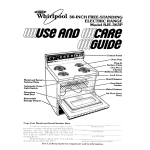
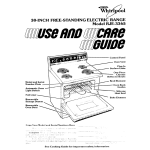
304NCH FREE-STANDING ELECTRIC RANGE
Model RJE-3750W
Control
Panel
Oven Went
Plug-In
face Units
Model and Serial
Number Plate
Automatic
Oven
Light Switch
Fiberglass
Seal
Heat
Removable
Storage Drawer
Air-Flow
Door
Oven
Oven Rack
Guides
Bake Element
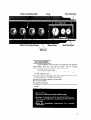
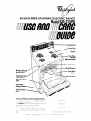
Oven Signal Light
Oven Tempera&e
Control Knob
Lock Light
Oven Selector
Knbb
Clean Light
Oven Light ‘Switch
Table of Contents
YOUR RESPONSIBILITIES
USING THE SURFACE UNIT CONTROLS
USING THE OVEN CONTROLS
l
Baking
l
Broiling
l
Variable Broil Feature
l
Resetting the Oven Temperature Control
SETTING THE CLOCK TO THE CORRECT TIME OF DAY
USING THE MINUTE TIMER
USING THE AUTOMATIC MEALTIMER’
CLOCK
OVEN RACK POSlTlONS
USING THE OVEN LIGHT
THE OVEN VENT
THE OPTIONAL ROTISSERIE
ACCESSORY CANNING KIT
USING THE SELF-CLEANING
OVEN
CLEANING AND CARING FOR YOUR RANGE
l
Removing and Replacing Control Knobs
l
Cleaning Under the Cooktop
l
Removing the Storage Drawer
l
Cleaning Chart
IF YOU NEED SERVICE OR ASSISTANCE
1. Before Calling for Assistance
2. If You Need Assistance
3. If You Need Service
4. If You Have a Problem
‘-Tmk
Page
3
9
9
9
12
12
1:3
1:i
1-1
15
15
16
:2
Your responsibilities
Proper installation and safe use of the range are your personal
responsibilities. Read this “Use and Care Guide” and the ‘Cooking
Guide” carefully for important use and safety information.
You must be sure your range..
l is properly installed and leveled on a floor that will hold the weight, and
in a well-ventilated room.
l is connected only to the right kind of outlet. with the right electric supply
and grounding (see “Installation Instructions”).
l is used only for jobs expected of home ranges.
l is out of the weather.
l is properly maintained.
l is not used by children or others who may not understand how it should
be used.
3
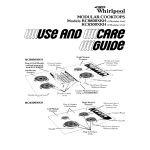
Usinn
the
surface
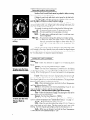
Surface
PUSH IN and turn to
setting.
Unit
unit
Control
controls
Knobs
must
be pushed
in before
turning.
Turn either way to the setting you want.
A design by each knob tells which unit is turned on by that knob.
The Signal
Light will glow whenever
a Surface Unit is on. Be
sure this light is off when you have finished
cooking.
The knob may be set anywhere between “HI” and “OFF.” As you
use your surface units. you will get used to the settings that match your
pots. pans and favorite foods the best.
As a guide, the setting should cook at about the following heats:
HI -To
start most foods cooking To bring water to a boil.
MED-HI
- To hold a rapid boil; to fry pancakes or chlcken.
MED -To
make gravy, puddings and icings. to cook large quantities of vegetables.
MED-LO
-To keep food cooking after starting it at a higher setting.
LO -To
keep food warm until ready to serve. You will notice
that you can set the heat higher or lower within the LO
band ( Lz ] to help keep food at the temperature you
want
NOTE:
Use only flat-bottomed utensils for best results and to prevent damage to the range. Specialty items with rounded or ridged bottoms
(woks, ridged-bottom canners or tea kettles) are not recommended. See
the “Cooking Guide” for important utensil information
Using
the
Oven
Controls
Baking:
First-Follow
Racks ”
Second-Turn
To bake, turn the Oven
Selector Knob to BAKE.
To broil, turn the Oven
Selector
BROIL.
4
Knob
to
the directions on page 8 for “Positlonlng
Oven
the Oven Selector Knob to -‘BAKE ”
the Oven Temperature Control Knob to the baking
temperature you want. The Oven Signal Light will glow while the oven is
heating When this light goes off. the oven has heated to the temperature
you set
Fourth-Place
food in the oven. During baking, the elements will
turrl on and off to help keep the oven at the temperature you set. The
Oven Signal Light will turn on and off with the elements The top element
helps heat during baking, but does not turn red.
Fifth-When
the baking is done, turn both the Oven Temperature
and Oven Selector Knobs to “OFF.”
NOTE:
Do not lock the oven door during baking. If you do, you
may not be able to unlock it until the oven has cooled.
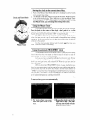
Broiling: (Note-The
door must be partly
open while broiling.)
First-Follow
the directions on page 5 for placing the meat at the
right distance from the Broil Element.
Second-Turn
the Oven Selector to “BROIL.”
Third-Turn
the Oven Temperature Control Knob to “BROIL” or
turn it to a lower temperature (see “Variable Broil Feature.” on page 5 1
Fourth-Put
the broiler pan on the oven rack.
Fifth-Open
the oven door about four inches (10 cm). There is a
stop in the hinges to hold it there. The door must be partly open while
broiling. The Oven Signal Light will glow while the broil element is on.
Sixth-When
you are through. turn both the Oven Temperature
Control and the Oven Selector Knobs to “OFF.”
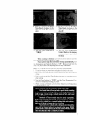
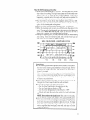
Third-Turn
The following
sitions for different
to BROIL.
Food
___.
chart
suggests
broiling
times and oven-rack
kinds of meats when the Oven Selector
Knob
Description
Inches (cm) from
top of food
to Broil
Element
pois set
Approximate
Minutes
1st side
2nd side
3” (3 cm
13” (6 cm
.i’ iS cm1
ALWAYS broil with the
door open about 4
inches (10 cm).
Loosen the Locking
You might want to broil some foods slower than others Brolllng
cafe be slowed down by setting a lower temperature on the Oven Temperature Control Knob instead of “BROIL.” Using a lower temperature will
cause the broil element to turn on and off during the broiling so that the
tood broils more slowly
When the Oven Temperature Control Knob is on “BROIL.” the
Broil Element heats all the time. Set the temperature lower and It heats
sc,me of the time The lower the temperature setting. the shorter are the
periods of heating
must
Lower: move black part
toward “LO.”
One notch equals about
10°F (5°C).
Higher:
move black
part toward “HI.”
One notch equals about
10°F (5°C).
NOTE:
be partly
Resetting
The Oven Selector
open for all broiling
the oven
temperature
must be on BROIL
temperatures.
and
the
door
control:
Does your new oven seem hotter or colder than your old oven”
The temperatures in older ovens often shift very gradually, gettmg hotter
or colder without the user really noticing the change Your new oven is
properly adjusted to provide accurate temperatures, but when compared
to your old range, the new design may give you different baking results If
you think that the temperature setting on your range needs to be hotter or
colder. you can adlust the Oven Temperature Control Knob by yourself.
To adjust the setting. first pull the Oven Temperature Control Knob
straight off On the back. lust across from the locking screw. are a row of
notches on the black part of the knob and one tooth on the chrome part.
To set your oven about lO’F(5”C) cooler. loosen the locking screw
about two full turns and move the row of notches one notch closer to
“LO ” To set your oven about lO’F(5-C) warmer:
move the row of
notches one notch closer to “HI.” Each notch equals about 10 F(5 C)
Tighten the locking screw and put the knob back on the
control panel
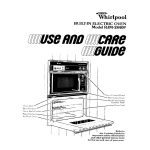
Setting
Clock
and
Timer
the
clock
to the
correct
time
of day
1. Push in the Minute Timer Knob and turn it clockwise to set the hands
to the correct time of day.
2. The Minute Timer hand will turn as you set the clock. When the clock
is set. let the knob pop out. Then, while it is out, turn the Minute Timer
hand clockwise
to “OFF.” If you push in on the knob when setting
Knob
the Minute
Using
the
Timer,
you will
Minute
change
the setting
of the clock.
Timer
The small numbers inside the clock face are the minute markings.
3
Minute
Timer
Turn the knob in the center
number
of minutes
you want
of the clock...don’t
to time. When
push
it in...to
the
the time you set is up. a
buzzer will sound. Turn the hand to “OFF“ to stop the buzzer.
The Minute Timer does not start or stop cooking It only buzzes
when the time you set is up It can be used to time almost any cooking
operation. It can even remind you of other things (like when to add the
softener to the washer)
For the most accurate timing. turn the knob past the time you
ulant Then turn it back to the setting.
Using
the
automatic
MEALTIMER’
clock
The automatic feature of the MEALTIMER’ Clock lets you be away
from home when the oven starts, or when it stops. It will turn on and off
automatically. or just turn off automatically.
Let’s say you have a roast that will take four hours to cook Dinner
IS supposed to be at 6:OO. but you have an appointment at 1 30 and you
know you won’t get home until at least 4:O0. When do you have time to
put in the roast7
With the Automatic MEALTIMER* Clock, it‘s easy. Just before you
leave for your appointment. put the roast in the oven, set the start time for
2.00 and the stop time for 6-00 (four hours). Set the Oven Selector to
“TIMED” and set the Oven Temperature Control Knob for the temperature you want Then leave. The oven will start at 2:O0. bake for four hours
at the selected temperature, and shut off at 6:O0.
'Tmk
To start
and stop
1. Put racks
them
and
oven.
your
where
place
oven
automatically:
you want
food in the
2. Be sure the clock
is set to the
right time of day. (The start
and stop time hands will also
show the correct
time.)
3.
5.
turn
the Start
clockwise
to the
want
the oven to
4.
Oven
6.
Push
in and
Time
Knob
time
start.
you
Set the
“TIMED.”
Selector
Push
in
Time
Knob
time
shut
to
you
off.
turn
the Stop
clockwise
to the
want
the oven to
and
Turn the Oven
Temperature
Control
Knob to the temperature you want to use to cook
the food.
turn both the Oven Selector and the
When cooking
is finished,
Oven Temperature Control Knobs to “OFF.”
If you want to stop the oven before it stops automatically,
turn
the Temperature and Selector Knobs to “OFF” Remove food from the
oven You don’t have to do anything with the Stop Time Knob.
When
you want
the oven
to start
now,
but stop
automatically:
1 Put racks where you want them and place the food in the oven
2 Be sure the clock and the start and stop time hands show the right time
of day
11 Push In and turn the Stop Time Knob to the time you want the oven to
stop cooklng
3 Turn the Oven Selector to “TIMED“ and the Oven Temperature Control to the temperature setting you want
5. When cooking is finished. turn the Oven Selector and Temperature
Control Knobs to “OFF.”
Oven
rack
positions
Your oven has two racks Always put the racks where you want
them to be before you turn on the oven.
To remove a rack, take hold of it on the front edge and pull It out
until It stops. Then lift up the front edge and pull again. It will slide past the
stops, out of the guides and out of the oven.
To put it back, fit the back corners into the guides at each side of
tile cxe’n and slide it tn. keeping the front tilted up until the rack passes
the stops
in the rack
guides.
For:
Place
Bakq
01 the second rack guide from the bottom
or so food is in the center of the oven
Rack:
So food IS about the distance from the broil
element suggested in the broiling tlmetahltx
under “Using the Oven Controls
On the bottom rack guide5
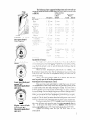
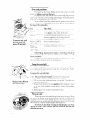
To remove
rack, pull
forward
until rack
stops, lift and pull.
So food ISIn the center clf the ONJII
When baking,
always
air space between
the sides
for air circulation.
Using
the
oven
leave at least 1% to 2 inches
(4-5 cm) of
of a pan and other pans and the oven wall
light
The over1 light will come on uzht>nthe oven door 1solxned To turn
on rt~c-z
light wIthout opening the door, push the oven Ilght sultch Push It
dgaln to turn tht) light off
To replace
Replace
with a 40-watt
APPLIANCE
bulb.
the oven
light
bulb:
The oven light bulb has a glass cover which IS held on bb a wire’
!~r)ld~~rThis cover must be in place when the oven IS helng used
Iilrn off the electric power at the maln power supply
Pull out on the wire holder and move It to one side This will let you
remove the glass cover
bulb (designed to stand
Rtjplace the bulb with a 40-watt appliance
up to oven heat) available at most grocery, variety and hardware
stores
Replace glass cover Snap the wire holder In place
The
oven
vent
There is an oven vent under the right rear surface element When
the oven IS on. heated air will escape through it A vent is needed for air
circulation in the oven during baking. You can cook on this surface unit
while the oven is on A warm pan of food will stay warm on this unit while
the oven is on It may be warm enough to melt butter. too.
Do not try to save
baking
can result.
Plastic
while the oven is on.
heat or energy
by blocking
the vent. Poor
utensils
may melt if they are over the vent
The
optional
rotisserie
If you would like a rotisserie with your ove~l. you can order a kit
(Part No 261881) from your dealer. Easy installation instructlons come
with the kit
Accessory
canning
kit
(Part
No. 242905)
The large diameter of most water-bath or pressure canners combined with high heat settings for long periods of time can shorten the life
of regular surface units and cause damage to the cooktop.
If you plan to use the cooktop for canning. we recommend the
installation of a Canning Kit. Order the kit from your Whirlpool Dealer or
Tech-Care Service Company.
SEE THE “COOKING
INFORMATION.
Using
the
GUIDE”
Self-Cleaning
FOR
oven
IMPORTANT
CANNING
cycle
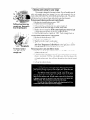
The Self-Cleaning Over) LIWS high heat that actually burns auab
oven so11For best results and saf&V. read this sectlon carefullv Make sure’
works
kwfore
y0~1
set
vou1oven
to
you understand hou’ t,Leryttllnq
“CLEAN ”
Things
to do before
you start:
Some areas may not be cleaned dunng thc~Self~Clear~111yqclr
-The frame around the ovt~n opening
-The door, especially the part around the>outsItit of the coven seal
5011 on these area\ u’ill be more dlfflcult to rtlmovta after thr SelfClclanlny cycle Use hot water and detc>rgent or a soapy stt+~lLi~ool
pad Rinse well
l
l
l
l
l
l
l
Do not move or bend
clean it by hand.
The hqh heat during
the fiberglass
oven
door
seal.
Do not try
to
tjhc>clc>anlny cycle 14~111 discolor thcj racks and
take the shine off them If thrv are>left 11‘1
the oven during the?SelfCleaning cycle If you want !;our own racks to stay shiny and bright.
take them out befor<>starting the clean~ny cycle If you do clean the
racks dunny the cleaning CICICJ.l.tjad th<J ‘Special Tops” at the) c>ndof
thk section
Wipe up splllovers. bollove>rs and yrtzaxa that hasn’t baked onto the
bottom ot the o~‘en This LLIIIhtllp reduce smokllly durtny the cleaning
cycle
DO NOT place the one-piece
during
the self-cleaning
cycle.
chrome
reflector
bowls
in the
oven
Turn on the vent hood fan or other kitchen vents during the clean~ny
cycle This LL~IIIhelp remove >mokca.odor and heat that are normal
during the cyclt!
If you have a rotisserie. be sure the motor socket cover 1sclosed
Setting
the
1. Set the
to “CLEAN.”
controls
Oven
to the
Selector
Self-Cleaning
Knob
2. Set
Control
cycle:
the Oven
Temperature
Knob to “CLEAN.”
9
3. The clock
and dials for start
and stop time should
all have the
right time of day.
5. Lock the oven door by moving
the Lock Lever all the way to the
right. When it is all the way over,
the Clean Light
will come on. If
the Clean Light doesn’t
come on,
the lever
isn’t all the way over
and the cleaning
cycle
won’t
start.
When the clean light comes
on,
the oven starts the cleaning
cycle.
About 20 minutes
later, the Lock
Light will come on. It will stay on
during
the cleaning
cycle.
The
door cannot
be unlocked
while
the Lock Light is on.
7. When the oven has cooled
ofj
all the way, wipe out any residue
or ashes from the bottom.
IO
4. Push
in on the Stop
Time
Knob and set it ahead
as many
hours as you want for the cleaning cycle.
For a lightly
soiled
oven, two hours
ahead
may be
enough.
For heavy
soil,
three
hours ahead may be about right.
If some soil does not get removed
during
the cleaning
cycle,
see
“Special
Tips”
later
in this
section.
the preset
stop time is reached,
but the oven door will stay locked
until the oven has cooled.
When
the Lock Light turns off, turn the
Oven
Selector
and Oven
Temperature
Control
Knobs
to
“OFF.”
Now move the Lock Lever back to the left. This turns off
the
the Clean Light. Do notjorce
Lock Lever. If it doesn’t
want to
move
easily,
wait
until
it does.
With the Lock Lever all the way
to the left, the oven door can be
opened.
How
the Self-Cleaning
cycle
works:
When oven controls are set to “CLEAN.” the oven gets much hotter
than it does for cooking. This high heat causes soil on the inside oven
walls to burn off, or break up and mostly disappear. While this is
happenrng. a special part in the oven vent helps remove smoke. Do
not cover the right-rear surface unit during the cleaning cycle.
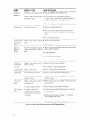
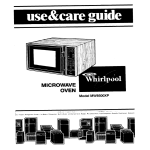
The chart below shows about what happens during a 2-hour SelfCleaning cycle. Any time less than that shortens only the cleaning
cycle. not the heating and cooling times.
Don‘t touch the range during the cleaning cycle.. it will be hot.
When the cleaning cycle is over. you will find some fine ashes in the
oven. The amount of ash depends upon the amount of soil there was
In the oven When the oven is cool, clean up all that is left with a
damp cloth. cleanser, or a soap-filled steel-wool pad.
During the cleaning cycle. you may hear the sounds of metal heating
and cooling. These are normal sounds, and a lot lrke those you can
hear when the oven heats for regular cooking.
l
l
l
l
l
SELF-CLEAN
OVEN-LIGHT
SOIL
CYCLE
1000
1000
800
600
600
400
400
200
200
(Door
can be opened
I
r
% hr.
Special
l
l
l
l
l
l
l
I
I
1 hr.
within
I
a few minute
I
1 h hr.
1
I
2 hr.
I
y
2% hr
tips:
If the cleanrng cycle doesn’t get the oven as clean as it should be.
the time set for cleaning was probably not long enough. Set the
cleaning time longer next time. You can set it for more than 3
hours. If you want
Plan to clean the oven before it gets too heavily soiled. Otherwise, you may notice more smoke than you would expect coming from the oven vent. And, the cleaning cycle has to be longer
to clean a very soiled oven.
There will be normal “heat odors” dunng the cleaning cycle. To
help get rid of them. keep the kitchen well ventilated.
To stop the cleaning cycle after rt has started:
-Turn the Stop Time Knob to the right time of day.
-Turn the Oven Selector Knob to “OFF.”
-Turn the Oven Temperature Control Knob to “OFF“
-Unlock and open the oven door when the Lock Light turns
off.
NOTE:
Do not force the Lock Lever. Wait until it moves easily.
Do not use foil or other oven liners in your Self-Cleaning Oven.
Don’t use commercial oven cleaners in your Self-Cleaning Oven
If racks are left in the oven during a cleanrng cycle. they will lose
their shine, discolor and be harder to slide in and out. To make
them slide easier. polish the edges of the racks and rack guides
with a soap-filled steel wool pad. rinse well. and wipe on a thin
coating of salad oil.
11
Cleaning
and
caring
for your
range
Your range is designed to be easy to clean. You will usually wipe off
spills and spatters when they happen. but you will sometimes want to
clean under and behind the control knobs and surface units. This section
will tell you how to remove those. and what to use when cleaning
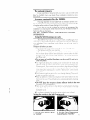
Removing
straight
out. Remember
how the spring goes.
1.
2.
:3
4
5
and replacing
surface
unit
control
knobs:
Be sure the control knobs are set to “OFF“
Pull the black knobs straight off
If the control has a chrome trim ring. pull It straight off
Wash the knobs (and trim rings) in warm, sudsy water
Replace the trim rings first. If the control spring was removed,
it back
exactly
as shown
on the left..
small
put
end first.
6 Hold the black knob so it points to “OFF“ Push it straight back on
Removing
1
2
3
4
To remove surface
unit, lift and pull
straight
out.
12
and replacing
oven
control
knobs:
Be sure the knobs are set to “OFF“
Pull each knob straight off.
Wash the knobs in warm. sudsy water.
The knobs are not interchangeable. Make sure you put the adjustable Oven Temperature
Control
Knob on the right place. and the
nonadjustable
Oven Selector Knob on the other
Removing
surface
units
and reflector
bowls:
1 First, be sure the Surface Unit Controls are all “OFF” and that the
surface units are cool.
2 ILIft each surface unit about an inch (2 5 cm) at the edge away from the
plug-ill !receptacle) Pull the unit straight away from the plug-irl. Do
not wash surface units. they will burn themselves clear) during normal
u5e
13 Lift out the reflector bowls.
Replacins
reflector
bowls
and surface
units:
Be sure the surface unit controls are on “OFF.”
Put the reflector bowls back into their places. Make sure you can see
the plug-ins (receptacles) for the surface units through the square
hole in the side of each bowl.
Hold the surface unit level with the prongs (terminals) pointing at
the plug-in.
With the prongs started in the plug-in. start pushing In on the surface
unit. At the same time. lift a little on the side of the surface unit that’s
by the plug-in.
Make sure the surface-unit prongs are pushed into the plug-in as far as
they will go The surface unit should fit into the reflector bowl and be
level.
Hold surface unlt level
wh:n replaclng.
Cleaning
under
the cooktop:
To clean the area under the cooktop. lift the front of the cooktop at
the center Raise the swing-up rod to hold it. (Be sure the tip of the rod is
In the notch In the c,ooktop. Jse warm soapywater and a sporige (x cloth
Scounng powders or any other abrasive cleaner may harm porcelainenamel finishes and can scratch chrome.
Be careful not to raise the cooktop so high that It touches the
control console. And don’t drop it. Dropping the cooktop can chip or crack
a hard porcelain finish. or damage side panels and surface units
Prop up the top with
support rod.
Remove screws; swing
out top. Lift up at
bottom.
Removing
the outer
oven
window:
Oven windows have several panes of glass to help hold the heat In
the oven. The outer glass and frame can be removed if you wish to clean
between the two It is held on by screws at the top. and tabs hidden at the
bottom.
1 With the oven door closed. remove the screws from the top of the
outer window frame.
2 Tip the frame out about two inches (5 cm) from the door. (The
frame and glass are one piece. so don‘t worry about them
coming apart.)
3. Lift up on both sides of the frame to pull the tabs out of the slot at
the bottom of the window opening.
To replace the frame and glass, line up the bottom of the frame
with the opening in the door.
1 Tilt the frame so that the tabs fit into the slot at the bottom of the
window opening.
2 Tilt the frame as far as you can and push down.
3 Push the frame in the rest of the way and replace the screws.
Removing
the storage
drawer:
The drawer below your oven is meant to store pots and pans.
Never
Pull to stop. Lift; pull
again.
keep
anything
in there
that
will
burn
or melt.
You may want to remove the drawer for cleaning under the range.
Pull it straight out until It stops. Use care when handling
the drawer.
Lift
the front and pull some more to get it over the stop. Now slide it out until
It stops agaln Lift the drawer away from the range until it slips out of the
yudes
To put it back, fit the side rails at the back of the drawer into both
guides on the range. Push it closed while lifting the front to get past the
stops.
PART
WHAT TO USE
HOW TO CLEAN
Outside of
appliance
Soft cloth. warm soapy water
l
Nylon or plastic scourrng pad
for stubborn spots
Surface units
No clean!ny requjred
Wipe off regularly when range is cool
Do not allow food containing acids (such as
vrnegar. tomato. lemon juice or milk) to remain on
surface. Acids will remove the glossy finish
l
l
Do not use abrasive or harsh cleansers.
l
Spatters or spills will burn off.
Wipe off excessive spills with damp cloth when
surface unrt 1scold. Do not place in Self-Cleaning
Over-i
l
Control knobs
and chrome
rims
Warm, sudsy water. and bristle
brush
Chrome
Reflector
Bowls
Automatic dishwasher: warm
soapy water; plastic scrubbing
pad
l
Do not Immerse In water
l
Wash, rinse and dry well
l
Do not soak
Wipe out excess spills. Wash with other cooking utensils for routine cleaning.
l
l
Clean frequently.
l
Do not use harsh abrasives
l
Do not place in Self-Cleaning Oven.
l
Wash with other cooking utensils
l
Do not place In Self-Cleaning Oven
Alumrjlum
broiler pan
and grid
Warm. soapy wdtt’r or soapy
steel wool pads
Control panel
Warm. soapy water
l
Wash. rtnse and dry with soft cloth
Oven racks
Self-Clearilrig Oven cycle
l
Leave in oven during Self-Cleaning cycle
Warm, soapy water or soapy
steel wool pads
l
Warm. soapy water or plastic
scrubbjng pad
l
Commer clal glass cleaner
l
For area> outside SelfCleaning area use warm.
soapy wdter or soapy steel
wool pads
@Clean before using Self-Cleaning cycle to prevent
burn-on of soil.
Oven door
glass
Self~Cleanlny
Oven
l
l
Wash. rinse and dry Use soapy steel wool pads for
stubborn areas.
Make certain oven is cool. Wash. rinse and dry well
wjth soft cloth
Follow directions provided with cleaner.
Follow djrectrons gjven on page 9, “Using the
Self-Cleaning Oven Cycle ”
Do not use commercial oven cleaners.
Do not use foil to line the bottom
of your
Self-Cleaning
Oven.
If you need service or assistance,
we suggest you follow these
four steps:
1
l
Before calling for assistance..
.
Performance problems often result from little thongs you can find
and fix yourself wrthout tools of any kind.
If nothing
l
l
If the oven
l
l
l
l
l
not operate:
units
will
Control
l
l
l
Knob
or Knobs
will
not turn:
Is the spring put in correctly, as shown on page 12 In the “Cleaning
and Carrng for your Range” Section”
Drd you push In before trying to turn?
If the Self-Cleaning
l
not operate:
Have you checked the main fuse or circurt-breaker box?
Are surface units plugged in all the way?
Do the control knobs turn?
If surface-unit
l
will
Is the Oven Selector Knob turned to a setting (BAKE or BROIL. but
not TIMED)‘?
Is the Oven Temperature Control Knob turned to a temperature
settrng’?
If surface
l
operates:
Is the range plugged into an operating outlet or wrred Into a live crrcuit
wrth the proper voltage? [See Installation
Instructions.)
Have you checked the marn fuse or circuit-breaker box?
Cycle
will
not operate:
Are the Oven Selector Knob and the Oven Temperature Control
Knob set to “CLEAN”’
Does the Start Time Knob show the correct time of day?
Is the Stop Time Knob set ahead to the time you want the cleaning
cycle to stop’)
Is the Lock Lever all the way to the right? (The Clean Lrght will come
on.)
If cooking
results
aren’t
what
you
expect:
Is the range level?
l Are you using pans recommended in the Cooking
Guide?
l If baking, have you allowed lrlz to 2 inches (4-5 cm) on all srdes of
the pans for air circulatron?
l Does the oven temperature seem too low or too high? See page 5.
“Resetting the Oven Temperature Control Knob.”
l Have you preheated the oven as the recipe calls for?
l Are the pans the size called for in the recipe?
l Are you following a tested recipe from a reliable source?
l Do the cooking utensils have smooth. flat bottoms?
l Do the cooking utensils fit the surface unit being used?
See the Cooking
Guide
for more information on cooking problems and how to solve them.
l
15
2.
number.
If you need assistance”.
Call the Whirlpool
Dial free from:
..
COOL-LINE
a service
Continental
U.S.
Michigan
Alaska
&Hawaii
.
assistance
(800)
. (800)
. . (800)
.
..
.
telephone
253-1301
632-2243
253-1121
and talk with one of our tralned Consultants. The Consultant can instruct
you in how to obtain satisfactory operation from your appliance or. II
sexIce IS necessary. recommend a qualified service company in your
areil
3.
FRANCHISED
SERVICE
If you need service?:. . .
Whirlpool has a nationulde network of franchised TECH-CARE’
service companies TECH-CARE service technicians are trained to fulfill
the product warranty and provide after-warranty service, anywhere In the
United States To iocate TECH-CARE service in your area, call our
COOL-LINE service asslstance telephone number (see Step 2) or look In
your telephcne directory Yellow Pages under
APPLIANCES-HOUSEHOLDMAJOR-SERVICE
tiMH~pC3LAPPLIAVCES
rQcZiCiqqtl‘tC*
CAAF ,'".,(.[
\i;H
~..Y:H'&
C!CC
.: i $li, b
4.
ELECTRICALAPPLIANCESMAJOR--REPAIRING
8 REPAIR
OR
‘RANCHISED TECH CARE SERWCE
i 1, t t ii\,,',\,*4
-31 qguu
WASHING
MACHINES,
8 IRONERS-SERVICING
8 PARTS
OR VvHlRLPOOLAPPLlANCES
.At./i r/c
E ('O.M/'.‘l.Y/E.S
iiiSEAVlCLC0
'23 bole
If you have a problem::.
999.9999
DRYERS
WHlRLPOOLAPPLlANCES
FRANCHISFD TEC'i CARFSER~ICE
sEHi'i('F
X"LSE9blCE C%
‘21 Maple
c OL,,'.,
V,E\
999 9999
..
Call our COOL-LINE service assistance telephone number (see
Step 21 and talk with one of our Consultants. or if you prefer. write to
Mr Guy Turner. Vice President
Whirlpool Corporation
AdmInIstratIve Center
2000 US-113 North
Benton Harbor. Ml 49022
If you must call or write. please provide model number, serlal number.
date of purchase. and a complete description of the problem. This Informatlon IS needed In order to better respond to your request for assistance.
Benton Harbor. Michrpan. Aulomalic Washers. Clolhes bvers.
Freezers, Relrrgeralor-Freezers.
Ice Makers, Dishwashers.
Built-in Ovens and Surface Unils. Ranges. Microwave Ovens.
Compactors, Room Air Conditioners. Dehumidiliers.
Central
Heatino and Air Conditioning Syslems
Part No
312487
Printed
in U S A.