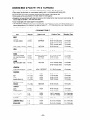
1
Microwave Oven
Use and
Care Guide
ROPER
Appliances
MCE04XW
Thank you for choosing
appliance
a Roper
This Use and Care Guide will help you operate
and maintain your new, qualitybuilt Roper
microwave oven. Keep this Use and Care
Guide in a safe place for future reference.
Complete and mail the Product
Registration
Card
This card enters your warranty into our
warranty system that insures efficient claim
processing, can be used as a proof of
purchase for insurance claims and helps
Roper to contact you immediately in the
unlikely event of a product-safety recall.
Please remember
It is your responsibility to be sure that your
microwave oven:
l
Has been properly installed and leveled
where it is protected from the elements and
on a surface strong enough to support its
weight. (See the Installation Instructions.)
The microwave oven should be at a
temperature
above 50°F (10%) for proper
operation.
l
Has been properly connected to electrical
supply, and grounded. (See the Installation
Instructions.)
l
Is not used by children or anyone unable to
operate it properly.
l
Is properly maintained.
. Is used only for jobs expected of a home
microwave oven.
c Precautions
To Avoid Possible
Exposure To Excessive
Microwave Energy . . .
Do not attempt to operate this oven with the
door open since open-door operation can
result in harmful exposure to microwave
energy. It is important not to defeat or tamper with the safety interlocks.
Do not place any object between the oven
front face and the door or allow soil or
cleaner residue to accumulate on sealing
surfaces.
Do not operate the oven if it is damaged. It
is particularly important that the oven door
close properly and that there is no damage
to the:
(1) Door (bent),
(2) Hinges and latches (broken or loosened),
(3) Door seals and sealing surfaces.
-2-
Do not operate the microwave
door window is broken.
oven if the
The microwave oven should be checked
for microwave leakage by qualified service
personnel after a repair is made.
The oven should not be adjusted or repaired by anyone except properly qualified
service personnel.
Do not operate the microwave oven with the
outer cabinet removed.
IMPORTANT SAFETY INSTRUCTIONS
Microwave ovens have been thoroughly
tested for safe and efficient operation. However, as
with any appliance, there are special installation
and safety precautions
which must be
followed to ensure safe and satisfactory
operation and prevent damage to the unit.
l
l
l
l
l
l
l
l
l
l
l
l
l
Read all
appliance.
instructions
before
using
l
Read and follow the specific “Precautions To Avoid Possible Exposure To
Excessive Microwave Energy” found on
page 2.
l
l
Do not let cord hang over edge of table or
counter. Electrical shock may result.
Follow door surface and interior cleaning
instructions on page 14.
To reduce the risk of fire in the oven cavity:
-
This appliance must be grounded. Connect only to properly grounded outlet. See
Grounding Instructions found on page 5.
Install or locate this appliance only in
accordance with the povided Installation
Instructions found on page 6.
Do not overcook food. Carefully attend
appliance if paper, plastic, or other
combustible
materials
are placed
inside the oven to facilitate cooking.
Paper can char or burn, and some
plastics can melt if used when heating
foods.
- Do not deep fry in oven.
- Test dinnerware or cookware before
using. See page 17. Some dishes
(melamine,
Centura@, etc.) absorb
microwave energy, becoming too hot to
handle and slowing cooking times.
Remove wire twist-ties from paper or
plastic bags before placing bag in
oven. Cooking in metal containers can
damage the oven. So can containers
with hidden metal (twist-ties, foil lining,
staples, metallic glaze or trim).
Some products such as whole eggs and
sealed containers, for example, closed
glass jars-may explode and should not be
heated in this oven.
Use this appliance only for its intended
use as described in this manual.
As with any appliance, close supervision
is necessary when used by children.
Do not operate this appliance if it has a
damaged cord or plug, if it is not working
properly, or if it has been damaged or
dropped. Electrical shock, fire or other
hazards may result.
-
This appliance should be serviced only by
qualified
service personnel.
Call an
authorized Roper”” service company for
examination, repair or adjustment.
l
Do not cover or block any opening on the
appliance. Fire may result.
Do not use outdoors. Damage to the oven
or electrical shock may result.
l
Do not immerse cord or plug in water.
Electrical shock may result.
If materials inside the oven should
ignite, keep oven door closed, turn
oven off, and disconnect the power
cord, or shut off power at the fuse or
circuit breaker panel.
Do not heat, store or use flammable
materials in or near the oven. Fumes can
create a fire hazard or explosion.
Read and follow “SAFETY
TIONS” on page 13.
Keep cord away from heated surfaces.
Electrical shock may result.
SAVE THESE INSTRUCTIONS
-3-
PRECAU-
CONTENTS
INSTALLATION
... ..
FEATURES
CONTROL
.
.
.
PANEL.
OPERATING
5
7
7
INSTRUCTIONS
1. SETTING
CLOCK
.......
2. HI-POWER COOKING
3. MULTI-POWER
4. TIMER.
8
. .......
COOKING
.......
.
.......
5. HOLD WARM
.......
12
.......
13
SAFETY
PRECAUTIONS
CLEANING
AND CARE.
.......
QUESTIONS
AND ANSWERS
.......
TECHNICAL
SPECIFICATIONS
.......
MICROWAVE COOKING
APPETIZERS
.
15
.
RECIPES AND TABLES
81 SOUPS .....................
MEAT, FISH 81 POULTRY
EGGS AND CHEESE
VEGETABLES
14
16
17
19
....................
20
.......................
23
.............................
24
DESSERTS
& BREADS
APPENDIX
................................
26
...............................
28
WARRANTY
.....................
25
-4-
INSTALLATION
A. EXAMINE OVEN
Empty the microwave oven and clean inside it with a soft, damp cloth. Check for damage such as
misaligned door, damage around the door or dents inside the oven or on the exterior. If there is
any damage, please do not operate the unit until it has been checked by an authorized service
technician and any repairs made.
B. GROUNDING INSTRUCTIONS
Electrical
Shock Hazard
Improper use of the grounding plug can result in a risk
of electrical shock. DO NOT, UNDER ANY CIRCUMSTANCES, REMOVE THE POWER SUPPLY CORD
GROUNDING PRONG.
For your personal safety, this appliance
must be grounded. In the event of an electrical short circuit, grounding reduces the risk
of electrical shock by providing an escape
wire for the electric current. This appliance
is equipped with a polarized 3-prong grounding plug. It must be plugged into a correctly
polarized mating 3-prong grounding type
wall receptacle,
properly installed and
grounded in accordance with local codes
and ordinances. If a mating wall receptacle
is not available or if you are not sure if the
wall receptacle is properly grounded and
polarized, have it checked by a qualified
electrician.
It is the personal responsibility and obligation of the customer to have a properly
grounded and correctly polarized 3-prong
wall receptacle installed by a qualified electrician.
Consult a qualified electrician if the grounding instructions are not completely under-
stood, or if doubt exists as to whether the
appliance is properly grounded.
It is not recommended
to use an extension cord with your microwave oven, but
if you find it necessary to do so temporarily (until a properly grounded and polarized 3-prong receptacle is installed), use
only a heavy duty UL listed 3-wire
grounding
type extension cord containing three 16-gauge (minimum)
copper
wires. It must not be longer than 10 feet
(cords longer than 10 feet may affect the
cooking performance of your microwave
oven). The plug on the extension cord must
fit into a 3-prong grounding type wall receptacle (as shown on this page) and the receptacle end of the extension cord must accept
the 3-prong grounding plug of the microwave oven. The marked rating of the extension cord should be equal to or greater than
the electrical rating of the appliance.
3-PRONG
GROUNDING TYPE
WALL RECEPTACLE
3-PRONG
GROUNDING
PLUG
POWER
SUPPLY
CORD
ENSURE PROPER GROUND EXISTS
BEFORE USE
-5-
C. CIRCUITS
Observe all governing codes and ordinances. A 120 Volt, 60Hz, AC only, 15 or 20 amp fused
electrical supply is required. (Time-delay fuse is recommended.)
It is recommended that a
separate circuit serving only this appliance be provided.
D. VOLTAGE WARNING
The voltage used at the wall receptacle must be the same as specificed on the oven serial plate
located on the back or on the side of the control panel of the oven. Use of a higher voltage is
dangerous and may result in a fire or other type of accidet causing oven damage. Low voltage will
cause slow cooking.
E. LOCATION OF THE OVEN
Your microwave oven can easily be placed in your kitchen, family room or any other room in your
home. Place the oven on a flat surface such as a kitchen countertop or a specially-designed
microwave oven cart. (The control side of the unit is the heavy side. Use care when handling.)
The weight of the oven is approximately 23 Ibs. (10.4 kg). Do not place oven above a gas or electric
range. Free air flow around the oven is important. The microwave oven should be placed three
inches or more away from the edge of the countertop or cart to avoid accidental tipping of the
oven.
F. DO NOT BLOCK VENTS
All air vents should be kept clear during cooking. If air vents are covered during oven operation,
the oven may overheat. In this case a sensitive thermal safety device automatically turns the oven
off. The oven will be inoperable until it has cooled sufficiently. Make sure the microwave oven legs
are in place to ensure proper air flow.
G. TEST THE OVEN
To test the oven, plug it into the proper electrical outlet. Put about one cup (250mL) of cold water
in a glass container in the oven. Close the door. Make sure it latches. Follow the directions on page
10 to set the oven to cook for 2 minutes. When the time is up, the water should be heated.
H. USE OVEN PROPERLY
This microwave oven is designed
commercial purposes.
for use in the household
only and must not be used for
Do not remove the door, control panel or cabinet at any time. The unit is cquipcld
voltage and should not be serviced unless by an authorized service technician.
-6-
with high
Remove your microwave oven
and all materials from the shipping carton. Your oven will be
the
following
packed
with
materials:
Oven Front Face
Glass Tray
Owner’s Manual & Cooking
Guide.
1
1
Safety Door Lock System
CONTROL PANEL
Indicator Light-COOK,
HIGH,
MED, DEF and TIMER lights
indicate which cooking operation is being used.
Power- Used in setting cooking
power level.
Timetime.
Used In setting cooking
Timer-
Used In setting timer.
Hold Warm-Used
food warm.
Clear-Clears
10un
lun
-
Display Window- Used to
show:
l Cooking
time.
l Cooking
power level.
l Time of day.
l Cycle selected.
-
Clock-Used
day.
in setting time of
-
Start-Starts
the oven.
-
Door Open Button
lOsac
non
to keep the
all entries.
I
CLEAR u
I
NOTE: To enter a setting, touch a word or number pad.
A beep sounds when a pad on the control
panel is touched to indicate a setting has been
entered.
-7-
OPERATING INSTRUCTIONS
1. SETTING CLOCK
KEY BOARD
STEP
1. Plug the power cord
into an electrical
outlet.
REMARKS
DISPLAY WINDOW
/
2. Touch CLEAR.
3. Touch CLOCK.
,
4. For correct hour touch minute key
three times.
CLOCK
,
/I
~
, Min
~
[31
~ The hour will be set.
, ,C Min ,
~
11
~ t;tfsres,time the minute will
,
~
13::o)
~
1-I
5. Touch CLOCK.
6. Touch 10 Min and/or
1 Min key for correct
minute.
7. Touch CLOCK.
(This “locks” in the
time and starts the
clock running.)
~
CLOCK
,
I
I
NOTE:
This unit is designed for 120 volts/60 Hz AC circuit only. If oven does not operate properly, remove
the plug from wall outlet (120 volt household outlet), then put the plug back in.
OPERATION
PLUG
THE
SUMMARY
SET THE CORRECT
HOUR
POWER
SET THE CORRECT
MINUTE
-a-
2. HIGH-POWER COOKING
EXAMPLE:
If you want to cook food at HIGH-POWER
KEY BOARD
STEP
1. Touch CLEAR.
,
for 6 minutes:
DISPLAY WINDOW
CLEAR ,
2. Touch HIGH.
REMARKS
j
~~~~“,~~~,“~~~a~
settings
/I
~~,er~~s”,kng,~~~~~~~~~~w.
p-j
~n~~~~~~~t~~~~;~y
pTj
‘&
3. Set 6 minutes by
touching “1 Min” six
times. “6:OO” will
show in the display
window.
,
4. Touch START.
1 Min
,
START
:I
Two short and one long
beeps will sound when the
cooking cycle is over, and
the word “End” will appear
in the display window.
NOTE:
1. To stir food during cookrng, open the door and stir or turn the food over. Close the oven door
and touch START. The oven will automatically continue to count down the amount of time left
on the timer.
2. While the set cooking time is counting down, you can add the desired additional cooking time
by touching the 1 Min key once for each additional minute, up to 9 minutes.
3. The cooking time available on power level HIGH is up to 30 minutes.
OPERATION
pr-+iL
SUMMARY
DESIRED
TIME
-9-
COOKING
3. MULTI-POWER COOKING
Many foods need slower cooking (at less than HIGH-POWER) in order to give you the best results.
ln addition to HIGH-POWER there are two multi-power settings (MEDIUM and DEFROST). The
“Microwave Cooking Recipes and Tables” sections of this book tell you which power setting is
recommended for the food being cooked. Refer to these sections for detailed reference.
EXAMPLE:
If you want to cook food at DEFROST for 1 minute 30 seconds:
KEY BOARD
STEP
REMARKS
DISPLAY WINDOW
1. Touch CLEAR.
2. To defrost - touch
the DEFROST key.
3. Set l-l/z minutes
(1 minute 30
seconds) by touching “1 Min” once
and “10 Set” three
times. “1:30” will
show in the display
window.
10 set
1 Min
II
The cooking time will appear in the display window.
4. Touch START.
,
START
,
VI
;;i
;r;;;;“,;;;$
show the time count down.
When cooking cycle is completed, two short and one
long beeps will sound and
the word “End” will appear
in the display window.
I
~
I
NOTE:
While the set cooking time is counting down, you can add the desired additional cooking time by
touching 1 Min key once for each additional minute, up to 9 minutes. Your microwave oven has
three power levels (HIGH, MEDIUM and DEFROST). The cooking time available for MEDIUM is
up to 30 minutes. The cooking time available for DEFROST is 99 minutes 90 seconds.
POWER LEVEL CHART
f-gyiq
OPERATION
SUMMARY
POWER
START
LEVEL
-lO-
4. TIMER
Your oven also has a timer that can be used for non-cooking functions. When used as a regular
timer, the oven is not running. The timer is simply counting down in seconds. See below for
detailed instructions.
DISPLAY WINDOW
KEY BOARD
STEP
1. Touch CLEAR.
CLEAR
~
I]
TIMER
’
ml
REMARKS
-I
2. Touch TIMER.
,I
3. Touch “10 Min”.
4. Touch START.
,
START
,
IEn
;;;;;et~‘;p,e,9;y~,sun”d’d”w”
with no cooking or heating
in the oven.
When time is completed,
two short and one long
beeps will sound and the
word “End” will show in the
display window.
NOTE:
1. While the set time is counting down, you can add the desired additional time by touching 1 Min
key once for each additional minute, up to 9 minutes. To add time over 9 minutes the 10 Min key
must be used. For example: to add 12 minutes, touch 10 Min key once then touch 1 Min key
twice.
2. The timer can be set for up to 99 minutes 90 seconds.
OPERATION
SUMMARY
TIMER
DESIRED
TIME
-ll-
5. HOLD WARM
Your oven has a HOLD WARM feature that keeps the food warm after the cooking is done.
If you want to cook food at MEDIUM for 6 minutes.
EXAMPLE:
KEY BOARD
STEP
DISPLAY WINDOW
REMARKS
1. Touch CLEAR.
2. Touch MEDIUM.
,
MEDIUM
,
PI
3. Touch “1 Min” six
times.
4. Touch HOLD WARM.
5. Touch START.
START
‘I
the food warm. The cook
control setting changes to
loo/o of cook power.
NOTE:
HOLD WARM will continue for up to 60 minutes if CLEAR has not been touched. At this time,
“End” will show in the display window will two short and one tong tones. The HOLD WARM function can be used independently.
OPERATION
CLEAR
SUMMARY
DESIRED
CYCLE
HOLD
WARM
COOKING
HOLD
WARM
START
1
-12-
SAFETY PRECAUTIONS
I. Do not attempt to tamper with, or make any adjustments or repairs to door, control panel,
safety interlock switches or any other part of the oven. Repairs should be done by qualified
service personnel only.
2: Do not hit or strike the control panel with objects such as silverware, utensils, etc. Breakage
may occur.
3. Be careful when taking the cooking utensils out of the oven. Some dishes absorb heat from
the cooked food and may be hot. Use hot pads. Microwave energy does not heat containers,
but the hot food does.
4. Do not rinse cooking utensils by immediately placing them into water just after cooking. This
may cause breakage. Allow the glass tray to cool down before cleaning.
5. Do not use metal utensils for cooking. See “UTENSILS”
section on page 17.
6. Starting a microwave oven when it’s empty is not recommeneded. If you experiment, put a
container of water in the oven. It is normal for the inside of the oven door to look wavy after the
oven has been running for a while.
7. Do not heat unopened food containers in the oven. Pressure build-up can cause the container
to burst, resulting in injury.
8. Do not use newspaper or other printed paper in the oven. Fire could result. Do not dry flowers,
fruit, herbs, wood, paper, gourds or clothes in the oven. Fire could result.
9. Only use thermometers approved for microwave oven cooking.
10. Be certain the glass tray is in place when you operate the oven.
11. Pierce the skin of potatoes, whole squash, apples or any fruit or vegetable which has a skin
covering before cooking. Do not overcook potatoes. Fire could result. At the end of the recommended cooking time they should be slightly firm. Wrap in foil and set aside for 5 minutes,
They will finish cooking while standing.
12. Never use your microwave oven to cook eggs in the shell or to cook or reheat a whole egg.
Steam build-up may cause them to burst and burn you, and possibly damage the oven. Slice
hard boiled eggs before heating. In rare instances, poached eggs have been known to
explode. Cover poached eggs and allow a standing time of one minute before cutting into
them.
13. Do not pop popcorn, except in a microwave approved popcorn popper or commercial package
designed especially for microwave ovens. Never try to pop popcorn in a paper bag. Overcooking may result in smoke and fire.
14. Liquids heated in certain containers (especially cylindrical-shaped
containers) may become
overheated. The liquid may splash out with a loud noise during or after heating or when
adding ingredients (coffee, etc.) resulting in harm to the oven and possible personal injury. For
best results stir any liquid several times before heating or reheating.
15. Never lean on the door or allow a child to swing on it when the door is open. Injury could result.
16. DO not do canning of foods in the oven. Closed glass jars may explode resulting in damage
to the oven or possible personal injury.
17. Do not use the oven to sterilize objects (baby bottles, etc.). It is difficult to maintain the high
temperature required for safe sterilization.
18. DO not deep fry in the oven. Microwavable utensils are not suitable and it is difficult to maintain
appropriate deep frying temperatures.
19. DO not use the oven for storage. Do not leave paper products, books or cooking utensils in the
oven when not in use. Fire may result if someone accidentally starts the oven,
20. Do not let food or containers touch the top or sides of the oven.
21. If a fire should start in the oven cavity: do not open oven door; turn oven off; unplug the oven
or turn off the power at the main power supply.
22. Do not place anything on top of the oven. Damage to the oven may result,
23. Do not try to melt paraffin wax in the oven. You may be burned.
-13-
CLEANING AND CARE
BE SURE THE OVEN IS TURNED OFF BEFORE CLEANING.
INTERIOR WALLS AND DOOR
Keep the inside of the oven clean. Food spatters or spilled liquids stick to oven walls and between
seal and door surface. It is best to wipe up spillovers with warm sudsy water and a soft cloth right
away. Crumbs and spillovers will absorb the microwave energy and lenghten cooking time.
Use warm sudsy water and a soft cloth or sponge to wipe up crumbs that fall between the door and
the frame. It is important to keep this area clean to assure a tight seal. Remove greasy spatters
with warm sudsy water and a soft cloth or sponge. Then rinse and dry. Do not use harsh detergent
or abrasive cleaners.
The glass tray can be washed by hand or in a dishwasher.
EXTERIORS
Keep the outside of the oven clean. Clean the outside of your oven with soap and water, then rinse
with clean water and dry with a soft cloth or paper towel. To prevent damage to the operating parts
inside the oven, the water should not be allowed to seep into the ventilation openings.
To clean control panel, open the door to prevent oven from accidentally starting, and wipe with a
damp cloth, followed immediately by a dry cloth. Touch clear pad after cleaning.
If steam accumulates inside or around the outside of the oven door, wipe with a soft cloth. This
may occur when the microwave oven is operated under high humidity conditions and in no way
indicates malfunctions of the unit.
NOTE:
When you insert or take out the glass tray, you should tilt it sideways to prevent the oven from
being damaged. Wipe up liquid spills before removing.
QUESTIONS AND ANSWERS
Q. What’s wrong when the oven light will not light?
A. H Light bulb is burned out.
H Door IS not closed.
H START has not been touched.
Q. Why is steam coming out of the air exhaust vent?
A. Steam is normally produced during cooking operations. The microwave oven has been made
to vent this steam out of the bottom vent and the side vent.
Q. Does microwave energy pass through the viewing screen in the door?
A. No. The metal screen reflects the energy to the oven cavity. The holes, or ports are made to
allow light to pass; they do not let microwave energy through.
Q. Why does the beep tone sound when a pad on the control panel is touched?
A. The tone sounds to indicate that the setting has been entered.
Q. Will the microwave oven be damaged if it operates while empty?
A. Yes. Never run it empty.
Q. Why do eggs sometimes pop?
A. When baking, frying, or poaching eggs, the yolk may pop due to steam build up inside the yolk
membrane. To prevent this, simply pierce the yolk with a toothpick before cooking. Never
microwave eggs in their shells.
0. Why is a standing time recommended after the cooking operation has been completed?
A. Standing time is very important. With microwave cooking, the heat is in the food, not in the
oven. Many foods build-up enough internal heat to allow the cooking process to continue,
even after the food is removed from the oven. The standing time for joints of meat, large
vegetables and cakes is to allow the inside to cook completely, without overcooking the
outside
Q. Why doesn’t my oven always cook as fast as the recipes and tables in this book say it should?
A. Check the recipes and tables again to make sure you’ve followed directions exactly and to see
what might cause variations in cooking time.
Times and heat setting are suggestions, chosen to help prevent over-cooking
the most
common problem in getting used to a microwave oven. Variations in the size, shape, weight
and density of the food could require longer cooking time. Use your own judgment along with
the cooking suggestions in this book to test for doneness, just as you would do with conventional cooking.
Make sure the power level is at the recommended setting and that you are allowing for more
time when cooking more food at one time.
Also, the electric supply to your home or wall outlets may be low or lower than normal. Your
electric company can tell you if the line voltage is low. Your electrician or service technician
can tell you if the outlet voltage is low.
Q. Why do sparks and crackling (arcing) occur in the oven?
A. There may be several reasons why sparks and crackling within cavity (arcing) happen.
H You are using dishes with parts or trim containing metal.
n You have left a fork or other metal utensil in the oven.
H You are using a large amount of metal foil.
n You are using a metal twist-tie.
-15-
TECHNICAL SPECIFICATIONS
Power Input
Power Output
Microwave Frequency
Outer Dimensions
Cavity Dimensions:
Cavity Volume
Net Weight
Shipping Weight
Power Consumption
: 12OV, 60Hz, 8.OA, AC only
3-prong grounded plug.
: 500 Watts
: 2,450MHz
: 16l5/16(W) x813/1&H) x117/g(D) inches
: 1O13/16(W)x5%(H) ~1111/1~(0) inches
: 0.4 Cu.ft.
: 23 Ibs. (Approx.)
: 26 Ibs. (Approx.)
: 900 Watts
Weights and dimensions shown are approximate.
Specifications are subject to change without notice.
The serial number is found on the back of
this unit.
This number is unique to this unit and not
available to others. You should record
requested information here and retain this
guide as a permanent
record of your
purchase.
Data of Purchase
Dealer Purchased
Dealer Address
Dealer Phone No.
Model No.
Serial No.
-16-
From
MCE 04XW
MICROWAVECOOKING RECIPES AND TABLES
INTRODUCTION
UTENSILS
Your microwave oven can be one of the most
useful appliances in your home. If you follow a
few basic instructions, this book will teach you
how to make microwave cooking both enjoyable and safe. All of the recipes in this book
have been tested and proven to provide many
rewarding meals for you and your family.
Before you begin trying the recipes, take a few
moments to read these pages of instructions
and helpful hints.
Never use metal or metal-trimmed utensils in
your microwave oven. Microwaves cannot
penetrate metal. They will bounce off any
metal object in the oven -just as they bounce
off the metal walls of the oven - and cause
“arcing”,
a phenomenon
that resembles
lightning. Many of the containers which you
already own are perfectly safe to use.
How Your Microwave Oven Works: Quite simply, microwaves are a form of energy, just as
sunlight and radio waves. The only difference
is in the shape and form of the energy
wavelengths. When the magnetron tube in
your oven is activated, electricity is converted
into high frequency radiating energy in the
form of very small (micro) waves. The microwaves are released into the oven compartment
through an opening in the top of the appliance,
and are distributed evenly by a built-in stirrer.
When microwaves penetrate food, individual
molecules in the food begin to vibrate, and the
heat friction caused by this vibration passes
from molecule to molecule, cooking the food.
Power and Standing Time: Like any conventional
oven,
microwave
appliances
are
affected by fluctuations in local energy supplies The location of your house, the weather
and the time of day may all affect energy availability and thereby vary the rate at which your
microwave oven cooks. This book provides
you with minimum and maximum cooking
times for each recipe to accommodate this
possible variation in energy availability.
Standing times, which allow the extra cooking
to take place, can vary from one to five minutes
for vegetables, or five to ten minutes for a large
roast. Experience will help you determine
standing times for the various foods you
prepare.
-17-
How to Test for Microwave Use: Here is a
simple test to determine whether or not a utensil is compatible with your microwave oven.
Measure one cup of water into a glass container, and place it on or near the dish you wish
to test. Turn microwave on HIGH for one
minute, until water is hot, then test the container in question. If the dish remains cool to
the touch, it is safe for the microwave oven.
Utensils to Use in a Microwave Oven: Containers made of glass, ceramics, and some
forms of paper and plastic, allow microwaves
to pass freely through them, making them
ideal for microwave use. Boilable pouches and
oven cooking
bags are usually equally
effective in your microwave oven.
Many utensils are made especially for use in a
microwave oven. These heat-resistant plastics
may go directly from freezer to microwave and
vice versa without harming either food or container. To avoid problems, always read the
instructions on these containers before using
them.
FOOD CHARACTERISTICS
YOUR MICROWAVE
Many people believe that
once the food goes into the
timer is set. This is far from
techniques are as important
selecting quality ingredients
TECHNIQUES
COOKING
&
their job is done
microwave and the
true. The following
to your cooking as
from the market.
Density: Microwaves penetrate porous foods
such as cakes or breads more easily than
heavy foods such as roasts or casseroles.
Dense foods must be cooked for a longer time,
and often at a lower power setting to avoid
uneven cooking.
Starting Temperatures:
The initial temperature of food directly affects the length of time
they must cook or heat. As in a conventional
oven, frozen food takes longer to cook than
does refrigerated food, while food at room temperature cooks most quickly.
Moisture Content: Because microwaves are
attracted to moisture, cooking time will vary
according to water content. Naturally moist
foods such as vegetables, fish and poultry will
cook quickly and evenly; drier foods such as
rice or dried beans require added moisture for
microwave cooking.
Bones and Fat Content in Meat: The bone
and fat distribution affects how evenly meats
cook in the microwave oven. Boneless cuts
cook more evenly, since bones conduct heat to
areas near them. Well-marbled meat cooks
more evenly. Large areas of fat attract energy
away from the meat, and slow cooking. To prevent uneven cooking, meats with bones or
large fatty areas may require frequent turning
during microwaving.
Shape of Foods: Thin parts of uneven foods
cook faster than thick parts. Chicken pieces,
fish fillets and other foods which vary in thickness will take longer to cook in the thicker portions To promote even cooking, arrange foods
so that thicker portions are to the outside,
where they will absorb more energy.
Quantity of Foods: Microwave times relate
directly to the amount of food being cooked.
Smaller quantities of food cook faster than
large quantities, When doubling a recipe,
increase time by about half and check for
doneness. Add any additional time very cautiously.
Size of Foods: Small, even-sized pieces of
food cook more rapidly than large ones, To
insure even cooking, cut all pieces of food into
similar sizes and shapes.
-18-
FOR MICROWAVE
Every different food has unique characteristics Here are some ideas and guidelines to
help you achieve optimum results from your
microwave oven.
Elevating: As in conventional cooking, foods
such as roasts are elevated so they are not
allowed to steam in their own juices. Turning
foods is especially important here because it
allows for more even cooking. Shielding may
also be needed to prevent overcooking in
some smaller areas.
Turning: Turning food while it cooks allows the
microwave energy to penetrate all areas. Large
items such as roasts must be turned occasionally to promote even cooking. Smaller foods
like pork chops should be turned midway
through the cooking time or the dish may be
rotated.
Stirring: As with other cooking methods, prevent uneven cooking by stirring and rearranging food while it is cooking. Since the food
towards the outside of a dish heats first, stir
from the outside toward the center to promote
even heat distribution.
Shielding:
Certain foods that attract excess
microwave energy, such as wing tips and leg
ends of poultry, and the corners of square baking pans, can be shielded to prevent overcooking. Shielding done with small pieces of foil will
not hurt your oven as long as they do not touch
each other or the sides of the oven.
Arranging and Spacing: Individual foods like
potatoes and muffins should be arranged in a
circle at the outside edge of the glass tray. This
will guarantee that all the pieces cook evenly at
the same rate. Foods which are uneven in
thickness, such as chicken wings, should be
arranged with the meatier portions to the outside. Delicate foods like asparagus tips should
be placed toward the inside of the dish to
receive less microwave energy. If possible,
always leave spaces between individual
pieces of food.
Browning: Many microwave utensils are specially designed to allow browning of some
foods. A special coating on the bottom of these
dishes absorbs microwave energy to create
temperatures high enough to brown food such
as hamburgers, fried eggs, and grilled sandwiches
Use these utensils according
to
manufacturer’s instructions.
APPETIZERS
MICROWAVING
l
l
l
l
l
l
& SOUPS
APPETIZERS
& SOUPS: TIPS & TECHNIQUES
Many appetizers can be prepared ahead of time, like meatballs and dips. They will reheat well on serving
trays and casseroles in just a minute or two.
Some other uses for the microwave oven:
Cook refrigerated cheese 30 seconds at MEDIUM for easrer slicing.
Soften 8 oz. cream cheese for a spread by removing foil and microwave at medium for 1 minute.
Freshen potato chips and pretzels by microwaving at HIGH for 1 minute per cup. Let stand until crisp.
What you can’t do:
Don’t deep fat fry appetizers.
Pull pastry does not microwave well
Breaded products can be microwaved, but they do not come out crispy.
Use HIGH power for water-based soups and MEDIUM for milk or cream-based soups; soups with
uncooked meat or chicken start on HIGH and finish on DEFROST.
Microwave soups in a container with twice the volume of the ingredients to prevent boiling over.
Generally microwaved soups are covered with either a casserole lid, waxed paper or plastic wrap.
APPETIZERS
COOKING TABLE
Amount
Food
Power Level
Cooking
Time
Meatballs
(1 lb.=40)
20
HIGH
3 to 8 minutes
Saucy Appetizers
(cocktail franks in sauce)
2 cups
HIGH
7 to 8 minutes
Cheese DIP
1 cup
MEDIUM
6 minutes
Sour Cream Dip
1 cup
DEFROST
5% minutes
Canapes
(spread on crackers or toast)
12
MEDIUM
I
I
2 to 4 minutes
I
CANNED SOUPS COOKING TABLE
soup
Amount
Power Level
Water-based
- Condensed
l-8 oz. serving
10% oz. can
HIGH
HIGH
Milk or
Cream-based
- Condensed
l-8 oz. serving
10% oz. can
15 oz. can
MEDIUM
MEDIUM
MEDIUM
3 to 5 minutes
7 to 8 minutes
11 to 12 minutes
Bean, pea
or mushroom
- Condensed
l-8 oz. serving
10% oz. can
MEDIUM
MEDIUM
3 to 5 minutes
7 to 8 minutes
Undiluted
Chunk-style
10% oz. can
19 to 20 oz. can
HIGH
HIGH
3 to 4 minutes
6 to 7 minutes
1. Mix soup as directed on can or package in a 1% or 2-quart casserole;
in a mug or soup bowl.
2. Cover and microwave as directed above. Stir once or twice.
3. Let stand, covered, 3 minutes before serving.
-19-
Cooking
Time
2% to 3% minutes
6 to 8 minutes
individual servings can be heated
MEAT, FISH & POULTRY
DEFROSTING
l
l
l
l
MEAT, POULTRY, FISH & SHELLFISH:
TIPS & TECHNIQUES
You can defrost meats and poultry in their original wrapping as long as no metal is present. Remove any
metal rings, twist ties, wire or foil.
Place meat and poultry in a shallow baking dish to catch juices.
Defrost meat using the defrosting table. Separate items like chops, hot dogs, and bacon as soon as possible. Remove thawed portions and continue to defrost remaining pieces.
Whole pieces of meat are ready for standing time as soon as a fork can be pushed into the center of the
meat using moderate pressure. The center will still be icy. Allow to stand until completely thawed.
DEFROSTING
I
Amount
Item
BEEF
frankfurter
ground beef
roast, rib (rolled)
roast, rump (boneless)
roast, sirloln tip
steak, sirloin
steak, cubed
1 lb.
1 lb.
3-4 tbs.
3-4 Ibs.
4-5 Ibs.
2 Ibs.
1 lb.
LAMB
roast, leg or shoulder
4-5 Ibs.
VEAL
chop
ground veal
steak
PORK
chop (l/z” thick)
cubes
ground pork
roast, loin (boneless)
1
FISH FILLETS
SCALLOPS
Standing
Time
25-30 minutes
15 minutes
1 lb
1 lb.
1 lb.
9-10 minutes
4-5 minutes
6-8 minutes
10 minutes
10 minutes
10 minutes
1% Ibs.
1% Ibs.
1 lb.
8-13 minutes
8-10 minutes
5-6 minutes
10
10
10
20
I
minutes
minutes
minutes
minutes
8-12 minutes
20 minutes
15 minutes
20 minutes
22-28 minutes
25 minutes
12-15 minutes
16-21 minutes
15 minutes
20 minutes
27-37 minutes
25 minutes
I
T
2-3 Ibs.
4-5 Ibs.
4-5 Ibs.
1 lb.
1.~
~- pmmtmlib-T~
A
LOBSTER TAILS
SHRIMP
Time
10 minutes
10 minutes
15 minutes
15 minutes
20 minutes
10 minutes
10 minutes
%-‘I Ibs.
~-______
TURKEY
~-____
parts
breast (bone-in)
~______
DUCKLING, WHOLE
T
Defrosting
5-6 minutes
6-8 minutes
13-18 minutes
18-23 minutes
25-30 minutes
11-13 minutes
7-8 minutes
CHICKEN
whole
parts
breasts (bone-in)
CORNISH HENS
WH9LE
TABLE
i
:
5-6 minutes
~Ap~~~
6-8 minutes
Tm.
-2o-
5 to 10 minutes
-
5 to 10 minutes
8-9 minutes
5 to 10 minutes
5-6 minutes
5 to 10 minutes
CONVENIENCE
Convenience
Meat
Amount
Cooking
Power Level
Time
Standing
Time
bacon slices
2
3
4
8
HIGH
2-2’12 minutes
2,/z-4 minutes
5-6 minutes
7-10 minutes
1
1
1
1
Canadian
slices
2
4
8
HIGH
2-3 minutes
3-5 minutes
5-6% minutes
1 minute
1 minute
1 minute
frankfurters
2
4
HIGH
l-2 minutes
P/z-~~/z minutes
2 minutes
2 minutes
ham slices,
2 oz. each
2
4
HIGH
2-3 minutes
4-6 minutes
1 minute
1 minute
hamburgers, fresh
4 oz. each
1
2
4
HIGH
2-21/z minutes
4-5 minutes
5-7 minutes
2 minutes
2 minutes
3 minutes
hamburgers, frozen
3% oz. each
1
2
4
HIGH
4-5 minutes
6-7 minutes
9-10 minutes
3 mmutes
3 minutes
3 minutes
sausage Irnks, fresh,
l-2 oz. each
2
4
8
HIGH
2%~4 minUleS
5-7% minutes
41/2-11 minutes
2 minutes
2 minutes
2 minutes
sausage links, brownand-serve, frozen,
11/2-3 minutes
3 minutes
3 minutes
2 minutes
2 minutes
2 minutes
sausage patties, fresh,
l-2 oz. each
2%-4 minutes
57% minutes
2 minutes
2 minutes
bacon
CONVENIENCE
Convenience
barbecued
Poultry
chicken, frozen
minute
minute
minute
minute
POULTRY COOKING TABLE
Amount
Power Level
5- to 6%ounce
pouch’
Cooking
Time
HIGH
4-6 minutes
chicken a la king, frozen
12-ounce pouch*
HIGH
9-13 minutes
chicken croquettes,
12-ounce package
HIGH
5-7 minutes
2 medium pieces
HIGH
3-6 minutes
sliced turkey with gravy, frozen
12-ounce pouch’
HIGH
lo-14 minutes
turkey tetrazzini,
5- to 6%-ounce
HIGH
4-6 minutes
thawed
fried chicken, precooked
l
MEAT COOKING TABLE
frozen
and thawed
pouch’
Slit pouch and place in a baking dish before placing in microwave oven
-21-
COOKING
MEAT & POULTRY: TIPS & TECHNIQUES
Be sure meat and poultry is completely defrosted before cooking. Trim off excess fat.
Place meat, fat side down, on a microwave roasting rack in a microwave-safe baking dish.
l Arrange
meat and poultry so thicker portions face the outside of the baking dish.
. Drain juices as they accumulate in the dish. Save for making gravy.
l Shield thin or bony portions
with strips of aluminium foil molded to the meat to prevent overcooking. Be
sure to keep foil at least 1 inch from oven walls.
l Cover meat lightly with waxed paper to stop spatters.
l Let meat stand, covered with foil 10 to 15 minutes, after removing
from the oven. During standing time the
internal temperature of the meat will rise approximately 5°F.-150F. Standing time is an important part of
the total time required to complete cooking
l
l
COOKING TABLE
Item
Amount
Power Level
+
BEEF
meatloaf
rib roast (rolled)
1’/2 Ibs.
3-4 Ibs.
HIGH
DEFROST
roast, rump or chuck
3-4 Ibs.
MEDIUM
VEAL
rump roast (bone-in)
4-5 Ibs.
PORK
ham (fully cooked)
loin roast (boneless)
shank
4-5 Ibs.
3-4 Ibs.
4-5 Ibs.
MEDIUM- DEFROST
DEFROST
DEFROST
LAMB
leg or shoulder roast
4-5 Ibs.
MEDIUM
VENISON
rump roast (bone-in)
2-3 Ibs
CHICKEN
whole
half
parts
breasts (bone-in)
HIGH-
HIGH-
+
2’h-3 Ibs.
MEDIUM
DEFROST
Cooking
25-30
50-57
57-70
78-91
30-43
Time
minutes
minutes (rare)
minutes (med)
minutes (well)
minutes
7-35-45
minutes
Standing
5
15
15
15
15
Time
minutes
minutes
minutes
minutes
minutes
15 minutes
20-45-60 minutes
45-65 minutes
55-75 minutes
15 minutes
15 minutes
15 minutes
24-37 minutes (med)
37-50 minutes (well)
15 minutes
15 minutes
15-32-45
10 minutes
l-l’/2 Ibs.
2%-3 Ibs.
2’h-3 Ibs.
HIGH
HIGH
HIGH
HIGH
CORNISH HENS
WHOLE
3%~4 Ibs.
MEDIUM
40-45 minutes
10 minutes
TURKEY
parts
breast (bone-in)
2-3 Ibs.
4-5 Ibs.
HIGH
40-45 minutes
50-65 minutes
10 minules
10 minutes
HIGH
HIGH
4 to 6V2 minutes
7 to 10% minutes
3 to 5 minutes
3 to 5 minutes
5 minutes
1 to 2 minutes
HIGH
5% to 6% minutes
3 to 4 minutes
HIGH
5% to 6’/2 minutes
1 to 2 minutes
FISH FILLETS
1 lb.
2 Ibs.
+
~
SHRIMP
LOBSTER TAILS
1 lb.
SCALLOPS
1 lb.
I
I
-22-
32-45
13-15
18-23
18-20
minutes
minutes
minutes
minutes
minutes
10
10
10
10
minutes
minutes
minutes
minutes
EGGS AND CHEESE
SCRAMBLED
EGGS
Milk
Salt
Microwavable
Dish
Butter
Eggs
15 oz. bowl
1 tablespoon
2
1 tablespoon
dash
dash
1% to 2 minutes
l-quart
casserole
2 tablespoon
4
2 tablespoons
V4 teaspoon
l/s teaspoon
3 to 4 minutes
l-quart
casserole
‘/4
8
‘14 cup
l/2
teaspoon
l/B teaspoon
7 to 8 minutes
cup
Place butter In microwavable
dish or casserole.
Microwave at HIGH for 30 to 90 seconds, or until
butter melts. Blend in eggs, milk, sall and pepper.
Pepper
Cooking
Time
Microwave at HIGH as directed above, or until eggs
are set but still moist, stirring twice. Cover with
waxed paper. Let stand 1 to 3 minutes. Eggs will
become firm as they stand.
1 to 4 servings
POACHED EGGS
Microwavable
Casserole
Hot Water (130°F)
Vinegar
Eggs
1 cup
1 teaspoon
2
l-quart
In microwavable casserole, combine hot water and
vinegar. Microwave at HIGH for 4 to 5 minutes, or
until water boils. Break each egg into separate custard cup. Pierce yolk with wooden pick. Gently place
eggs, one at a time, into hot water. Cover tightly.
Cooking
Time
3 to 4 minutes
Microwave at DEFROST as directed above, or until
whites are set and yolks are soft-set, rotating casserole once. Let stand, covered, for 2 to 3 minutes.
Remove eggs with slotted spoon. Serve over toast
or English muffin halves.
2 servings
BASIC OMELET
1
tablespoon butter or margarine
2 eggs
2 tablespoons milk
V3 teaspoon salt
dash pepper
‘14cup shredded cheese or % cup
diced ham or ‘14cup jelly (optional)
1. Place butter in a g-inch glass pie plate. Microwave, uncovered, at
HIGH for 30 seconds, or until melted. Tilt plate to cover bottom with
melted butter.
2. Combine eggs, milk, salt and pepper in a small bowl. Beat to
blend thoroughly. Pour mixture into pie plate. Microwave at MEDIUM
for 4Y2 to 5Y2 minutes, or until nearly set, stirring once after 2
minutes of cooking time. Let stand, covered, 2 minutes to set completely.
3. If desired, spread a filling such as shredded cheese, diced ham,
or jelly on top of the omelet. Fold in thirds like a business letter.
Makes 1 to 2 servings.
-23-
VEGETABLES
MICROWAVING
l
l
l
l
VEGETABLES:
TIPS & TECHNIQUES
Pierce the skins of whole potatoes and winter squash before microwaving. Thus allows steam to escape
and prevents bursting in the oven. Arrange lhese whole vegetables in a ring, allowing space in between.
Fresh vegetables should be cooked in a covered glass casserole or baking dish.
Vegetables like broccoli and asparagus should be arranged with the stalks to the outside of the dish.
Frozen vegetables may be cooked in their ongrnal carton, or in a plastic cooking pouch. Vegetables in a
carton should be laid on a double layer of paper towels, which will absorb moisture. Cooking pouches
should be slit to allow steam to escape. Check if package has microwave cooking instructions.
VEGETABLE
cabbage,
carrols.
COOKING TABLE
fresh
fresh
-24-
DESSERTS & BREADS
COCONUTCAKE
1 W/z-ounce
package yellow cake
mix
1 3Sounce
package coconutflavored instant pudding mix
4 eggs
1 cup water
l/4 cup oil
1 12-ounce jar strawberry
or
raspberry preserves
2 4%ounce
containers dessert
topping thawed
1% cups flaked coconut
1. Combine cake mix, pudding mix, eggs, water and oil in a large
bowl of an electric mixer and beat at medium speed with mixer for 4
mrnutes. Pour batter into a well-greased 10 to 12-cup tube pan.
Microwave, uncovered at MEDIUM for 15 to 20 minutes, or until there
is no uncooked batter remaining near the bottom of the pan and the
cake has begun to pull away from the sides of the pan. Let stand,
covered, for 15 minutes. Loosen edges, invert onto a serving plate.
Cover and let stand until cool.
2. Split cake horizontally into 3 layers, spread with preserves and
reassemble. Frost with dessert topping and sprinkle with coconut.
Store, covered, in the refrigerator until serving time.
Makes 1 cake
PINEAPPLE
MUFFINS
1 O-ounce can crushed pineapple,
well drained
‘14cup syrup reserved
% cup packed dark brown sugar
3 tablespoons
butter or margarine
1 egg
1 cup flour
VZ cup chopped pecans or walnuts
1 teaspoon baking powder
‘12teaspoon salt
1. In a 11/z-quart mixing bowl, cream together drained pineapple,
brown sugar, and butter. Beat in egg and reserved syrup. Add flour,
nuts, baking powder and salt. Stir only until dry ingredients are
moistened. Turn batter into 6 to B-ounce custard cups lined with
cupcake papers.
2. Arrange 4 custard cups on a round baking tray. Microwave,
uncovered at HIGH for 4% to 6% minutes. Repeat procedure with
remaining 4 custard cups. Let muffins stand 5 minutes before
serving.
Makes 8 muffins
APRICOT WALNUT BREAD
% cup milk
‘12cup water
1 cup chopped dried apricots
grated peel of 1 orange
V4 cup packed dark brown sugar
1 egg, lightly beaten
3 tablespoons
oil
% cup chopped walnuts
1% cups flour
1 teaspoon baking powder
‘14teaspoon ground nutmeg or mace
‘12teaspoon salt
1. Combine milk, water, dried apricots, and orange peel in a 2-quart
glass bowl. Microwave, uncovered, at HIGH for 2 to 3% minutes, or
until mixture boils, stirring once.
2. Add brown sugar, egg, and oil to fruit mixture, beating to blend
well. Stir in remaining ingredients. Pour batter into a greased loaf
dish. Do not cover.
3. Set microwave oven at MEDIUM 10 minutes and then HIGH for 3
minutes. If necessary, microwave at HIGH an additional 3% to 8
minutes to complete cooking, rotating once. Let loaf stand 10
minutes before removing from dish. Let stand an additional 5
minutes before serving.
Makes 1 loaf.
-25-
APPENDIX
TABLE FOR HEATING FROZEN CONVENIENCE
Heating
FOODS
Time & Comments
(in minutes)
Amount
Power Level
2 servings
HIGH
3 to 5
Heat 12 at a trme on paper towel lined paper
plate or microwave oven roasting rack.
4 to 5 oz.
HIGH
2 to 3
8 to 9 oz.
21 oz.
HIGH
HIGH
7 to 9
17 to 19
11 oz
HIGH
5’/2 to 8
If container is %-inch deep, remove foil
cover and replace foil tray in original box.
For contarners more than z/4 Inch deep,
remove food to similar size glass
container; heat, covered. If no top crust
stir occasronally.
17 oz.
HIGH
9 to II’/2
a oz.
HIGH
7 to 6’/2
Brush top of pot pie with a browning
2 preces
4 pieces
6 pieces
2 fillets
4 fillets
HIGH
HIGH
HIGH
HIGH
HIGH
4% to 5%
5’12 to 7
8 to 9
2% to 3%
4 to 5
Arrange, on paper towel lined paper plate,
covered with paper towel.
1
2
4
HIGH
HIGH
HIGH
2 to 3
3% to 4%
5% to 7
Arrange on mrcrowave oven roasting rack.
5 to 6 oz.
10 to 11 oz.
HIGH
HIGH
4% to 5%
a to 9
Pierce pouch; set on plate.
2
4
1
2
4 (6 oz. pkg.
j (13 OZ. pkg
6
(1 to I’/4 oz
2
4
DEFROST
DEFROST
DEFROST
DEFROST
DEFROST
DEFROST
DEFROST
DEFROST
DEFROST
DEFROST
2 to 3
3 to 4
‘/2 to 1
1% to 2
2% to 3%
3% to 4%
1% to 2%
‘/2 to v4
1 to 1’12
2 to 2%
Each indrvrdually wrapped In paper towel (for
1 to 2). Arrange on paper plate. Cover with
paper towel (for 4 to 6).
Frozen juice
concentrates
6 oz.
12 oz.
HIGH
HIGH
‘/3 to 1
1 to 3%
Remove lid. If container is foil lmed transfer
to a pitcher.
Open carton. Let stand equal
time after defrosting.
Non-dairy
creamer
Pancake
16 oz.
HIGH
9% IO 10%
10 oz.
HIGH
4 to 5
Frozen vegetable
6 oz.
10 oz.
DEFROST
DEFROST
3 to 4
5 to 6
Pierce box, set on saucer.
If box is foil wrapped, remove foil.
If vegetables are in pouch, pierce pouch.
Let stand 5 minutes.
Cbteese cake
Brownies
17 oz.
13 oz.
DEFROST
DEFROST
3% to 4%
2 to 3
Remove from original container.
Arrange on a serving plate. Let stand 5 mrnutes
after cooking (to defrost). Add an additional 1
to 2 mmutes to serve warm.
Pound cake
Cc’ffee cake
10% oz.
11 to 12 oz.
DEFROST
DEFROST
1 to2
3 to 4
Item
Appetizers
(bite size)
Breakfast
entree
Entree
Regular TV-style
dinner
Hearty TV-style
dinner
Pot pie
Fried chicken
Fried fresh
fillets
Pizzas
Pouch dinners
Bagels
Danish
Dmner rolls
Hard rolls
-26-
agent.
TABLE FOR HEATING
Canned
10% to
soup
Barbecue
beef
Chicken a la king
Scalloped
tuna
Power Level
Amount
Foods
11%
oz.
15 oz.
12 oz
10'h
I
oz.
Heating
Time
Standing
Time
HIGH
3% to 7 minutes
3 minutes
HIGH
3% to 4% minutes
3 minutes
HIGH
3% to 4 minutes
3 minutes
HIGH
3 to 3% minutes
3 minutes
I
Baked beans
8 oz.
HIGH
2 to 3 minutes
3 minutes
Baked beans
15 to 16 oz.
HIGH
4 minutes
3 minutes
Vegetables
I3 oz.
HIGH
2V2 to 3’/2 minutes
3 minutes
Vegetables
16 oz.
HIGH
3% to 4’/2 minutes
3 minutes
Sloppy Joe
15 oz.
HIGH
5 to 6 minutes
3 minutes
Ravioli
15 oz.
HIGH
4’/z to 5% minutes
3 minutes
HIGH
3% to 5% minutes
3 minutes
Spanish rice
I
REHEATING
Amount
Item
Spaghetti
sauce
TABLE
Power Level
Heating Time
(in minutes)
2 cups
I
HIGH
4 to 5
soup
1 bowl
I
HIGH
3 to 4
Beef Stroganoff
2 cups
I
HIGH
Sliced roast
3 slices
HIGH
1 to 1%
Chicken
3 pieces
HIGH
4 to 5
Fish fillet
1 serving
HIGH
1 to 2
Casserole
1 cup
HIGH
2’12 to 4
Lasagna noodles
1 serving
HIGH
4 to 5
Sloppy Joe
1 serving
HIGH
Mashed potatoes
Bread
1
,
1 cup
1 slice
I
I
4 to 6
I
1 to
HIGH
I
HIGH
I
2%
t0
1%
3%
1
l/2
to
%
to 1
Dessert
1 serving
HIGH
Baby food
1 jar
HIGH
% to 1’/2
Canned food
2 cups
HIGH
4 to 6
-27-
LIMITEDWARRANTY
Appliances
LENGTHOFWARRANTY
(From date of purchase)
PRODUCTS
COVEREC
WHAT WE WILL PAY FOR
FULL ONE YEAR
WARRANTY
All Roper Appliances
Replacement parts and reparr labor to correct defects In materials or workmanship.
FULL FIVE YEAR
WARRANTY
Refrigerators
Freezers
Air Conditioners
Replacement parts and repair labor for the
sealed refrigeration system (compressor,
evaporator, condenser, drier or connecting
tubing) whrch we find to be defective rn
materials or workmanshrp.
Repair or replacement of magnetron tube
which we fmd to be defectrve in materrals or
workmanship.
LIMITED 2ND-5TH
WARRANTY
YEAR
Mrcrowave
Ovens
LIMITED 2ND-5TH
WARRANTY
YEAR
Automatrc Washers
Repair or replacement of any part of the
gear case assembly which we find to be
defective In materials or workmanship.
WHAT WE WILL NOT PAY FOR
A SERVICE CALLS TO,
1. Correct the installation of your applrance
2. Instruct you how to use your appliance.
3. Replace house fuses or correct house wiring or plumbing
4. Replace owner accessible light bulbs.
B. Repairs when appliance is used in other than normal. single-family household use.
C Pick up and delivery. Your appliance is designed to be repaired in the home.
D. Damage to appliance caused by accrdent, misuse, fire, flood, acts of God. or use of product not approved
E Any labor costs during the limited warranties.
by us
Thus Roper appliance is warranted by Whirlpool Corporation. Under no circumstances shall it be liable under thus warranty
for incidental or consequential damages and all implied warranties are limited to the same time periods stated in the
express warranties for Roper Brand Appliances. Some states do not allow the exclusion or limitation of incidental or consequential damages or limitations of how long an implied warranty may last, so that above limitations or exclusions may
not apply to you.
This warranty gives you specrfrc legal nghts, and you may also have other rights which vary from state to state.
Outside the United States, a different warranty may apply. For details, please contact your franchised Roper distributor
or military exchange.
HOW TO GET SERVICE OR ASSISTANCE
II you need service, first see the “Before You Call For Servrce” section of this book. If you still need servrce after checking
this sectron additional help can be found if you:
l Contant
your selling dealer for the authorized servicer rn your area:*
OR
l
Phone l-600-44.ROPER
(l-600-447-6737) between 8:OO a.m. and 4:30 p.m. Eastern Trme, Monday through Friday’.
OR
l
For further InformatIon. wrote to: Consumer Relations Dept., Roper Brand Appliances, 2000 M-63 North, Benton Harbor,
Ml 49022’.
* When requesting assistance, plase provrde the model and serial numbers, date of purchase, and a complete descriptron
of the problem The model and serial numbers are located on front of unit.
If you are not satrsfred with the service received, contact the Major Appliance Consumer Action Panel (MACAP). MACAP
IS a group of independent consumer experts that voices consumer views at the highest levels of the major appliance
industry.
Contact MACAP only when the dealer, authorized servicer or Roper Brand Appliance warrantor have failed to resolve your
problem:
20 North Wacker Drive
Major Appliance Consumer Actron Panel
MACAP will In turn Inform us of your actron.
Part No. 4874722D/4156663
1990 Whirlpool Corporation
Chicago, IL 60606
Printed in Korea