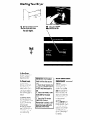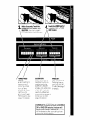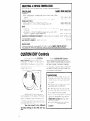
1
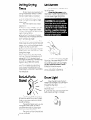
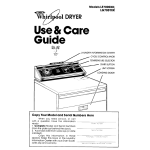
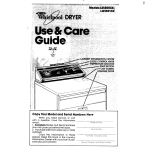
SOLID STATE Mark II Series
ELECTRONIC TOUCH CONTROL
Models LE9800XK and LG9801XK
Guide
POWER ON /OFF
LAUNDRY
INFORMATION
c------._ __..- ~_-
Copy
Your Model
and Serial
Numbers
When
you nee!r
service,
or !:(JI!
vlth ,a question
havl’
‘QIS informatlc?,J
eady
Complete
Model
or13 Serial Numbers
from the plate just behtnd
the door]
) Purchase
date from sales slip (or date
._---.-_._ -__
1
Here
)..‘/
:_
kstalled).
Copy
this lnformatton
In these
<paces.
Keep
this book
In the Laundry
lnformatlon
Center
with your Dryer Guide
sales slip and warranty
I
Before using
your Dryer
Please reclri t YE bc loklet to be
sLre your dryer 15 II s’allecl and used
properly.
It WIII help ,ou get the best
results and longrs1 fe Your dryer was
designed
to gtvp
You are personally
responsible for making sure that your dryer...
Is installed
by a +alIfied
Installer.
Is Malled
In GUI crea protected
from
the weather
l Is properly
tnstalNe 3 and leveled
in a
well ventilated
r-ior~
on a floor that
can support the weight
l Is located
in a-’ area where the temperature
IS aboie
45 F (7 2 C).
l Is connected
to the right kind of outlet,
electric
supply and grounding.
l Is properly
connected
tc fuel and
exhaust systems
l Is used
only for robs rlormally
expected
of home clothes dryers
l Is properly
maintained
l Is not run where
there may be explosive fumes
l Is not used
by children
or anyone
unable to operate
It properly.
Remove the Consumer
Buy
Guide label before using your dryer It
will be easier to remove.
Wipe out the drum with a damp
cloth to remove any dust
l
l
SPECIAL INSTRUCTIONS: See the
Dryer Guide for drying tips, information about permanent
press and
knits, instructions
for drying special
items and for things not to be dried in
your dryer.
See the ‘lnstal~at~or
Instructions’
complete
information
See Setting D-vthg Tmes, page8
for
FOR YOUR SAFETY
If you smell gas:
1. Open windows
2. Don’t touch
electrical
switches
3. Extinguish any open
flame
4. Immediately
call
your gas supplier
Please read this manual
Follow the instructions
to help
you get the best drying
results.
Save the manual
for future use
FOR YOUR SAFETY
Do not store or use
gasoline or other
flammable
vapors and
liquids in the vicinity of
this or any other
appliance.
Understanding
your Dryer
loading
your
-
Ihrs dryer IS (?f+err
t Porn ones
you may nave Jsec ! t)ef :.e I+ IS rmportant that you read
‘) ‘; U 1 arld Care
Gurde
It contarns
: ~qg+-r:
r#s on the
way to use ‘, our dr\ +?I to ;I& the best
results and longest .jief;.l rrf+ from your
dryer Please read + c-ark>l JI y
Contents
Before Using Your Dryer
Understanding
Your Dryer
Loading Your Dryer
Starting Your Dryer
Other Selections
Selecting
A Drying Temperature
CUSTOM DRY CONTROL
TIMED DRY CONTROL
TUMBLE PRESS. Control
FINISH GUARD’ Control
FLUFF AIR
Setting Drying Times
End-of-Cycle
Signal
Lint Screen
Drum Light
Using the Drying Rack
If You Need Service or Assistance
I.
2
3
4
Before Callrng for Assistance
If You Need Azsrstance
If You Need Servrce
If You Have CI r’roblern
2
3
4
5
6
a
9
10
10
10
11
For best drying results and energy
so: rr;gs. sort dryer loads carefully
Sort loads according
to the type
of fabric and weight
For example
l Dry heavy
fabrics (denims. towels,
cottons]
separately
from light fabrics
(permanent
press, synthetics)
l Separate
lint grvers (towels, sweatshorts, etc ) from lint takers (synthetics,
blends. permanent
press).
l Keep
dark colors and lrght colors
seoarote
l Keep
colorfast
Items away from non
colorfast
fabrrcs.
Allow room for items to tumble
freely The load WIII dry faster with fewer
wrrnkles
When drying permanent
press,
dry smaller-than-normal
loads for the
best wrinkle removal
Use a mesh bag to hold small
Items such as baby socks
Read the Dryer Guide for more
hints on sorting and loadtng.
Starting
1
n
Your Dryer
Put the sorted load into
the dryer and close
the door tightly.
2
Move the POWER
. SWITCH to ON.
To Stop Dryer:
Open the door
Move POWER
SWITCH to OFF
l
or
l
To Check
load:
Open door.
l Dryer
will remember setting if you
restart within 2 mmutes Touch selector
with blinking
light to
restart
l
To Restart
Dryer:
Close dryer door
. Touch FABRICTEMP
SELECTOR with the
blinking
light.
l Dryer
will remember CUSTOM DRY or
TIMED DRY settrng
you were using
l
4
IMPORTANT: If a finished
load is not as dry as you
like:
1. Clear dryer memory by
moving the POWER SWITCH
to OFF and then back to
ON.
2. Touch the FABRIC-TEMP
SELECTOR for the load
type.
3. Touch the 20-minute
TIMED DRY Control.
Remember
to select a different dryness setting for
the next similar load.
Other Selections:
FINISH GUARD ” Control
. FINISH GUARD IS
automatrc
in all
cycles. If o load is
not removed
at the
end of a cycle, the
dryer will tumble the
load in short cycles
to help prevent
wrinkling.
l If you do not want
FINISH GUARD, touch
the FINISH GUARD
Selector
[The FINISH
GUARD light will
go out.) See page
7
for details
3
4
Within 8 seconds, Touch the
. LOWER part of a FABRIC-TEMP
SELECTOR. [See chart, page 6.
for correct
selection
for load
type
Control
l Use this setting
for
freshening
and
removing
wrinkles
frorn dry items.
l Move
the POWER
SWITCH to ON.
@Touch the TUMBLE
PRESS Selector
(See
page 7 fa details )
Touch the LOWER part of
a CUSTOM DRY or TIMED
DRY Control.
]
A
\
/(/
n
CUSTO!DRY
TIMED DRY
Select the set&
that
describes
how dry you
want the load to be’
DAMP DRY, LESS DRY,
NORMAL
DRY, MORE DRY
or VERY DRY. You may
need to try different
settings to find the degree
of
dryness you like. (See
page 6 for details )
Touch the cbniroi for
the drying time you
want, from 20 to 80
mtnutes. (See page 7
for details.)
IMPORTANT: If you do not touch a CUSTOM
DRY or TIMED DRY selector, the dryer will
automatically
select NORMAL DRY. If this IS
not the dryness you like, you must touch
of the other dryness selectors
one
1_
SELECTING A DRYING TEMPERATURE
The chart
below
has suggested
fabric
lzads
and
temperatures
drying
FABRIC-TEMP
TYPE OF LOAD
COTTONS
HtAVV ~ Bedspreads
mattress
pads
:]uilts
denims
wfD/UM
ANC IIGHJ~~I/F/GH~ ~ Shirts dresses
towels
work
sheets
diapers
SELECTOR
clothes
REG
REG
HEAVY HIGH
HEAVY~HIGP
PERMANENT PRESS
HEAWWork clothes
,ackets.
raIncoats,
etc
MED/UWVEIC+/L
Shirts uniforms
dresses
slacks
PERM T PRESS-MED
PERM T PRESS-MED
etc
KNITS
YEAVYWIGH~
shirts etc
dGHTWElGYT
BLENDS
~ CO’TOYS
RAYONS
BLENDS
T~shlrts slacks
KNITS
~ SYNTHETIC FIBERS [polyester
tIngetIe
blouses, dresses
etc
ocn/l~c
DELICATELY CONSTRUCTED FABRICS
Sheer curtains
FOAM RUBBER ARTICLES
HEAT SENSITIVE FABRICS ~ Oleflr
nylor
etc
To leave
polo
a load
slightly
damp
for !ronlng
select
GENTLE
LOW
etc ) AND
(2 or 3 panels]
the DAMP
KNITS
GENTLE-LOW
KNITS
GENTLE~LOW
FLUFF AIR
FLUFF AIR
DRY setting
MIXED LOADS
If you dry o load with mlxed
the llahtest
one
When
weights
of a fabric use the FABRIC-TEMP SELECTOR for
the dryer slops. take out the dry Items and restart the dryer
CUSTOM DRY Controls
If you use one of the CUSTOM
DRY Control select~cns [VERY DRY
DRY NORMAL
DRY LESS DRY ::r
DRY], the dryer ti,:,l ‘un until the
selected
dryness s reocrled
ThIere IS nc
heed to set a time
MORE
DAMP
Each CUSTOM DRY Control
selection
has up to 10 mrnutes of cooldown before the dryer stops. During the
last few minutes, the load is tumbled
without heat. This cool-down
helps keep
wrinkles from settrng In and makes handling the dry items easier
SUGGESTIONS:
touch
As the load tumbies
a sensor
on the back
l For the first few
loads you dry bse
NORMAL
DRY When the dryer stops,
check to see If the load IS as dry as
you want
l If the load
IS not as dry as You l’ke,
use MORE DRY or VERY DRY
l If the load
IS too dry, you can use
LESS DRY the next time, or DAMP DRY
If you want to Iron the clothes
l Bulky loads
[beaspreads.
blankets.
quilts) ~111dry better if you use the
TIMED DRY Control setting [Start
‘with 60 minutes )
l For best dryng
and wrinkle-free
results, use the CUSTOM DRY
the items
of thle dryer
drum This sensor
feels the omount of
moisture in the load When the dryrless
you have selected
IS reached,
the dryer
automatically
shuts off
You may need to fry different
dryness settings to find the one you
like.
6
Control
,
TIMED DRY Controls
Use a TIMED DRY Control
setting
for any load you want to dry by time
For example,
very small loads or large,
bulky item loads
l Touch
a FABRIC-TEMP
Control
setting
l Touch
the number of minutes you
want 20, 30,40. 60 or 80
Each TIMED DRY Control setting
has a cool-down
time That time
depends
on the setting
FINISH GUARD R
Control
When ihe dry cycle IS completed,
FINISH GUARD rakes over auiomatlcally
The FINISH GUARD Control tumbles tne ;oad lavthout Cleat, every five
minutes for up io 2’ 2 hours This tumbling
rearranges
and fluffs ihe load io help
prevent wrinkles thai set IV when a load
remans
in a tiNarm dryer
The lndlcator
llghi will stay on as
long as FINISH GUARD IS tumbling
the
load
TO CANCEL FINISH GUARD:
--
Includes 5Minute
Cool-Down
Includes
lo-Minute
Cool-Down.
Touch FINISH GUARD Control selecior
any iime during the cycle (ltght WI/I
go out)
at
FLUFF AIR
TUMBLE PRESS’R
Control
This setting is useful for removing
wrinkles from items packed
In suitcases
or closets. TUMBLE PRESS gives you 15
minutes of tumbling
at the medium
fabric temperature,
and 5 more minutes
of tumbling
without heat FINISH GUARD
IS automatically
selected
with this cycle.
For best results, TUMBLE PRESS
only a few items at a time. Put them on
hangers or fold them as soon as the
dryer stops.
FLUFF AIR gives you 20 minutes of
tumbling
without heat To remind you
of what WIII happen,
the FLUFF AIR and
FINISH GUARD lights will be on. [You can
cancel
FINISH GUARD by touching
it )
This setting IS useful for flufftng
bedding,
pillows and clothing
Use ii
also for damp-drying
heat-sensltlve
items such as plastic shower curtains
or
tablecloths,
rubber-backed
rugs, some
pillows, stuffed toys, etc
If you want more than 20 minutes
of tumbling,
touch the FLUFF AIR and
the TIMED DRY Control
for the amount
of iime you want [up to 80 minutes).
Setting Drying
Times
lint Screen
Modern
dryers are designed
with
temperatures
needed
to safely
modern fabrics. Cooldown
hove been added
to heat setYou might notrce slightly longer
times
The time It takes to dry CI load
depends
on
l lbe knd
of fabric, ifs weight
and the
size of the iood A large load of jeans
WIII take a lot longer to dry than a small
load of light synthetics.
0 The amount
of moisture in the iood
Towels hold a lot of moisture; synthetics
don’t. Synthetics
dry faster
l Temperature
of the rinse water Cold
rinses cause less wrinkling
and help save
energy, but a cold load will take slightly
longer to dry than a warm one.
l Amount
of iint on the screen
A full lint
screen slows the air flow and can make
drying time longer
l Room
femperoture
The dryer heats
room air If the room temperature
is not
above
45 F (7 2 C), drying time WIII
be longer and removal
of wrrnkles may
be poor. Use a TIMED DRY Control
l Proper
instaiiation
and exhaust systerns For the fastest possrble drying
time, installing
and exhausting
your
dryer properly
IS important.
See installation instructions
Clean the lint screen before
each load. A screen that’s blocked
by
lint can cause longer drying times.
The lint screen
top of the dryer.
drying
handle
times
trngs.
dryrng
End-of-Cycle
Signal
a
the lid on
To remove the screen, open the
lid and pull the screen straight out. Roll
the lint off the screen with your fingers.
DO NOT rinse the screen or wash
it. Wet lint IS hard to remove.
It firmly
When replacing
the screen,
Into place. Close the lid
I
push
Drum light
9
91
3
IS under
7
\\
The dryer will beep five times to
let you know when the cycle IS finished.
Dryer will also beep after each FINISH
GUARD tumbling.
The slgnal is helpful when you are
drying permanent
press, synthetics
and other items that should be taken
out as soon us the dryer stops
The signal can’t be turned off and
it is not adjustable.
When the light Inside the drum
needs to be changed,
you can reach It
through the dryer door.
1. Unplug the dryer to avoid possible
electrical
shock
2. Open the door and remove the lightbulb cover by turning It clockwrse.
3. Remove the light bulb
counterclockwrse
bv turning
it
4. Rep/ace
ihe nil/t: on/y wi:h 0 40 watt
app//once
bdb (from most hardware,
grocery
or vorletv stores]
5. Replace
the light-bulb
cover and
lock in place by turning
counterclockwise
Using the
Drying Rack
The drying rack lets you dry Items
that you may not “vant to tumble,
like
sneakers,
stuffed tovs, etc
1. Fit the rear legs of the rack Into the
grooves
on the back wall of the drY/er
Push them In and jet the front legs of the
rack down on the front of the dryer as
shown
2. Lay wet items on top of the rack
Now space between
them for air to
mode around
3. The rack does not move, but the
drum turns Be sure nothing hangs over
the edges of the rack Do not hang
items from the rack
4. To remove the rack, push It back. lrft
up and pull out.
NOTE Use the TIMED DRY Control seTtrngs Drying times WIII depend
on how
much moisture the items hold Suggested dryrng temperatures
ore given II
the following
chart
Items for
Rack Drying
Drying Temp.
Setting
I. Wool Sweaters
[Block to shape and
lay flat on rack ]
2. Stuffed Toys
[Cotton or polyester
fiber filled )
3. Stuffed Toys
(Foam rubber fIlled
4. Sneakers
5. Foam Rubber
Pillows
KNITS GENTLE
- LOW
REG HEAVY
~ HIGH
FLUFF AIR
FLUFF AIR
FLUFF AIR
If You Need
Service or
Assistance, We
Suggest You Follow
These Four Steps:
1. Before
calling
for assistance...
Pr::t:le-r>: or;. 5 >s ietimes
caused
b\i Ilt’ e :I~I~IC~I
.-I ‘I X. 1 ]‘~I :orrect wlthout
tools rYhrx zk -*> ‘, ‘1s‘ ::? sre you catI
for serv~c‘~2
ClRYC R D,E:
‘,OT I J’J
0 Is elec+:~c f:ower
.rr plugged
lcl
-DRYER RUNS BUT DOES NOT HEAT
DICI you touch a FABRIC-TEMP
SELECTOR other than FLUFF AIR7
Is I+ o gas dryer7 See if the gas IS
-urned on If not move the POWER
<WITCH to OFF. Turr on the gas and
wat five mrnutes for the automatic
swh/tch to reset Then trv starting it
agalr
1s 11ar\ electrrc
aryer7 Check the clrcult breakers
or fuses in the fuse box.
An electric
dryer will have two fuses If
one IS blown, the dryer may run, but
rlo+ heat
DRYING TIME IS LONGER THAN USUAL
l Check
the lent screen. Remove lent
Keep the screen clean
l Modern
dryers are designed
with
drying temperatures
needed
to safely
handle
modern
fabrics. Cool-down
trmes have been added
to heat settlngs You might notice slrghtly longer
dving
times.
l Room
temperature
IS cold
2. If you need
l
Is the orYer door C/IX-~ tightly’
Your
dryer bus c svrtcr
11Y -he door that
shuts off the dryer If ‘he door IS
opened
l
DIG you move the l,:?,VER SWITCH to
ON? And touch a FABRIC-TEMP
SELECTOR wIthin G?,ghNtseconds’
l
Check crrcuit breakers
or both fuses in
the fuse box
Was there on electrlcol
InterruptIon
or
brownout
condrtrcn’)
The dryer shuts
off so motor will no+ be damaged
Restart dryer
l
10
assistance
Call the Whirlpool
COOL-LINE’
assistance
telephone
number
free from
...
servrce
DIOI
Continental
U.S. . . . (800) 253-1301
Michigan
. . . . . . . . . . (800) 632-2243
Alaska &
Hawaii
. . . . . . . . . . . . (800) 253-l 121
and talk with one of our trained
Consultants
The Consultant
can Instruct
you In how to obtain satisfactory
operatron
from your applrunce
or, if
servrce IS necessary,
recommend
a
qualified
service company
In your area
3. If you need service
.. .
WhIrlpool
nas a ,,I~IVI L. lie network
of
fror ‘chased ‘ECti-(
A TjF Service
Companres
TECk C tI?t- servrce
technicians
are trr I 18+x to fulfill the
product
warrar,tv
:II c> rjrovlde
afterwarrapltv
service
ar \ wnere In the
United States To 1 :ca+e TECH-CARE
service In vour arc a c‘crl our COOL-Llf \iE
service assrstancctelephone
number
(see Step 21 or lot k r \’ )ur telephone
director\/
Yellow Fnges Jnder
APPLIANCES-HOUSEHOLDMAJOR-SERVICE
.‘;k,-II,l’?.nFl
:Lli,\
AY
bl'F!
1L -
r, HI I,,
tY:~ki'.ll
c CL'
'I :',,;, I
ELECTRICALAPPLIANCESMAJOR-REPAIRING
8 REPAIR
OR
IS
.42i
[.
, 01,,',
\,I
4. If you have
,
I 4,s
a problem
Yv B(~I
WASHING
MACHINES.
8 IRONERS-SERVICING
8 PARTS
;v-IRLFUOI AF-'.mAVCCq
~PANiHISEi'lFl-.
CAFLlt?:l(t
,111, I,,
, O\II'l\ll
I \ ,7 5 t 1 ,i E ,I
1'l\;i:l.
OR
v'Hl'ILPOOLA"P.mANCES
-4ANCVlSEU‘ELH
CAQti:P'r
r/:I~I,,~
,Ol,,',\,,.
,
~riSERblLE(O
QQY qqaq
1:1 MasIr
...
Call our COOL-LINE servrce assistance
telephone
number :see Step 2) and talk
wrth one of our Corsultants,
or if you
prefer, write to
Mr Guy Turner Vrce Presrdert
Whrrlpool
Corporation
Admrnrstrotive
Center
2000 US-33 korth
Benton Harbor, Ml 49022
If you must call or ‘write please
provide
model r,urnber
serial number,
date of purchase,
ond a complete
descrrptron
of the problem
This
Information
IS neeaed
in order to better
respond
to your reauest for assrstance
DRYERS
Model and Serial
Number Plate
t
7
Benlon Harbor, Michigan. Automatic Washers. Clolhes Dryers.
Freezers. Aelrigeralor-Freezers.
Ice Makers, Dishwashers.
Buill-In Ovens and Surlace Units. Ranges. Microwave Ovens,
Compaclors. Room Air Condilioners, Dehumidiliers.
Cenlral
Healing and Air Conditioning Syslems.
Part No
690720
Rev D
PrInted in IJ S A