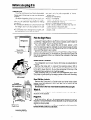
1
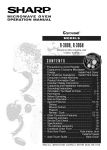
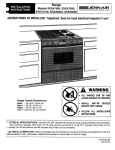
%irlpoolCORPORATION
USC and
Care
Guide
Please read
this Use and
Care Guide
before you do
anything else...
It will help you get the longest useful life your refrigerator
can give.
It tells you how to start your
refrigerator,
clean
it, move
shelves and adjust controls. It
even tells you what to do if you
hear strange
sounds or think
Door Shelves
something
is wrong.
Treat your new refrigerator
with care. Use it only to do what Glass Shelves
home refrigerators
are designed to do. It will pay you
Sealed
-I-*
back with the years of service
it was built to give.
Slide-Out
Shelf
* -/
Slide-Out
Basket
Base Grill
Model and
Serial Number
Plate
Copy Your Model Number
and Serial Number Here
If you have to call for se vice, the service technician
will ask for your Model an I Serial Numbers. Your refrigerator has these numbers or a plate just above the base
grill. Copy them in the spc ces below while you are thinking a bout it.
Keep this book in a hanc ly place. Your warranty and
sales slip should be kept v ith it.
Model
Serial
No.
No.
Purchase/Installation
I late
J
Before you plug it in
IMPORTANT
This is the only ftne print you’ll find in this booklet.
Please read it to be sure you use your refrigerator
properly.
We build refrigerators to last, but we can’t control how they are used. Before using your refrigerator, you are personally responsible for making
sure that It...
l is installed
and leveled on a floor that will hold
the weight, and In an area suitable for Its size
and use.
l IS connected
only to the right kind of outlet, with
the right electric supply and grounding.
l
l
l
l
l
l
l
is useI only for jobs expected
of home
refrlge cltors.
is prop ?rly maintalned.
is out c the weather.
IS usea n an area where the room temperature
will noi fall below 55” F. (13” C).
ISnot rt n where there are explosive fumes.
is not I sed by children or others who may not
unders and how it should be used.
is not I( aded with food before it has time to get
proper y cold.
Pick the Right Place,
but do YOU want
thai way?
it
Raise
lower
Right to Raise;
Left to Lower
Save steps by putting yo Jr refrigerator
near the sink and next to a
countertop.
It should not tie near a stove, radiator, water heater or
any source of heat...includlng
direct sunlight.
You can install it flush c gainst the wall in back. Leave % inch
(1.3 cm) clearance
against cabinets
on each side for ease of installation. Do you want it in a cl>rner? Leave some room on the wall side
if you want the doors to op+tn wider.
Planning to add the autcinatic
ice maker? Will the refrigerator
be
near a cold water pipe? Some people run the water line through the
floor to the basement.
Othc rs run it behind the cabinets
to the pipes
under the sink.
Make
Sure It’s Level<
Your refrigerator
is on rol ers; the two front ones are adjustable
for
leveling.
Remove the base grill lo uncover
the leveling
screws. With a
screwdriver,
turn each screw to the right to raise the front. Turn them
to the left to lower the fron.1 (If you have someone tilt the top of the
refrigerator
back while turr ing, it will be easier.)
Keep adjusting
one or tile other until the refrigerator
won’t rock.
Then raise or lower both by the same number of turns until the refrigerator is level (use a level tc’ check this).
Peel Off the labels.
3-prong
grounding
type
wall receptacle
Remove the Consumer
Euy Guide label and other inside labels
before using the refrigeralor.
Any glue left can be taken off with
rubbing alcohol.
Do not remove the Tech Sheet fastened
behind the base grill.
Wash It.
To clean your refrigerate
structions in this booklet.
r before
using it. check
the washing
in-
Plug It In.
3-prong
grounding
plug
+
Refrigerator
Power Cord
Recommended
Grounding
Method
2
A 120 Volt, 60 Hz., AC only, 15 ampere
fused electrical
supply is
required. It is recommended
that a separate circuit serving only this
appliance
be provided.
Do not use an extension ( ord. Use a receptacle
which cannot be
turned off with a switch or pull chain.
Cleaning
your refrigerator
Both the refrigerator
ar :j freezer sections defrost automatically.
But both should be clear m?d about once a month to help prevent
odors from building
up. Cmfcourse, spills should be wiped up right
away.
To clean your refrigerat )r, unplug it, turn the Temperature
Control
to OFF, take out all remov :ble parts, and clean it according
to the
following
directions.
Inside.
You can wash the parts ‘ou take out in the sink with a mild soap or
mild detergent
and warm water. Harsh cleansers, scouring powders
and solvents should neve be used on any part of your refrigerator.
Wash the walls with a SClution of two tablespoons
(309) of baking
soda mixed with one qua1 t (IL) of warm water. Rinse well and dry. Let
the freezer warm up with ‘he door open for 10 or 15 minutes so the
cloth doesn’t stick.
The inside of the door, ncluding
the gasket, should be washed
with warm water and a ml d soap or mild detergent.
Do not use cleaning
w( Ixes, concentrated
detergents,
bleaches
or cleansers containing
p ?troleum products. They can damage
the
gasket and plastic finish.
Grill-holding
labs
Outside.
Cleaning
waxes are no’ recommended.
Just use warm water and
a mild soap or mild deters ent. Rinse well and dry. If you want to wax,
use a special appliance
vax or a good auto paste wax that does
not contain solvents.
Underneath.
Lift Up
Notice the
Notched
Corner on the
Defrost-water
Pan
Energy Saving
To remove the base grill open the door and lift up on the two tabs
that show through the gril at both ends near the top. When you’ve
lifted the tabs: swing the 3p of the grill forward. Lift the grill off the
bottom supports.
The defrost water pan i, on the left and the condenser
is on the
right. Pull out the defrost oan and wash. Make sure the notched
corner is in the rear when 1 ou put it back, and that you push it all the
way in. The defrost drain tt be should point into the pan.
Clean dust from the COI denser with a vacuum cleaner. The condenser should be cleaner’
every two or three months.
To clean the floor under ‘he refrigerator,
make sure you don’t roll it
out farther than the ice-mc Iker water supply line allows.
Heat is removed
from yc ur refrigerator
and transferred
to the condenser. From there, the h ?at is spread
into the room. Dust on the
condenser
insulates it ant stops the heat from leaving it. If the heat
can’t get out easily, the rE frigerator will have to run longer to keep
food cold.
Tips
You can help your refrigerator use less electncity.
l Check
door gaskets for a tight seal. Level the
cabinet to be sure of a good seal.
l Clean
the condenser co11 regularly
l Open
the door as few times as possible. Think
about what you need before you open the door.
Get everything out at one time. Keep foods organized so you won’t have to search for what
you want. Close door as soon as focd is removed.
l Go ahead
and fill up the refrigerator, but don’t
overcrowd it so air movement IS blocked,
l
l
l
It is a t/aste of electricity to set the refrigerator
and fl !ezer to temperatures
colder than they
need 1:) be. If ice cream ISfirm in the freezer and
drinks rre as cold as your family likes them. that’s
cold E -lough.
Keep ie power-saving
heater control switch on
OFF u bless moisture forms on the refrigerator
exterlc I,
Make iure your refrigerator IS not next to a heat
source such as a range, water heater. furnace,
radiat’ br,or in direct sunlight.
Using your refrigerator
CONTROL
CONSOLE
Air Control
Temperature
Control Dial
Setting
Dial
the Controls.
Control Iand Air Control dials are on a console
inside the refrigerator. To stall the refrigerator, turn the TEMP. CONTROL
dial to 3 and the AIR CONTRIL dial to B. These are normal settings.
It takes time for your refrigerator
to reach proper storage temperatures. When you first turn it c’n, it will run continuously
until the interior
gets properly cold. Before Ic.#ading with food, be sure the refrigerator
has cycled
at least once (turned on, turned off, and on again).
Controls will be set about ri!.lht if your milk or juice is as cold as your
family likes it, and when ice cream is firm.
The control console has directions
for raising or lowering the temperatures, if needed.
The Temperature
Power
Off Setting
Helps Save Energy
Saving
Adjusting
Lift the Front;
Then the Back
Contra I.
The Power Saving Control Inside your refrigerator
controls electric
heaters. These heaters heIF prevent moisture from forming on the
outside of the refrigerator
wllen humidity is high. Use the OFF setting
when humidity is low to he@ save electricity.
Use ON only if moisture
forms on the outside of the r<bfrigerator.
the Shelve:;
and Meat Pan.
Arrange your glass refrigc rator shelves to suit yourself. Be careful.
The shelves are heavy.
To remove a shelf, tilt up it the front. Then lift up at the back. To
replace
it, keep it tilted. Guic e the rear hooks into the slots in the shelf
bracket. Lower the front.
Before moving the meat l ban itself, remove the pan by pulling it
out, lifting the front and then Dulling out the rest of the way.
Removing
the Freezer
Basket
and Shelf.
Slide the basket or shelf OI it until it stops. Lift and slide it out the rest
of the way. To replace
it, put It back on the slides; make sure the wire
stops clear the front of the sli 1e.s; push it in. For proper air movement,
always keep the basket in p ace when the freezer is operating.
Pull to stop;
Lift; Pull Again
4
Adjusting
Door She1 ves.
To move a door shelf, I ft it up and out. To replace
it in a new
position, insert the shelf hc oks into guides on both sides and push
down.
Removing
the light
lihields.
To remove the refrigerate
a bulb, first unplug the ref
center of the shield until the
down until the tab clears,
The freezer light shield pi
reverse.
Removing
I light shield when cleaning
or changing
lgerator. Then, push lightly on the upper
notched tab is free from the console. Pull
hen lift the back hooks out of their slots.
Is straight out. To replace
them, do the
the Crisp’zrs
and Crisper
Covers.
To remove the crispers, s de them out until they stop. Lift the front a
little and slide them the res of the way out.
Each cover is held in p zce by two pegs at the back and two
notched tabs in the front. P ‘3s~ the tabs out of the way to lift the front
Lift the back off the pegs.
To put the covers back, replace
the center leg. Replace
each
cover by first fitting the ba :k notches over the pegs. Then push the
front down into the notches tabs.
The center leg can be r lade shorter or longer to help level the
crisper covers, if necessc y Hold the leg and turn the top part
counter-clockwise
to make ‘he leg longer Turn it clockwise
to shorten
the leg.
, Push in the Center;
Pull Down
Ice Cube
Trays.
To remove ice from the flc ,xible ice trays, hold a tray at both ends,
as shown. Slightly twist the t ay; the ice will come out easily.
If cubes are not used for a number of weeks, they may become
smaller. The moving air is I 3 cold that it starts a slow evaporation.
(That’s also why it’s so impc 9ant to wrap food carefully.)
The longer
they are stored, the smaller they can get.
Push the lab
to Clear the Cover
Optional
A Twist of the Wrists
Off
Raise Signal
Arm to Stop Ice Maker
Lower Signal
Arm to Start It.
ICE MAGIC
’ Automatic
Ice Maker.
If you have the automatic
ice maker accessory
(Part No. ECKMF-61,
or plan to add one, there aI’3 a few things you will want to know:
l On the side of your
ice ml rker is a wire signal arm. When it’s down,
the ice maker will make ce automaticdlly.
Raise the arm to shut
off the ice maker.
Shake the bin occasiona
ly to keep cubes separated.
It is normal
for the cubes to be attac ied by a corner. They will break apart
easily.
You will hear water runnir g when the ice maker is working. You’ll
hear ice fall into the bin. C In’t let these new sounds bother you.
The ice maker will not oc: ?rate until the freezer is cold enough to
make ice. This can take o ternight.
Because of new plumbin J connections,
the first ice may be discolored or off-flavored.
Your ice maker will work faster when the freezer is colder. If you
want more ice, turn the Te nperature
Control dial to a higher number, or turn the Air Control dial toward A.
If you remove the ice bir make sure you raise the signal arm to
shut off operation.
When y IU put the bin back, make sure it’s all the
way in and the arm is IOWI Ired.
If cubes are stored too IOI g, they may develop
an off-flavor...like
stale water. Throw them a\ lay. They will be replaced.
Cubes in the
ice bin can also become
;maller by evaporation.
5
Sounds you may hear.
Your new refrigerator may make sounds that your
old one didn’t Because the sounds are new tl:, you,
you might be concerned about them Don t be Most
of the new sounds are normal Hard surfaces ilke the
Possible Sounds:
Slight Hum; Soft hiss:
l
Clicking
Sounds:
l
or Snapping
floor, wall and metal cabinets con make the sounds
seem IOU< sr
The foil wing chart describes the kinds of sounds
that mIgh be new to you, and whc? may be maklng
them
Probable
Causes:
Your refrigerator has two fans, you may hear the fan motors and moving
(I
The defrost timer makes a deflnltt click when the refrigerator
sound when the rl frigerator starts
I?also makes
air
stops running
l
Water Sounds:
When the refrlsgerator stops runner -1,you may hear gurgling in the tubing for
a few minutes after It stops You rr IV also hear defrost water running Into the
defrost hater pan
l
Ice Maker
l
Running
If your refrigerator has an IX rr
water valve), trickling water and
Your refrlgeraror has a high-effl
longer than older designs It rray
Sounds:
Sounds:
rker, you may hear a buzzing (from the
‘le clatter of Ice dumped Into the bin
lency compressor ond motor It ~111run
:ven seem to run most of the time
Vacation and
moving care
Short Vacations.
No need to shut off the rE ‘rigerator
if you will be away for only a
few weeks Use up the peri: hables; freeze other items. If your refrigerator is equipped
with ar automatic
ice maker, turn off your ice
maker: 1) raise the signal a -n; 2) shut off the water supply to the ice
maker. Empty the ice bin.
long
Vacations.
Remove all the food if yo I are going for a month or more. If your
refrigerator
is equipped
witl an automatic
ice maker, at least a day
ahead, turn off the water sue ply to the ice maker. When the last load
of ice drops, lift the signal a ‘n.
Unplug the refrigerator
c nd clean it...rinse well and dry. Tape
rubber or wood blocks to bo ti doors...keeping
them open far enough
for air to get in. This will keer odor and mold from building
up.
Tape the blocks
near the refrigerator
out of c child’s reach...do
not allow
when 178 doors are blocked
open.
To restart Fefrigerator,
children
see ’ .Jsing Your Refrigerator.”
Moving.
If your refrigerator
IS equil
off the ice maker water sup1
water line Afterthe last sup1
off the ice maker
Remove all food Pack fro
arcr and c iear! it thoroughly
Remove c-hverything that :
them toge tt-ier so they dcln’t
Screw lr the !eveling ro!le
CoiC: lc ‘hi: ~::ab;inet. Jv’her! y’
LOCK itl~,~hl it recor!nect
t/Usl5~. ” p2;Je
ped with an automatic
ice maker, shut
ly a day ahead of time Disconnect
the
:y of Ice drops, lift the signal arm to turn
!?n foods in dry ice
Unpiug
the refriger-
:mes out Wrap 71’ parts well une tape
hift and rattle
;’ tape the doors ;“iut. tape the electric
J getto yourne&
horse p!Ji evervlhllg
water suppl:! ar-‘: ‘:‘e- :3 the ‘Before
Food storage
guide
Cooke ,d Meat. Wrap or cover cooked meat witt
waxed F Iper, plastic wrap or aluminum foil Store
lmmedlc ‘ely
Curec or Smoked Meat and Cold Cuts. Ham
bacon, s Iusage, cold cuts, etc., keep best In o(lgl
nal wrap pings. Once opened,
tightly re-wrap ir
plastic w ap or aluminum foil
Cannc ,d Ham. Store in refrigerator unless the la
bel says ‘s okay to store on the shelf Do not freeze
Fresh ‘oultry. Loosen the market wrapping ant
store In ie supermarket
tray. or loosely wrap II
waxed F lper or plastic wrap.
STORING FRESH FOOD
STORA ;E CHART FOR FRESHAND CURED MEAT’
Approximate
Time
TYFB
(days)
1 to 2
Varie y Meats
1 to 2
Chic1 en
. .._.............
1 to 2
Groul td Beef
3 to 5
Steal ‘5and Roasts
7 to 10
Cure’ I Meats
Baco ‘1
.._..........
.._.......
5to 7
3 to 5
Cold ‘::uts
There IS a right way to package
and store refrigerated or frozen foods To keep foods fresher longer.
take the flme to study these recommended
steps
Remove the store &rapleafy
Vegetables
ping and trim or tear off bruised and discc-,lored
areas Wash In cool water and drain Leave some
water on the leaves as they go Into the crisper Cold,
If me’
motst air helps keep leafy vegetables
fresh and
follow+
crisp
Vegetables
with Skins [tomatoes, peppers)
NOTE:
Wash, dry and store IV a crisper
same dc
Fruits
Wash, dry and store or a crisper Do not
wash or hull berries until they are ready to I,%: Sort
and keep berrtes in their store container In a crisper,
refng- _
or store In a loosely closed paper bag on
erator shelf
* IStc be stored longer ti?on the times given
‘-e dIrectIons for freezlng
,‘resh fish and shellfish should be used the
./ as purchased
(I
Meat.
Meat IS perishable and expe?sl :t: you
areless
tidor~t want to daste an oclnce of it thrcjugh
horIrJllrIg
-he follotiing
Qst and chart
g de you
gackaglrg
hln+s apa
time
imits
Fresh, Prepackaged
Meat. Store ‘res- -neat r,
+hp s’zre ~rapp~rg
Y’x car ‘reeze
J- t’ E wrap
a’~
s70k? t ior me
8’ fr32en !r?cger
“t;e:$r
\hraccin
3rho
heels
if ,‘\>
~0, s-c~~,,d r\rar
~cnt
.c. keey=
: dd1!3 jr)ec a
g -rate-~~;l
Fresh Meat, Not Prepackaged
%A-- ‘\)e the
y‘3irz‘T .\rJ:~>p’Pg r.)onL1’ ;>’ 2 r<.>,A,enc ;:B jl,el'J
r
.k’J~j ~:: ,cJpw i>r a ,;.-I _,\~jr.>L, 7 ,: >+~:rmr
a + .,~~Irgzer,
Eggs
ton or u
refrlgeraf
Milk
the refrig
Beverc
door she1
Butter
the serv;i
you havl
Store without washing in the original car
e the Utility Bin that came with you
sr.
\Nipe milk cartons Store on a shelf Insldc
‘rotor. Do not store on a door shelf
Wipe bottles and cans Store on (
ges
or Inside the refrigerator.
Store what you might use In a day of
3 dish in the Butter Compartment
Wher
extra, wrap in freezer packaging
ant
freeze
Cheer
you are
tightly IF
Condl
sup, mus
they are
Leftov
wrap 3r :
Plcrstl-
c,
‘I? .Store In the orIgInal wrapplng
unt
eady to use it Once opened,
re-wray
astic wrap or aluminum foil
Store small jars and bottles [cat
nents
lrd jelly, olives) on the door shelves where
easy reach
Always ccsver leftovers with plas?l,
: rs
ljmnun- foil to keep food from d?:lng OL
+a ners with tight Iids are fine too
FREEZING & STORING FROZEN
Your refrigerator has a freezer section designed
to keep
temperatures
In the zero
zone
[ 17 8 C) the recommended
frozen food storage
temperature
It can freeze bargains
In freshness
and prrce, and convenrent meals you can make
ahead of time
Here are some basics to help get You acquarnted with Your new freezer For detarled recrpes. many excellent books are avarlable
PackagingThe only brg secret to successful
freezing IS In the packaging
The wrap must be air.
moisture and vapor proof This wrap IS not enough
If the sealing allows air. morsture or vapors rr
Rigid polyethylene
containers
with tight-fitting
lids. straight-sided
canning
freezing jars heavyduty alumrnum
foil. plastrc-coated
paper and
poiyethyiene
plastrc are recommended
Note
Heat-sealed
bolting bags are easy to bse. and
other firms supply polyethylene
bags to be used by
themselves or carton loners
Sealing - When sealing foods In bags squeeze
out the air (lrqurds need headspace
to allow for
expansron)
Twist the top and turn It back Fasten
tre securely around the doubled-over
toll Put the
label inside transparent
bags, use self-adhesive
label on outside of opaque ones
Arr-t ,Jht wrapprng calls for “drugstore” wrap Cut
the shf et about one-thrrd longer thon the distance
orounc the focd Bring the ends together and fold
In (toi* :ird the food) at least twice to seal out air
Creasr ends close to food, press air from package
Fold t 1)s over twice Finish package
and tape
closet
NOTE Wrth unboned
meats. pad sharp
edges .vrth extra wrap or use stockinette to protect
the wr( o from punctures
DO \JOT USE
l Br ad
wrappers
l Nc ?-polyethylene
plastic containers
l Cl ‘ntarners wrthout
tight lids
l W axed paper
l W :x-coated
freezer wrap
Nor 1 of these are totally morsture. arr or vapor Iroof
Free2
Be sure
3 quart:
In wate
Sort, pe
Pack
recomn
low liqc
Freezer
ing Fruits-Select
ripe, blemish-free
fruits
hey taste as good as they look Wash 2 to
[liters] at a time and drain Frurt that stands
may lose food value and become, soggy
31,trim, p/t and slice as needed
1 rigid wide-mouthed
contaners
or other
ended material Leave head space to ol3s to expand during freezing. Refer to a
i’ook for packing recipes
Freezing Vegetables-Freeze
only fresh highqualrty vegetables
picked when barely mature.
For best results, freeze no more than 2 to 3 hours
after prckrng. Wash In cold water. sort and cut Into
approprrate
sizes Blanch or scold Pack In recommended conturner and freeze
Do not freeze lettuce, celery, carrot strcks, potatoes or fresh tomatoes
All WIII become
limp or
mushy Tomatoes wtll collapse when thawed
Refer to freezer book for further Information
Freezing Meats-The
meat you thaw con only
be us good as the meat you freeze “Drugstore”
wrap In meal-size packages
Flat cuts or pattres
should be wrapped
rndrvrdually or In layers separoted by a double thickness of freezer wrap.
Freezlq I Cooked Food - Prepare cooked foods
as you WOI Id for the table, shorten cookrng time 10
to15 mrnut -s to allow for addtttonal cookrng during
reheating.
Xmrt seasonrngs and part of the lrquid
Plan toads i them at reheatrng trme. Potatoes should
also be a( ‘3ed to soup and stew at heoting time
Add crum and cheese toppings at heotrng trme
Cool as ‘aprdly as possrble and freeze at once
Liquid or s ~rnr~lrqurd dashes may be frozen In retommende
j conturners wrth head-space
Casseroles and c ther more solrd foods may be frozen In
the bakinr I container
If you don’t wont to leave
your CCISSE,ole dish In the freezer, line It with forI
Bake, coo freeze, lift out the forI package.
bag It
and return o freezer
Freezing Baked Goods-Wrap
baked breads
in recomm nded material Thaw In wrapprng
Unboked yet ,;t breads con be frozen ofter the frrst
rising. Punt I down, wrap and freeze
Bake cot kies as usual Cool and freeze on trays.
then pock n recommended
freezer bogs or cartons Unba ed cookres may be dropped,
molded
or rolled or 1 frozen on cookie trays Store In bog or
carton, bc +:e without thawing.
Refrtgerator-type
cookres cc ‘I be wrapped
and frozen In roll form
Thaw only nough to slice when ready to bake.
Fruit pies :are best frozen unbaked. Bake without
thawing
E .xke pecan
and similar pres before
freezrng ..r :h fillings do not freeze solid. Cut steam
vents In top crusts when ready to bake.
9
IMPORTANT:
Do not expect
your
freezer
to quick-freeze
any large
quantity
of food. No more than 2 to
3 pounds
of fresh meat or 3 to 4
pounds of vegetables
per cubic foot
of freezer
space.
leave
enough
space
for air to circulate
around
packages.
Fe careful
to leave
enough room at the front so the door
can close tightly.
FROZENFOODSTORAGECHART
Storage ilmes’ will vary according
to the
quality of the food, the type of packaging
or
wrap used (moisture and vapor-proof],
and
the storage temperature
[should be at 0 F
( -18’C) )
Food
Storage time
FRUITS
Fruit juice concentrate
12 months
Commercially
frozen fruit
12 months
Citrus fruit and juices
4 to 6 months
Others
.. . . .. .
. 8to12months
VEGETABLES
Commercially
frozen
8 months
Home trozen
8 to 12 months
MEAT
4 weeks or less
Bacon
Corned beef . .
.
. . . 2 weeks
Cured ham
1 to 2 months
[Salting meat shortens freezer life)
Frankfurters
_. _. _. _, _. 1 month
Ground beef, lamb, veal 2 to 3 months
Roasts:
Beef
6 to 12 months
Lamb and veal
6 to 9 months
Pork
4 to 8 months
Sausage,
fresh
1 to 2 months
Steaks and chops:
Beef
8 to 12 months
3 to 9 months
Lamb, veal, pork
FISH
Cod, flounder, haddock
sole.......................
6months
Blue fish, salmon
2 to 3 months
Mackerel,
perch
2 fo 3 months
Breaded
fish (purchased]
3 months
Clams, oysters, cooked
fish, crab, scallops
3 to 4 months
Alaskan king crab
10 months
Shrimp, uncooked
12 months
POULTRY
Whole chicken
or turkey..
12 months
Duck
6 months
Giblets
2 to 3 months
Cooked
poultry w/gravy
6 months
1 month
Slices [no gravy)
10
1
Storage time
Foot
MAIf’ DISHES
Stc ws; meat, poultry
c nd fish casserole
2 to 3 months
TV jinners
3 to 6 months
DAIR ” PRODUCTS
Bui’er _....__......,.....
2to9months
Mc: rgarine
2 to 9 months
Ch’?ese:
C amembert,
dry curd
cottage,
farmer’s,
Roquefort,
blue
3 months
C reamed cottage
DO NOT FREEZE
C heddar, Edam, Gouda,
Swiss, brick, etc.
6 to 8 weeks
Frei?zing can change
texture of
ch#, !ese.
ICE cream, ice milk.
s lerbet
4 weeks
EGG!
Wh >le [mixed)
9 to 12 months
Wh tes
9 to 12 months
Yol #:s
9 to 12 months
(AC :1 sugar or salt to yolks or whole mixed
egl IS]
BAKEI ) GOODS
Yec!st breads and rolls
3 months
Bal ed Brown ‘N Serve
r( Ills
3 months
1 month
Unt aked breads
_.
QUI zk breads
2 to 3 months
Ca #:es, unfrosted
.
2 to 4 months
CaN#,:es,frosted
8 to 12 months
Frui 1cakes
12 months
Co )kie dough
3 months
8 to 12 months
8aC ed cookies
BaCedpies
_,_,...._,._,,
lto2months
Pie jough only
4 to 6 months
-003?0 u j DA “‘7 :,,r ^ gor I- ~,x-pr+.c trlP.5 se,. c
idgqes’l : IIc-logeII-NC’
If electr city goes off
Call the :)ower company
Ask how long power WIII
be off
1. If se IvIce IS to be interrupted 24 hours or less,
kee ) freezer ciosed Most food WIII stay frozen.
2. If SCrvlce IS to be interrupted longer than 24
hoi .s
(a) Remove all frozen food and store in a
frozen food locker Or..
(b) Place about 20 pounds of dry Ice on top
zf the food, using pieces as large as posjlble Protect your hands with gloves
(c] If neither food locker storage nor dry ice
s available.
use or can perlshable food
3t once.
3. A fc freezer will stay cold longer than CIpartly
fille 1 one. A freezer full of meat will stay cold
Ion! ler than a freezer full of baked goods If
foe 1 contains Ice crystals, it may be safely
refrc Izen. although the quality and flavor may
be Iffected. Use this quickly. If the condition
of tt e food ISpoor or you have any suspicions.
It is iiise to dispose of tt
If you need service or help,
we suggest you follow
these three stem:
1. Before
calling
for service...
Performance problems are sometimes caused by
little things you can correct without tools. Before you
call for service, check this list.
If your refrigerator
will not operate:
Is the electric cord plugged in?
l Is a fuse blown
or a circuit breaker tripped?
l Is the Temperature
Control dial turned ON?
If your ice maker will not operate:
l Has the freezer
had enough time to get cold? With
a new refrigerator, this might take overnight.
l Is the signal
arm ON...in the down position?
l Is the water
valve turned on, and IS water getting
to the Ice maker?
If there is a rattling
or jingling
noise, or other
unfamiliar
sounds:
l Is somethrng
on top or behrnd the refrigerator making noise when the refrrgerator IS running?
l New features
on your new refrigerator make new
sounds. You may be hearing air flowing from the
fans, tamer clicks for the defrosting cycle, defrost
water drarning into the defrost pan. If you have an
ice maker, you will hear water fill the molds and
the ice drop into the bin.
If there is water in the defrost pan:
l In hot, muggy
weather, this is normal. The pan can
even be half full. Make sure the refrigerator is level
so the pan doesn’t overflow.
If the light doesn’t work:
l Check
fuses and circuit breakers. Make sure it’s
plugged in.
l The bulb
may be burned out. Unplug the refrigerator; remove the light shield; replace the bulb with
an appliance
bulb no larger than 40 watts. Replace the light shield and plug in the cord.
If the motor seems to run too much:
l Is the condenser,
behind the base grill, free of dust
and Irnt?
l On hot days,
or if the room is warm, the motor
naturally runs longer.
l If the door
has been opened a lot, or if a large
amount of food has been put in, the motor WIII run
longer to cool down the interior.
l
Remember:
Motor running time depends on different things: number of door openings, amount of
food stored, temperature
of the room, setting of the
controls.
And, your new refrigerator may be larger than
your old one so it has more space to be cooled. It
also has a regular freezer instead of a frozen food
compartment.
It provides colder and more unrform
temperatures
for better food storage. All this means
better refrigeratron and may require more running
time than your old one.
2. If ycu need service*:
If vour WHIRLPOOL’
appliance
ever needs
service anywhere in the
United States, help is
just toa phone
away
your call
nearest
Whirlpool
franchised
TECH-CARE’
service
>YMBOL
representative.
C QUALITY
Whirlpool
maintains
-,tRVlCE
a nationwide
network
of franchi ed TECH-CARE service companies to fulfill
your war1 anty and provide after-warranty
service
and mair tenance to keep your WHIRLPOOL appliance in p’eak condition.
You’ll fi >d your nearest TECH-CARE service company lists ‘3 in your local telephone
book Yellow
Pages ur Jer Washers/ Dryers - Repairing or Servrcing. Shoi Id you not find a listing, dial free, the
Whirlpoc I COOL-LINE”
service assistance
telephone nilmber (800) 253-1301.
When cc lling from:
(800) 632-2243
Michigan
.
Alaskc, & Hawaii . .
. (800) 253-1121
IS
If you mi,ve...To make sure that your appliance
correctly
Istalled and to insure its continued satisfactory c loeration, please telephone
your nearest
TECH-CA FE” service company
for installation or to
get the I ame of a qualified
installer. (Installation
cost will, :f course, be paid by you]
Helpful hints...You can help your TECH-CARE service repr 3sentative give you faster service if you
include tl e model and serial number of your applrante whl J-Irequesting service. Also, retain your sales
slip and \ farranty to verify your warranty status.
Rememtber...Your
TECH-CARE service representative is spc cially trained in the expert repairing and
servicing of your WHIRLPOOL appliances.
He can
help you maintain the quality originally built into
your WHI ?LPOOL appliance.
So why not take the
time, nov , to look up his telephone number and jot it
down in I :e space provided on the cover.
3. If you have a problem*:
Call W lirlpool Corporation in Benton Harbor at the
COOL-Llf IE service assistance telephone
number
(see Step 2) or write:
Mr. Step Ihen,E. Upton, Vice President
Whirlpc loI Corporation Administrative
Center
2000 U I,. 33 North, Benton Harbor, Michigan 49022
-If you m
telephone I
ber date of
tlon of ihe
respond to
;t call o( wk.
please prwde
your name. address.
l-nber. type of appliance.
brand model. serlal “urn:wrchase. the dealers name. and a complete descw
-oblem This InformatIon
IS needed in order to better
our request for assistance
11
0
FSP
R
FSP 15CI registered Irac
of iNhlrluoo: Ccroorat~
quoiltv’parts
Look for
ymbol of quality whel
) cu neeo a replocem
$31‘your ‘.Lhlrlpool app
,-nark
for
‘5
.‘er
t part
r’ce
Bonton
Harbor,
Mxhlgan.
Automatic
Washers.
.;lothes
Dryers.
Freezers,
Refrlgera
01 Freezers,
Ice
Make)
Dishwashers.
Budt-m
Ovens and !+urface
Umts.
Ranges,
H :zowave
Ovens.
Compactors,
Room
P,II Candltioners.
Oehun
Illflers,
Central
tfeatlng and Au Cone ~t~onmg Systems.
Part No. 992617
Rev. A
Prrnted in USA