1
Der Leuchtrahmen-Sucier
zeigt das Motiv in nattirlicher GroBe. Bei Aufnahmen auf etwa 1 m geben die beiden kurzen
Strichmarken am Leuchtrahmen die Bildbegrenzung - beim Querformat oben, beim Hochformat seitlich rechts oder links.
Der Schiirfetiefe-Bereich
umfaBt bei der Aufnahme den Teil des Bildraumes, der vor und hinter der eingestellten
Entfernung mit ausreichender Abbildungsschdrfe wiedergegeben wird; er erstreckt si'ch
von der Meter-Entfernung Llber einer Iinks
stehenden Blendenzahl auf der SchdrfentiefeSkala (2) bis zur Meter-Entfernung [iber der
gleichen Blendenzahl rechts der Malke A.
Gravure I
Fiir Blitzlichtauf nahmen
wird das Blitzgerdt in den Zubehorschuh (9)
und das Synchronkabel vom Gereit auf den
Kontaktnippel (3) gesteckt. Mit 1/so SekundeBelichtungszeit lassen sich jetzt alle Blitzl a m p e n _ . z L l n d e nU
. ber die Blenden-Einstellung
s t e h t n d h e r e s a u f d e r L a m p e n - V e r p a c k u n qb z w .
i n d e n D r u c k s c h r i f t e nz u d e n B l i t z g j e r r i t e n l
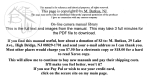
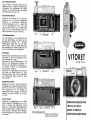
Filmeinlegen
VITORET
Rtickwand durch Zusammendrrlckender beiden
Federriegel (4) offnen und Rrickspulknopf (5)
ganz herausziehen (s. Abb. l).
Filmanfang mit einem Perforationsloch in den
Haken an der Aufwickelrolle einhdnqen. Pat r o n e r l b e r d i e F i l m g l e i t b a h n h i n w e g z i " e h e n ,i n
die Kamrner einsetzen und Rrlckspulknopf
z u r L l c k s c h i e b e n( s . A b b l l ) .
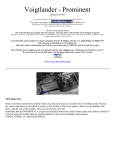
Druckknopf (10)'niederdrricken und Aufwickelrolle unten am Rdndel drehen, bis beide
Perforationsstreifen des Films im Zahnkranz
der Transportwelle liegen (s. Abb. Ill). Rrickwand schlieBen.
24x 36. 35 mm
G r a v u r el l
Bildzdhlwerk einslellen
Rdndelknopf (13) drehen, bis bei 36er Patrone
d i e M a r k e | ( b z w . b e i 2 0 e rP a t r o n e d i e M a r k e Q )
unter dem roten Punkt am Sichtfenster steht.
Dann SchnellaufzuS (11) und Ausloser (8)
wechselweise so lange betdtigen, bis das Bildzdhlwerk zur ersten Aufnahme auf ,,36" bzw.
,,20" zeigt.
Kamera entladen
Druckknopf (10) niederdrilcken und in dieser
S t e l l u n g f e s t h a l t e n . R r . i c k s p u l k n o p f( 5 ) n u n s o lange in Richtung des aufgravierten Pfeiles
drehen, bis im Sichtfenster des Bildzaihlwerkes
wieder die Marke I bzw. O steht. Dann Druckknopf loslassen, Rirckwand 6ffnen, Rrickspulknopf herausziehen und Patrone aus der Kammer nehmen.
Abb. lll
Fig. lll
G r a v u r el l l
Afb. lll
13709-12-348 (VA)/463 ACO
G e d r u c k itn D e u t s c h l a n d
vorbehalten
Anderungen
G EBRAUCH SAN I.EITUN G
INSTRUCTIONS
MODE D'EMPLOI
GEBRUIKSAANWIJZING
The crystal-frame viewf inder
shows the subject fully life-sized. When taking
pictures at about 31/z feet, the two short lines
within the crystal frame indicate the limits of
the picture area - according to whether the
camera is held horizontally or vertically.
Le viseur A cadrage lumineux
montre I'image de vis6e en grandeur nature.
Les deux petits traits indiquent le d6calage de
l'image lorsque le sujet se trouve d une distance
de 1 m seulement. Ce d6calage se produit vers
le bas pour les vues en largeur ou lat6ralement
pour les vues en hauteur.
Depth of lield
is that zone of the subject area which is sufficiently sharply rendered- in front of and behind
the focused distance. lt is read off from the
distance in feet opposite the selected aperture
number on the depth of field scale (2) to the
distance number opposite the same aperture
number on the other side of the A mark.
La profondeur de champ
c'est-dr-dire I'espace en avant et en arridre du
plan de mise au point reproduit avec une
nettet6 suffisante. s'6tend de la distance marqu6e (A) par un nombre correspondant de diaphragme d gauche sur l'6chelle (2) jusqu'au
nombre 6quivalent d droite.
Flash shots
Slide the flash-gun into accessory shoe (9) and
connect the lead to the flash socket (3). Any
type of flash-bulb can now be used with the
s h u t t e r s e t t o 1 A os e c o n d . Y o u w i l l f i n d a l l t h e
necessary information as to which aperture to
choose, with the flash-bulbs and with the
flash-gun itself.
Loading the camera
Press the locking catches (4) together and open
the camera back; fully pull out rewind knob (5).
See Fig. l.
Anchor the film leader to the hook on the
take-up spool by a perforation hole. Draw the
cassette across the film track and insert it into
the cassette chamber; push back the rewind
knob (see Fig. ll).
Press button (10) and rotate the take-up spool
by its lower milled ring until both perforated
edges of the film engage the teeth of the
sprocket wheel (see Fig. lll). Close the camera.
Setting the lilm counter
Turn the milled knob (13) until the diamond I
mark (for a 36-exposure film) or the O mark
(for a 20-exposure film) is opposite the red dot.
Now operate the rapid winding lever ('ll) and
the release button (8) alternately until the filrn
counter indicates No. 36 or No. 20 respectively
for the first exposure.
Unloading the camera
Press button (10)and kneep it depressed. Turn
rewind knob (5) in the direction of the engraved
arrow until the I or the O reappears in the
film counter window. Release press button ('10),
open camera, pull out rewind knob and remove
the cassette.
Pour les prises de vues au flash
la lampe flash peut 6tre montr6e dans la griffe
(9) et le cAble de connection dans la prise (3).
Toutes sortes d'appareils flash sont utilis6s
avec la vitesse de 1/ro. de sec. Les emballages
ou modes d'emploi livr6s avec les flash vous
renseignent sur les diaphragmes d employer.
Ghargement de I'appareil
Presser I'un vers l'autre les verrous (4) et ouvrir
l'appareil. Sortir ensuite compldtement le bouton de r6embobinage (5), voir gravure l.
Fixer sur le crochet de la bobine r6ceptrice
I'amorce du film par dessus le couloir, et
placer la cartouche dans son logement. Puis,
renfoncer compidtement le bouton de r6embobinage (voir gravure ll).
Presser le bouton de d6brayage (10)et tourner
la bobine r6ceptrice au moyen de sa couronne
molet6ejusqu'a ce que lefilm soitbien engag6
avec sa perforation sur les dents du rouleau
d ' e n t r a i n e m e n t ( v o ir g r a v ur e | | l ) . F e r m e r l ' a r r i d r e .
De lichtraamzoeker
toont het motief op ware grootte. Bij opnamen
op ongeveer I meter geven de beide korte
streepjes 9p het lichtraam de beeldbegrenzing
aan. Bij drivarsformaat boven, bij staind for-maat rechts en links aan de zijkanten.
Het scherptediepte bereik
omvat bij de opname het gedeelte van de
ruimte, dat v66r en achterde ingestelde afstand
met voldoende afbeeldingsscherpte wordt weergegeven. Het strekt zich uit van het getal in
meters tegenover een linksstaand diafragmagetal op de scherptediepte schaal (2) tot de
afstand. in meters tegenover hetzelfde diafragmagetal rechts van het teken A.
Voor f litslichtopnamen
het flitsapparaat in het schoentje (9) en het
synchroonkabeltjevan het apparaat op de con. elichtingstijd
t a c t n i p p e J( 3 ) s t e k e n . M e t 1 / a o s e c b
kunnen alle flitslampen worden ontstoken. Over
de instelling van het diafragma staan nadere
bijzonderheden op de verpakking van de lampjes resp. in de gebruiksaanwijzingen van de
flitsapparaten,
Inleggen van de film
Achterwand door het indrukken van de beide
v e e r g r e n c i e l s( 4 ) o p e n e n e n d e t e r u g s p o e l k n o p
(5) helemaal naar buiten trekken (zie afb. l).
Het begin van de film met een perforatiegaatje
in de haak van de opwikkelspoel bevestigen
(pijl). Patroon over de filmgeleidebaan trekken,
in de kamer voor de filmpatroon leggen en
terugspoelknop geheel indrukken (zie afb. ll).
Drukknop (10) indrukken en opwikkelspoel
onderaan de kartelrand draaien tot beide perforatiestripjes van de film in het tandwiel van
de transportrol liggen (zie afb. lll). Achterwand
s l ui t e n .
R6glage du compteur d'images
Tourner le bouton stri6 (13) jusqu'd ce que le
signe | (cartouche de 36 vues) ou le signe Q
(cartouche de 20 poses) soit en regard du point
rougede la fen6trede contrOle. Fairefonctionner ensuite alternativement le levier d'avancement (11) et le ddclencheur (8) jusqu'd ce que
le compteur indique 36 ou 20, le num6ro de la
premtere vue.
Beeldtelwerk instellen
l(artelknop (13)draaien tot bij patronen met 35
opnamen het teken | (resp. bij patronen met 20
opnamen het teken O) onder de rode punt in
h e t v e n s t e r s t a a t . D a n s n e l t r a n s p o r t ( 1 1 )e n o n t spanknop (8) beurtelings laten functioneren tot
het beeldtelwerk voor de eerste opname op
,,36" resp. ,,20" staat.
D6chargement de I'appareil
Presser le bouton (10) et tourner le bouton de
r6embobinage (5) dans la direction de la fldche
jusqu'A ce que r6apparaisse dans la fenCtre
du compteur la marque I ou la marque @.
P u i s , l d c h e r l e b o u t o n ( 1 0 )e t o u v r i r l ' a r r i d r e d e
I'appareil pour sortir la cartouche de son
logement.
Camera ontladen
Drukknop (10) indrukken en in deze positie
vasthouden. Terugspoelknop (5) zolang in de
richting van de ingegraveerde pijl draaien, tot
in het venster van het beeldtelwerk weer het
teken I resp. @ staat. Dan drukknop loslaten,
achterwand openen, terugspoelknop uittrekken
en patroon uit de kamer nemen.
Lieber Fotofreund,
g u t e B i l d l e i s t u n gu n d I a n g e L e b e n s d a u e r
der VITORETmit dem Voigtldnder-Objektiv
VASKAR 1 :2,8/50 hdngen im wesentlichen
von einer sorgfdltigen Pflege und sachgem d B e n B e d i e n u n ga b . W e n n S i e d i e K a m e r a
mit Verstdndnisbehandeln sowie auch vor
hartem StoB oder Fall bewahren. wird sie
es lhnen noch nach vielen Jahren durch
w u n d e r b a rs c h o n e B i l d e r d a n k e n .
V O I G T L A N D E RA . G . B R A U N S C H W E I G
Cher Ami,
Si vous d6sirezobtenir de bonnes photos au
cours de longues ann6es, retenezbien que
de bons succes d6pendent pour beaucoup
des soins que vous apporterez d votre
VITORET muni d'un objectif Voigtldnder
VASKAR 1 :2,8150.Evitez lui surtout des
c h o c s v i o l e n t s e t d e s c h u t e s .V o t r e V I T O R E T
v o u s r e m e r c i e r a ,p a r d e m e r v e i l l e u s e sp h o tos, du traitement compr6hensif que vous
lui accorderez.
Geachle Fotovriend!
G o e d e f o t o p r e s t a t i e se n l a n g e l e v e n s d u u r
v a n d e , , V I T O R E T "h a n g e n i n d e p r a k t i j k
a f v a n e e n z o r g v u l d i g e b e h a n d e l i n ge n e e n
d e s k u n d i g eb e d i e n i n g W
. a n n e e rU d e c a m e r a
met gevoel en verstand behandelt en deze
v o o r s t o t e n o f v a l l e n b e h o e d t ,z a l d e z e U n o g
v e l ej a r e n m e t b i j z o n d e rm o o i ef o t o ' s b e l o n e n .
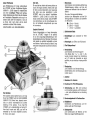
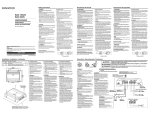
I Meter-Skala
z u m E i n s t e l l e nd e r A u f n a h m e - E n t f e r n u n g
( O b j e k t i v f a s s u n gd r e h e n , u n d d i e e n t s p r e c h e n d eM e t e r z a h l u b e r d i e M a r k e A
stellen)
Die roten SchnappschuB-Marken
z w i s c h e n d e n M e t e r z a h l e na u f d e r E n t f e r n u n g s - S k a l a( 1 ) d i e n e n z u m s c h n e l l e ren Einstellen:
O (t,so m) : Portrdt,
V ( 3 , 3 0m ) : G r u p p e ,
(10m) : Landschaft.
O
2 Schiirfentiefe-Skala
3 Kontaktnippel zum AnschluB frjr Blitzgerdte
4 Federriegel zum Offnen der Rtickwand
5 Film-Riickspulknopf
6 VerschluBring
z u m E i n s t e l l e nd e r B e l i c h t u n g s z e i t
( r o t e M a r k e [ i b e r t / r z r , 1 / e oo d e r r / i o S e k u n d e e i n r a s t e nl a s s e n ) ;b e i E i n s t e l l u n g
a u f , , 8 " b l e i b t d e r V e r s c h l u Bs o l a n g e
g e o f f n e t ,w i e d e r A u s l o s e r n i e d e r g e d r u c k t
wird.
7 Blendenring
z u m E i n s t e l l e nd e r B l e n d e n o f f n u n g
( w e i B eM a r k e u n t e r d e r B l e n d e n z a hel i n rasten lassen)
s----re
8 Ausliiser
9 Steckschuh fiir Zubehdr
10 Druckknopf fiir Film-Riickspulung
Dear Amateur,
T h e e x c e l l e n tp i c t u r e p e r f o r m a n c ea n d l o n g
l i f e o f t h e V I T O R E Tw
, ith the VOIGTLANDER
VASKAR f/2.8, 50-mm lens, depend essent i a l l y o n c a r e f u l m a i n t e n a n c ea n d c o r r e c t
handling of the camera. lf you treat the
V I T O R E Tw i t h u n d e r s t a n d i n ga n d p r o t e c t i t
from hard knocks and falls, you will be
rewarded by the most delightful pictures,
for many, many years.
11 Schnellaufzug (auf Bild nicht sichtbar)
z u m V e r s c h l u Bs p a n n e nu n d F i l m t r a n s p o r t
- n a c h j e d e r A u f n a h m eb i s z u m A n s c h l a g
ziehen.
12 Einschraubgewindeliir Drahtauslciser
13 Bildzdhlwerk
S i c h t f e n s t e ru n d R d n d e l k n o p fz u m E i n s t e l l e nn a c h d e m F i l m e i n l e q e n
14 Stativgewinde
z u m A u f s c h r a u b e nd e r K a m e r a a u f e i n
Stativ bei langen Belichtungszeiten
1 Distance scale
f o r s e t t i n g t h e s u b j e c t d i s t a n c e ;t u r n l e n s
mount and adjust the correct distance
oppositethe A mark.
The red symbols
between the numbers on the distance
scale (1)are used for rapid focusing:
C 1+tl,feet) : portraits,
V ( 1 1f e e t ) : g r o u p s ,
O ( 3 3f e e t o r m o r e ) : v i e w s .
1 Echelle m6trique
p o u r l a m i s e a u p o i n t d e l ' o b j e c t i fs u i v a n t
la distancedu sujet.
L e s m a r q u e sr o u g e s
p o u r l e s p r i s e sd e v u e s " s u r l e v i f"
s u r l ' 6 c h e l l em 6 t r i q u e ( 1 ) s e r v e n td s i m p l i f i e rl a m i s e a u p o i n t :
C (tmso) : portraits,
V ( 3 m 3 0 ): g r o u p e s ,
O (1om): paysage.
2 Depth of field scale
2 Echelte des profondeurs de chamP
3 Prise de flash
3 Flashsocketto connect a flash-gun
4 Bac{< lock, spring-loaded for opening
and closing of camera back.
5 Rewind knob
4 Fermoir
pour ouvrir et fermer l'arridre de l'appareil
5 Bouton de r6embobinage
6 Shutter speed ring
for setting the shutter speed. Allow the
red marker line to click into position
o p p o s i t e r l n s , r l a oo r l l a o s e c o n d ; w h e n
set to B the shutter remains open as
l o n g a s t h e r e l e a s ei s d e p r e s s e d .
6 Bague de commande
p o u r l e 1 6 9 l a g ed e l a v i t e s s e d e l ' o b t u r a t e u r ( a m e n e rl ' i n d e x r o u g ej u s q u ' a uc r a n t a g e e n r e g a r d d u n o m b r e 7 l n s ," t l e o"
ou'/ao" de sec.); si le point rouge se
trouve face d la lettre "B", l'obturateur
reste ouvert tant que la pression sur le
d 6 c l e n c h e u rp e r s i s t e .
7 Aperture ring
f o r t h e a d j u s t m e n to f t h e a p e r t u r e .A l l o w
t h e w h i t e m a r k e r l i n et o c l i c k i n t o p o s i t i o n
opposite the selected aperture number.
7 Bague de commande du diaphragme
p e r m e t t a n td e 1 6 9 l e r l ' o u v e r t u r ed e l ' o b jectif (l'index blanc crant6 face au nombre de diaphragme).
8 Shutter release
9 Accessory shoe
10 Press button for film rewind
11 Rapidwinding lever (not visible in photograph) for cocking the shutter and advancing the film by one frame after each
e x p o s u r e ;t u r n a s f a r a s i t w i l l g o .
12 Cable release socket
13 Film counter with setting button
14 Tripod bush
f o r a t t a c h i n gt h e c a m e r a t o a t r i p o d f o r
longer exposures.
8 D6clencheur
9 Grifle pour accessoires
10 Bouton de d6brayage pour !e r6embobinage du film
1 1 L e v i e r d ' a v a n c e m e n td u f i l m ( n o n r e p r 6 sent6 sur la gravure)op6rant simultan6m e n t l ' a r m e m e n td e l ' o b t u r a t e u r( d rm a n i p u l e r d f o n d a p r d s c h a q u ep r i s e d e v u e ) .
1 2 A l v 6 o l e p o u r u n d 6 c l e n c h e u rs o u p l e
1 3 C o m p t e u rd ' i m a g e s
Fendtrede contrdle et bouton stri6 pour
l e 1 6 9 l a g ea p r d sl e c h a r g e m e n t d el ' a p p a reil
14 Ecrou de pied
permettant de visser l'appareil sur un
p i e d e n c a s p o s e s d e l o n g u ed u r 6 e
1 Meterschaal
Voor het instellen van de opnamea f s t a n d .( O b j e c t i e f - v a t t i n gd r a a i e n e n h e t
o v e r e e n k o m s t i g eg e t a l i n m e t e r s i n s t e l l e n
t e g e n o v e rh e t t e k e n A . )
De rode snapshottekens
t u s s e n d e m e t e r g e t a l l e no p d e a f s t a n d s schaal (1) dienen om snellerte kunnen
instellen.
O (t.so m) : portret,
V ( 3 . 3 0m ) : g r o e p ,
( 1 0m ) = - l a n d s c h a p .
O
2 Scherptediepteschaal
3 Contactnippel voor het aansluiten van
f litsapparaten.
4 V e e r g r e n d e lv o o r h e t o p e n e n e n s l u i t e n
van de achterwand.
5 Film-terugspoelknop
6 S l u i t e r t i j d e n r i n gv o o r h e t i n s t e l l e n v a n
d e b e l i c h t i n g s t i j d .( R o d e t e k e n t e g e n o v e r
7 l r r r , 7 l aoof r / r os e c . l a t e n i n s n a p p e n . B
) ij
h e t i n s t e l l e no p , , B " b l i j f t d e s l u i t e r z o l a n g g e o p e n d , a l s d e o n t s p a n k n o pw o r d l
ingedrukt.
7 Dialragmaring voor het instellen van de
d i a f r a g m a - o p e n i n g e n (. W i t t e t e k e n l a t e n
insnappen onder het getal, dat het diafragma aangeeft.)
8 Ontspanknop
9 Schoentje voor accessoires
10 Drukknop voor het terugspoelen van de
film
11 Sneltransport(op afbeelding niet zichtb a a r ) v o o r h e t s p a n n e nv a n d e s l u i t e r e n
h e t t r a n s p o r t e r e nv a n d e f i l m , n a i e d e r e
opname tot aan de aanslagoverhalen.
1 2 S c h r o e f d r a a dv o o r d r a a d o n t s p a n n e r
13 Beeldtelwerk
B e e l d v e n s t e re n k a r t e l k n o p v o o r h e t i n s t e l l e nn a h e t i n l e g g e nv a n d e f i l m .
1 4 S t a t i e f m o e r ,o m d e c a m e r a o p e e n s t a t i e f
te schroevenbij lange belichtingstijden.