1
-
!
t
l '
t
www.orphancameras.com
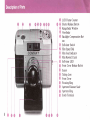
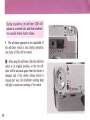
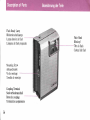
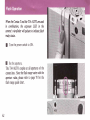
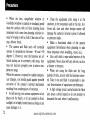
LCD Frame Counter
Shutter ReleaseButton
Rangefinder Window
Viewfinder
Backtight Compensation Button
O Self-timer Switch
O Film Speed Dial
O Film Feed Indicator
g Film Rewind Crank
@ Self-timer LED
O Front Cover ReleaseButton
(D Sensor
(D Taking Lens
(E Front Cover
O Focusing Ring
(p Aperture/Distance Scale
O Aperture Ring
($ Synch Terminal
O
@
O
O
O
I
I
I
i
o
@
@
(D
@
@
@
@
@
q)
@
@
10
www.orphancameras.com
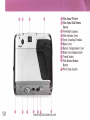
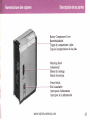
Film Speed Window
Film Speed Dial Release
Button
Viewfinder Eyepiece
Film Advance Lever
Synch Coupling Terminal
Body Cover
Battery Compartment Cover
Body Cover Release Knob
Tripod Socket
Film Rewind Release
Button
Wrist Strap Anchor
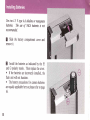
Usetwo 1.5 V alkaline(LR44) or 1.55 V silver
oxide (5R44 - type GI3) batteries.
tr Open the battery compartment cover by
unscrewingit with a coin.
2 As illustrated, insert batteries with the ( + )
mark facing upward. Then screw cover into
place.
12
Jk
(Battery Check)
Battery check is made by opening the front cover
(seepage l8) and using the exposure LED in the
viewfinder. Press shutter releasebutton part way
and the LED will glow steadily if batteries are
good, but it will not glow and the camera will not
function if the batteries are weak. When weak
batteries are indicated, replace both of them at
the same time.
www.orphancameras.com
(Battery Precautions)
o Battery performance will be temporarily impaired when temperatures drop near to 0 degree
C. In this case, keep the batteries warm during
use or carry a spare set of batteries with you.
Batteries so impaired by exposure to cold will
recover their power if warmed up to normal
rcmperature.
o The service life of batteries will vary depending on such factors as frequency of use, ambient temperatures, and condition at time of purchase.
o Smearing or staining of battery terminals can
lead to poor electrical contact. Use the batteries
after carefully wiping the terminals with some
cloth.
o Do not discard used batteries in a fire or
dismantle them.
16
(VorsichtsmaBnahmen
ftir die Batterien)
o Die Leistungsfiihigkeit der Batterien verschlechtert sich zeitweilig, wenn die Temperaturen auf nahe 0 Grad C absinken. Halten Sie in
diesem Fall die Batterien wtihrend des Gebrauchs warm oder nehmen Sie Ersatzbatterien mit.
Batterien, deren Leistungsftihigkeit sich verschlechtert hat, weil sie zu kalt sind, erreichen ihre
volle Leistungsfiihigkeit wieder, wenn sie auf
normale Betriebstemperatur angewarmt werden.
o Die Lebensdauer der Batterien ist unterschiedlich und hingt von solchen Faktoren ab,
wie Hiiufigkeit des Gebrauchs, Umgebungstemperaturen und Zustand zum Zeitpunkt des
Kaufs.
o Verschmierte oder verschmutzte Batteriepole verhindern einen einwandfreien elektrischen Kontakt. Die Pole vor Verwendung der
Batterien mit einem Tuch sorgfiiltig abwischen.
o Verbrauchte Batterien nicht ins Feuer werfen oder zerlegen.
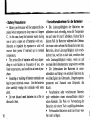
Pressthe front cover releasebutton, causing the
front cover to open up slightly. Then lower the
front cover fully with the finger, and simultaneously the lens unit will fully extend and the
camera circuitry will switch on, readying the
shutter, film advance and other systems for action.
o When the front cover is partially or fully closed, it will cut off the power source and make the
carnera inoperative.
18
www.orphancameras.com
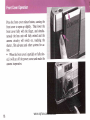
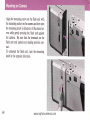
Load the Jilm with the front cover in opened
position. When loading or unloading the Jilm,
avoid direct sunlight.
tr Slide the body cover release knob and then
remove the body cover by drawing it all the way
off.
6
@
o
o
o
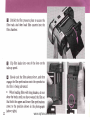
Film Rewind Stud
FiIm Chamber
Film Pressure Plate
Take-up Spool
Sprocket
A Unfold the film pressure plate to accessthe
film track and then load film cassette into the
film chamber.
ts Clip film leader into one of the slots on the
take-up spool.
22
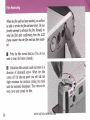
q Slowly cock the film advance lever, and then
engagethe film perforations onto the sprocket as
the film is being advanced.
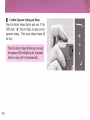
o When loading films with long leaders, do not
close the body until you have wound the film so
that both the upper and lower film perforations
come to the position shown in the photograph
(above right).
www.orphancameras.com
<Film Advance Lever)
When the film advance lever is stroked fully, it
will advance the film for one frame while cocking
the shutter. The lever can also be operated with
severalshort strokes.
o When the front cover is left open and the
body cover is removed, the film advance lever
can be cocked repeatedlywithout having to press
the shutter releasebutton. In this case.the frame
counter will not advance.
E Refold the film pressureplate. Then replace
the body cover and secureit by sliding the body
cover releaseknob toward "A LOCK."
24
E Take blank shots by alternately cocking the
film advance lever and pressing the shutter
release button until the LCD frame counter advances from " - - " to "01". Film feed indicator (white line) rotation during film advancing indicates proper advancing of film.
<LCD Frame Counter)
The LCD (liquid crystal display) frame counter
will register when the camera's front cover is
opened, and it will automatically clear a few seconds after closing of the cover. The counter will
advance each time the film advance lever is cocked. However, when the body cover is removed,
the counter will clear and show a " - - " mark.
The counter will register up to "79t' before reverting to "00".
26
www.orphancameras.com
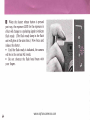
Be sure to set the Jilm speed index correctly so os
to insure proper exposure. The film speed is indicated on the film box.
While pressing down the film speed dial release
button, use the lever-tab on the speed dial top to
turn the dial until film speed window shows the
desired speed rating. Then remove your finger
from the dial releasebutton and make any needed adjustment of film speed dial to make sure it
is clickstopped. The film speed range is from
ISO 25 to 1000.
28
www.orphancameras.com
Focusing system is of the double-image merging
type. lAhile peering into the viewfinder, turn the
focusing ring until the horizontal double image in
the focusing zone merges togeher.
(Fixed Focus Mark>
((-o-"
The green pn1ft
on the focusing ring
indicates the focusing range set for fixed focusing. When the " o " mark is aligned with the
aperture/distance scale index and the aperture
ring is set to the green "8" mark, everything will
be in focus from about l 7 meters to infinity.
36
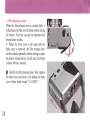
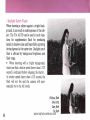
The Contax T has an aperture priority exposure
system so thot when you select the desired aperture, it automaticolly controls and sets the proper
shutter speedsfrom I/500 to 8 seconds.
tr Aperture Selection
Select the desired aperture by turning the aperture nng.
2 Focusing and Composing
While peering into the viewfinder, turn the
focusing ring and compose your picture at the
same time.
3B
www.orphancameras.com
E Confirm Exposure Setting and Shoot
Pressthe shutter releasebutton part way. If the
LED mark "A" does not light, it means correct
exposure setting. Then press releasebutton all
the way.
40
42
(Exposure LED>
(Aufnahme LED>
O Overexposure .... Subject is too bright so either stop
down the aperture until the LED shows a shutter speed
of l/500 or slower, or use a slower speed film.
@ Correct Exposure .... Go ahead and shoot. When
the upper LED lights, it indicates a correct exposure be!
ween l,/500 and l/125 sec. will be made, and when the
middle and lower LEDs light, the same is indicated for
shutter speedsbetween l/125 and l,/30 sec. and between
l/30 and 8 sec. respectively.
(There are times when two
LEDs will glow simultaneouslv.)
When the LED indicates
slower than l,/30 sec., camera
shake may occur because of
slow shutter speed. In this
case, either use a wider aperture or the electronic flash
"Tl4 AUTO".
Or use a
faster film, or a tripod to
steady the camera.
Uberbelichtet .... das Motiv ist zu hell, so daB Sie
O
entweder eine kleinere Blende wiihlen miissen, bis die
LED eine Belichtungszeit von l,/500 oder langsamer
anzeigt, oder einen Film mit geringerer Empfindlichkeit verwenden.
@ Richtige Belichtung .... fiihren Sie die Aufnahme
durch. Wenn die obere LED aufleuchtet, zeigt sie an,
daB mit einer Belichtungszeit zwischen l/500 und
l/125 Sekunde eine richtig belichtete Aufnahme erfolgt. Wenn die mittlere und untere LED aufleuchtet,
erfolgt die richtig belichtete Aufnahme mit einer Verschlu8geschwindigkeit zwischen l/125 und l/30 Sekunde bzw. zwischen l/30 und 8 Sekunden. (Es kann
vorkommen, daB zwei LED gleichzeitig aufleuchten).
Wenn die LED eine langsamereBelichtungzeit als l/30
Sekunde anzeigt, kann die Kamera bei der Aufnahme
erschiittert werden, weil die VerschluBgeschwindigkeit
langsam ist. In diesem Fall entweder eine grofiere Blende wiihlen oder das elektronischeBlitzgerdt Tl4 AUTO
verwenden. Sie konnen auch einen empfindlicheren
Film wiihlen oder ein Stativ verwenden, um die Kamera
zu stabilisieren.
www.orphancameras.com
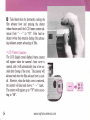
(Backlight Compensation Button)
When shooting a subject in a backlit situation or
closelyagainsta lighted window, it will come out
dark and underexposed. In this case, use the
backlight compensation button. Train the
carnera on subject and, while keeping the compensation button pressed, release the shutter.
When the backlight compensation is used, the
exposurevalue will be increasedby 1.5 EV.
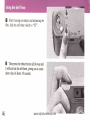
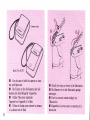
tr After focusing on subject and advancing the
film, slide the self-timer switch to "ST".
2 Then pressthe releasebutton all the way and
it will activate the self-timer, giving you a countdown time of about l0 seconds.
46
www.orphancameras.com
During countdown, the self-timer LED will
pulsate at a normal rate, and then accelerate
two seconds before shutter release.
r The self-timer operation is not cancelable. If
the self-timer switch is reset during operation,
one frame of film will be wasted.
E After using the self-timer, slide the self-timer
switch to its original position, or else the selftimer will be activated again when the shutter is
released, and if the shutter release button is
pressed part way, the viewfinder warning lamp
will lisht to warn non-resettineof the switch.
48
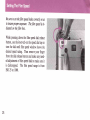
Wen thefilm end has been reached, you will not
be able to stroke the Jilm advance lever. Do not
forcibly attempt to udvance the Jilm. Instead, rewind the Jilm after conJirming from the LCD
frame counter thot the film end has been reached.
B Press the film rewind button. (You do not
need to keep the button Pressed.)
2 Unfold the film rewind crank and rotate it in
direction of illustrated arrow. When the film
comes off the take-up spool you will still feel
slight resistance but continue turning the crank
until the resistancedisappears' Then remove the
body cover and unload the film.
50
www.orphancameras.com
Camera only
Wilh TI4 AUTO
I
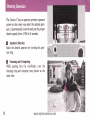
Use the case to hold the camera or camera with flash unit.
I
Die Tasche ist fiir die Kamera oder die
Kamera mit dem Blitzgerdt vorgesehen.
I
Utiliser l'6tui pour maintenir
I'appareil ou I'appareil et le flash.
I
Utilizar la funda p€ua sostener la cimara,
o Ia c6mara con el flash.
52
I Attach the strap as shown in the illustration.
I Die Riemen wie in der Illustration gezeigt
anbringen.
I Fixer la courroie comme indiqu6 sur
I'illustration.
I Enganchar la correa como se muestra en la
ilustraci6n.
ffiffiffidweK
ilfs{{r$rcia{f *sfi/.f\fektr*rcssa&er
R{itxfi:-tc";sh
edeefrdraicp
#fe*{r*rsir.taelFfos&
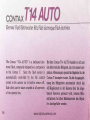
The Contax "T14 AUT0" is a dedicated eleo
tronic flash, compactly designed as a companion
to the Contax T.
Since the flash output is
automatically controlled by the AE control
system in the camera via its built-in sensor cell,
flash shots can be taken coupled at all apertuies
,'
i,
of the camera lens.
54
www.orphancameras.com
Flash Ready Lamp
Blitzbereitschaftslampe
Lampe-t6moin de flash
L6mpara de flash preparado
Mounting Screw
Anbauschraube
Vis de montage
Tornillo de montaie
Coupling Terminal
SteckverbinderanschluB
Bome de couplage
Terminal de acoplamiento
56
Flash Head
Blitzkopf
T0te du flash
Cabezal del flash
Battery Compartment Cover
Batteriefachdeckel
Trappe du compartiment d piles
Tapa del compartimiento de las pilas
Mounting Knob
Anbauknopf
Bouton de montage
Mando de montaje
Power Switch
Ein-/Ausschalter
Interrupteur d'alimentation
Interruptor de la alimentaci6n
www.orphancameras.com
57
Use two 1.5 V type AA alksline or mongonese
batteries.
The use of NiCd batteries is not
recommended.
tr Slide the battery compartment cover and
remove it.
Install the batteries as indicated by the @
2
and O polarity marks. Then replace the cover.
o If the batteries are incorrectly installed, the
flash unit will not function.
o The battery precautions for camera batteries
are equally applicable here so pleaserefer to page
16.
58
Align the mounting screw on the flash unit with
the mounting socket on the camera and then turn
the mounting knob in direction of illustrated arrow while gently pressing the flash unit against
the camera. Be sure that the terminals on the
flash unit and camera are making positive contact.
To unmount the flash unit, turn the mounting
knob in the opposite direction.
60
www.orphancameras.com
4;:;
llhen the Contax T and the 714 AUTO ure used
in combination, the exposure LED in the
camera's viewfinder will pulsate to indicate flosh
ready status.
tr
Turn the power switch to ON.
2 Set the aperture.
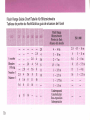
The Tl4 AUTO couples at all apertures of the
camera lens. Since the flash range varies with the
aperture value, please refer to page 70 for the
flash range guide chart.
62
ts When the shutter release button is pressed
part way, the exposureLED for the exposurein
effect will change to a pulsating signal to indicate
flash ready. (The flash ready lamp in the flash
unit will glow at the sametime.) Now focus and
releasethe shutter.
o Until the flash-readyis indicated, the camera
will be in the normal AE mode.
. Do not obstruct the flash head beam with
your fingers.
64
www.orphancameras.com
turn OFF
E After finishing with flash shots,
the po*e, switch to conserve the batteries'
(Battery Check)
When bittery power becomes inadequate, the
recycling time will become longer. If it takes
more than 30 seconds to recycle, replace both
batteries at the same time with fresh ones of the
same type.
66
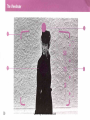
<Daylight Synch Flash)
When shooting a subject against a bright background, it can result in underexposure of the subject. The T14 AUTO can be used in such situations for supplementary flash for producing
details in shadow areas and beautifully capturing
the background at the same time. Daylight synch
flash is affected by background brightness and
flash range.
o When shooting with a bright background,
make sure that a shutter speedslower than l/125
second is indicated before releasing the shutter.
At shutter speeds faster than l/125 second, the
flash will not fire and the camera will automatically be in the AE mode.
6B
Without flosh
Ohne blitz
Sans flash
Sin flash
www.orphancameras.com
F*astuffiamge&**f;de#fiart/?ahcflEe$i.inffi$$€ereEehwelte
gn"liado n{cemccsd*[ $[nsh
Tmhfiea*x
de pert6e du flashdffira&ffi*CI
ffiffiffiffiffiffiffi
Z.S
q
5.6
5.6
8
2.8
2.8 4
2.8 4
5.6
4
5.6 8
ll
5.6 8
ll
16
8
ll
16
ll
16
f number
Blendendffnung
Nombre I
Nirmero f
70
2.g
4
2.8
4
5.6
8
ll
16
4.5 - 16m
3 -llm
2 -
8m
1 . 5- 5 . 5 m
I - 4m
I - 2.5m
o When the lens, rangefinder window or
viewfinder window is stained or smudged, gently
clean the surfaces with soft lens cleaning tissue
moistened with some lens-cleaningsolution instead of wiping it with a cloth. Clear dust off using a blower brush.
o The camera and flash units will normally
operate in temperatures between -10 and +50
degreesC. However, once the batteries are affected during use in extremely cold areas, they
may not function properly even in above temperature range.
When the camera is exposedto sudden temperature changes,you should guard against possible
corrosion of the camera's internal mechanism
resulting from condensation of moisture.
o Avoid leaving your camera equipment in hot
places (on the beach, or in car parked in direct
sunlight) or in highly humid areasas doing so can
causedamage to it.
72
o Clean the equipment after using it at the
seashore,in the mountains and in the rain. Airborne salt, dust and other foreign matter will
damage the camera's internal system if allowed
to pentrate inside.
o Make a functional check of the camera
equipment beforehand when planning to take
those important shots (wedding, travel, etc.).
o Use a soft cloth to wipe soiled exterior of the
equipment. Never clean with any solvent, such as
a thinner or benzene.
o When not using the flash unit for long
periods of time, store it with the batteriesremoved. Take it out and flash it occasionally to prevent deterioration of capacitator performance.
o A high voltage circuit carried inside the flash
unit poses a shock hazard so do not attempt to
dismantle the unit when it malfunctions.
www.orphancameras.com
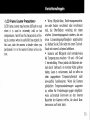
<LCD Frame Counter Precautions)
LCD frame counter may becomedifficult to read
when it is used in extremely cold or hot
temperatures.And it has the characteristicof losing its contrast when its useful life has expired. In
this case, take the camera to dealer where you
purchasedit or to the nearestContax servicestation.
o Wenn Objektivlinse, Entfernungsmesserfenster oder Sucher verschmiert oder verschmutzt
sind, die Oberfliichen vorsichtig mit einem
weichen Linsenreinigungstuchsiubern, das mit
etwas Linsenreinigungsfliissigkeit angefeuchtet
ist. Reiben Sie die Teile nicht mit einem Tuch ab.
Staub mit einem Luftpinsel abblasen.
r Kamera und Blitzgerit sind normalerweise
bei Temperaturen zwischen -10 und + 50 Grad
C betriebsfiihig. Wenn jedoch die Batterien einmal durch Gebrauch in extremer Kiilte gelitten
haben, kann es vorkommen, daB sie selbst im
oben angegebenen Temperaturbereich nicht
einwandfrei funktionieren. Wenn die Kamera
plotzlichen Temperaturdnderungen ausgesetzt
ist, sollten Sie Vorkehrungen gegen mOglicherweise auftretende Korrosion an den inneren
Bauteilen der Kamera treffen, die durch Kondenswasserauftreten kann.
73
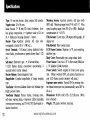
Type: 35 mm lens shutter, ultra compact AE camera.
Negative sne: A x 36 mm.
Lens: Sonnar T* 38 mm F2.8 lens (5-element, fourlens group composition. ) . Aperture scale of 2.8 to
16. r Minimum focusing distance: I meter.
AE type elecShutter Type: Aperture priority
tromagnetic shutter (8 to l/500 sec.).
X-Contact (using dedicated elecSynch Terminal:
tronic flash), synchronizes at speeds slower than l/125
sec.
Self-timer: Electronic type. o l0 second delay.
. LED flashes during countdown (accelerating 2
seconds before shutter release).
Shutter Release: Electromagnetic type.
Rangefinder: Coupled rangefinder of image merging
type
Viewfinder: Reverse-Galilean finder with Albada type
bright picture frame.
Yiewfinder Display: Picture frame, focusing zone,
self-timer warning lamp, 4 exposure LEDs (including
overexposure warning, and Tl4 AUTO flash-ready indicator function).
7B
Metering System: Aperture priority AE type (with
SPD cell). Metering range from EV 0 to EV 17. Film
speed coupling range from ISO 25 to 1000. Backlight
compensation of +1.5 EV.
Film Advance: Lever type, 120 degree setting angle, l0
degree rest.
Film Rewind: Film rewind crank.
LCD Frame Counter: Registers to 79; auto-resetting,
additive type.
Body Cover: Removable type, using release knob.
Power Sourre: Uses two 1.55 V silver-oxide (SR44) or
1.5 V alkaline (LR14) batteries.
Power Switch: Switch coupled to front cover operation. (When switched OFF, all cilnera functions except LCD frame counter memory will cease.)
Exposurc meter switch: Turned ON by pressing shutter releasebutton part way (automatically turns OFF in
l0 sec.).
Dimensions: 98 (U) x 66.5 (H) x 32.5 (D) mm. (With
lens retracted)
Weight: 270 grams (without batteries).
www.orphancameras.com
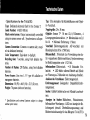
<Specifications lor the T14 AUTO>
Type: Dedicated electronic flash for the Contax T.
Guide Number: 14 (ISO 100.m)
Flash control system: Output automatically controlled
using on-camera sensor cell. Synchronizes at all apertures.
Camera Connection: Connects to camera side, coupled via dedicated terminal.
Color Temperature: Equivalent to daylight.
Recycling time: 7 seconds, using fresh alkaline batteries.
Number of trlashes: 250 flashes, using fresh alkaline
batteries.
Power Source: Uses two 1.5 V type AA alkaline or
manganese batteries.
Dimensions: 58 (W) x 66.5 (H) x 32.5 (D) mm.
Weight: 70 grams (without batteries).
t Specificationsond external
features subject to change
without prior notice.
Typ: Ultra kompakte AE-Kleinbildkamera mit Objektiv-VerschluB.
Negativgrii0e: A x 36 mm.
Objektiv: Sonnar T* 38 mm l:2,8 (5 Elemente-, 4
Linsengruppenkonstruktion. ) . Blendenskalavon 2,8
bis 16. r Minimale Entfernung: I Meter.
Venchlull: Elektromagnetischer AE-VerschlufJ mit
Blendenpriori*it (8 bis l/500 Sek).
Blitzanschlull: X-Kontakt (zur Verwendung eines dafiir vorgesehenen Elektronenblitzes), Synchronisierung
bei Belichtungszeitenunter l,/125 Sek.
. l0 Sekunden VorSelbstausliiser: Elektronisch.
. LED blinkt wiihrend Betrieb auf (blinkt
laufzeit.
zur Warnung ca. 2 Sekunden vor Auslosung schneller).
Ausliisen des Verschlusses: Elektromagnetisch.
Entfernungsmesser: Gekoppelter Doppelbild-Entfernungsmesser.
Sucher: Galilei-Umkehrsucher mit Albada-Leuchtrahmen.
Anzeigen im Sucher: Bildrahmen, Fokussierzone,
Selbstausldser-Warnlampe, 4 LED zur Anzeige der Belichtungszeit (einschl. Uberbelichtungswarnung und
Blitzbereitschaftsanzeige ftir das Blitzgeriit Tl4 AUTO).
79