1
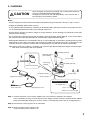
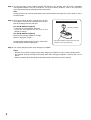
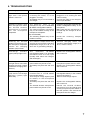
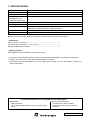
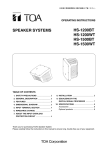
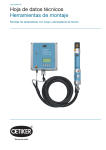
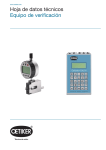
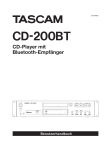
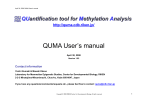
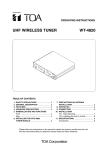
OPERATING INSTRUCTIONS
BATTERY CHARGER
IR-200BC
TABLE OF CONTENTS
1. SAFETY PRECAUTIONS ........................... 2
5. CHARGING ................................................. 5
2. GENERAL DESCRIPTION ......................... 3
6. TROUBLESHOOTING ................................ 7
3. HANDLING PRECAUTIONS ...................... 3
7. SPECIFICATIONS ...................................... 8
Accessories ................................................. 8
4. NOMENCLATURE AND FUNCTIONS ....... 4
Thank you for purchasing TOA's Battery Charger.
Please carefully follow the instructions in this manual to ensure long, trouble-free use of your equipment.
1. SAFETY PRECAUTIONS
• Before installation or use, be sure to carefully read all the instructions in this section for correct and safe
operation.
• Be sure to follow all the precautionary instructions in this section, which contain important warnings and/or
cautions regarding safety.
• After reading, keep this manual handy for future reference.
WARNING
Indicates a potentially hazardous situation which, if mishandled, could
result in death or serious personal injury.
CAUTION
Indicates a potentially hazardous situation which, if mishandled, could
result in moderate or minor personal injury, and/or property damage.
WARNING
When Installing the Unit
• Do not expose the unit to rain or an environment
where it may be splashed by water or other liquids,
as doing so may result in fire or electric shock.
• Use the unit only with the voltage specified on the
unit. Using a voltage higher than that which is
specified may result in fire or electric shock.
• Do not cut, kink, otherwise damage nor modify the
power supply cord. In addition, avoid using the
power cord in close proximity to heaters, and never
place heavy objects -- including the unit itself -- on
the power cord, as doing so may result in fire or
electric shock.
• Avoid installing or mounting the unit in unstable
locations, such as on a rickety table or a slanted
surface. Doing so may result in the unit falling
down and causing personal injury and/or property
damage.
When the Unit is in Use
• Should the following irregularity be found during
use, immediately switch off the power, disconnect
the power supply plug from the AC outlet and
contact your nearest TOA dealer. Make no further
attempt to operate the unit in this condition as this
may cause fire or electric shock.
· If you detect smoke or a strange smell coming
from the unit
· If water or any metallic object gets into the unit
· If the unit falls, or the unit case breaks
· If the power supply cord is damaged (exposure of
the core, disconnection, etc.)
• To prevent a fire or electric shock, never open nor
remove the unit case as there are high voltage
components inside the unit. Refer all servicing to
your nearest TOA dealer.
2
• Do not place cups, bowls, or other containers of
liquid or metallic objects on top of the unit. If they
accidentally spill into the unit, this may cause a fire
or electric shock.
• Do not insert nor drop metallic objects or
flammable materials inside the battery charger or
its infrared microphone receptacle, as this may
result in fire or electric shock.
• Do not touch a power supply plug during thunder
and lightning, as this may result in electric shock.
• Stop charging if the batteries are not fully charged
within 3 hours. Failure to do so may cause the
batteries to fire, explode, leak, or heat.
CAUTION
When Installing the Unit
• Never plug in nor remove the power supply plug with
wet hands, as doing so may cause electric shock.
• When unplugging the power supply cord, be sure to
grasp the power supply plug; never pull on the cord
itself. Operating the unit with a damaged power
supply cord may cause a fire or electric shock.
• When moving the unit, be sure to remove its power
supply cord from the wall outlet. Moving the unit
with the power supply cord connected to the outlet
may cause damage to the power supply cord,
resulting in fire or electric shock.
• Avoid installing the unit in humid or dusty locations,
in locations exposed to the direct sunlight, near the
heaters, or in locations generating sooty smoke or
steam as doing otherwise may result in fire or
electric shock.
When the Unit is in Use
• If dust accumulates on the power supply plug or in
the wall AC outlet, a fire may result. Clean it
periodically. In addition, insert the plug in the wall
outlet securely.
• Switch off the power, and unplug the power supply
plug from the AC outlet for safety purposes when
cleaning or leaving the unit unused for 10 days or
more. Doing otherwise may cause a fire or electric
shock.
• Use the dedicated AC adapter for the unit. Note
that the use of other adapter may cause a fire.
• Avoid charging microphones installed with
rechargeable batteries other than the dedicated IR200BT battery. Charging any other than the
specified battery could result in fire or personal
injury due to battery rupture.
• When the infrared wireless microphone is not in
use for 2 weeks or more, be sure to take the
batteries out of the microphone because battery
leakage may cause a fire, personal injury, or
contamination of environment.
• Make sure to observe the following handling
precautions so that a fire or personal injury does
not result from leakage or explosion of the battery.
· Be sure to use only the rechargeable battery
designed for use with the infrared wireless
microphone
· Avoid mixed use of new and old batteries,
batteries of different types, or fully charged and
discharged batteries in the same microphone.
· Do not short, disassemble, heat nor put the
battery into a fire.
· Do not solder a battery directly.
· Note correct polarity (positive and negative
orientation) when inserting a battery in the unit.
· Avoid locations exposed to the direct sunlight,
high temperature and high humidity when storing
batteries.
FCC Compliance
This device complies with Part 15 of the FCC Rules. Operation is subject to the following two conditions:
(1) this device may not cause harmful interference, and
(2) this device must accept any interference received, including interference that may cause undesired
operation.
Any modifications made to this device that are not approved by TOA Corporation may void the authority
granted the user by the FCC to operate this equipment.
Note: This equipment has been tested and found to comply with the limits for a Class A digital device,
pursuant to part 15 of the FCC Rules. These limits are designed to provide reasonable protection against
harmful interference when the equipment is operated in a commercial environment. This equipment
generates, uses, and can radiate radio frequency energy and, if not installed and used in accordance
with the instruction manual, may cause harmful interference to radio communications. Operation of this
equipment in a residential area is likely to cause harmful interference in which case the user will be
required correct the interference at his own expense.
2. GENERAL DESCRIPTION
The TOA IR-200BC is a dedicated battery charger for the IR-200M and IR-300M Infrared Wireless
Microphones.
It employs a quick charging system for nickel metal hydride (NiMH) batteries, allowing up to 2 infrared wireless
microphones to be fully charged within 3 hours.
3. HANDLING PRECAUTIONS
• Since the supplied power cord is designed for use specifically with the IR-200BC charger, do not use it with
equipment other than the IR-200BC.
• Use the IR-200BC in locations where an ambient temperature ranges from 0 to 40 ºC (32 to 104 ºF).
• When cleaning the case, be sure to first switch off the power, then wipe with a dry cloth. Never use benzene,
thinner, alcohol or chemically processed towels, as these may damage the charger's components and parts.
• Clean the charging terminals on a regular basis using a dry cotton swab. Dirty terminals can cause poor
electrical contact and cause batteries to be charged incorrectly.
3
4. NOMENCLATURE AND FUNCTIONS
2
8
6
3
7
1. Power switch
To turn on the power, set this switch to the [ ]
position. To turn off the power, shift this switch
back.
2. Mounting Adapter
(factory-attached to the charger)
Used when charging the IR-200M handheld
infrared wireless microphone.
Remove this adapter when charging the IR-300M
hands-free infrared wireless microphone. (Refer to
p. 5 "Charging.")
3. Power indicator
Lights when the power is switched on.
4. Screwdriver inlet
Insert the setting screwdriver supplied with the
infrared wireless microphone into this inlet when
storing it.
6
4
7
5
1
5. Infrared wireless microphone receptacle
• Use the mounting adapter when charging the
IR-200M microphone.
• When charging the IR-300M microphone,
remove the mounting adapter and insert the
microphone directly into the receptacle.
6. Full-charge indicator
Lights green once the battery is fully charged.
7. Charging indicator
Lights red continuously while charging is in
progress.
8. Power input terminal
Connect the supplied AC adapter to this terminal.
[Indicator status table]
Charging indicator (red)
Full-charge indicator (green)
Lit
Unlit
Charging in progress
Unlit
Lit
Charging completed
Flashing
Unlit
Both indicators light alternately.
4
Status
Outside the operating temperature range
(refer to p. 7 "Troubleshooting.")
Charging failure (refer to p. 7 "Troubleshooting.")
5. CHARGING
CAUTION
Avoid charging microphones installed with rechargeable batteries
other than the dedicated IR-200BT battery.
Charging any other than the specified battery could result in fire or
personal injury due to battery rupture.
Notes
• Use the charger in locations where the ambient temperature range is between 0 and 40 ºC (32 to 104 ºF).
• Charge the IR-200BT battery before using it.
• If an infrared wireless microphone containing an IR-200BT battery has been stored for a long period of time,
it is recommended that the microphone be charged before use.
• Avoid using the charger in locations subject to strong vibrations, as the resulting poor electrical contact may
prevent correct charging.
• Do not frequently insert and remove the microphone from the charger during charging, as this could reduce
the number of times that the IR-200BT can be effectively charged and discharged.
• Rechargeable batteries are consumables and do not last indefinitely. If the battery operating time becomes
extremely short even when it has been fully charged, the battery has reached the end of its life and must be
replaced. Be sure to replace the battery with one designated for use with the microphone (IR-200BT).
Tip: Under normal use conditions, the battery can cycle through approximately 500 charges and discharges,
after which it will usually need to be replaced.
IR-200M (optional)
Mounting adapter
(pre-installed)
1
4
Power switch
Power input terminal
Full-charge
indicator
5
IR-300M (optional)
3, 6
Charging indicator
Supplied AC adapter
Charger
Power switch
Power indicator
1
2
Handling the power cord
AC adapter plug
To AC wall outlet
Supplied power cord
Cord
Bottom view of the charger
Step 1. Connect the power cord to the AC adapter, then connect the AC adapter to the charger.
Once connected, push the cord into the slot in the charger's bottom surface to prevent the AC adapter
plug from accidentally slipping out of place. (Refer to "Handling the power cord" in the figure above.)
Step 2. Insert the AC power plug into an AC wall outlet.
Step 3. Set the charger's power switch to ON.
Confirm that the power indicator is lit.
5
Step 4. Turn off the power of the infrared wireless microphone to be charged, then insert the 2 IR-200BT
rechargeable batteries into the microphone. For proper battery insertion, refer to the instruction
manual enclosed with the infrared wireless microphone.
Note
Charging cannot be correctly performed if the infrared wireless microphone's power switch is set to
the ON position.
Step 5. Insert the infrared wireless microphone fully into
the charger's microphone receptacle and confirm
that the charging indicator (red) is lit.
[For the IR-200M microphone]
• Leave the mounting adapter attached.
• Insert the microphone into the hole in the
adapter to charge.
[For the IR-300M microphone]
Remove the mounting adapter to charge.
(Refer to the figure at right.)
Charging takes approximately 3 hours, after which
the full-charge indicator lights green.
Removing the mounting adapter
Mounting adapter
Charger
Pull up the adapter holding down this part
(another on the opposite side).
Step 6. Turn off the charger's power once charging is complete.
Notes
• Be sure to turn off the charger's power after charging is complete in order to save standby power.
• The infrared wireless microphone becomes warm after charging completion, however this is not a
failure.
• Hold the charger when detaching the infrared wireless microphone from the charger.
6
6. TROUBLESHOOTING
Symptom
Possible cause
Remedy
Power indicator does not
light even if the power
switch is turned on.
• The AC adapter is not plugged into
a working AC outlet, or is not
plugged in correctly.
• AC adapter plug is not connected to
the charger.
• Make sure the AC adapter is
plugged in to a working AC wall
outlet correctly.
• Connect the plug to the charger's
power input terminal.
Charging indicator (red)
does not light even when
the infrared wireless
microphone is inserted
into the microphone
receptacle.
• The batteries used in the
microphone may not be dedicated
IR-200BT rechargeable batteries.
• The infrared wireless microphone
may not be seated correctly in the
microphone receptacle.
[For the IR-200M]
• The mounting adapter may not be
installed correctly.
• Install the appropriate dedicated IR200BT rechargeable battery in the
microphone.
• Make sure that the microphone is
inserted fully into charger as far as
it will go.
Inserting the infrared
wireless microphone into
the microphone receptacle
causes the charging
indicator (red) to flash.
• The ambient temperature may
exceed the permissible operating
temperature range (0 to 40 ºC, or
32 to 104 ºF), preventing charging.
• Perform charging within the
operating temperature range (0 to
40 ºC, or 32 to 104 ºF).
Full-charge
indicator
(green) always lights soon.
• The
dedicated
IR-200BT
rechargeable battery has probably
reached the end of its life cycle
(usually after about 500 charges
and discharges).
• Replace the rechargeable battery
with a new one.
Full-charge indicator does
not light even 3 hours after
charging has been started
(maximum charging time:
3 hours).
• The infrared wireless microphone's
power switch may be set to ON.
• The battery may be at the end of its
life.
• Set
the
infrared
wireless
microphone's power switch to OFF.
• Replace the rechargeable battery
with a new one.
Both the charging indicator
(red) and the full-charge
indicator (green) light
alternately.
• The microphone may have been
installed with a non-IR-200BT
rechargeable battery.
• There may be foreign objects (such
as metals) in the microphone
receptacle.
• The battery may be at the end of its
life.
• The infrared wireless microphone's
power switch may be set to ON.
• Use a dedicated IR-200BT
rechargeable battery in the infrared
wireless microphone.
• Remove such foreign objects.
• Install the mounting adapter
correctly.
• Replace the rechargeable battery
with a new one.
• Detach the infrared wireless
microphone from the charger and
set the microphone power switch to
the OFF position, then reinsert the
microphone into the charger.
7
7. SPECIFICATIONS
Power Source
Current Consumption
Charging Time
Number of wireless
microphones to be
charged simultaneously
Operating Temperature
Operating Humidity
Finish
Dimensions
Weight
AC mains, 50/60 Hz (Power is supplied from the enclosed AC adapter.)
Max. 2 A
Max. 3 hours
2 pieces*1
0 to 40 °C (32 to 104 °F)
30 to 85% RH
Case:
ABS resin, metallic gray, 50% gloss, paint
Microphone receptacle section: PPE resin, black
238 (w) x 83 (h*2) x 98 (d) mm (9.37" x 3.27" x 3.86")
635 g or 1.4 lb (charger with the mounting adapters attached)
Note: The design and specifications are subject to change without notice for improvement.
• Accessories
Power cord (2 m or 6.56 ft)*3 ......................................................................... 1
AC adapter (DC cord length: 1.5 m or 4.92 ft)*3 ............................................ 1
Mounting adapter (pre-installed) ................................................................... 2
• Optional products
Rechargeable battery: IR-200BT-2 (containing 2 pieces)
*1 Using the mounting adapter allows one each of the IR-200M and IR-300M to be charged in combination.
*2 Height is 109.5 mm (4.31") when the mounting adapter is installed.
*3 Not supplied with the IR-200BC KR. For the usable power supply cord and AC adapter, contact your
nearest TOA dealer.
Traceability Information for Europe (EMC directive 2004/108/EC)
Manufacturer:
TOA Corporation
7-2-1, Minatojima Nakamachi, Chuo-ku, Kobe, Hyogo,
Japan
Authorized representative:
TOA Electronics Europe GmbH
Suederstrasse 282, 20537 Hamburg,
Germany
URL: http://www.toa.jp/
133-07-272-70