1
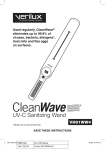
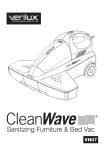
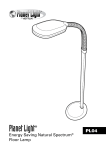
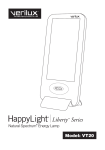
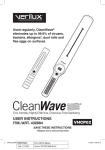
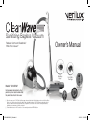
Sanitizing Bagless Vacuum
Reduce Germs and Deodorize§
While You Vacuum†
Owner’s Manual
Bed Bug
Eggs
Dust Mite &
Flea Eggs
Model: VH04WW1
Influenza A
(H1N1)
Due to ongoing improvements, actual
product may have slight variations from
the product described in this manual.
† Based on exposure of UV-C light to bed bug eggs, viruses and bacteria in the laboratory under controlled conditions.
May be less effective when used on pile carpets and certain fabric surfaces. UV-C effectiveness depends on direct
exposure duration and intensity and must shine on organism to be effective. In the event of bed bug infestation, a
qualified pest exterminator should be contacted.
§ Deodorization based on UV-C reduction of odor-causing bacteria and HEPA filtration.
VH04-MAN-2012_Web.indd 1
E. coli
MRSA
12/12/12 3:36 PM
Table of Contents
Dear Customer,
Thank you for purchasing the Verilux CleanWave Sanitizing
Bagless Vacuum. You now own an innovative product,
manufactured to the highest standards and backed by a oneyear limited warranty.
®
Many other healthy-lighting products are available through our
catalog and online. Visit us on the web at www.verilux.com to
request a free catalog and learn more about all of our quality
Verilux products, or call us toll-free at 1-800-454-4408.
As a Verilux customer, your satisfaction means everything to
us. We look forward to serving you now and in the future.
Have a bright day!
Nicholas Harmon
President, Verilux, Inc.
2
VH04-MAN-2012_Web.indd 2
1. Important Safeguards. . . . . . . . . . . . . . . . . . . . . . . . . . . . . 3
2. CleanWave® Sanitizing Bagless Vacuum. . . . . . . . . . . . . . . 6
2.1 Introduction . . . . . . . . . . . . . . . . . . . . . . . . . . . . . . . 6
2.2 Special Functions. . . . . . . . . . . . . . . . . . . . . . . . . . . 6
3. Carton Contents. . . . . . . . . . . . . . . . . . . . . . . . . . . . . . . . . 7
4. Features. . . . . . . . . . . . . . . . . . . . . . . . . . . . . . . . . . . . . . . 8
4.1 Vacuum Canister . . . . . . . . . . . . . . . . . . . . . . . . . . . 8
4.2 Handle and Hose. . . . . . . . . . . . . . . . . . . . . . . . . . . 9
4.3 Sanitizing Power Head. . . . . . . . . . . . . . . . . . . . . . 10
4.4 Telescoping Wand . . . . . . . . . . . . . . . . . . . . . . . . . 11
4.5 Accessories. . . . . . . . . . . . . . . . . . . . . . . . . . . . . . 11
4.6 Spare Parts . . . . . . . . . . . . . . . . . . . . . . . . . . . . . . 11
5. Assembly. . . . . . . . . . . . . . . . . . . . . . . . . . . . . . . . . . . . . 16
5.1 Connecting the Hose. . . . . . . . . . . . . . . . . . . . . . . 12
5.2 Connecting the Telescoping Wand. . . . . . . . . . . . . 13
5.3 Connecting the Sanitizing Power Head. . . . . . . . . . 13
6. CleanWave Sanitizing Bagless Vacuum Operation . . . . . . 14
6.1 Handle. . . . . . . . . . . . . . . . . . . . . . . . . . . . . . . . . . 14
6.2 Cord Release / Rewind. . . . . . . . . . . . . . . . . . . . . . 14
6.3 Canister. . . . . . . . . . . . . . . . . . . . . . . . . . . . . . . . . 15
6.4 Handle and Hose. . . . . . . . . . . . . . . . . . . . . . . . . . 15
6.5 Sanitizing Power Head. . . . . . . . . . . . . . . . . . . . . . 15
6.6 Operating Modes. . . . . . . . . . . . . . . . . . . . . . . . . . 16
6.7 Using the Accessories . . . . . . . . . . . . . . . . . . . . . . 18
7. Care and Maintenance. . . . . . . . . . . . . . . . . . . . . . . . . . . 19
7.1 How to Empty . . . . . . . . . . . . . . . . . . . . . . . . . . . . 19
7.2 Cleaning and Replacing Filters. . . . . . . . . . . . . . . . 20
7.3 HEPA-12 Pre-Filter. . . . . . . . . . . . . . . . . . . . . . . . . 20
7.4 Sponge Filter . . . . . . . . . . . . . . . . . . . . . . . . . . . . . 21
7.5 HEPA-12 Exhaust Filter . . . . . . . . . . . . . . . . . . . . . 21
7.6 Replacement Filters . . . . . . . . . . . . . . . . . . . . . . . . 21
7.7 Cleaning and Replacing the Sanitizing Light Bulb. . 22
7.8 Sanitizing Light Bulb Disposal. . . . . . . . . . . . . . . . . 23
7.9 Replacement Parts. . . . . . . . . . . . . . . . . . . . . . . . . 24
7.9a-b Replacing the Wheels and Stand-up Locks. . . . 24
7.9c Replacement Part List . . . . . . . . . . . . . . . . . . . . . 25
8. Troubleshooting . . . . . . . . . . . . . . . . . . . . . . . . . . . . . . . . 26
9. One-Year Limited Warranty. . . . . . . . . . . . . . . . . . . . . . . . 28
12/12/12 3:36 PM
1. Important Safeguards
READ ALL INSTRUCTIONS BEFORE USING
DANGER:
• To avoid electrocution, do not operate this device near water.
• Always direct the UV-C light AWAY from the eyes and skin. Direct prolonged exposure of eyes or skin to the UV-C light bulb can cause serious skin
burn and eye inflammation from short wave ultraviolet radiation. Radiation from these lamps is harmful to the eyes and skin.
• Application of UV-C light to existing mold growth can cause respiratory irritation and allergic symptoms. Do not use UV-C light where active mold
growth exists. Remove active mold growth from surface prior to exposure. Ultraviolet (UV-C) Radiation Hazard.
WARNING:
•
•
•
•
•
•
•
•
•
Do not use outdoors or on wet surfaces.
Do not allow to be used as a toy. Close attention is needed when used by or near children.
Do not handle plug or appliance with wet hands.
Keep all openings away from your face and body.
Do not use to vacuum flammable or combustible liquids such as gasoline or use in areas where they may be present.
Do not touch the UV-C bulb during or directly after use; it will be hot and may burn.
Do not use with damaged cord or plug. Do not use vacuum if it has been dropped, damaged, left outdoors or dropped in water.
DO NOT point the vacuum cleaner directly at your or anyone’s face.
The bulb in this product contains a trace amount of mercury, a chemical known to the state of California to cause birth defects or other reproductive
harm. This substance may also cause injury if inhaled or ingested.
• No serviceable parts. Refer all servicing to qualified service personnel. Servicing is required when the apparatus is damaged in any way, such as
power supply cord or plug is damaged, liquid has been spilled or objects have fallen into the apparatus, the apparatus has been exposed to rain or
moisture, does not operate normally or has been dropped.
• Never use this device on pets.
• Allow bulb to cool before replacing.
CAUTION:
• Do not leave appliance when plugged in. Unplug from outlet when not in use and before servicing.
• With prolonged use, UV-C light may degrade, discolor and/or bleach fabrics, plastic and rubber. Safety features are included to help ensure
surface damage does not occur. Do not override these features.
VH04-MAN-2012_Web.indd 3
3
12/12/12 3:36 PM
1. Important Safeguards — continued
CAUTION: — continued
•
•
•
•
•
Do not attempt to pick up large or sharp objects, as these may cause damage to the vacuum cleaner.
Do not use the vacuum cleaner without dust filter in place.
Use only as described in this manual. Use only with manufacturer’s recommended attachments.
Do not pull or carry cord, use cord as a handle, close a door on cord or pull cord around sharp edges or corners.
Do not leave appliance when plugged in. Unplug when not in use and before servicing.
• Do not run vacuum over cord. Keep cord away from heated surfaces.
• Do not unplug by pulling on cord. To unplug, grasp the plug, not the cord.
• Do not put any object into openings. Do not use with any blocked openings. Keep free of dust, lint, hair and anything that may reduce air flow.
• Keep hair, loose clothing, fingers and all body parts away from openings and moving parts.
• Do not vacuum anything that is burning or smoking, such as cigarettes, matches or hot ashes.
• Turn off vacuum before unplugging.
• Use extra care when cleaning on stairs.
• Follow all labels and instructions.
• Store the vacuum cleaner indoors. Put the vacuum cleaner away after use to prevent tripping accidentally.
• Using improper voltage may result in damage to the motor and possible injury to the user. The correct voltage is listed on the rating label.
• Use on dry, indoor surfaces.
• Do not use for any purpose other than described in this manual.
• Always turn off this appliance before connecting or disconnecting the UV-C base unit.
• All repairs must be carried out by a qualified service technician.
• There are a number of safety switches on the underside of the unit. These switches prevent the UV-C bulb from activating when the product is removed from the cleaning surface. The UV-C bulb will re-activate when placed back on a cleaning surface.
• For your safety, DO NOT attempt to manually override the safety switch.
• Do not leave product unattended while on.
• Take care to prevent bulb breakage.
4
VH04-MAN-2012_Web.indd 4
12/12/12 3:36 PM
1. Important Safeguards — continued
CAUTION: — continued
• Use only Verilux bulbs. Use of an incorrect bulb can result in damage. To order a replacement bulb, use the Component Reorder form included with this product, or call Verilux Customer Service at 1-800-786-6850 or visit www.verilux.com.
• Dispose of bulbs per local regulations. For more information on clean-up and disposal, see www.lamprecycle.org.
®
SAVE THESE INSTRUCTIONS
Direct prolonged exposure of eyes or skin to
the UV-C light bulb can cause serious skin
burn and eye inflammation from short wave
ultraviolet radiation. Radiation from these
lamps is harmful to the eyes and skin.
VH04-MAN-2012_Web.indd 5
5
12/12/12 3:36 PM
2. CleanWave® Sanitizing Bagless Vacuum
2.1Introduction
Your new Verilux® CleanWave Sanitizing Bagless Vacuum is both a convenient and powerful vacuum with Ultraviolet (UV-C) Light
Technology that destroys up to 99.9% of viruses, odor-causing bacteria, certain molds and other allergens and even pest eggs
like bed bug, flea and dust mite eggs, while you vacuum†‡◊§.
2.2 Special Functions
Your new Verilux CleanWave Sanitizing Bagless Vacuum features include:
• Significantly reduces germs and deodorizes§ while you vacuum†.
• Combats certain molds and allergens without chemicals or liquids◊.
• Safely sanitizes surfaces without irritants* or residues‡
• Laboratory proven to eliminate up to 99% of H1N1 and MRSA in 1
second‡.
• Specially designed floor sensor safety switches that prevent direct.
exposure to UV-C light. Note: Do not override these floor sensor
safety switches.
• Powerful suction quickly and efficiently lifts and removes dust, dirt and
debris from floors, carpets and rugs into generous 1.5-liter capacity,
bagless canister.
• The HEPA-12 multi-stage filtration system traps pollen, certain
allergens and large and small particles and prevents recirculation of
pollutants.
• Won’t warp, dull or damage flooring*.
• Variable suction speed control slide adjusts desired level of suction to
suit energy-saving, decibel, fabric and fiber treatment preferences.
6
• Includes accessories for tight spaces, corners, stairs, lamps,
blinds, drapes and upholstery.
• Telescoping wand with an ergonomic handle, power and
suction controls, lets you adjust its length for height and reach
preferences.
• Offers three modes of operation so you can engage the Powered
Brush Roller, the Sanitizing Light or both.
• Built-in safety feature turns off the sanitizing light when sanitizing
power head is held or left stationary for more than five seconds
preventing direct exposure to UV-C light and assuring your
vacuum is always safe to operate.
• Easy-access controls are right on top of the power head for
smooth transitions from carpets to bare floors or from only
vacuuming to vacuuming and sanitizing.
• Snap-in, replaceable filters and parts require no tools.
• Perfect for use on carpets and all types of hard floors.
† Based on exposure of UV-C light to bed bug eggs, viruses and bacteria in the laboratory under controlled conditions. May be less effective when used on pile carpets and certain fabric surfaces. UV-C
effectiveness depends on direct exposure duration and intensity and must shine on organism to be effective. In the event of bed bug infestation, a qualified pest exterminator should be contacted.
‡ Based on exposure of UV-C light to test organisms in laboratory on non-porous hard surface, under controlled conditions. MRSA refers to Methicillin Resistant Staphylococcus Aureus (ATCC 33592). H1N1
refers to A/Swine/Iowa Swine Influenza A (ATCC 333)
◊ Direct UV-C Light exposure is effective on certain allergen-producing organisms such as Mold A and reduces dust mites. HEPA-12 filtration can trap pet dander and mold spores.
* When used as directed.
§ Deodorization based on UV-C reduction of odor-causing bacteria and HEPA filtration.
VH04-MAN-2012_Web.indd 6
12/12/12 3:36 PM
3. Carton Contents
Remove all parts from the carton and identify each item as shown below.
Make sure all items are removed before recycling the packaging material.
1.
2.
3.
4.
5.
6.
7.
Sanitizing Power Head
Vacuum Canister
Handle and Hose
Telescoping Wand
Crevice Tool, Dusting Brush and Upholstery Tool
Spare Power Head Rear Wheels (2), Spare Stand-up Locks (2)
Owner’s Manual, Other Literature
4
3
1
5
2
6
7
7
VH04-MAN-2012_Web.indd 7
12/12/12 3:36 PM
4. Features
4.1 Vacuum Canister
1. ON/OFF Switch
2. Suction Control Slider
3. Low Airflow Indicator
4. Canister Handle
5. Retractable Power Cord
6. Cord Rewind Button
7. Dirt Cup
8. Release Latch
9. Canister Inlet
10. Canister Power Receptacle
11. Sponge Filter
12. HEPA-12 Pre-Filter
13. Cone Filter
14. HEPA-12 Exhaust Filter
15. Filter Access Panel
13
16. Access Panel Tabs
4
1
4.1
6
2
3
8
14
2
1
15
7
9
11
12
10
6
5
16
8
VH04-MAN-2012_Web.indd 8
12/12/12 3:36 PM
4. Features — continued
4.2 Handle and Hose
1.
2.
3.
4.
5.
6.
Power Head ON/OFF Switch
Airflow Selector
Wand Coupler
Hose Power Plug
Canister Coupler
Release Button
4.2
3
1
5
2
4
3
6
4
9
VH04-MAN-2012_Web.indd 9
12/12/12 3:36 PM
4. Features — continued
4.3 Sanitizing Power Head
1. Mode Selector Switch
2. Mode Indicator
3. Floor Selector
4. Syphon Receptacle
5. Syphon Release
6.Headlight
7. Sanitizing Light Bulb
8. Bulb Cover
9. Floor Sensor (safety switch)
10. Powered Brush Roll
11.Squeegee
12. Bulb Cover
Release Tabs
13. Rear Wheels
14.Stand-up
Locks
4.3
3
5
4
2
1
3
14
2
5
1
10
4
12
9
9
7
11
8
6
10
VH04-MAN-2012_Web.indd 10
13
12/12/12 3:37 PM
4. Features — continued
4.4 Telescoping Wand
1.
2.
3.
4.
4.4
Wand Receptacle
Release Button
Release Cuff
Sanitizing Power Head Coupler
1
2
3
1
2
4.5Accessories
1. Rear Wheels (2)
2.Stand-up Locks (2)
3
4.5
1. Crevice Tool
2. Dusting Brush
3. Upholstery Tool
4.6 Power Head Spare Parts
4
1
2
4.6
11
VH04-MAN-2012_Web.indd 11
12/12/12 3:37 PM
5. Assembly
Note: Before assembling or disassembling, always ensure that the
CleanWave® Sanitizing Bagless Vacuum has been unplugged from
the electrical outlet.
5.1
5.1 Connecting the Hose
1. Align the latch of the Canister Coupler (A) with the Canister
Inlet (B) and push until the latch clicks. To disconnect, press
the Release Button (C) on the Canister Coupler (A) and
pull out.
2. Insert the Hose Power Plug (D) into the Canister Power
Receptacle (E), pressing firmly to ensure a good connection.
To disconnect, grasp the Hose Power Plug (D) firmly and
pull out.
C
B
A
E
D
12
VH04-MAN-2012_Web.indd 12
12/12/12 3:37 PM
5. Assembly — continued
5.2 Connecting the Telescoping Wand
1. Align the Wand Coupler (A) with the Wand
Receptacle (B) and push together until
the latch clicks. To disconnect, press the
Release Button (C) and pull apart.
2. To operate the Telescoping Wand, grab
the Release Cuff (D) and push it forward to
extend the wand and pull it back to contract
the wand.
5.2
C
A
B
D
D
A
5.3
B
C
VH04-MAN-2012_Web.indd 13
5.3 Connecting the Sanitizing Power Head
1. Align the Sanitizing Power Head Coupler (A) with
the Syphon Receptacle (B) and push together
firmly until they latch. To disconnect, depress
(step on) the Syphon Release (C) and pull Wand
(D) out of Syphon Receptacle (B).
13
12/12/12 3:37 PM
6. CleanWave® Sanitizing Bagless Vacuum Operation
6.1Handle
1. Grasp the Canister Handle (A) to move
the CleanWave® Sanitizing Bagless
Vacuum from room to room. Before
moving, make sure the Dirt Cup is
secured and the canister is unplugged
from the electrical outlet.
A
6.1
C
6.2 Cord Release / Rewind
1. Pull on the Power Cord (B) to unwind
to desired length and insert the plug
into a convenient electrical outlet. The
yellow mark on the Power Cord (B)
shows the typical cord length. Do not
pull out beyond the red mark.
2. When done vacuuming, retract the
Power Cord by pressing the Cord
Rewind Button (C) and guiding the
Power Cord into the canister with one
hand.
A
C
B
14
VH04-MAN-2012_Web.indd 14
6.2
12/12/12 3:37 PM
6. CleanWave® Sanitizing Bagless Vacuum Operation — continued
Vacuum Suction Controls
6.3Canister
1. ON/OFF Button (A)
Press to turn the canister on and off.
2. Suction Control Slider (B)
Slide to the maximum position (closest to
ON/OFF Button) for the maximum suction
power.
6.4 Handle and Hose
1. Power Head ON/OFF Button (C)
Press to turn the Sanitizing Power Head on
and off.
2. Airflow Selector (D)
Slide the Airflow Selector to the open
position to reduce suction when cleaning
delicate fabrics.
6.5 Sanitizing Power Head
1. Floor Selector (E)
The three-position Floor Selector provides
adjustment for the desired cleaning surface.
Slide Floor Selector to match the floor type:
i)bare floor,
ii)low-pile carpet,
iii)high-pile carpet.
VH04-MAN-2012_Web.indd 15
6.3
A
6.4
B
C
D
6.5
E
15
12/12/12 3:37 PM
6. CleanWave® Sanitizing Bagless Vacuum Operation — continued
6.6 Operating Modes
The Sanitizing Power Head has three operating modes:
i) Brush
ii) Sanitizer/Deodorizer
iii) Both
1. The Mode Indicator (A) will illuminate as one of three colors
depending on the selected operating mode. The Sanitizing Power
Head will be controlled as shown in Table 6-1, with the default
power-up mode being Brush Mode:
A
B
6.6
Table 6-1. CleanWave® Sanitizing Bagless Vacuum Operating Modes
Operating Mode
Mode Indicator Color
Sanitizing Light
Powered Brush Roll
Suction
Function
Brush
Red
Off
On
On
Powered Brush Roll
& Suction
Sanitizer/Deodorizer
Blue
On
Off
On
Sanitizing Light & Suction
Both
Purple
On
On
On
Sanitizing Light, Powered Brush Roll & Suction
Surface Protection
Sanitizer/Deodorizer
Mode (Blue)
Both Mode (Purple)
(slow blinking)
Off
Sanitizer/Deodorizer
Mode (Off)
Both Mode (On)
On
Protects surfaces from overexposure to
Sanitizer/Deodorizer
Low Airflow
Red
(rapid blinking)
Off
Off
On
Notice: Clean all filters and clear any blockages.
See Section 7.
2. Press the Mode Selector Switch (B) repeatedly to select the desired operating mode.
3. Proceed to vacuum your floors and surfaces just as you normally would. You can sanitize your floors and surfaces at the
same time with little or no additional effort.
16
VH04-MAN-2012_Web.indd 16
12/12/12 3:37 PM
6. CleanWave® Sanitizing Bagless Vacuum Operation — continued
Brush Mode
Select Brush Mode for conventional vacuuming with a Powered Brush Roll and Powerful Suction. Use this setting when you wish
to operate the Powered Brush Roll without the Sanitizing Light. The Mode Indicator will illuminate as RED.
Sanitizer/Deodorizer Mode
Select the Sanitizer/Deodorizer Mode when you want to engage the Sanitizing Light and Powerful Suction. The Sanitizing Light
Bulb will turn on when the Floor Sensors detect a surface. When the Sanitizing Light Bulb is on, the Mode Indicator will illuminate
as BLUE. Selecting this mode disengages the Powered Brush Roll. The Sanitizing Light Bulb will turn off when the Floor Sensors
do not detect a surface, such as when the Sanitizing Power Head is lifted off the floor. When this occurs, the Mode Indicator will
not be illuminated (turns off).
Both Mode (Brush and Sanitizer/Deodorizer Modes Simultaneously)
Select the Both Mode when you want to engage the Sanitizing Light as well as the Powered Brush Roll and Powerful Suction.
When the Sanitizing Light Bulb is on, the Mode Indicator will illuminate as PURPLE. The Sanitizing Light Bulb will turn off when the
Floor Sensors do not detect a surface. When this occurs, the Mode Indicator will not be illuminated (turns off).
Surface Protection
When the Sanitizing Power Head is held or left stationary on a surface (i.e., not moving) for more than five seconds, the Sanitizing
Light Bulb will automatically turn off. When this occurs, the Mode Indicator will blink slowly (blink BLUE if in Sanitizer/Deodorizer
Mode; blink PURPLE if in Both Mode). Once movement is re-initiated, the Sanitizing Light Bulb will turn back on and the Mode
Indicator blinking will stop. This happens automatically and is one of the features designed to protect your surfaces.
17
VH04-MAN-2012_Web.indd 17
12/12/12 3:37 PM
6. CleanWave® Sanitizing Bagless Vacuum Operation — continued
6.7 Using the Accessories
The accessories can be used by
sliding them onto either the Wand
Coupler of the Hose and Handle
or to the Sanitizing Power Head
Coupler of the Telescoping Wand.
Crevice Tool
Use the crevice tool in tight
spaces, corners or along edges
such as baseboards and stairs.
You can use this tool in drawers,
cupboards and upholstery.
6.7
Dusting Brush
Select the dusting brush to
clean furniture, lamps, lighting
fixtures, blinds, drapes, shutters,
baseboards and registers.
Upholstery Tool
The upholstery tool can be used
to clean upholstery, carpeted
stairs and mattresses.
18
VH04-MAN-2012_Web.indd 18
12/12/12 3:37 PM
7. Care and Maintenance
Note: Always unplug the CleanWave® Sanitizing Bagless Vacuum from
the electrical outlet prior to completing any care and maintenance.
Dirt Cup
Empty the Dirt Cup (A) after each use.
7.1
C
B
A
7.1 How to Empty
1. Disconnect Power Cord from electrical outlet.
2. Remove the Dirt Cup (A) by lifting up on the Cup Release Latch (C).
3. Hold the Dirt Cup (A) over a garbage receptacle and press on the
Lid Release Latch (D) to open and empty the Dirt Cup (A). For bed
bug disposal, see note below.
4. After emptying the Dirt Cup (A), remove and clean the Cone Filter (E)
by rotating counter-clockwise and pulling out. If desired, rinse with
water, dry completely, and replace Cone Filter (E) by inserting and
rotating clock-wise to lock.
5. Close the Lid (F) and slide Dirt Cup (A) into the canister until it
securely latches.
Note: When disposing of bed bugs, tie or seal garbage bag tightly and
immediately remove from home. Do not leave inside home.
D
F
E
Note: When removed, emptied, and with filters removed, the Dirt Cup
(A) may be washed with mild detergent and water.
Note: The Cone Filter (E) is specially designed to trap and capture pet
hair. This filter may require frequent cleaning if exposed to large amounts
of pet or human hair.
VH04-MAN-2012_Web.indd 19
19
12/12/12 3:37 PM
7. Care and Maintenance — continued
7.2 Cleaning and Replacing Filters
For best performance, clean filters after each use. Replace filters
periodically depending on frequency of use and the amount of dirt
picked up with each use.
D
7.3
Note: If the Power Head Mode Indicator light begins to rapidly blink
RED, the airflow may be blocked. The Low Airflow Indicator (A) may also
be illuminated. Clean all filters as directed below.
A
C
How to Clean
Before cleaning or replacing any filters, disconnect Power Cord from
electrical outlet.
7.3 HEPA-12 Pre-Filter
The HEPA-12 Pre-Filter (B) is located outside dirt cup (C).
1. Remove the Dirt Cup (C) by lifting up on the Release Latch (D).
2. The HEPA-12 Pre-Filter (B) can be removed by pressing the
Release Tab (E) and rotating away from the Dirt Cup (C).
3. Gently tap the filter on the inside of a garbage receptacle to remove
excess dust and dirt. If very dirty can be cleaned with a damp cloth
(warm water) — should not be wet, just damp.
4. Replace filter by aligning Hinge Tabs (F) and rotating into place until
latched into the Dirt Cup (C).
B
E
F
20
VH04-MAN-2012_Web.indd 20
12/12/12 3:37 PM
7. Care and Maintenance — continued
7.4 Sponge Filter
The Sponge Filter is located behind the HEPA-12 Pre-Filter attached to the Dirt Cup.
1. Access the Sponge Filter by first removing the HEPA-12 Pre-Filter.
2. Grasp Sponge Filter and remove.
3. Hold filter under cold running water to remove dirt. Squeeze filter to remove excess
water and allow to dry completely.
4. Replace filter into Dirt Cup with proper orientation.
7.4
Note: Assure the Sponge Filter and the HEPA-12 Pre-Filter are installed properly before replacing the Dirt Cup into the Canister.
7.5 HEPA-12 Exhaust Filter
The HEPA-12 Exhaust Filter (A) is located under the Filter Access
Panel (B) on the back of the canister.
1. Remove the the HEPA-12 Exhaust Filter (A) by lifting up on
the Access Panel Tabs (C).
2. Grasp the filter by the tab (D) and lift away from canister.
3. Gently tap the filter on the inside of a garbage receptacle to
remove excess dust and dirt.
4. Replace filter by first aligning filter’s rear edge inside the lip of
the recess and then rotate filter down flat into recess (E).
5. Replace Filter Access Panel (B) by first aligning capture tabs,
then pressing down on the two Access Panel Tabs (C) to
latch in place.
B
7.5
C
A
D
E
7.6 Replacement Filters
A Replacement Filter Kit is available for purchase. Please refer to the Replacement Part List in Table 7-1 on page 28.
VH04-MAN-2012_Web.indd 21
21
12/12/12 3:37 PM
7. Care and Maintenance — continued
7.7 Cleaning and Replacing the Sanitizing Light Bulb
The Sanitizing Light Bulb (A) is located on the bottom of the
Sanitizing Power Head (B).
7.7a
B
A
C
Note: Before cleaning or replacing the Sanitizing Light
Bulb (A), disconnect Power Cord from electrical outlet.
Also disconnect the Sanitizing Power Head (B) from the
Telescoping Wand.
F
1. Turn the Sanitizing Power Head (B) over (bottom up)
with the Powered Brush Roll (C) closest to you.
D
2. With one hand, depress one Bulb Cover Release Tab (D)
by pulling it toward the Powered Brush Roll (C).
3. With the other hand, grasp the Squeegee (E) near the
Bulb Cover Release Tab (D) and gently lift the Bulb
Cover (F).
4. Repeat Steps 2 and 3 for the other Bulb Cover Release
Tab (D). The Bulb Cover (F) should now lift freely from the
Sanitizing Power Head (B).
F
E
D
C
E
5. Wipe the Sanitizing Light Bulb (A) clean with a soft,
dry cloth. Be careful not to leave fingerprints on the
Sanitizing Light Bulb (A) or the Reflector.
F
22
VH04-MAN-2012_Web.indd 22
12/12/12 3:37 PM
7. Care and Maintenance — continued
6. Should additional cleaning be required or if replacing the Sanitizing Light Bulb,
remove the Sanitizing Light Bulb (A) by depressing the Bulb Socket Tab (H)
with your thumb. Grasp the Bulb Cap Tab (I) with your other hand and lift the
Bulb Cap (G) and Sanitizing Light Bulb (A) away from the Power Head (B).
7. Gently grasp the Sanitizing Light Bulb (A) and remove from Bulb Socket.
8. Wipe Sanitizing Light Bulb (A) and Reflector clean with a soft, dry cloth.
9. To re-install the Sanitizing Light Bulb (A), place the Bulb Cap (G) over end of
the Sanitizing Light Bulb (A).
10. With your thumb, depress the Bulb Socket Tab (H).
11. Grasp the Sanitizing Light Bulb (A), align its four pin conductors with the four
holes in the Bulb Socket. Firmly insert the Sanitizing Light Bulb (A) into the
Bulb Socket.
12. Slide the Bulb Cap (G) end down into the Capture Slots (I) of the Sanitizing
Power Head (B) to secure the Sanitizing Light Bulb (A) in place.
13. To replace the Bulb Cover (F) , first assure the Squeegee (E) is slid on
completely. Grasp the Bulb Cover (F) by the Squeegee (E) with both hands,
place opposite edge into recessed slots, rotate down and press firmly until
latched securely.
A
7.7b
G
E
F
H
I
Note: Use only Verilux Sanitizing Light Bulbs. Use of non-Verilux light bulbs can result
in damage to the unit. To order a replacement Verilux Sanitizing Light Bulb, refer to the
Replacement Part List on Table 7-1.
7.8 Sanitizing Light Bulb Disposal
If disposing of a Verilux Sanitizing Light Bulb, follow local regulations for proper
disposal. For more information, see www.lamprecycle.org or call 1-866-666-6850.
VH04-MAN-2012_Web.indd 23
B
23
12/12/12 3:37 PM
7. Care and Maintenance — continued
7.9 Replacement Parts
7.9a
A) Rear Wheels (two included)
If a rear wheel on the Sanitizing Power Head of your
CleanWave should become cracked or come off, simply
push a replacement wheel onto the axel until you hear a
snapping sound signifying it is securely in place.
Insertion of wheel onto axel of the
Sanitizing Power Head
B) Stand-up Locks (two included)
Your CleanWave is designed with rubber locks to allow the
wand to remain upright when desired. To remove a lock,
press your thumb on the base of the lock, push up and pull
out as the lock is removed from the slot. To replace the lock,
insert a spare rubber lock into the slot as shown (note the
orientation) and slide downward so as to seat in the bottom
of the slot.
7.9b
Removal of Stand-up Lock
Insertion of Stand-up Lock
24
VH04-MAN-2012_Web.indd 24
12/12/12 3:37 PM
7. Care and Maintenance — continued
C) Replacement Part List
Table 7-1 Replacement Part List
For ordering information, see below.
Available Replacement Parts
Part Number
Price*
Telescoping Wand
VH04WD1
$39.95
Hose and Handle
VH04HH1
$39.95
Belt and Brush Roll Kit (Drive Belt, Brush Roll)
VH04BR1
$14.95
UV Bulb Kit (Sanitizing Light Bulb, Bulb Cap)
VH04RB1
$14.95
Bulb Cover Kit (Bulb Cover, Grill, Squeegee)
VH04BC1
$9.95
Attachment Kit (Crevice Tool, Dusting Brush, Upholstery Tool)
VH04AK1
$9.95
Filter Kit (HEPA-12 Pre-Filter, HEPA-12 Exhaust Filter, Sponge Filter)
VH04RF1
$14.95
*Prices do not include shipping and handling, and are subject to change without notice.
To order, please visit www.verilux.com or call our Order Department
24 hours a day, 7 days a week
at 1-800-454-4408
25
VH04-MAN-2012_Web.indd 25
12/12/12 3:37 PM
8. Troubleshooting
8.1Troubleshooting
To troubleshoot your vacuum, see Table 8-1 below.
Note: Always turn off the vacuum and disconnect the power cord from the electrical outlet before troubleshooting or servicing.
Table 8-1 Troubleshooting Your Vacuum
Problem
Vacuum cleaner
will not run, or runs
intermittently
Poor Suction:
Canister / Sanitizing
Power Head
Possible Cause
Possible Solution
Reference
Switch not “ON” on Canister.
Toggle switch to “ON” on canister.
6.3
Switch not “ON” on Hose/Handle.
Toggle switch to “ON” on hose handle.
6.4
No voltage at wall electrical outlet.
Try a different electrical outlet or contact a licensed
electrician.
N/A
Power cord not securely plugged in.
Plug power cord securely in wall electrical outlet.
6.2
Filter(s) are dirty or clogged.
Clean or replace filters.
Dirt Cup is full.
Empty Dirt Cup and clear Cone Filter.
7.1
Blockage in Sanitizing Power Head Syphon,
Wand or Hose.
Remove wand from syphon receptacle and carefully
remove blockage.
5.2
Suction power controls open.
Slide Suction Control Slider to maximum position and
Airflow Selector to closed position; set Floor Selector
for bare floors.
6.3—6.5
Loose hose or wand connection.
Check that all hose and wand connections are
secured properly.
5.1—5.3
7.1—7.6
26
VH04-MAN-2012_Web.indd 26
12/12/12 3:37 PM
8. Troubleshooting — continued
Problem
Possible Cause
Possible Solution
Sanitizing Power Head Coupler or Wand
Coupler not securely fastened.
Assure Sanitizing Power Head and Hose/Handle are
firmly connected.
5.3
Hose Power Plug not plugged into Canister
Firmly insert Hose Power Plug.
5.1
Switch not “ON” on Hose/Handle.
Toggle switch to “ON” on hose handle.
6.4
Floor Sensors may not be properly activated.
Assure the Floor Sensors actuate properly when
Sanitizing Power Head lies flat on cleaning surface.
NA
Sanitizing Power Head is stationary.
Push Sanitizing Power Head back and forth. If the
Sanitizing Power Head is stationary for five or more
seconds, the Sanitizing Light Bulb will turn off.
6.6
Floor
Protection
Sanitizing Light Bulb may be burned out.
Replace Sanitizing Light Bulb.
Sanitizing Light
Bulb turns off
unexpectedly
Sanitizing Power Head is stationary.
Push Sanitizing Power Head back and forth. If the
Sanitizing Power Head is stationary for five or more
seconds, the Sanitizing Light Bulb will turn off.
6.6
Floor
Protection
Brush Roll will not
turn
Belt may be broken.
Order a replacement Belt and Brush Roll Kit (VH04BR1)
Table 7-1
Sanitizing Power
Head will not run, or
runs intermittently
Sanitizing Light Bulb
does not illuminate
Reference
7.7
Note: Any other servicing should be completed only by authorized service personnel.
27
VH04-MAN-2012_Web.indd 27
12/12/12 3:37 PM
9. One-Year Limited Warranty
ATTENTION! ONCE OPENED, PLEASE DO NOT RETURN THIS PRODUCT TO THE STORE WHERE IT WAS
PURCHASED FOR REPAIR OR REPLACEMENT!
Many questions may be answered by visiting www.verilux.com, or you may call our Customer Service Department at
800-786-6850 during normal business hours.
This limited warranty is provided by: Verilux, Inc., 340 Mad River Park, Waitsfield, VT 05673
Covered By This Warranty
Verilux warrants this product when used and maintained
in normal household use and in accordance with the
Owner’s Manual to be free from original defects in material
and workmanship for a period of one year from the date of
the original retail purchase (the “Limited Warranty Period”)
from Verilux or an authorized Verilux distributor. During
the limited warranty period, Verilux, Inc., will, at its option,
repair or replace defective parts of this product, at no
charge to the customer, to correct any such defects.
Not Covered By This Warranty
This warranty does not cover the brush roll, drive belt,
UV-C bulb, motor brushes, wheels or the filters. This
warranty does not include any postage, freight, handling,
insurance, or delivery fees. This warranty does not cover
damage, defect or failure caused by or resulting from
accident, external destruction, alteration, modification,
abuse, misuse or misapplication of this product. This
warranty does not cover damage to the product
resulting from return shipping or handling. Verilux advises
purchasing shipping insurance to protect your investment
in the product.
Additional Warranty Terms
This warranty is non-transferable and may not be
assigned. The Limited Warranty Period will not be
extended by any replacement or repair performed under
this warranty.
THIS WARRANTY IS THE EXCLUSIVE WARRANTY AND
REMEDY, ALL OTHER WARRANTIES, EXPRESSED
OR IMPLIED, INCLUDING WARRANTIES OF
MERCHANTABILITY OR FITNESS FOR PARTICULAR
PURPOSE, ARE DISCLAIMED, IN NO EVENT WILL
VERILUX BE LIABLE FOR ANY SPECIAL, INDIRECT,
INCIDENTAL OR CONSEQUENTIAL DAMAGES OF
ANY KIND OR NATURE TO OWNER OR ANY PARTY
CLAIMING THROUGH OWNER, WHETHER BASED
IN CONTRACT, NEGLIGENCE, TORT OR STRICT
PRODUCTS LIABILITY OR ARISING FROM ANY CAUSE
WHATSOEVER. Some states do not allow the exclusion of
consequential damages, so the above exclusion may not
apply to you. This warranty gives you specific rights; you
may also have others that vary from state to state.
Making A Warranty Claim
Proof of purchase is required for all warranty claims.
Return Authorization is required for all returns. To
obtain a Return Authorization, please contact the Verilux
Customer Service Department at 800-786-6850.
If, during the first year of ownership, this product fails to
operate properly, it should be returned as specified at
www.verilux.com/warrantyreplacement or as instructed by
a Verilux customer service representative at
800-786-6850.
Due to ongoing improvements, the actual product may
have slight variations from the one described in this
manual.
Please visit our website at www.verilux.com or call our Customer Service Department at
1-800-786-6850
Representatives are available Monday — Friday, 9:00a.m. to 5:00p.m Eastern Time
Do not return product for warranty claim without a Return Authorization number.
VH04-MAN-2012-WEB
VH04-MAN-2012_Web.indd 28
Printed in China for Verilux, Inc.
© Copyright 2012 Verilux, Inc. All rights reserved.
12/12/12 3:37 PM