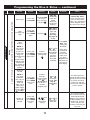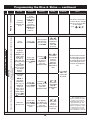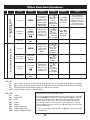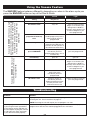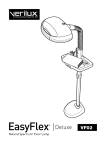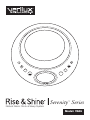
1
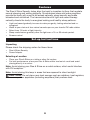
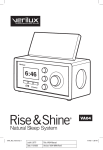
SLEEP WAKE OFF SET Natural Alarm Clock & Sleep System SOUND Serenity™ Series Model: VA06 Dear Customer, Thank you for purchasing the Verilux® Rise & Shine® Serenity™ Natural Alarm Clock & Sleep System. You now own an innovative product, manufactured to the highest standards and backed by a one-year limited warranty. Many other healthy-lighting products are available through our catalog and online. To request a free copy of our catalog, call us toll-free at 1-800-786-6850. You may also visit us online at www.verilux.com to learn more about all our quality Verilux products. Your satisfaction means everything to us. We look forward to serving you now and in the future. Have a bright day! Nicholas Harmon President, Verilux, Inc. 2 Table of Contents Important Safeguards. . . . . . . . . . . . . . . . . . . . . . . . . . . . . . . . . . . . . . . . . . . . . 4–5 FCC Compliance. . . . . . . . . . . . . . . . . . . . . . . . . . . . . . . . . . . . . . . . . . . . . . . . . . . 5 Features. . . . . . . . . . . . . . . . . . . . . . . . . . . . . . . . . . . . . . . . . . . . . . . . . . . . . . . . . . 6 Set-up Instructions Unpacking. . . . . . . . . . . . . . . . . . . . . . . . . . . . . . . . . . . . . . . . . . . . . . . . . . . 6 Selecting a Location . . . . . . . . . . . . . . . . . . . . . . . . . . . . . . . . . . . . . . . . . . . 6 Display and Controls Front of Unit. . . . . . . . . . . . . . . . . . . . . . . . . . . . . . . . . . . . . . . . . . . . . . . . 7–8 LCD Display. . . . . . . . . . . . . . . . . . . . . . . . . . . . . . . . . . . . . . . . . . . . . . . . . . 8 Back of Unit. . . . . . . . . . . . . . . . . . . . . . . . . . . . . . . . . . . . . . . . . . . . . . . . . . 9 Programming the Rise & Shine. . . . . . . . . . . . . . . . . . . . . . . . . . . . . . . . . . . . 10–12 Other Functions/Features. . . . . . . . . . . . . . . . . . . . . . . . . . . . . . . . . . . . . . . . . . . 13 Using the Snooze Feature. . . . . . . . . . . . . . . . . . . . . . . . . . . . . . . . . . . . . . . . . . . 14 Troubleshooting. . . . . . . . . . . . . . . . . . . . . . . . . . . . . . . . . . . . . . . . . . . . . . . . 14–15 Care and Maintenance Cleaning. . . . . . . . . . . . . . . . . . . . . . . . . . . . . . . . . . . . . . . . . . . . . . . . . . . . 15 Technical Specifications . . . . . . . . . . . . . . . . . . . . . . . . . . . . . . . . . . . . . . . . . . . . 15 Warranty . . . . . . . . . . . . . . . . . . . . . . . . . . . . . . . . . . . . . . . . . . . . . . . . . . . . . . . . 16 3 READ ALL INSTRUCTIONS BEFORE USING Important Safeguards DANGER: • To avoid electrocution, do not use this device near water. WARNING: • Do not dismantle. • Do not use with power supply voltage other than 120 VAC. • Do not operate in close proximity to flammable or combustible vapors, such as aerosol spray products, or where oxygen is being administered. • To avoid overheating the electronics or increasing the risk of fire, never cover the product. • Do not block any ventilation openings. They are necessary for proper function of the lamp, and blocking them may cause overheating of the electronics and increase risk of fire. • Battery leakage may cause damage to the unit. Do not use the device if the battery is leaking. Avoid direct skin or eye contact with any material leaking from the battery. • BATTERY SAFETY PRECAUTIONS: Improper use of this or any batteryoperated product may cause batteries to leak or explode, which may cause personal injury or damage to electronic equipment. • Do not mix BATTERY TYPES: Batteries are commonly available in alkaline, standard (carbo-zinc) and rechargeable (nickel-cadmium). DO NOT MIX. Use only three alkaline, three standard or three rechargeable batteries. • Do not mix OLD and NEW batteries. • Remove batteries when the product is not in use for extended periods of time. • Dispose of batteries according to local regulations. Do not dispose of batteries in fire. • Do not operate this product if it has been damaged in any way. For example, if the power supply cable or plug has been damaged or liquid has been spilled on or objects have fallen on it, if it has been exposed to rain or moisture, it does not operate normally or it has been dropped. There are no userserviceable parts in this product. CAUTION: • For indoor use only. • This lamp is not for use with light dimmers, timers, motion detectors, voltage transformers or extension cords. • Unplug lamp during lightning storms or when unused for long periods. 4 CAUTION: — continued • Do not use solvents or cleaners containing abrasives or ammonia-based cleaners on this product. After cleaning, all moisture should be properly wiped away and dried before restoring power. • Avoid placing this product in areas that are dusty, humid/moist, lack ventilation or are subject to constant vibration. • After cleaning, properly wipe and dry the lamp prior to restoring power. • Do not place near heat sources such as radiators, heat registers, stoves or any other apparatus (including amplifiers) that produce heat. • Modifications not authorized by the manufacturer will void the warranty and may result in personal injury. SAVE THESE INSTRUCTIONS FCC Compliance This device complies with part 15 of the FCC Rules. Operation is subject to these two conditions: (1) this device may not cause harmful interference, and (2) this device must accept any interference received, including interference that may cause undesired operation. This equipment has been tested and found to comply with the limits for a Class B digital device, pursuant to part 15 of the FCC Rules. These limits are designed to provide reasonable protection against harmful interference in a residential installation. This equipment generates, uses and can radiate radio frequency energy and if not installed and used in accordance with the instructions, may cause harmful interference to radio communications. However, there is no guarantee that interference will not occur in a particular installation. If this equipment does cause harmful interference to radio or television reception, which can be determined by turning the equipment off and on, the user is encouraged to try to correct the interference by one or more of these measures: • Reorient or relocate the receiving antenna. • Increase the separation between the equipment and receiver. • Connect the equipment into an outlet on a circuit different from that to which the receiver is connected. • Consult the dealer or an experienced radio/TV technician for help. 5 Features The Rise & Shine Serenity helps align the body’s circadian rhythms that regulate normal sleeping and waking patterns. Synchronized sleep and wake programs provide the body with cues to fall asleep naturally, sleep soundly and wake refreshed and revitalized. The harmonious blend of light and sound therapy naturally directs the body to energized waking and healthy sleep patterns. • • • • • Light and sound gradually increase to wake you gently, feeling refreshed and reenergized Wake to your choice of four natural soundscapes or your favorite FM radio station Select from 15 levels of light intensity Sleep mode feature gradually dims the light over a 15- or 30-minute period. Snooze control Set-up Instructions Unpacking Please check the shipping carton for these items: • • Rise & Shine Serenity Power Adapter Selecting a Location • • Place your Rise & Shine on a table or other flat surface. For best performance, place your Rise & Shine within two feet of a wall and avoid placing directly in a corner. Note: Avoid placing your Rise & Shine on a metal surface, which could interfere with FM reception. Note: Avoid placing this lamp in areas that are exposed to direct sunlight. CAUTION: Do not place near heat sources such as radiators, heat registers, stoves or any other apparatus (including amplifiers) that produce heat. 6 Display and Controls 8 9 1 1 SLEEP WAKE 2 OFF SOUND SET 3 4 5 6 10 7 Front of Unit Button Standard Clock Mode: Programming Mode: 1 After pressing one of the function buttons (2 through 7), use to adjust your various audio and light settings Use to customize many of the settings you'll make, including time of day, light illumination level, and sound level 2 1) press to set the display LED illumination level, 2) Press and hold to turn on the light to its previous or to change the light level. intensity. Use the Press and hold to turn on the light to its previous intensity. Use or to change the light level. With the radio or soundscape playing, press to or to change it. display the volume. Use the 3 4 WAKE Press to activate the alarm to activate at the time and with the audio and light you've programmed. Press and hold to initiate WAKE programming. You can set: 1. t he wake time 2. the wake illumination type, duration and desired maximum intensity 3. the wake-up sound, duration and desired maximum volume. 5 SLEEP Turns on audio and light to previous settings. To , then adjust the audio volume, press and hold or . To adjust light intensity, press and use , then use or . hold 7 Press and hold to initiate SLEEP programming. You can set: 1. t he time at which the light and/or sound go off. 2. t he sleep illumination type, duration and desired intensity at the starting point 3. t he sleep sound, duration and desired initial volume. Display and Controls — continued Button 6 7 OFF Standard Clock Mode: Programming Mode: Press to turn off a sound source or the light Press to complete any programming step SET Press to turn on the radio station or soundscape you or to change your have selected. Use with to adjust the volume. May also selection. Press be used to turn it off. SOUND 8 LIGHT 9 SNOOZE Tap to turn on the light. No function Tap to turn on the light, or, when the alarm sounds, to activate the Snooze function. No function 10 LCD Display WAKE B SLEEP OFF SET 12 58 SOUND PM A C A PM indicator (If nothing appears here, the time shown is AM.) B Programming and status icons: Alarm , light and sound or icons flash during programming to indicate which feature is being programmed. When in standard time mode: • • • visible in the display indicates the alarm is activated; visible in the display indicates the light will go on at the time you’ve programmed; indicates the radio will go on at the time you’ve programmed; indicates a soundscape will go on at the time you’ve programmed. • NOTE: appears and represents all six of the available soundscapes (A1 and N1 through N5). C Time of day indicator 8 Display and Controls — continued Verilux Patent: 6,236,622 F E D Back of Unit D Back-up battery compartment: To keep the Rise & Shine working during a power outage, open the compartment and insert three AAA batteries (not included). Properly orient each battery to ensure correct polarity. E Power source: Insert power cord jack into the “DC5V” receptacle. Plug the other end into a standard outlet. F Reset: To reset the Rise & Shine to its original settings, insert an object (e,g., the tip of a pen or the end of a paper clip) into the RESET opening. This should restore all original settings and will require that you re-program the unit. 9 Programming the Rise & Shine NOTE: If you make an error at any time, press OFF/SET to re-start the step you had been programming. General Set-up Or, wait about eight seconds, and, once the unit returns to the time display mode, you may begin the step again. To Set: Action: Display: Action: To Finish: Notes Time Press and hold OFF/ SET Flashing 12:00 (or the last time you have set) or to desired time (Hold button to accelerate display.) Press OFF/ SET again If PM is not showing, the time displayed is AM. Intensity of LCD Display Light In standard clock mode, press to turn display backlight on and off. Press Key #1: 15light comes on faintly and increases in brightness for 15 minutes prior to alarm sounding 30light comes on faintly and increases in brightness for 30 minutes prior to alarm sounding C1 Calming Colors Illumination comes on when alarm sounds OFF wake-up light function is deactivated Key #2: A1chime rd radio (FM)* N1birds N2ocean N3stream N4 ocean with music N5 stream with music OFF sound is deactivated** *To find and set your favorite FM station: If you have selected rd (FM radio) for your sound, set the station by pressing WAKE once again. The radio frequency (“MHz”) and “rd” appear on the display. Press ▲ or ▼ to select your favorite radio station. Start an automatic station search by holding ▲ or ▼ for a few seconds and then releasing. The search stops when a strong signal reception has been found. Press ▲ or ▼ until you have found your desired station. **If you set the wake-up light duration to OFF, this setting cannot be set to OFF also. 10 Programming the Rise & Shine — continued Waking Awaken to the nature sound, radio station and/or light intensity you have programmed. Programming To Set: Action: Display: Action: Alarm Time Press and Hold WAKE Flashing 12:00 (or the last time you have set) and or to desired wake time (Hold button to accelerate display.) Light Duration and Type Press and hold WAKE. Press WAKE again. Notes This step does not activate the alarm; it only sets the alarm time. To activate the alarm, see "Turning the Alarm Program On & Off" later in this section. or for illumination type and duration (See Key #1, page 10 or 13.) Flashing Maximum Light Intensity NOTE: If you set the light type to “OFF” in the previous step, the programming will automatically skip this step and initiate the “Wake-up Sound” step below. To Finish: Press OFF/ SET. Your setting will be stored. Press and hold WAKE. Press WAKE twice more. Initial or previous light setting and or for maximum desired light intensity. (Choose between LL1, LL2 and LL3.) After eight seconds of inactivity, the unit will store what has been programmed and return to the normal time display. Wake-up Sound NOTE: If you select radio rd in this step, an additional step will allow you to select your radio station. or Use the to do so. Volume of Wake-up Sound Press and hold WAKE. Press WAKE three times more. Press and hold WAKE. Press WAKE four times more. Initial or previous sound setting or and , depending on what is currently programmed , and previous sound-level setting 11 or to choose sound (See Key #2, page 10 or 13.) The wake-up/alarm sound you play and the light (if you've activated it) will stay on for 60 minutes or until you turn them off, whichever occurs sooner. or to choose L1, L2 or L3. Five minutes before the set alarm time, the wake-up sound will begin at a low volume and get progressively louder until, at alarm time, it reaches the maximum volume you have set. The sunset simulator/sleep timer allows you to fall asleep to the nature sound, radio station and/or light intensity you have programmed. Programming — continued Sleeping Waking — continued Programming the Rise & Shine — continued To Set: Action: Turning the Alarm Program On & Off In the normal time mode, press WAKE to turn off the alarm program and WAKE again to turn it back on. Timer Duration Display: Action: To Finish: Notes The alarm is activated if the icons for the sounds you have set are visible on the display , , ). (e.g., Press and hold SLEEP Flashing 15 (or the last time you have set) and SLEEP or to desired sleep timer duration: 15 or 30 (minutes) Press and hold SLEEP. Press SLEEP again. Flashing and OFF (or the last brightness you have programmed). or for maximum desired light intensity. (Choose between OFF, LL1, LL2, LL3 or C1.) Lightto-Sleep Brightness NOTE: If you set the light brightness to “Off” in this step, the programming will automatically proceed to the next step, “The Sleep Sound,” below. Press OFF/ SET. Your setting will be stored. The Sleep Sound NOTE: If you select radio rd in this step, an additional step will allow you to select your radio station. or Use the to do so. Maximum Sound Level Over the course of the timer duration you have set, the light intensity will slowly diminish from the setting you have chosen to completely off. Press and hold SLEEP. Press SLEEP twice more. Press and hold SLEEP. Press SLEEP three times more. Flashing and N1 (or the last setting you have programmed). L1 appears on display (or the last setting you have programmed). 12 or to choose sound (See Key #2, page 10 or 13.) or to choose volume (Choose between L1, L2 or L3.) This step will set the volume at which the audio portion of your sunset program begins (if you’ve programmed one). The volume will stay constant and then, beginning at five minutes before the end of the duration you have chosen, diminish to fully off. Other Functions/Features Using as Sound Source (Radio) Using as Sound Source (Soundscapes) To Set: Action: Display: Action: To Finish: Notes Turn On Press SOUND The code for the sound you previously programmed appears in the display. [See Key#2, page 10 or 13.].) or Press to scroll through sounds. (See Key #2, page 10 or 13.) Press OFF/ SET. Your setting will be stored. The unit will play the sound source at the volume you programmed in the "Waking" section of the Programming instructions (above.) To Set the Volume Press SOUND, then press and hold . L15 appears (or the level that you have programmed previously). or to set desired volume level -- between L1 and L30. Press SET/ OFF. Your setting will be stored. Turn Off Press OFF/ SET rd or the last programmed soundscape appears on display If required, or press to scroll until rd appears in the display. Turn On Press SOUND To Change the Station With radio on, press SOUND To Set the Volume With radio on, press . Turn Off Press OFF/ SET Use or Use to find desired station. L15 appears (or the level that you have programmed previously). or to set desired volume level -- between L1 and L30. Use Key #1: 15light comes on faintly and increases in brightness for 15 minutes prior to alarm sounding 30light comes on faintly and increases in brightness for 30 minutes prior to alarm sounding C1 Calming Colors Illumination comes on when alarm sounds OFF wake-up light function is deactivated Key #2: A1chime rd radio (FM)* N1birds N2ocean N3stream N4 ocean with music N5 stream with music OFF sound is deactivated** *To find and set your favorite FM station: If you have selected rd (FM radio) for your sound, set the station by pressing WAKE once again. The radio frequency (“MHz”) and “rd” appear on the display. Press ▲ or ▼ to select your favorite radio station. Start an automatic station search by holding ▲ or ▼ for a few seconds and then releasing. The search stops when a strong signal reception has been found. Press ▲ or ▼ until you have found your desired station. **If you set the wake-up light duration to OFF, this setting cannot be set to OFF also. 13 Using the Snooze Feature Sound Light Timing Responses Responses immediately stays off goes off five minutes later stays off starts at a low level and begins a 15-minute cycle during which it builds in intensity until it reaches the maximum brightness you have programmed five minutes before the programmed wake-up time starts at low volume and builds progressively to the wake-up level you have programmed continues 15-minute cycle at wake-up time at full volume you have programmed. (Will play for one hour or until you turn it off, whichever comes first.) continues 15-minute cycle 20 minutes after you pressed SNOOZE continues to play at full volume you have programmed (unless you've turned it off). reaches maximum intensity you have programmed If you press SNOOZE five minutes or less earlier than the alarm time you have programmed: If you press SNOOZE after the wake-up light goes on (15 or 30 minutes before the wake-up time, depending on what you’ve programmed) but before the wake-up audio starts (five minutes before the wake-up time you have programmed): The SNOOZE feature behaves differently, depending on when in the alarm cycle you press the SNOOZE button on top of the Rise & Shine: immediately goes off goes off five minutes later begins at low volume starts at a low level and begins a 15-minute cycle during which it builds in intensity until it reaches the maximum brightness you have programmed 10 minutes later has increased in intensity and is now at the full volume you have programmed continues 15-minute cycle 20 minutes later continues to play at full volume you have programmed for one hour or until you tune it off, whichever comes first reaches maximum intensity you have programmed Troubleshooting Problem Solution The device is not working correctly. Unplug from power, wait 30 seconds, then plug in again. If this is unsuccessful, try resetting the unit. See instructions on page 10. NOTE: Resetting the unit will require you to reprogram it as well. When I program the alarm or sleep cycle using the back-up batteries as the power source and later use the AC adapter to plug the unit into a wall outlet, the alarm and sleep cycles do not function properly. Install new or fully charged batteries and reprogram the alarm and sleep cycles, or program them with the Rise & Shine plugged into the wall outlet. 14 Troubleshooting — continued Problem Solution Lamp does not light during wake and sleep modes. For proper alarm lamp operation: 1) c omplete setting and activating the alarm at least 30 minutes before you want it to sound. 2) m ake sure the power cord is plugged in. The lamp will not function when the unit is on battery power. No light. In the standard time mode, tap the top of the unit. In the programming mode, recheck programming instructions. NOTE: When the unit is running on back-up batteries, the light will not work. No radio or no sound. Volume button twice. This activates the audio Check the volume by pressing the or buttons to adjust the volume. to the sound you’ve programmed. Use the Alarm doesn’t function. Verify the correct AM/PM setting. Verify that the alarm is activated. An alarm is activated if an alarm or icon is showing in the LCD display and the clock is displaying the time of day. If not, press the WAKE button to activate the alarm or initiate alarm programming. (See page 11.) Care and Maintenance Cleaning Disconnect the Rise & Shine from the power outlet. Use only a dry, soft cloth and a mild non-abrasive cleaner to clean the lamp. CAUTION: Do not use solvents or cleaners containing abrasives, or ammoniabased cleaners on this product. CAUTION: After cleaning, properly wipe and dry the lamp prior to restoring power. Technical Specifications Rise & Shine® Serenity™ Natural Alarm Clock & Sleep System Dimensions 7.6"H x 2.5"D x 7.3"W LCD Display — Dimensions: 1.5"H x 2.5"W Oval Environment — Operating Temperatures: 15°C to 35°C; 56°F to 95°F; Storage Temperatures: 0°C to 40°C; 32°F to 104°F Relative Humidity: 5% to 95% noncondensing LEDs — Quantity: 21 Power Input Power: 5V DC, 1.2 AMP from a 120/240 VAC, 50/60Hz AC/DC Convertor 4.5V DC from 3 Type AAA Alkaline Batteries. Power — continued Recommended AC/DC Converter Line Cord is SWITCHING POWER SUPPLY MODEL S006MU0500120. ETL Listed Cord/Plug — Plug Type: Non-polarized/ USA two prong 60" cord length Intellectual Property — Patent: 6,236,622; Trademark: Rise & Shine®, Serenity™ Safety — ETL Listed Warranty — One–Year Limited 15 One-Year Limited Warranty ATTENTION! ONCE OPENED, PLEASE DO NOT RETURN THIS PRODUCT TO THE STORE WHERE IT WAS PURCHASED FOR REPAIR OR REPLACEMENT! Many questions may be answered by visiting www.verilux.com, or you may call our Customer Service Department at 800-786-6850 during normal business hours. This limited warranty is provided by: Verilux, Inc., 340 Mad River Park, Waitsfield, VT 05673 Verilux warrants this product to be free from defects in material and workmanship for a period of one year from the date of the original retail purchase from Verilux or an authorized Verilux distributor. Proof of purchase is required for all warranty claims. During the limited warranty period, Verilux, Inc. will, at its option, repair or replace defective parts of this product, at no charge to the customer, subject to the following limitations: This limited warranty does not include any postage, freight, handling, insurance or delivery fees. This warranty does not cover damage, defect or failure caused by or resulting from accident, external destruction, alteration, modification, abuse, misuse or misapplication of this product. This warranty does not cover damage to the product resulting from return shipping or handling. The use of shipping insurance is recommended to help protect your product. Return Authorization is required for all returns. To obtain a Return Authorization, please contact the Verilux Customer Service Department at 800-786-6850. If, during the first year of ownership, this product fails to operate properly, it should be returned as specified at www.verilux.com/warrantyreplacement or as instructed by a Verilux customer service representative at 800-786-6850. Note: Verilux recommends using a quality surge suppressor on all electronics equipment. Voltage variations and spikes can damage electronic components in any system. A quality suppressor can eliminate the vast majority of failures attributed to surges and may be purchased at electronics stores. Due to ongoing improvements, actual product may have slight variations from the product described in this manual. Please visit our web site at www.verilux.com or call our Customer Service Department at 1-800-786-6850 Representatives are available 8 a.m. – 10 p.m. M – S, 9 a.m. – 8 p.m. Sunday EST 340 Mad River Park, Waitsfield, VT 05673 VA06-MAN-Rev16 Printed in China for Verilux, Inc. © Copyright 2012 Verilux, Inc. All rights reserved.