1
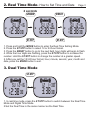
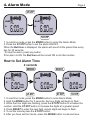
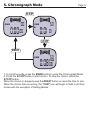
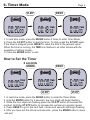
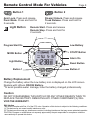
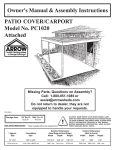
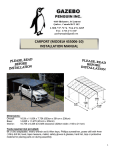
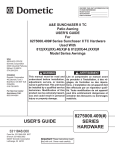
007 Remote Wrist Watch
Advanced Digital Wrist Watch with Alarm and Remote Starter
Control Capabilities.
ULTRA
Warning!!
CARBON MONOXIDE MAY CAUSE SERIOUS INJURY, EVEN DEATH!
The system must be placed into Service Mode before any service work is started on the
responsibilityofofthethe
userowner
to place
the system
in isService
Mode
vehicle.ItItisisthe
the sole responsibility
vehicle
to ensure
that this
done. The
manufacturer
accepts
no liability
or responsibility
for accidental
theenclosed
vehicle.
when
parking
a vehicle
equipped with
a remote starting
starterinofan
CARBON MONOXIDE - Never Start in an Enclosed Building (Garage, Carport etc...)
area
garage,
partially
enclosed
area be
ex:Installed!
carport, or when the vehicle is being serviced.
- Theex:
Hood
Pin Safety
Switch
Must Always
1. Change from Mode to Mode
Page 2
MODE
SU 5-16
P
ALM
12:38 38
A
Real Time Mode
AL
6:00 00
Alarm Mode
MODE
MODE
MODE
MODE
SU 5-16
P
18:88 88
Program Start Mode
0:00 00
CHR
TMR
Timer Mode
0:00
Chronograph Mode
Press and release the MODE button to switch from Mode to Mode.
MODE BUTTON
Default Screen
Mode Button Once
Mode Button Twice
Mode Button Three times
Mode Button Four times
Mode Button Five times
00
00
MODE SELECT
Real Time Mode
Alarm Mode
Chronograph Mode
Timer Mode
Program Start Mode
Returns to Real Time Mode
2. Real Time Mode- How to Set Time and Date
2 seconds
MODE
P
SU 12-16
38
12:38
P
Page 3
RESET
SU 12-16
38
12:38
TMR
P
SU 12-16
38
18:38
TMR
ST.STP
ST.STP
1. Press and hold the MODE button to enter the Real Time Setting Mode.
2. Press the ST.STP button to select 12 or 24 hour format.
3. Press the RESET button to go to the next field, hour digits will begin to flash.
4. While the hour digits are flashing, press the ST.STP button to increase the
number. Hold the ST.STP button to change the number at a greater speed.
5. Aftter you set the 12/ 24 hour format, hour, minute, second, year, month and
date, press the MODE button to exit.
3. Dual Time Mode
ST.STP
P
SU 12-16
38
12:38
12 1-38
38
A
P
3:38
1. In real time mode, press the ST.STP button to switch between the Real Time
Mode and Digital Time Mode.
2.Set the Dual Time in the same manner as the Real Time.
4. Alarm Mode
Page 4
ST.STP
ALM
A
AL
ALM
6:00 00
A
AL
6:0000
ST.STP
1. In real time mode, press the MODE button to enter the Alarm Mode.
2. Press the ST.STP button to set the alarm ON/OFF.
When the Bell Icon is displayed, the alarm will sound at the preset time every
day for 30 seconds.
-To stop the alarm, press any button.
If the alarm is ON, the Bell Icon will be turned ON in all other modes.
How to Set Alarm Time
2 seconds
MODE
ALM
A
AL
RESET
ALM
ALM
6:00 00
A
ST.STP
6:0000
8:00 00
ST.STP
ST.STP
1. In real time mode, press the MODE button to enter Alarm Mode.
2. Hold the MODE button for 2 seconds, the hour digits will begin to flash.
3. While the hour digits are flashing, press the ST.STP button to increase the
number. Hold the ST.STP button to increase the digits at a greater speed.
4. Press RESET to enter the next field, minute digits will begin to flash.
5. To set the minute press the ST.STP button.
6. After you have set the minute, press the MODE button to exit and save.
5. Chronograph Mode
Page 5
ST.STP
CHR
0:00
00
00
CHR
A
0:01
53
01
ST.STP
RESET
CHR
0:08
53
08
TMR
1. In real time mode, press the MODE button to enter the Chronograph Mode.
2. Press the ST.STP button to start chrono. To stop the chrono, press the
ST.STP button.
When the chrono is stopped press the RESET button so reset the time to zero
When the chrono time is running, the “CHR” icon will begin to flash in all other
modes with the exception of Setting Modes.
6. Timer Mode
Page 6
RESET
ST.STP
00:2000
TMR
00:18 58
0:00 00
TMR
TMR
1. In real time mode, press the MODE button 3 times to enter Timer Mode.
2. Press the ST.STP button to start the timer. To stop, press the ST.STP again.
If the timer is stopped, press RESET to reset the time to the present value.
When the timer is running, the TMR Icon flashes in all other modes with the
exception of setting modes.
3. Press the MODE button to exit.
How to Set the Timer
2 seconds
MODE
00:0000
TMR
RESET
00:0000
TMR
ST.STP
6:00
TMR
00
ST.STP
1. In real time mode, press the MODE button to enter the Timer Mode.
2. Hold the MODE button for 2 seconds, the hour digits will begin flashing.
3. While the hour digits are flashing press the ST.STP button to increase the
number. Hold the ST.STP button to increase the number at a greater speed.
4. Press RESET to go to the next field, minute and seconds will begin flashing.
5. After you have set the minute and seconds , press the MODE button to save
and exit
7. Program Start Mode
Page 7
ST.STP
MODE
PRO
P
PS 6-20
38
12:38
PRO
PS 6-20
38
SU 5-16
38
A
A
P
12:38
A
12:38
1. In real time mode, press the MODE button 4 times to enter the Program Start
mode.
2. Press the ST.STP button to change the ON/OFF function of the Program Start.
When the “PRO” icon is ON, the engine will start and run at the preset time. The
remote will beep three times to confirm starting of the engine. The remote start
will only activate when the system is armed and within RF operating range.
3. Press the MODE button to exit.
How to Set the Engine Start
2 seconds
MODE
RESET
PRO
P
PS 6-20
38
12:38
TMR
PRO
PS 6-20
38
A
A
P
12:38
TMR
ST.STP
PS 8-20
38
A
P
12:38
TMR
ST.STP
1. Press the MODE button to enter the Program Start Mode.
2. Hold the MODE button for 2 seconds, the hour digits will start flashing.
3. While the digits are flashing, press the ST.STP button to increase the number.
Hold down the ST.STP button to change the number at a greater speed.
4. To set the minute, press the RESET button.
5. After you set the hours and minutes, press the MODE button to exit and save.
Remote Control Mode For Vehicles
Button 1
Button 2
Arm/ Lock- Press and release.
Panic Mode- Press and hold for
2 seconds.
Light Button
Program Start On
MODE Button
Page 8
Disarm/ Unlock- Press and release
Trunk Release- Press and hold for
2 seconds.
Remote Start- Press and release
Remote Stop- Press and hold for
2 seconds.
Low Battery
ST.STP Button
Alarm On
Light Button
Reset Button
Button 1
Button 2
Battery Replacement
Change the battery when the Low battery icon is displayed on the LCD screen.
Replace with Lithium CR2032 Battery.
*To avoid possible water damage, have the battery changed professionally.
Caution
DO NOT DISASSEMBLE THIS WATCH FOR ANY OTHER REASON THEN TO
REPLACE THE BATTERY. REMOVING ANY OTHER COMPONENT(S) WILL
VOID THE WARRANTY.
FCC Notice
This device complies with Part 15 of the FCC rules. Operation of this device is subject to the following conditions:
(1) This device may not cause harmful interference, and
(2) This device must accept any interference received, including interference that may cause undesired operation.
CAUTION: Changes or modifications not expressly approved by the part responsible for compliance voids the
users authority to operate this device.