1
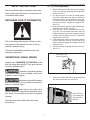
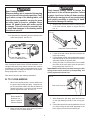
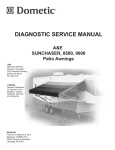
RECORD THIS UNIT INFORMATION FOR
FUTURE REFERENCE:
Model Number
Serial Number
Date Purchased
A&E SUNCHASER II TC
Patio Awning
USER'S GUIDE
For
8275000.409# Series Sunchaser II TC Hardware
Used With
812(XX)(XX).40(X)# & 812(XX)44.(XXX)#
Model Series Awnings
USA
SERVICE OFFICE
Dometic Corporation
2320 Industrial Parkway
Elkhart, IN 46516
574-294-2511
CANADA
Dometic Corporation
46 Zatonski, Unit 3
Brantford, ON N3T 5L8
CANADA
519-720-9578
For Service Center
Assistance Call:
800-544-4881
This manual must be read and
understood before installation,
adjustment, service, or maintenance is performed. This unit must
be installed by a qualified service
technician. Modification of this
product can be extremely hazardous and could result in personal
injury or property damage.
Lire et comprendre ce manuel avant
de procéder à l'installation, à des réglages, de l'entretien ou des réparations. L'installation de cet appareil doit
être effectuée par un réparateur qualifié. Toute modification de cet appareil
peut être extrêmement dangereuse et
entraîner des blessures ou dommages
matériels.
USER'S GUIDE
3311848.000
Form No. 3311848.000 6/07
(French 3311853.000)
©2007 Dometic Corporation
LaGrange, IN 46761
Important: These Instructions must
stay with unit. Owner read carefully.
8275000.409(#)
SERIES
HARDWARE
SUNCHASER II TC 812(XX)(XX).40(X)# AND 812(XX)44.(XXX)# AWNINGS
Quick Reference Guide
FIG 1
FIG. 2
3
2
1
Unlock Rafter Arms
WARNING: Handle MUST be in upright
position to open and close trailer.
FIG. 4
FIG. 3
3
2
EXTENDED TRAILER
1
Ready to open awning
SUNCHASER II TC 812(XX)(XX).40(X)# AND 812(XX)44.(XXX)# AWNINGS
A.TO OPEN AWNING
Safety Instructions
1. Before extending the trailer, pinch lock to release
rafter from main arm assembly and loosen rafter
knobs. See FIG. 1.
2. Pull the clevis pin out of the lift handle assembly, lift the handle away from the arm and into its
horizontal position, and re-install the clevis pin.
This should secure the handle in the disengaged
(horizontal) position. Repeat on opposite side.
See FIG 2.
3. Extend the trailer (consult the User’s Manual provided with your vehicle). See FIG. 3.
4. Once the trailer is fully extended, pull the clevis pin out of the lift handle assembly, lower the
handle towards the arm into its engaged (vertical)
position, and re-install the clevis pin. Repeat on
opposite side. See FIG 4.
5. Using both hands, hold on to the bottom edge of
the arm and gently push up until you feel the lift
handle assembly engage the nearest hole in the
adjustable arm.
6. Use the pull rod to hook and pull down lock lever.
See FIG. 5.
This manual has safety information and instructions to help users eliminate or reduce the risk
of accidents and injuries.
Recognize Safety Information
This is the safety-alert symbol. When you see
this symbol in this manual, be alert to the potential for personal injury.
Follow recommended precautions and safe
operating instructions.
FIG. 5
Understand Signal Words
Hook Lock Lever
And Pull Down
A signal word , WARNING OR CAUTION is used
with the safety-alert symbol. They give the level
of risk for potential injury.
indicates a potentially hazardous situation which, if not avoided, could result
in death or serious injury.
7. Hook the pull rod in the loop on the pull strap and
pull awning all the way out. See FIG. 6.
indicates a potentially hazardous situation which, if not avoided, may result in
minor or moderate injury.
FIG.6
used without the safety alert
symbol indicates, a potentially hazardous situation which, if not avoided, may result in property
damage.
Hook Pull Rod
In Loop And Pull
Awning All The
Way Out
Read and follow all safety information and
instructions.
SUNCHASER II TC 812(XX)(XX).40(X)# AND 812(XX)44.(XXX)# AWNINGS
8. Swing rafter out and towards the roller tube end
cap. Hook the rafter claw onto torsion rod inside
of the end cap. See FIG. 7.
FIG. 7
11. Press the release lever on the lower mounting
bracket and pull the arm away. Snap the patio foot into the higher mounting bracket on the
coach side wall. Repeat on opposite side. See
FIG. 14.
12. Pull the clevis pin out of the lift handle assembly.
While holding arm, pull up on the lift handle to
release and lift awning to desired height. Release
handle and allow the lock button to engage into a
hole in the adjustable arm. See FIG. 10.
Hook Rafter Claw
Onto Torsion Rod
FIG.10
Torsion Rod
Pull Up Handle
To Release Lock
Button, Lower
Handle to Engage
Button
9. While stretching fabric taut, tighten knob. Repeat
on opposite side. The knob is designed with a
groove. If the height of the knob makes it difficult
to tighten, you may insert the end of the 23” wire
handle (supplied) in the groove and tighten the
knob by turning the handle. See FIG. 8.
FIG. 8
13. To place the awning in the carport position, press
the release lever on the bottom mounting bracket
and pull the arm away. Move to a vertical position,
and secure in place with stakes. Rise to desired
height. Repeat on opposite end. See FIG. 11.
Loosen Knob Swing,
Rafter Towards End
Cap, And Hook,
Stretch fabric Taut,
Tighten Knob
FIG. 5A
Lifting Hazard: Use extreme caution when
lifting arm off bottom mounting bracket. If
not controlled Fabric Roller Tube Assembly
could cause back injury and or damage to
RV and Awning
Place
Rod In
Groove
To And
Turn
10. Slide pull strap to the right hand end of the roller
tube and wrap around arm. See FIG. 9.
FIG. 11
FIG. 9
Important: Never leave the roller tube level with the
Wrap Pull Strap
Around Right arm
Assembly
awning rail, adjust both arms of the Universal Hardware 7 to 8 adjustable arm holes below awning rail
(fabric slope approximately 10 degrees). Sunchaser
hardware should be in the water shed position. See
FIG. 12.
SUNCHASER II TC 812(XX)(XX).40(X)# AND 812(XX)44.(XXX)# AWNINGS
Pinch hazard: Always check to ensure the
lock lever is in the roll down position. Failure
to place Lock Lever in the roll down position
will allow the awning to roll up unexpectedly
and quickly resulting in pinching of hand,
arm and/or damage to awning.
Water Pooling Hazard:
Whenever heavy rain is expected the awning
must be placed in the storage position. Pooling of water on top of the awning fabric, will
make the awning unstable causing the arms
and roller tube to bend or collapse. Never
release lift handle locks with water pooled
on canopy. This will result in personal injury, death and damages to the awning and/or
recreational vehicle.
3. Snap the patio foot into the bottom mounting bracket
on the coach side wall. Repeat on opposite side. See
FIG. 14.
FIG.14
14. If light rains are expected, place the awning in the
water shed position. See FIG 12.
FIG.12
Snap Patio Foot Into Bracket
4. Loosen knob and unhook the rafter end from the
torsion top casting.
5. For Sunchaser models, swing rafters back against
side wall resting on top of the patio foot in the arm
assembly. Repeat for opposite side.
6. Grasp pull strap in left hand and move towards
the center of the roller tube. Hook the pull rod in
the pull strap loop. See FIG. 15.
Important: Do Not release pull strap. Awning is under
spring tension and it could roll up unexpectedly and
quickly against the vehicle side.
Lower Arm Away From
Door 7-8 additional Holes
Note: Sunchaser Model Series 8275000 hardware is not
equipped with water dump feature and one arm must be
an additional 7-8 holes (fabric slope approximate 10 degrees) lower than the other arm before it is in the waterdump configuration. See FIG. 9.
Note: Never leave an open awning unattended.
FIG. 15
B.TO CLOSE AWNING
1. When in the carport position, remove stakes from
the ground and unwrap pull strap. Grasp the upper arm with both hands, and raise lift handle to
release lock button. Lower arms to their shortest
position against the stops. See FIG. 13.
Push Lock Lever Up
FIG.13
Raise Handle To
Release Lock
Button, Lower To
Shortest Position
7. While holding the pull strap, push the lock lever
on the right awning end cap to the roll up position.
8. Control the speed of the awning and allow it to roll
up, while moving the pull strap diagonally to the
left or right to prevent it from bunching up.
2. Make sure the lock lever on the awning right hand
torsion is in the roll down position.
SUNCHASER II TC 812(XX)(XX).40(X)# AND 812(XX)44.(XXX)# AWNINGS
b. Avoid touching the underside of the 9000
canopy when it is wet. To do so will break the
surface tension of the water and encourage
seepage through the fabric.
c. Because woven acrylic is of a much lighter
weight than vinyl, shifting may occur if the
awning and pull strap are not centrally aligned
with the fabric roller tube while the awning is
being rolled up. If necessary, roll the awning
out and adjust the alignment.
7. When To Get More Help:
a. If malfunctions occur that cannot be corrected by reviewing this user’s guide, contact
a qualified Dometic service technician.
Note: A slight “travel line” may appear where the door
roller contacts the awning fabric. This is considered normal and does not affect the integrity of the awning.
9. Pull the clevis pin out of the lift handle assembly, lift the handle away from the arm and into its
horizontal position, and re-install the clevis pin.
This should secure the handle in the disengaged
(horizontal) position. Repeat on opposite side.
See FIG. 2
10. Making sure the lift handle assemblies are disengaged and the rafter knobs are loose, lower the
trailer (consult the User’s Manual provided with
your vehicle).
11. Once the trailer is fully lowered, pull the clevis pin
out of the lift handle assembly, lower the handle
towards the arm into its engaged (vertical) position, and re-install the clevis pin. Repeat on opposite side.
12. Using both hands, hold on to the bottom edge of
the arm and gently push up until you feel the lift
handle assembly engage the nearest hole in the
adjustable arm.
13. Replace the pin in the lift handle assembly and
squeeze the rafter into the main arm until a click
is heard. This will indicate it is locked in place.
Tighten knobs on both sides to secure in place.
C.CARE AND USE
1. Whenever the awning is wet while rolled up, as
soon as conditions allow, roll it out and let it dry
before rolling it up again. This will help prevent
mildew and rotting.
2. Mildew does not form on the fabric itself, but on
the accumulated dust, dirt and grime. Periodically clean vinyl or woven acrylic. Refer to cleaning instructions below for fabric care.
3. Always make sure the awning is extended high
enough before opening the entry door.
4. Apply silicone spray lubricant as needed to keep
the awning’s moving parts operating smoothly.
For ease of operation on hardware, rub candle
wax on all sliding surfaces.
5. A&E 8500 and SUNCHASER:
a. Abrasion, weather and long hours in the sun
are vinyl’s worst enemies. To avoid these
problems, you will need to keep your awning
fabric clean. Use a mixture of 1/4 cup dish
soap, 1/4 cup bleach and five gallons of fresh
water. Soap the open awning with this mixture, then roll it up and let stand for five minutes. Rolling up of the awning will apply the
mixture to the underside of the fabric. Unroll
the awning and hose off the top and bottom
with clean water. Repeat if necessary and allow to completely dry.
6. A&E 9000 :
a. In addition to its beauty and soft translucence,
woven acrylic fabric offers the advantages of
strength and breathable. It is water repellent;
but because it is a woven cloth, it is not water proof. To keep your acrylic awning clean,
simply hose it off occasionally and let it dry.
Do Not Scrub.