1
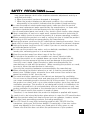
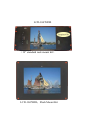
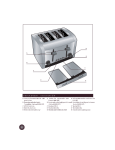
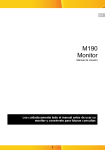
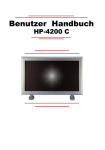
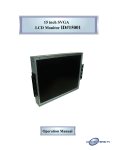
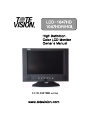
LCD-1047HD
1047HDR/HDL
High Definition
Color LCD Monitor
Owner’s Manual
LCD-1047HD series
www.totevision.com
SAFETY PRECAUTIONS
Improper use can result in electric shock and/or fire. In order to prevent potential
danger, please observe the following instructions when installing, operating and
cleaning the product. To ensure your safety and prolong the service life of your
Color TFT-LCD monitor product, please read the following precautions carefully
before using the product.
■ All operating instructions must be read and understood before the
product is operated.
■ These safety and operating instructions must be kept in a safe place
for future reference.
■ All warnings on the product and in the instructions must be observed
closely.
■ All operating instructions must be followed.
■ Do not use accessories not recommended by the manufacturer.
Use of inadequate accessories can result in accidents.
■ This product must be operated on a power source specified on the
specification label. If you are not sure of the type of power supply used
in your home, consult your dealer or local power company.
For units designed to operate on batteries or another power source,
refer to the operating instructions.
■ The power cords must be routed properly to prevent people from
stepping on them or objects from resting on them.
Check the cords at the electrical outlet and product.
■ If you plan to use a 12V DC power supply unit other than the AC adapter
supplied with the product, make sure the power supply unit provides
stable voltage with minimum fluctuations.
■ Do not overload AC outlets or extension cords.
Overloading can cause fire or electric shock.
■ Never insert an object into the product through vents or openings.
High voltage flows in the product, and inserting an object can cause
electric shock and/or short internal parts.
For the same reason, do not spill water or liquid on the product.
■ Do not attempt to service the product yourself.
Removing covers can expose you to high voltage and other dangerous
conditions. Request a qualified service person to perform servicing.
■ If any of the following conditions occurs, unplug the power cord from
the AC outlet, and request a qualified service person to perform repairs.
a. When the power cord or plug is damaged.
b. When a liquid was spilled on the product or when objects have
fallen into the product.
c. When the product has been exposed to rain or water.
d. When the product does not operate properly as described in the
operating instructions.
Do not touch the controls other than those described in the operating
instructions. Improper adjustment of controls not described in the instruction
2
SAFETY PRECAUTIONS (Continued)
may cause damage, which often requires extensive adjustment work by a
qualified technician.
e. When the product has been dropped or damaged.
f. When the product displays an abnormal condition. Any noticeable
abnormality in the product indicates that the product needs servicing.
■ In case the product needs replacement parts, make sure that the service
person uses replacement parts specified by the manufacturer, or those with
the same characteristics and performance as the original parts.
Use of unauthorized parts can result in fire, electric shock and/or other danger.
■ Upon completion of service or repair work, request the service technician to
perform safety checks to ensure the product is in proper operating condition.
■ When mounting the product on a wall or ceiling, be sure to install the product
according to the method recommended by the manufacturer.
■ Unplug the power cord from the AC outlet before cleaning the product. Use a
damp cloth to clean the product. Do not use liquid cleaners or aerosol cleaners.
■ Unplug the power cord from the AC outlet if you do not use the product for
an extended period of time.
■ Do not use the product near water, such as bathtub, washbasin, kitchen sink,
laundry tub, swimming pool or in a wet basement.
■ Keep the product away from direct rays of the Sun-light.
■ Do not place the product on an unstable cart, stand, tripod or table.
Placing the product on an unstable base can cause the product to fall,
resulting in serious personal injuries as well as damage to the product.
Use only a cart, stand, tripod, bracket or table recommended by the
manufacturer or sold with the product. When mounting the product on a wall,
be sure to follow the manufacturer's instruction.
Use only the mounting hardware recommended by the manufacturer.
■ When relocating the product placed on a cart, it must be moved with the
utmost care. Sudden stops, excessive force and uneven floor surface can
cause the product to fall from the cart.
■ The vents and other openings in the cabinet are designed for ventilation.
Do not cover or block these vents and openings since insufficient ventilation
can cause overheating and/or shorten the life of the product. Do not place
the product on a bed, sofa, rug or other similar surface, since they can block
ventilation openings. This product is not designed for built-in installation; do
not place the product in an enclosed place such as a bookcase or rack, less
proper ventilation is provided or the manufacturer's instructions are followed.
■ The LCD panel used in this product is made of glass.
Therefore, it can break when the product is dropped or applied with impact.
Be careful not to be injured by broken glass pieces in case the LCD panel broken.
■ Keep the product away from heat sources such as radiators, heaters, stoves
and other heat-generating products (including amplifiers).
■ The LCD Panel is a very high technology product with 786,432 thin film
transistors, giving you fine picture details. Occasionally, a few non-active
pixels may appear on the screen as a fixed point of blue, green or red.
Please note that this does not affect the performance of your product.
3
LCD-1047HDR
<19” standard rack mount kit>
LCD-1047HDL, Flush Mount Kit
LCD-1047HD/HDR/HDL
1. LCD-1047HD (stand alone unit)
2. LCD-1047HDL (unit in flush mount kit)
3. LCD-1047HDR (unit in rack kit)
OPERATION MANUAL
SUPPLIED ACCESSORIES
Please check to make sure the following accessories are included with this product.
-Power supply
-Remote Control
-User manual
-Desk stand (1047HD only)
-Cable for PC
-Stereo Cable
5
PREPARATION
Remote Control
■ Use the remote control by pointing it towards the remote sensor window.
Objects between the remote control and sensor window may prevent proper
operation.
Cautions regarding use of remote control
!
■ Do not drop the remote control . In addition, do not expose the remote
control to liquids, and do not place in an area with high humidity.
■ Do not install or place the remote control under direct sunlight.
The heat may deform the unit.
■ The remote control may not work properly if the remote sensor window of
the main unit is under direct sunlight or strong lighting. In such case,
change the angle of the lighting or HD LCD monitor set, or operate the
remote control closer to the remote sensor window.
Batteries for Remote Control
If the remote control fails to operate the HD LCD Monitor functions, replace
the batteries in the remote control.
1 Open the battery cover.
2 Insert batteries (two Size-AAA batteries, Supplied with product).
■ Place batteries with their terminals corresponding to the (+) and (-)
indications in the battery compartment.
3 Close the battery cover
!
Cautions regarding batteries
Improper use of batteries can result in a leakage of chemicals and/or explosion. Be sure to
follow the instructions below.
• Place batteries with their terminals corresponding to the (+) and (-) indications.
• Different types of batteries have different characteristics. Do not mix batteries of different
types.
• Do not mix old and new batteries. Mixing old and new batteries can shorten the life of
new batteries and/or cause old batteries to leak chemicals.
• Remove batteries as soon as they are non-operable. Chemicals that leak from batteries
can cause a rash. If chemical leakage is found, wipe with a cloth.
• The batteries supplied with the product may have a shorter life expectancy due to storage
conditions.
• If the remote control is not used for an extended period of time remove batteries from the
remote control
6
PREPARATION (Continued)
Cable Connection
Rear view of main unit
1. BNC Video OUT is
passive loop out.
2. If BNC Video IN is
applied, RCA Video IN
will be disabled.
EXT. Speaker
KEY control
(option) BNC Video
IN & loop out
*RS-232
(option)
<Main board connectors>
VGA
S-Video Y
Pb
Pr PC 12V Video 1 L
sound DC IN
EXT. DC
R Line Video Vdeo2 IR
*OUTPUT
Ext.
*VIDEO OUT is active output for Video 1 or Video 2 input.
If S-Video or component input is selected, display of this output will be
changed to black and white because the color of the original input signal is
already separated.
7
LOCATION OF USER CONTROLS
Control Panel (C/P) on the front of main unit
POWER ▼ VOL ▲
IR window
Power
Indicator
▼
▲
Menu
Power
Decrease volume
Increase volume
Menu move down
Menu move up
Mode select/Menu
Remote control (R/C)
Power
Menu
Vol (▲)/(▼)
▲ Increase volume (up)
▼ Decrease volume (down)
Sound mute
(▲)/(▼)
▲Selects next MENU.
▼Selects next MENU.
Select input source
Select Under Scan
Auto Color
to set default Display setting
8
BASIC OSD USAGE
Main Menu Screen
1 Press the Menu of R/C or press MENU for 2 sec. of C/P to access the OSD menu screen.
2 Press the ▲/▼ to move the cursor to desired menu icon.
3 Press the Menu to select the menu icon.
4 Press the Menu to exit menu.
Note:
R/C - Remote Control & C/P - Control Panel
Available Mode
■ Yes / □ No
■ PC ■ Video ■ S-Video ■ YPbPr
Basic Setup
Select item
Press the Vol▼ of R/C
or press the ▼ of C/P
Press the Vol▲ of R/C
or press the ▲ of C/P
1024x768 60Hz
PICTURE
Color
OSD Menu
Misc.
Sound
Contrast
Brightness
Color
TINT
Sharpness
OSD MENU
1024x768 60Hz
Color
OSD Menu
Misc.
Sound
MISC.
Language
H.Position
V.Position
OSD Timer
Tranlucent
ON
Off
Signal Source - PC, Video 1, Video 2 , S-Video, Y/Pb/Pr
Display mode - Normal, Under Scan
Reset - YES, NO
SOUND
Sound
ON
OFF
Volume
9
Available Mode
■ Yes / □ No
■ PC □ Video □ S-Video ■ YPbPr
PC Setup
Press the Vol▼ of R/C
Press the Vol▲ of R/C
or press the ▲ of C/P
Selected item or press the ▼ of C/P
Color
1024x768 60Hz
Color
Picture
Function
OSD Menu
Misc.
Sound
Contrast
Brightness
Gamma
Color Temp
Color Adjust
1024x768 60Hz
PICTURE
Function
Color
Picture
Function
OSD Menu
Misc.
Sound
Color
Picture
Function
OSD Menu
Misc.
Sound
Move down
V-Position
H.Position
V.Position
Phase
Clock
Sharpness
1024x768 60Hz
AUTO Adjust
YES
AUTO color
YES
NO
NO
■ Automatically adjusted items are bellow
1) Frequency, 2) Phase
3) H-position of PC Setup
4) V-Position of PC Setup
5) Canceling Speaker Mute
Move up
Video
Video
Move left
Move right
H-Position
ideo
10
Vide
Available Mode
■ Yes / □ No
□ PC ■ Video ■ S-Video
Video Setup
Selected item
Under Scan
Press the ▼ of R/C
or press the ▼ of C/P
Press the ▲ of R/C
or press the ▲ of C/P
Normal Screen ..... The screen takes the source of 4:3
aspect ratio as its full-sized regular picture. You may loose
some of the edge of the original image.
Under scan mode ...... This mode enables the user to display
100% of input image without hiding any image of Source. Video
will be displayed with small black border around the border.
Some video source which is non-standard format may break
the black border.
Normal Display
Under Scan
11
Available Mode
■ Yes / □ No
■ PC ■ Video ■ S-Video ■YPbPr
OSD Setup
Press the Vol▼ of R/C
Press the Vol▲ of R/C
or press the ▲ of C/P
Selected item or press the ▼ of C/P
Language
1 Press the Menu of R/C or C/P to select the Language.
The language select menu screen will appear.
2 Press the Vol▲/▼ of R/C or press the ▲/▼ of C/P to move
the cursor to the English or other.
3 Press the Vol ▲ of R/C or Menu of C/P to select the desired
language. Then press Exit to move to previous menu screen.
H-Position
move left the OSD menu box
move right the OSD menu box
■
V-Position
■
move down the OSD menu box
move up the OSD menu box
■
■
Background
Translucent
Opaque
Duration Time ■ The range of controlling the duration time of the OSD menu is from
5 sec. up to 30 sec. Default setting is 10 sec.
12
SPECIFICATIONS
LCD-1047HD/HDR/HDL
Active Screen Size
214 (H) × 160 (V) mm (10.4 inches) diagonal
Surface Treatment
Anti glare
Audio Output
5 Watts x 2, 8 Ohm
Pixel Pitch
0.206 mm × 0.206 mm
Pixel Format
1024 (H) x 768 (V) Pixels RGB strip arrangement
Black Light
CCFL 15,000 Hours life
Color Depth
6-bit, 262,144 colors
Viewing Angle
80/80(H) , 80/80(V) Degrees
Response Time
16 mSec.
Contrast Ratio
450:1
Luminance, White
250 cd/m2(Typ.)
Special feature
"Under scan" mode
Inputs
VGA, S-Video, Component, Composite-1/2, Audio
Video format
YPbPr accept 480i, 480p, 720p and 1080i/p
Outputs
BNC Video-2 OUT, selected Video 1/ 2 Output
Others
RS-232, External IR Input
Dimensions
1047HD:270x230x50(without desk stand)
1047HDL:337x247x42, 1047HDR:482x177x50mm
Power Consumption
Approx. 15 Watt @ DC 12V
Operating Temperature
0 – 50 °C
Storage Temperature
-20 – 60 °C
Net Weight
1.5 Kgs,2.5 Kgs(with desk stand)
13
Applicable PC Mode
Resolution
640x350
640x400
720x400
320x200
640x215
680x350
640x480
800x600
1024x768
14
V-Frequency H-Frequency
(Hz)
(KHz)
85
85
85
60
53
59.477
60
72
75
56
60
72
75
43
60
70
75
37.9
37.9
37.9
15.75
15.75
23.169
31.5
37.9
37.5
31.5
37.9
48.1
46.9
35.5
48.4
56.5
60.0
Pixel Rate
(MHz)
31.5
31.5
35.5
25.175
31.5
31.5
36
40
50
49.5
44.9
65
75
78.75
Standard
Type
VESA
VESA
VESA
Graphic
Text
Graphic
Industrial
VESA
VESA
VESA
VESA
VESA
VESA
Industrial
VESA
VESA
VESA
Remarks
DOS
CGA
EGA
VGA
SVGA
XGA
Warranty
ONE YEAR LIMITED WARRANTY
ToteVision warrants to the original purchaser that this product is free fromdefects in workmanship and material under normal use and
conditions for a period of 1 year fromthe date of original purchase, subject to the limitations below. Should service be required by reason of
any defect or malfunction during the warranty period, ToteVision will repair or at its discretion replace this product, without charge (except
for a $15.00 charge for handling, packing, return shipping, and subject to verification of the defect or malfunction), upon delivery of this
product to the Factory Service Center listed belowwith proof of date of purchase. During the warranty period ToteVision will repair or
replace, free of charge, defective units WHICHARE NOT DEFECTIVE DUE TOORDINARY WEARANDTEAR, USERABUSE,
OROTHERCAUSES NOT ARISINGOUT OF MANUFACTURER’S DEFECTS INMATERIALS ORWORKMANSHIP.
Before returning this product for service:
1. If it is necessary to pack the unit in other than original carton and protectors, please insure proper packaging for good protection.
2. Enclose a photocopy of your dated sales receipt, credit card statement, or other proof of the date of purchase, a description of your
complaint, your name, address and day time telephone number. (Do not use P.O. Box numbers since UPS cannot deliver to P.O. Boxes.)
Your warranty registration information must be on file in our office as a method of identification. If proof of original ownership is not in our
records, the repairs will be treated as “out-of-warranty” and your unit will be returned to you after you have paid for repair and handling
charges.
3. For “In Warranty repairs” enclose a check or money order payable to the order of ToteVisionfor the sumof $15.00 for return postage and
handling.
4. Ship the unit prepaid to the Factory Service Center listed below.
5. If your unit needs service after the warranty period has expired, ship it prepaid and insured to the Factory Service Center below. Enclose
a description of your complaint; your name, company name, address, and day time telephone number. You will be advised of estimated repair
charges.
NOTE: This warranty is valid only if the product is used for the purpose for which it was designed. It does not cover:
(i ) products which have been damaged by negligence, misuse, accidents, abuse, acts of God, or units which have been modified or repaired
by unauthorized persons,
(ii ) cracked or broken units or components or units damaged by excessive heat or cold, or units exposed to excessive UVlight.
(iii) products which have their serial numbers removed, altered or rendered illegible,
(iv) products that have cold cathode florescent tubes (CCFTs) that do not provide sufficient illumination,
(v) the cost of shipping this product to the Factory Service Center and its return to you.
No warranty, expressed or implied, as to merchantability or fitness for a particular use is made beyond this Limited Warranty. ToteVision
will not be liable for incidental or consequential damages or lost profits arising fromproduct defects or malfunctions. This warranty is valid
only in the United States of America and does not extend to owners of the product subsequent to the original purchaser. Any applicable
implied warranties are also limited to 1 year and ToteVision will not be liable for consequential damages. (Some states do no allow
limitations on implied warranties or exclusions of consequential damages, so that these restrictions may not apply to you.) This warranty
gives you specific legal rights, and you may also have other rights which vary fromstate to state.
As a precondition to receiving any of the benefits of this limited warranty, your completed warranty registration information must be
on file in our office. IF YOURINFORMATIONIS NOT ONFILE WITHUS, ALL WARRANTYCLAIMS WILL BE DENIED. TO
PROTECT YOURWARRANTY, MAIL YOURREGISTRATIONINFORMATIONTODAY! Submission of a unit determined to be not
defective will result in a charge to you for testing and handling the unit. Thoroughly test your unit before submitting it for warranty claim
repair.
Send unit to: TOTEVISIONSERVICE CENTER1319 Dexter Avenue N. # 020, Seattle, WA98109
For further information: call (206) 623-6000 or fax (206) 623-6609
_____________________________________________________________________________________________________
WARRANTY REGISTRATION
Protect your Warranty by completing and mailing this formto: ToteVision, 1319 Dexter Avenue N. # 020, Seattle, WA 98109
Model Number: _______________________Serial Number:
_______________________
Name: _____________________________________________________________________
Address:
____________________________________________________________________
City: ___________________________________ State: _______Zip:________________
Telephone number: (____________)_______________________________
Dealer: ______________________Dealer City: _____________________ State: _______________
Version 082203
15