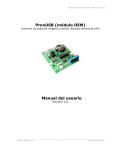
1
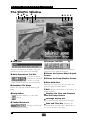
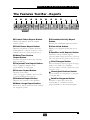
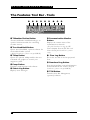
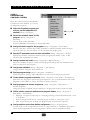
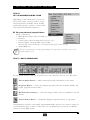
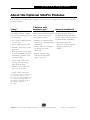
SitePro
Central
Getting
Control
Started
®
System
Manual
Getting
Started
Manual
Table of Contents
Introduction . . . . . . . . . . . . . . . . . . . . . . . . . . . . . . . . . . . . . . . . . . . . .1
Quick Reference Guide . . . . . . . . . . . . . . . . . . . . . . . . . . . . . . . . . . . . .2
SitePro Window . . . . . . . . . . . . . . . . . . . . . . . . . . . . . .2
Menu Bar . . . . . . . . . . . . . . . . . . . . . . . . . . . . . . . . . . .3
Daily Operations Tool Bar . . . . . . . . . . . . . . . . . . . . . . .5
Tabbed Notebook . . . . . . . . . . . . . . . . . . . . . . . . . . . . .6
Features Tool Bar - Manual . . . . . . . . . . . . . . . . . . . . . .6
Features Tool Bar - Reports . . . . . . . . . . . . . . . . . . . . . .7
Features Tool Bar - Tools . . . . . . . . . . . . . . . . . . . . . . .8
Before You Start . . . . . . . . . . . . . . . . . . . . . . . . . . . . . . . . . . . . . . . . . .9
Unlock Screen . . . . . . . . . . . . . . . . . . . . . . . . . . . . . . .9
What to have on hand . . . . . . . . . . . . . . . . . . . . . . . . .10
Initial SitePro Setup . . . . . . . . . . . . . . . . . . . . . . . . . . . . . . . . . . . . . . .10
Basic Irrigation Method . . . . . . . . . . . . . . . . . . . . . . . .11
Intermediate Irrigation Method . . . . . . . . . . . . . . . . . . .11
Advanced Irrigation Method . . . . . . . . . . . . . . . . . . . . .11
Step 1: General Setup . . . . . . . . . . . . . . . . . . . . . . . . .12
Step 2: Build the Irrigation Methods Database . . . . . . . .13
Step 3: Set Up the Control System . . . . . . . . . . . . . . . .14
Step 4: Set Up the Hydraulic System . . . . . . . . . . . . . .15
Step 5: Program the Control System . . . . . . . . . . . . . . .16
Step 6: Set Up the Advanced Menu Items . . . . . . . . . . .17
Step 7: Daily Operations . . . . . . . . . . . . . . . . . . . . . . .17
About the Optional SitePro Modules . . . . . . . . . . . . . . . . . . . . . . . . . .18
ii
SitePro Central Control System
Getting
Started
Manual
Welcome to SitePro
®
Advanced Central Irrigation Control Software
from The Toro Company
Congratulations on purchasing the most advanced irrigation site management system available.
SitePro offers advanced features for total site management, yet is quite easy to use. An
integral part of SitePro is the comprehensive on-line help screens that follow the familiar
Windows format.
This Getting Started guide outlines:
• An overview of SitePro’s features and screens (located in the Quick Reference pages).
• The general information you need to have on hand before setting up SitePro.
• The basic steps you should take to program SitePro.
• An introduction to the daily operation features.
SitePro Central Control System
1
G
Qe
u ti tcikn gR e
Sftearret e
nd
c e MG
au
n iudael
The SitePro Window
➊
➋ ➌
➍
➎
➏
➐ ❽ ❾ ❿
11
12
13
➊ Menu Bar
➏ Features Tool Bar
Accesses all functions of SitePro using the
pull-down menus under each heading.
Provides quick access to features related to
each item of the tabbed notebook.
➋ Daily Operations Tool Bar
➐ Shows the System Watch Report
Consists of speed
buttons for one-click
access to central
control functions that are used frequently.
Screen
➑ Shows the Pump Monitor Screen
➌ Database File Name
Changes to a cloud over the sun when the
system is placed on Rain Hold.
Shows the currently loaded database file
name
➍ Help Button
Launches SitePro’s on-line help
system.
➒ Rain Hold Alert
❿ Bell Displays movement as an alert to an
alarm condition.
11 Displays the Flow and Pressure
from the Pump Station
Message Display Bar
Shows informational and system messages.
12
➎ Tabbed Notebook
Changes the buttons
on the Features tool bar.
2
SitePro Central Control System
Date and Time Bar Displays the
computer date and time. The current day of
the year is shown to the right.
13
G
Qe
u ti tcikn gR e
Sftearret e
nd
c e MG
au
n iudael
The Menu Bar
—➊
—
—
—
—
➋
➌
➍
➎
—
➏
—
➐
➊ Clears the existing database file and starts a
➋
➌
➍
➎
➏
➐
new one*.
Opens a previously saved database file.
Closes the existing database.
Saves the current database and keeps the file
open.
Saves the current information under a new
file name.
Brings up the print dialog box.
Exits the SitePro application.
*Note: This erases any current program
information. Before clearing the database,
make sure you have saved any necessary data.
—➊
—
—
—
➊
➋
➌
➍
➋
➌
➍
—
—
—
➊
➋
➌
➍
➎
➏
➐
➑
—➒
—
—
—
—
—
Displays the background graphic.
Displays the tool bar.
Activates balloon hints.
Enables the Message Display bar and
Date and Time bar.
➊ Choose the preferred language and units.
➋ Set up the field hardware used and satellite
communications.
➌ Customize the home screen, map
➍
➎
➏
➐
➑
➒
coordinates, update time, alarms notice and
other information unique to your system.
Define demand ET, site codes and nozzles.
Define groups of satellites, individual
satellites and stations.
Create a model of the hydraulic system.
Define irrigation programs, master start times
and sequences.
Assign stations to programs.
Access advanced program features:
Multi-Manual, Switches, Control Codes,
Sensors/Alarms and Alarms/Responses.
SitePro Central Control System
3
G
Qe
u ti tcikn gR e
Sftearret e
nd
c e MG
au
n iudael
The Menu Bar
➊
➋
➌
➍
➎
(cont.)
—
➊ Make manual run time percentage
adjustments.
➋ Select a program to start.
➌ Start multiple stations at one time.
➍ Activate commands that stop/start irrigation.
➎ Turn switches on or off.
➏ Send a page to a pager or satellite.
(OSMAC field hardware only.)
➐ Download system operating parameters to
the satellites.
(Network 8000, Network DR2, Network CDS
and Network LTC Plus field hardware only.)
—
—
—
—
➏ —
➐ —
➊ —
➋ —
➌ —
➍ —
➎ —
➏ —
➐ —
➑ —
➒ —
➓ —
11
12
13
—
—
—
➊ Displays information available from the
central control system.
➋ Displays information available from field
hardware. (Network 8000, Network LTC,
Network LTC Plus Network DR2 and
Network CDS field hardware only.)
➌ Provides information and printed reports
about the actual watering times of stations.
➍ Gives a graphical display of the
projected flow of a program or programs.
4
SitePro Central Control System
➎ Analyzes the sensor data.
(Network 8000, Network CDS and
Network LTC Plus field hardware systems
only.)
➏ Displays the contents of the database.
➐ Shows how much water has been used
by the irrigation system.
➑ Provides an overview of the scheduled
irrigation activity.
➒ Displays any irrigation holds that are in
effect.
➓ Generates various satellite reports.
(All hardware systems except OSMAC
and Network DR2.)
11 Gives information about program
changes made in the field at the satellites. (Network LTC Plus and
Network 8000 field hardware only.)
12 Shows stations not assigned to a
program or a hydro-link.
13 Launches a report that shows the relationship of a satellite’s internal program
number to the Central program.
Quick
The Menu Bar
Reference
Guide
(cont.)
➊
➋
➌
➍
—
—
—
—
➎ —
➏ —
➐ —
➑ —
➒ —
➊ Accesses the optional T.Weather with
WeatherLogic software module for
controlling weather stations.
➋ Opens optional Toro Network
Hand-Held software for the hand-held
radio system.
➌ Opens the optional T.Map software
module for advanced site graphics.
➍ Launches the pump station software.
➎ Compiles diagnostic messages generated by SitePro.
➏ Displays the current status of the
communication channels.
(Network 8000, Network LTC Plus
and Network CDS.)
➐ Shows the messages created by the
flow manager.
➑ Lists which satellites received information
downloaded from the central.
(All field hardware except OSMAC.)
➒ Launches the optional Toro Site
Management software.
The Daily Operations Tool Bar
➊
➋
➌
➍
➊ Percent Adjust Button
➌ Run-Time Review Button
Make manual percentage adjustments
of run times.
Check the scheduled to run times of stations.
➋ Programs Button
➍ Projected Flow Button
Access the irrigation programs function
of SitePro. Define and review programs
and start times.
Graphically display the projected flow.
SitePro Central Control System
5
Quick
Reference
Guide
Tabbed Notebook
➊
➋
➌
➊ Manual Tab
➋ Reports Tab
Select this tab to display buttons on the
Features tool bar that focus on Manual
operations.
Choose this tab to change the buttons on
the Features tool bar to the Reports
functions.
An active tab is displayed as
gray. Inactive tabs are white.
➌ Tools Tab
Click on this tab to change the buttons on
the Features tool tar to the optional Tool
modules.
The Features Tool Bar - Manual
➊
➋
➌
➍
➎
➏
➐
➊ Percent Adjust Button
➍ Cancel/Hold Button
Make manual percentage adjustments of
run times.
Activate commands that stop irrigation.
➋ Start/Stop Program Button
Turn switches on or off.
Select a program to start or stop manually.
➏ Send Page Button
➌ Start/Stop Multi-Manual
Send a page to a pager or satellite. (OSMAC
field hardware only.)
Button
Start or stop multiple stations at one time.
6
SitePro Central Control System
➎ Switch Button
➐ Download Button
Download system operating parameters to
the satellites. (Network 8000, Network DR2,
Network LTC Plus and Network CDS field
hardware only.)
Quick
Reference
Guide
The Features Tool Bar - Reports
➊
➋
➌
➍
➎
➏
➐
➑
➒
➓
11
12
13
➊ Central Status Report Button
➑ Scheduled Activity Report
Gathers information from the central
control system.
Button
Reviews the scheduled irrigation activity.
➋ Field Status Report Button
➒ View Holds Button
Displays information available from the
field hardware. (All field hardware except
OSMAC which has simulated field status.)
Displays any irrigation holds that are in
effect.
➌ Water-Time Review
Generates various satellite reports.
(Network 8000, Network LTC Plus, Network
LTC and Network CDS field hardware only.)
Report Button
Provides information about the watering
times of stations.
➍ Projected Flow Report Button
Gives a graphical display of the
projected flow of a program.
➎ Sensors Report Button
➓ Satellites with Reports Button
Field Changes Button
Gives information about program changes
made in the field at the satellites.
(Network 8000 and Network LTC Plus field
hardware only.)
11
Analyzes sensor data.
(Does not apply to OSMAC, Network CDS
or Network DR2 field hardware.)
Unassigned Stations Button
Shows stations not assigned to a program
or a hydro-link.
➏ Database Report Button
13 Satellite Programs Button
Launches a report that shows the
relationship of a satellite’s internal
program number to the Central program.
Displays the contents of the database.
➐ Water Usage Report Button
Shows how much water has been used by
the irrigation system.
12
SitePro Central Control System
7
Quick
Reference
Guide
The Features Tool Bar - Tools
➊
➋
➌
➍
➎
➏
➐
➑
➒
➊ T.Weather Station Button
➏ Communication Monitor
Accesses T.Weather with WeatherLogic, an
optional software module for controlling
weather stations.
Opens Toro Hand-Held, optional software for
the hand-held radio system.
(All field hardware systems except OSMAC.)
Button
Displays the current status of the
communication channels.
(For field hardware using the FIU.
Network 8000, Network LTC Plus and
Network CDS field hardware systems
only.)
➌ T.Map Button
➐ Flow Log Button
Opens the optional T.Map module that uses
advanced site graphics to control your
irrigation system.
Shows the text file of the last projected
flow.
➋ Toro Hand-Held Button
➍ Pump Button
➑ Download Log Button
➎ Status Log Button
Lists which satellites received information
downloaded from the central (All field
hardware systems except OSMAC.)
Displays error messages.
➒ TSM Button
Launches pump monitor and software.
Launches Toro Site Management,
(optional) software.
8
SitePro Central Control System
Before
Yo u
Start
Before You Start
The first time you launch the SitePro software, the Unlock screen appears as pictured
below. You need to contact the Toro National Support Network (NSN) and provide them the
code entry number, shown on the sample screen as “240263602,” and the computer number
as they appear on your screen. NSN then runs an encryption program which provides the
access code needed to continue the initial SitePro launch. You must enter this number into
the “Enter code” box immediately.
After entering the code and clicking “OK,” SitePro will continue launching. You will only
need to do this once. The Unlock screen will not appear again unless the following
circumstances occur:
• The computer’s hard drive or mother board is replaced.
• New system hardware components have been added.
• The CMOS settings have been changed.
• New software is installed.
If this happens, a new code number will be required, since the code entry number changes
each time the program is launched on a new system or hard drive. Additionally, if you have
a laptop or docking station, the SitePro application cannot be shared. The applications must
reside with their own unique access codes on each machine.
The Unlock screen also appears on the T.Weather with WeatherLogic™ software modules as
well. This application requires a unique access code number from NSN in order to run.
SitePro Central Control System
9
G e tB
t ie
n fgo rSet aYrot u
e dS M
t aar n
t ual
Before You Start
(cont.)
If you have purchased the optional Network Hand-Held™ or T.Weather with WeatherLogic™
software modules for SitePro, please install and configure them before setting up SitePro.
The T.Map™ software module, which offers superior control over your site with graphic
capabilities, should be configured after you have completed programming SitePro.
You need to have the following information on hand before you start programming your
customized irrigation control system:
• The specific unique address of each satellite in your system (if your field hardware
includes satellites) — required to define the overall control system structure which is
made up of groups, satellites assigned to groups and stations assigned to satellites.
• As-built plans of your hydraulic system — helpful when configuring the hydraulic
database that is part of the flow management feature. The traditional golf course
irrigation design is a series of complex loops. These will need to be converted into a
tree-type configuration. If you are uncomfortable doing this, please contact your Toro
distributor or irrigation consultant.
• All sprinkler and nozzle information for all the satellites — needed to build the
sprinkler database.
• The number of stations and their names.
• The initialization string for the modem — if using a telephone communications
hardware link.
• Plan how you want to irrigate — an understanding of the way stations will be
assigned to specific programs and how you want those programs to operate.
Other useful information, depending on the irrigation method you want to use, includes:
• Monthly ET for your climate zone — located in the Toro Rainfall-Evapotranspiration
Data booklet. (Form #490-1358)
• Map coordinates for your site: latitude, longitude and altitude — often can be
obtained from your local airport. You’ll need this information if you want to calculate
watering times based on sunrise and sunset.
• Plant and soil types for your site — used as an optional database in adjusting your
watering schedule based upon these types or any other grouping of stations.
Initial SitePro Setup
SitePro offers powerful central control of your irrigation system. You can optimize all of
SitePro’s features by determining the irrigation method you would like to use: Advanced,
Intermediate or Basic. The Advanced irrigation method offers sophisticated calculation of
watering times based on ET; Intermediate provides adjustment of station run times based on
a reference ET; Basic allows for simple direct adjustments on watering times. With SitePro,
you can easily create an irrigation environment customized to your site.
Before beginning the initial set up and programming of SitePro, be sure you have
read the “Before You Start” section and that you have all the necessary information available.
•
Follow the basic steps outlined below to set up SitePro for the first time.
10
SitePro Central Control System
G Ient it ti inagl
Initial SitePro Setup
•
•
•
S it taer P
t er d
o
M
Se
a tnuupa l
(cont.)
Use the Irrigation Method tables above to guide you on the amount of information you
need to provide SitePro to meet your irrigation needs. On Step 2: Build the Irrigation
Methods Database outlined below, the symbols I , II and III indicate the
items you need to complete for your selected irrigation method.
II = Intermediate III = Advanced.
I = Basic
Refer to the Quick Reference Guide pages 2–8 for the location of screen menus and buttons.
The on-line help screens can provide you with additional information about SitePro.
I
BASIC IRRIGATION METHOD
Direct Adjustment of Station Run Times
Sprinkler Data Required:
Program Setup:
Operation:
• Types
• Locations
• Pressure
• Daily run times for the
sprinklers are assigned
to the program.
• You assign run times to
the sprinklers. Make
manual percentage
adjustments to change
run times.
II INTERMEDIATE IRRIGATION METHOD
Adjustment of Station Run Times Based on ET
Sprinkler Data Required:
Program Setup:
Operation:
• Types
• Locations
• Pressure
• Daily run times for the
sprinklers are assigned
to the program.
• A reference ET is
associated with the
run times.
• You assign run times to
the sprinklers based on a
reference ET. Run times
can be automatically
adjusted by the daily ET
(operational ET).
• Define an ET source
for the program.
III ADVANCED IRRIGATION METHOD
Automatic Calculation of Station Run Times Based on ET
11
Sprinkler Data Required:
Program Setup:
Operation:
•
•
•
•
•
•
• Define an ET source
for the program.
• Run times are calculated
automatically based on
the ET data from the
selected ET source and on
the sprinkler configuration.
• Define an ET source for
the program.
Types
Locations
Pressure
Arc
Pattern
Distance
SitePro Central Control System
11
G Ient it ti inagl
S it taer P
t er d
o
M
Se
a tnuupa l
STEP 1:
GENERAL SETUP
Follow these steps to set up the general
configuration of SitePro:
—➊➋
—➌➍
—➎➏➐➑
➒➓
➊ Select the language (Setup >
Language/Units)
Select the language used on the
SitePro screens.
➋ Select units of measure (Setup >
Language/Units)
Select the units of measure you
prefer for calculations and display.
➌ Select control system hardware
(Setup > Hardware> System)
Choose the type of Toro field
hardware/satellites used in your irrigation system.
Only one type of hardware can be selected. Throughout SitePro, features will be
grayed out if they do not apply to the selected hardware type.
➍ Select the communications configuration (Setup > Hardware > Communications)
Define the wire, telephone and/or radio parameters used between the SitePro central
and your field hardware.
➎ System Settings: Choose the update time (Setup > System Settings > Update Time)
Set the control system update time and water-time window. You can also perform a
manual update or change the field time.
System update time must be at least 60 minutes prior to the first master sequence
start time.
➏ System Settings: Configure the home screen (Setup > System Settings > Site Setup >
Home Screen)
Customize the look of your home screen.
➐ System Settings: Configure the map coordinates (Setup > System Settings > Site >
Setup >Map Coordinates)
Enter information to calculate sunrise and sunset if you want to use them for irrigation
start times.
➑ System Settings: Select the flow management algorithm (Setup > System Settings >
Site Setup >Flow Management)
Select either Program-based flow or Station-based flow. (For Network DR2, Network CDS
and OSMAC field hardware systems only.)
➒ System Settings: Define the alarm notice (Setup > System Settings > Alarm Notice)
Define the action SitePro will provide to notify you of an alarm.
➓ System Settings: (Setup > System Settings > Upload Select) Select satellite and station
information upload parameters. (For Network 8000 and Network LTC Plus systems only.)
12
SitePro Central Control System
G Ient it ti inagl
S it taer P
t er d
o
M
Se
a tnuupa l
STEP 2:
BUILD THE IRRIGATION
METHODS DATABASE
Using these steps, you will define the
elements SitePro needs to build the
irrigation methods database: nozzles,
site codes, and methods and sources of
ET (evapotranspiration).
—➊➋➌
These symbols highlight the steps you
need to complete for your selected
irrigation method:
I = Basic (Direct adjustment of run times.)
II = Intermediate (Adjustment of run times based on ET.)
III = Advanced (Calculation of run times based on ET.)
➊ Set up the Demand ET information (Setup > Environmental >Demand ET) II
III
Station run times can be based on time or on ET. This section does not need to
be defined if you choose to run the stations on time-based data, as in the Basic
Irrigation Method.
Define the methods and sources of ET you want to use to adjust and calculate station
run times.
• Demand ET Summary
• TempET (Network 8000 field hardware only)
• Historical ET
• Water Budget
• Select ET Sources
➋ Define site codes (Setup > Environmental > Site Codes) III
Site codes are optional information. Complete this section of the database only if
you want to adjust ET, a group of station run times or create programs based on
site code factors.
Define plant and soil types, compaction and slope. This allows you to fine-tune the
watering time of individual sprinklers to meet specific site needs.
III
II
➌ Select the Toro nozzles (Setup > Environmental > Nozzles) I
Select the nozzles used in your irrigation system and fine-tune pressure, radius and flow
rates. A complete listing of Toro nozzles is already created in SitePro for this purpose.
The nozzle information is used in the Control System menu and is necessary for
Electro-Flow™ to operate. Electro-Flow is SitePro’s flow and electrical management
feature.
SitePro Central Control System
13
G Ient it ti inagl
S it taer P
t er d
o
M
Se
a tnuupa l
STEP 3:
SET UP THE CONTROL SYSTEM
Next, you need to create the database
that defines the control system: groups of
satellites, individual satellites and the
stations assigned to specific satellites.
—➊➋➌
➊ Define satellite groups (Setup >
Control System > Groups)
Define groups of satellites that allow
you to control similar areas of your
site at the same time. For example,
you may want to create a group
named “Front 9” or “Tees.” (If you
have Central Decoder System hardware,
you may combine DIUs.) If desired, you may choose to control the system with only
one defined group of satellites.
For satellites to be assigned to the same group, they must have the same method
of communication (i.e., wire, telephone or radio).
➋ Define satellites (Setup > Control System > Satellites)
After defining groups, you can assign satellites to groups and enter individual satellite
information.
The satellite numbers entered here must correspond with the unique address set
at the satellite in the field.
➌ Define stations (Setup > Control System > Stations)
Assign stations to specific satellites and enter individual station information. Use the
“copy” and “paste” buttons to enter repetitive station information quickly.
It is not necessary to enter information in all columns of the station database
table. However, you must enter a station number, name, percent adjustment,
nozzle flow, number of heads and the flow rate for the station in order for
SitePro to perform properly. Other data may be added to optimize SitePro. (For more
information, refer to Defining Stations in the on-line Help screens.)
14 SitePro Central Control System
G Ient it ti inagl
S it taer P
t er d
o
M
Se
a tnuupa l
STEP 4:
SET UP THE
HYDRAULIC SYSTEM
After you have defined the groups,
satellites and stations, you must create a
model of your hydraulic system and
assign each station to an hydraulic
element.
—➊➋
SitePro offers a convenient
graphical way to define a multilevel hydraulic tree. You can
easily define your flow limits
through mainlines, branches and flow
groups within the SitePro software.
➊ Define elements of the hydraulic system (Setup > Hydraulic System > Attributes)
Create a model of the flow demand on your hydraulic system by defining water sources
and their associated pipes which represent mainlines, branches and flow groups.
➋ Create Hydro-Links: Assign stations to the hydraulic system (Setup > Hydraulic
System > Assign)
Assign each station to a hydraulic element. This defines the Hydro-Link, a connection
point at the station level between the control system and the hydraulic system. You can
review these assignments using the Review tab (Setup > Hydraulic System > Review).
Each station must have a Hydro-Link defined
in order for the station to run.
➌ Review Station Assignments (Setup > Hydraulic System > Review)
Review these Hydro-Link assignments using the Review tab.
To double check station assignments to Hydro-Links:
• Run an Unassigned Stations report.
You also can verify the station assignments by:
• Running a projected flow (click on the Projected Flow button on the daily operations
tool bar).
• After closing the graph, check the Flow Log (F-Log) to review any errors in the
hydraulic assignments. Select the F-Log from the Tools menu (Tools > F-Log) or by
clicking on the F-Log button on the tool bar. Any stations missing a Hyrdo-Link will
be displayed in this text file.
SitePro Central Control System
15
G Ient it ti inagl
S it taer P
t er d
o
M
Se
a tnuupa l
STEP 5:
PROGRAM THE
CONTROL SYSTEM
Once the control system and hydraulic
system have been defined, you can set
up irrigation programs.
➊ Name the irrigation program and
select a percent adjustment (if
desired) (Setup > Programs)
— ➊ through ➓
— 11
➋ Select the schedule mode for the
program (Setup > Programs >
Schedule)
Choose from 14-day Calendar,
Interval, Odd Days, Even Days or Annual Calendar.
➌ Assign the active days for the program (Setup > Programs > Active Days)
Set the active days if either the 14-Day Calendar or Annual Calendar mode has been
selected. Once set, the active days on the calendar turn bright green.
➍ Specify ET parameters and run-time calculation (Setup > Programs > ET Use)
Specify the run-time calculation method of the program, ET mode, source of ET,
reference ET and default run times.
➎ Assign repeats and soaks (Setup > Programs > Repeats/Soaks)
Select the number of repeats of the selected program and specify the minimum soak
time for stations in the program.
➏ Assign auto switches (Setup > Programs > Auto Switch)
Assign switches using the Auto Switch tab.
➐ Review program setup (Setup > Programs > Summary)
Verify the feature settings and configuration of each of your irrigation programs.
➑ Create master program sequences (Setup > Programs > Start Times > Information)
Start times are assigned to master program sequences. Go to the Information tab under
Programs > Start Times to create and name a master sequence.
➒ Assign programs to master sequences (Setup > Programs > Start Times >
System Programs)
Assign programs to specific master sequences. All programs in the system are listed.
➓ Define master sequence attributes and program modes (Setup > Programs >
Start Times > Information)
• Highlight a sequence and assign it a watering priority, percent adjustment and a start
or stop time.
• Select a program and choose a running mode: normal or syringe/test cycle.
• Click on the check box to make the program part of the master sequence.
11
Assign stations and review station assignment (Setup > Assign Stations)
Use the table on the Assign Stations screen to assign stations to a particular program or
select Auto Programmer to create assignments. Review stations assignments here.
16 SitePro Central Control System
Initial
SitePro
Setup
STEP 6:
SET UP ADVANCED MENU ITEMS
Depending on the components of your central control system, you may need to set up
advanced features of SitePro. These include
multi-manual groups, switches, control codes,
sensors/alarms and alarms/responses.
➊ Set up any advanced program features
(Setup > Advanced)
• Multi-Manual Groups (Network 8000 field hardware only)
• Switches
• Control Codes (Network 8000 field hardware only)
• Sensors/Alarms (Network 8000, Network DR2,
Network LTC, Network LTC Plus and Network CDS field hardware only)
• Alarms/Response
For more information on the programming and operation of SitePro, refer to the
on-line Help screens.
STEP 7: DAILY OPERATIONS
Use the speed buttons at the top for quick access to the functions you use on a daily basis.
Percent Adjust Button — Make manual percentage adjustments of run times.
Programs Button — Access the irrigation programs function of SitePro. Define and
review programs and start times.
Run-Time Review Button — Check the length of time water is scheduled to run for
stations.
Projected Flow Button — Graphically display the projected flow of a program.
Congratulations! You have successfully programmed SitePro and are now ready to irrigate. If
you need further help, or want to make sure you are optimizing your system, use SitePro’s
extensive on-line Help screens.
SitePro Central Control System
17
SitePro
Options
About the Optional SitePro Modules
Extend SitePro’s picture-perfect irrigation control to an even higher level with these optional
software modules.
T.Map™
T.Weather with
Weather Logic™
Network Hand-Held
The T.Map software module
puts resource management at
your fingertips:
T.Weather with WeatherLogic™
gives you the most out of
your weather station:
• Use a precise representation
of your site*.
• Establish an interactive link
between the weather station
and SitePro.
SitePro with Toro Network
Hand-Held delivers powerful
central control with convenient
hand-held radio capabilities:
• Allows GPS map accuracy.
• Dynamic, interactive system
operation.
• Point and click on the map
to make immediate system
adjustments, manual starts
and rain holds.
• Define “if/then” statements
for interactive alarm
thresholds.
• Provides field-based
operation of many manual
irrigation functions of
SitePro.
• Prepare reports using
historical weather data
(up to one year).
• Create work orders and
manage event planning
right from the map.
• Quickly measure distance
and area (with GPS).
* T.Map is GPS compatible
and requires the assistance of
a service provider to create
the map — using CAD graphics or aerial photography —
and then to link the map to
the SitePro irrigation
database.
© 2000 The Toro Company, Irrigation Division • An ISO 9001-Certified Facility
Form No. 371-0043 Rev E