1
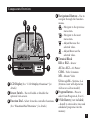
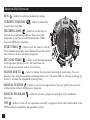
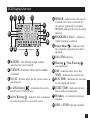
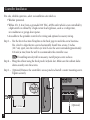
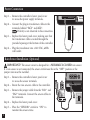
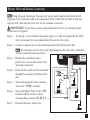
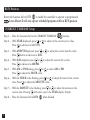
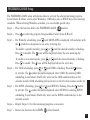
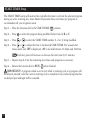
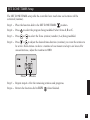
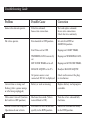
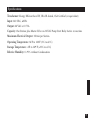
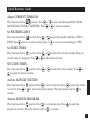
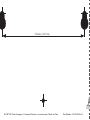
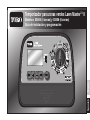
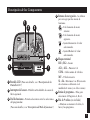
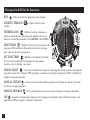
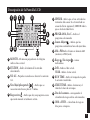
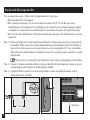
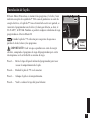
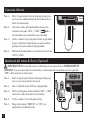
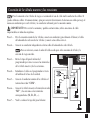
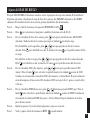
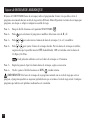
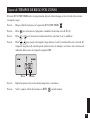
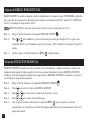
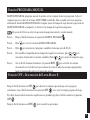
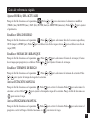
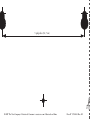
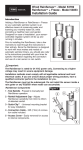
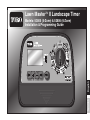
Lawn MasterTM II Landscape Timer
Spanish
English
Models: 53805 (4-Zone) & 53806 (6-Zone)
Installation & Programming Guide
Table of Contents
Components Overview - - - - - - - - - - - - - - - - - - - - - - - - - - - - - - - Page 1
Function Dial Overview - - - - - - - - - - - - - - - - - - - - - - - - - - - - - - - Page 2
LCD Display Overview - - - - - - - - - - - - - - - - - - - - - - - - - - - - - - - Page 3
Controller Installation - - - - - - - - - - - - - - - - - - - - - - - - - - - - - - - - Page 4
Battery Installation - - - - - - - - - - - - - - - - - - - - - - - - - - - - - - - - - Page 5
Power Connection - - - - - - - - - - - - - - - - - - - - - - - - - - - - - - - - - - Page 6
Rain Sensor Installation (Optional) - - - - - - - - - - - - - - - - - - - - - - - - - Page 6
Master Valve & Station Connection - - - - - - - - - - - - - - - - - - - - - - - - - Page 7
RUN Position - - - - - - - - - - - - - - - - - - - - - - - - - - - - - - - - - - - - Page 8
CURRENT TIME/DAY Setup - - - - - - - - - - - - - - - - - - - - - - - - - - - - Page 8
WATERING DAYS Setup - - - - - - - - - - - - - - - - - - - - - - - - - - - - - - Page 9
START TIMES Setup - - - - - - - - - - - - - - - - - - - - - - - - - - - - - - - Page 10
SET ZONE TIMES Setup - - - - - - - - - - - - - - - - - - - - - - - - - - - - - Page 11
SEASON ADJUST Setup - - - - - - - - - - - - - - - - - - - - - - - - - - - - - - Page 12
MANUAL STATION Operation - - - - - - - - - - - - - - - - - - - - - - - - - - Page 12
MANUAL PROGRAM Operation - - - - - - - - - - - - - - - - - - - - - - - - - Page 13
Turning OFF Operation & Shutting Down Lawn Master II - - - - - - - - - - - - - Page 13
Troubleshooting Guide - - - - - - - - - - - - - - - - - - - - - - - - - - - - - - - Page 14
Specifications - - - - - - - - - - - - - - - - - - - - - - - - - - - - - - - - - - - Page 15
Limited One-Year Warranty - - - - - - - - - - - - - - - - - - - - - - - - - - - - Page 16
The Toro Dedication to Quality - - - - - - - - - - - - - - - - - - - - - - - - - - Page 16
Quick Reference Guide - - - - - - - - - - - - - - - - - - - - - - - - - - - - - - Page 17
Screw Location Template - - - - - - - - - - - - - - - - - - - - - - - - - - - - Back Page
ii
Components Overview
4 Navigational Buttons – Use to
navigate through the function
menus.
1
– Navigate to the previous
2
3
menu item.
– Navigate to the next
menu item.
– Adjust/Increase the
selected value.
– Adjust/Decrease the
selected value.
6
4
5 Terminal Block
RS1 & RS2 – Sensor
5
AC1 & AC2 – AC Power
7
COM – Valve Common
MV – Master Valve
S1 through S6 – Stations 1–6
1 LCD Display (See “LCD Display Overview” for
(Station count will depend on
details)
4-Zone or 6-Zone model)
6
Program
Button – Press to
2 Sensor Switch – Use to Enable or Disable the
select from Program A, B or C.
optional rain sensor.
3 Function Dial – Select from the controller functions. 7 9-Volt Battery (not included)
– Install to retain date, time and
(See “Function Dial Overview” for details)
scheduled programs into the
memory.
Function Dial Overview
RUN
– Select to operate scheduled programs.
CURRENT TIME/DAY
– Select to adjust the
current date and time.
WATERING DAYS
– Select to set the days to
activate the scheduled programs. You can set the
programs to operate on selected weekdays, ODD
days or EVEN days schedule.
START TIMES
– Select to set the time to activate
the scheduled programs. Lawn Master II provides three
start times to each of the three programs.
SET ZONE TIMES
– Select to set the time duration
of the specified station to run. The run times can
be set from one minute and up to six hours.
SEASON ADJUST
– Select to adjust the program’s watering by percentage. You can
decrease your irrigation system’s watering down to 0% (System OFF) or increase watering up
to 200% (double the scheduled watering time).
MANUAL STATION
– Select to activate a single station. You can specify the run time
of the station without affecting any program.
MANUAL PROGRAM
– Select to activate a program regardless of its scheduled
start time.
OFF
– Select to turn off any operation currently in progress. Leave the function dial in the
OFF position to shutdown the sprinkler system.
LCD Display Overview
1
2
3 4
5
6
7
11
9
12 13
14
8
10
15
6 SENSOR – Indicates that the sensor
terminals have been activated. If a
rain sensor (optional) is installed,
SENSOR indicates that rain has been
detected.
7 PROGRAM A, B or C – Indicates
which program is selected.
8 Season Adjust
– Indicates that
the automatic programs have been
adjusted.
9 AM or PM indicator.
1 MONTH – The flashing 2-digit number
indicates the current month.
10
2 STATION – Indicates which station number
11
Watering
/ Non-Watering
icon indicators.
3 NO AC – Flashes when the AC power source is
not detected.
12
DAY – Indicates the current day.
YEAR – Indicates the current year.
RUN TIME – Indicates the run time
4 Low/No Battery
– Indicates the need to
install a new 9-Volt battery.
13
START TIME – Indicates the start
5 Active Watering
– Indicates that a program
or manual operation is currently active.
14
Weekdays – for selective watering
15
ODD or EVEN watering schedule.
is selected.
for the displayed station.
time number and duration.
schedule.
Controller Installation
For safe, reliable operation, select an installation site which is:
• Weather protected.
• Within 4 ft. (1.2 m) from a grounded 110 VAC, 60 Hz outlet which is not controlled by
a light switch or utilized by a high current load appliance, such as a refrigerator,
air conditioner or garage door opener.
• Accessible to the sprinkler control valve wiring and optional accessory wiring.
Step 1 – Use the Screw Location Template on the back page to mark the screw locations.
Use a level to align the two screws horizontally. Install two screws, 5 inches
(12.7 cm) apart, into the wall at eye level. Leave the screw extended approximately
1/4 inch (6 mm) from the wall to accommodate the controller case.
lawn
If installing into drywall or masonry, install proper screw
anchors.
master
Step 2 – Hang the cabinet using the back panel’s keyhole slot. Make sure the cabinet slides
SENSOR
down securely onto the screws.
ON
OFF
Step 3 – (Optional) Remove the controller’s access panel and install a center mounting screw.
Tighten securely.
PRG
Questions?
Call the Toro Helpline
(800) 367-8676
www.toro.com
RS1 RS2 AC1 AC2 COM MV
5’’ (12.7cm)
S1
S2
S3
S4
S5
S6
(Optional)
master
SENSOR
ON
Battery Installation
OFF
The Lawn Master II maintains the programmed schedule and its
time and date by using a 9V battery backup. In the event of a
power outage and the 9V battery is not installed or very low in
power, the controller will reset the date and time to the default
01-01-2007 and 12:00am. Any scheduled watering that is
programmed in the Lawn Master II will also be lost.
RS1 RS2 AC1 AC2 COM MV
S1
S2
PRG
Questions?
Call the Toro Helpline
(800) 367-8676
www.toro.com
S3
S4
S5
S6
Replace the 9V battery yearly to assure that the current
time, date and scheduled programs are retained.
9-Volt
Battery
IMPORTANT! Check the controller’s scheduled watering
program after every power outage to prevent interruption to your irrigation
system’s activity.
Step 1 – Remove the controller’s lower panel cover to access the battery compartment.
Step 2 – Install the 9V battery to the battery plug.
Step 3 – Secure the battery into the compartment.
Step 4 – Reinstall the lower panel cover.
OFF
PRG
Power Connection
Step 1 – Remove the controller’s lower panel cover
to access the power supply terminals.
Questions?
Call the Toro Helpline
(800) 367-8676
www.toro.com
RS1 RS2 AC1 AC2 COM MV
S1
S2
S3
S4
S5
9-Volt
Battery
S6
Step 2 – Connect the plug-in transformer cables to the
terminals labeled “AC1” and AC2”.
Polarity is not observed in this connection.
Step 3 – Replace the lower panel cover, making sure that
the transformer cable is routed through the
provided opening at the bottom of the controller.
Step 4 – Plug the transformer into a 120 VAC, 60Hz
wall outlet.
Rain Sensor Installation (Optional)
lawn
master
IMPORTANT! The sensor circuit is designed for a NORMALLY-CLOSED rain sensor.
SENSOR
ON
If a rain sensor is not connected, the sensor switch must be in the “OFF” position or the
jumper wire must be installed.
OFF
PRG
Step 1 – Remove the controller’s lower panel cover
to access the sensor terminals.
Step 2 – Route the rain sensor’s cable to the controller.
Step 3 – Remove the jumper cable from the “RS1” and
“RS2” terminals. Connect the sensor cables to
the terminals.
Step 4 – Replace the lower panel cover.
Step 5 – Place the “SENSOR” switch to “ON” to
monitor the sensor status.
Questions?
Call the Toro Helpline
(800) 367-8676
www.toro.com
RS1 RS2 AC1 AC2 COM MV
S1
S2
S3
S4
S5
S6
SENSOR
ON
OFF
9-Volt
Battery
Master Valve and Station Connection
Using 18-gauge (maximum 14-gauge wire can be used), multi-strand, direct burial
irrigation valve connection cable is recommended. Select a cable that provides at least one
wire for each valve and one extra wire for the common connection.
IMPORTANT! To prevent corrosion and possible short circuit, use waterproof wire
connectors on all splices.
lawn
master
SENSOR
ON
Step 1 – To provide a valve common connection, splice one cable wire (generally the white
wire) and connect it to one solenoid lead from each of the valves.
OFF
Step 2 – Connect a separate wire to the remaining solenoid lead from each valve.
PRG
Questions?
Call the Toro Helpline
(800) 367-8676
www.toro.com
For reference, note the wire color code being used for each valve connection
and the associated watering station.
Step 3 – Remove the controller’s lower
panel cover to access the master valve
and station terminals.
Step 4 – Route the wire cable into the controller
through the opening at the base of the
unit.
RS1 RS2 AC1 AC2 COM MV
S1
S2
S3
S4
S5
9-Volt
Battery
S6
COM
S3
S2
S1
MV
Step 5 – Secure the designated valve common
wire to the “COM” terminal.
Step 6 – Secure the Master Valve to the “MV”
terminal and the stations to their
corresponding terminals (S1, S2, S3, ...).
COM
Step 7 – Reinstall the lower panel cover.
RUN Position
Rotate the function dial to RUN
to enable the controller to operate as programmed.
Lawn Master II will only operate scheduled programs while in RUN position.
CURRENT TIME/DAY Setup
Step 1 – Place the function dial to the CURRENT TIME/DAY
Step 2 – With YEAR displayed, press
or
Press
to advance to MONTH.
to adjust to the current year’s value.
Step 3 – With MONTH displayed, press
or
Press
button to advance to DAY.
Step 4 – With DAY displayed, press
or
Press
to advance to AM/PM.
position.
to adjust the current month’s value.
to adjust the current day’s value.
Step 5 – With AM or PM flashing, press
or
Press
to adjust the HOUR value.
to select AM or PM.
Step 6 – With the HOUR value flashing, press
or
time. Press
to adjust the MINUTE value.
to adjust the hour to the current
Step 7 – With the MINUTE value flashing, press
or
to adjust the minutes to the
current time. Pressing
will return you to the YEAR display (Step 2).
Step 8 – Place the function dial to RUN
when finished.
WATERING DAYS Setup
The WATERING DAYS setup will dictate when to activate the selected watering program.
Lawn Master II allows you to select Weekdays, ODD days only or EVEN days only watering
schedules. When selecting Weekdays schedule, you can disable specific days.
Step 1 – Place the function dial to the WATERING DAYS
Step 2 – Press
PRG
position.
to select the program being modified. Select from A, B or C.
Step 3 – For Weekday scheduling, press
until MON–SUN is displayed. All weekdays with
the
symbol are designated as an active watering day.
To disable a specific weekday, press
or
until the desired weekday is flashing.
Press
to disable. The
icon will be displayed above the non-watering day.
To enable a non-watering day, press
or
until the desired weekday is flashing.
Press
to enable. The
icon will be displayed above the active day.
Step 4 – For ODD scheduling, press
or
until ODD is flashing. Press the
button
to activate. The
symbol should be displayed above ODD. By selecting ODD
scheduling, Lawn Master II will only water on the ODD numbered days in the
calendar month. ODD scheduling will not water on the 31st but resumes on the 1st.
Step 5 – For EVEN scheduling, press
or
until EVEN is flashing. Press the
button
to activate. The
symbol should be displayed above EVEN. By selecting EVEN
scheduling, Lawn Master II will only water on the EVEN numbered days in the
calendar month.
Step 6 – Repeat Steps 2–5 for the remaining programs as necessary.
Step 7 – Return the function dial to RUN
when finished.
START TIMES Setup
The START TIMES setup will instruct the controller the time to activate the selected program
during an active watering day. Lawn Master II provides three start times per program to
accommodate all your irrigation needs.
Step 1 – Place the function dial to the START TIMES
Step 2 – Press
Step 3 – Press
PRG
position.
to select the program being modified. Select from A, B or C.
or
to select the START TIME number (1, 2 or 3) being modified.
Step 4 – Press
or
to adjust the time to the desired START TIME. For unused start
times, make sure OFF is displayed. OFF is located between 11:45pm and 12:00am.
Each key-press will increase or decrease the start time by 15 minutes.
Step 5 – Repeat steps 2–4 for the remaining start times and programs as necessary.
Step 6 – Return the function dial to RUN
when finished.
IMPORTANT! A program which is set to start while a watering cycle is in progress will
be delayed (stacked) until the current watering cycle is completed. Any stacked programs that
are delayed past midnight will be canceled.
10
SET ZONE TIMES Setup
The SET ZONE TIMES setup tells the controller how much time each station will be
activated (runtime).
Step 1 – Place the function dial to the SET ZONE TIMES
Step 2 – Press
Step 3 – Press
PRG
position.
to select the program being modified. Select from A, B or C.
or
to select the Zone (station) number (1–6) being modified.
Step 4 – Press
or
to adjust the desired time duration (runtime) you want the station to
be active. Each station can have a runtime of one minute and up to six hours. For
unused stations, adjust the runtime to 0:00.
Hours
Minutes
Step 5 – Repeat steps 2–4 for the remaining stations and programs.
Step 6 – Return the function dial to RUN
when finished.
11
SEASON ADJUST Setup
SEASON ADJUST enables you to conveniently decrease or increase the ZONE TIME (run
time) currently set for each of the programs. The adjustment can be made in 10% increments
from 0% (OFF) to 200% of the normal (100%) run time.
SEASON ADJUST is a universal setting which will affect all three (A, B and C)
programs.
Step 1 – Place the function dial to the SEASON ADJUST
position.
Step 2 – Press
or
to adjust to the desired adjustment percentage; i.e., 90% equals 10%
reduction of station run time and 200% will double the station run time.
Step 3 – Return the function dial to RUN
when finished.
MANUAL STATION Operation
MANUAL STATION operation enables you to activate any station and give a temporary run
time duration. Only one station can be activated by the MANUAL STATION operation. Any
run time adjustment made in MANUAL STATION is temporary and will not affect the actual
run times in the programs.
Step 1 – Place the function dial to the MANUAL STATION
Step 2 – Press
position.
to activate MANUAL STATION operation.
Step 3 – Press
or
to select the Station number being activated.
Step 4 – Press
or
to adjust the desired run time duration.
Step 5 – Turn the function dial slowly to the RUN
position to activate. The selected
station will be activated until the set run time expires, then the controller will revert
to normal operation.
12
MANUAL PROGRAM Operation
MANUAL PROGRAM operation enables you to activate any of the three (A, B or C)
programs, regardless of their set START TIMES. Only one program can be activated by the
MANUAL PROGRAM operation. Any run time adjustment made in MANUAL PROGRAM
is temporary and will not affect the actual run times in the programs.
Rain sensor does not affect Manual Program and Manual Station operations.
Step 1 – Place the function dial to the MANUAL PROGRAM
Step 2 – Press
Step 3 – Press
position.
to activate MANUAL PROGRAM operation.
PRG
to select the program being modified. Select from A, B or C.
Step 4 – To modify the station run times temporarily, press
or
to select the Station
number being modified. Press
or
to adjust the desired run time duration.
Step 5 – Turn the function dial slowly to the RUN
position to activate. The selected
program will be activated until all programmed stations are cycled, then the
controller will revert to normal operation.
Turning OFF Operation and Shutting Down Lawn Master II
Place the function dial in the OFF
position to turn off any operation currently in
progress. While the function dial is in the OFF
position, any scheduled watering
programs will be prevented from activating. For extended sprinkler system shutdown, leave
the control dial in the OFF
position.
Place the function dial to RUN
to resume operations.
13
Troubleshooting Guide
14
Problem
Possible Cause
Correction
Some valves do not operate.
Defective solenoid.
Loose wire connection.
Test and replace solenoid.
Secure wire connections.
Check for wire continuity.
No valves operate.
Function dial in OFF position.
Set switch to RUN or
MANUAL position.
Start Times set to OFF.
Reprogram START TIMES.
WATERING DAYS incorrectly
set.
SET ZONE TIMES set to off.
Reprogram WATERING DAYS.
SEASON ADJUST set to 0%.
Readjust SEASON ADJUST.
AC power source is not
connected. NO AC is displayed.
Check and reconnect the plugin transformer.
Current time is wrong and
flashing (after a power outage
or after being unplugged).
Battery is weak or missing.
Replace battery and reprogram
controller.
Valves won’t turn off (function
dial switch in OFF position).
Mechanical override (Valve’s
manual bleed is ON).
Turn the valve’s solenoid fully
clockwise.
Manual Station and Program
Operations do not activate.
Function Dial was rotated too
quickly to the RUN position.
Rotate the function dial slowly
to the RUN position.
Reprogram SET ZONE TIMES.
Specifications
Transformer: Energy Efficient Level IV, UL/cUL Listed, CSA Certified (or equivalent)
Input: 120 VAC, 60 Hz
Output: 24 VAC at 0.75A
Capacity: One Station plus Master Valve or 24 VAC Pump Start Relay Active at one time
Maximum Electrical Output: 350mA per Station
Operating Temperature: 32˚F to 140˚F (0˚C to 60˚C)
Storage Temperature: -4˚F to 149˚F (-20˚C to 65˚C)
Relative Humidity: 0–95% without Condensation
15
Limited One-Year Warranty
The Toro Company and its affiliate, Toro Warranty Company, pursuant to an agreement between them, jointly warrants,
to the owner, against defects in material and workmanship for a period of one year from the date of purchase.
Neither The Toro Company nor Toro Warranty Company is liable for failure of products not manufactured by them even
though such products may be sold or used in conjunction with Toro products.
During such warranty period, we will repair or replace, at our option, any part found to be defective.
Return the defective part to the place of purchase.
Our liability is limited solely to the replacement or repair of defective parts. There are no other express warranties.
This warranty does not apply where equipment is used, or installation is performed, in any manner contrary to Toro’s
specifications and instructions, nor where equipment is altered or modified.
Neither The Toro Company nor Toro Warranty Company is liable for indirect, incidental or consequential damages in
connection with the use of equipment, including but not limited to: vegetation loss, the cost of substitute equipment or
services required during periods of malfunction or resulting non-use, property damage or personal injury resulting from
installer’s negligence.
Some states do not allow the exclusion or limitation of incidental or consequential damages, so the above limitation or
exclusion may not apply to you.
All implied warranties, including those of merchantability and fitness for use, are limited to the duration of this express
warranty.
Some states do not allow limitations of how long an implied warranty lasts, so the above limitation may not apply to you.
This warranty gives you specific legal rights and you may have other rights which vary from state to state.
The Toro Dedication to Quality – Lawn Master II Timer
Toro is committed to developing and producing the highest quality, best performing, most dependable products on the
market. Because your satisfaction is our first priority, we have provided the Toro Helpline to assist you with any questions
or problems that may arise. If for some reason you are not satisfied with your purchase or have questions, please contact
us toll free at 1-800-367-8676.
16© The Toro Company • Consumer Division • www.toro.com • Made in China
Part Number 373-0445 Rev. A
Quick Reference Guide
Adjust CURRENT TIME/DAY
Place function dial to
position. Press
or
to select item being modified (YEAR,
MONTH, DAY, HOUR or MINUTES). Press
or
to adjust parameter.
Set WATERING DAYS
Place function dial to
position. Press
or
to select the specific weekdays, ODD or
EVEN. Press
to set as an active watering day or
to set as a non-watering day (OFF).
Set START TIMES
Place function dial to
position. Press
(3 start times per program). Press
or
or
to select the start time number being set
to adjust the start time.
SET ZONE TIMES
Place function dial to
position. Press
to adjust the station runtime.
or
to select the station number. Press
or
Activate MANUAL STATION
Place function dial to
to activate. Press
or
execute.
position. Press
to activate function. Press
to select the station
to adjust the station runtime. Place the function dial to
to
Activate MANUAL PROGRAM
Place function dial to
position. Press
to activate function. Press
program to activate. Place the function dial to
to execute.
PRG
to select the
17
5 Inches (12.7cm)
18© 2007 The Toro Company • Consumer Division • www.toro.com • Made in China
Part Number 373-0445 Rev. B
Temporizador para zonas verdes Lawn MasterTM II
Spanish
English
Modelos: 53805 (4 zonas) y 53806 (6 zonas)
Guía de instalación y programación
Tabla de contenidos
Descripción de los Componentes - - - - - - - - - - - - - - - - - - - - - - - - - - - - - - - Página 1
Descripción del Dial de funciones - - - - - - - - - - - - - - - - - - - - - - - - - - - - - - Página 2
Descripción de la Pantalla LCD - - - - - - - - - - - - - - - - - - - - - - - - - - - - - - - Página 3
Instalación del programador - - - - - - - - - - - - - - - - - - - - - - - - - - - - - - - - - Página 4
Instalación de la pila - - - - - - - - - - - - - - - - - - - - - - - - - - - - - - - - - - - - Página 5
Conexión eléctrica - - - - - - - - - - - - - - - - - - - - - - - - - - - - - - - - - - - - - - Página 6
Instalación del sensor de lluvia (Opcional) - - - - - - - - - - - - - - - - - - - - - - - - - - Página 6
Conexión de la válvula maestra y las estaciones - - - - - - - - - - - - - - - - - - - - - - - - Página 7
Posición RUN - - - - - - - - - - - - - - - - - - - - - - - - - - - - - - - - - - - - - - - - Página 8
Ajuste de DÍA y HORA ACTUALES - - - - - - - - - - - - - - - - - - - - - - - - - - - - - Página 8
Ajuste de DÍAS DE RIEGO - - - - - - - - - - - - - - - - - - - - - - - - - - - - - - - - - Página 9
Ajuste de HORAS DE ARRANQUE - - - - - - - - - - - - - - - - - - - - - - - - - - - - - Página 10
Ajuste de TIEMPOS DE RIEGO POR ZONAS - - - - - - - - - - - - - - - - - - - - - - - - Página 11
Ajuste de RIEGO PORCENTUAL - - - - - - - - - - - - - - - - - - - - - - - - - - - - - - Página 12
Función ESTACIÓN MANUAL - - - - - - - - - - - - - - - - - - - - - - - - - - - - - - - Página 12
Función PROGRAMA MANUAL - - - - - - - - - - - - - - - - - - - - - - - - - - - - - - Página 13
Posición OFF – Desconexión del Lawn Master II - - - - - - - - - - - - - - - - - - - - - - - Página 13
Guía de solución de problemas - - - - - - - - - - - - - - - - - - - - - - - - - - - - - - - Página 14
Especificaciones - - - - - - - - - - - - - - - - - - - - - - - - - - - - - - - - - - - - - - - Página 15
Garantía limitada de un año - - - - - - - - - - - - - - - - - - - - - - - - - - - - - - - - Página 16
El compromiso Toro con la calidad - - - - - - - - - - - - - - - - - - - - - - - - - - - - - Página 16
Guía de referencia rápida - - - - - - - - - - - - - - - - - - - - - - - - - - - - - - - - - - Página 17
Plantilla para la colocación de los tornillos - - - - - - - - - - - - - - - - - - - - - -
ii
Contraportada
Descripción de los Componentes
4
Botones de navegación – Se utilizan
para navegar por los menús de
funciones.
1
2
3
– Ir al elemento de menú
anterior.
– Ir al elemento de menú
siguiente.
– Ajustar/Aumentar el valor
seleccionado.
– Ajustar/Reducir el valor
seleccionado.
6
4
5
5
7
1
Pantalla LCD (Para más detalles, vea “Descripción de la
de estaciones es diferente en el
modelo de 4 zonas y en el de 6 zonas)
Pantalla LCD”)
2
Interruptor del sensor – Habilita o Deshabilita el sensor de
lluvia opcional.
3
Dial de funciones – Permite seleccionar entre las selecciones
del programador.
(Para más detalles, vea “Descripción del Dial de funciones”)
Bloque terminal
RS1 y RS2 – Sensor
AC1 y AC2 – Potencia CA
COM – Cable común de válvulas
MV – Válvula maestra
S1 a S6 – Estaciones 1–6 (El recuento
6
Botón de programas – Pulse para
7
Pila de 9 voltios (no incluida)
seleccionar el Programa A, B o C.
– Mantiene en memoria la fecha, la
hora y los programas.
Descripción del Dial de funciones
RUN
– Pone en marcha los programas seleccionados.
CURRENT TIME/DAY
– Ajusta la fecha y hora
actuales.
WATERING DAYS
– Establece los días en los que se
activará cada programa. Los programas pueden activarse en
días de la semana determinados, días IMPARES o días PARES.
START TIMES
– Establece la hora de activación de cada
programa. El Lawn Master II permite tres horas de arranque
para cada uno de los tres programas.
SET ZONE TIMES
– Establece el tiempo de activación
de la estación especificada. Los tiempos de riego pueden
ajustarse entre un minuto y seis horas.
SEASON ADJUST
– Ajusta porcentualmente el riego de cada programa. Puede reducirse el tiempo de
riego del sistema al 0% (Sistema OFF (apagado)) o aumentar el tiempo de riego hasta el 200% (el doble del
tiempo de riego programado).
MANUAL STATION
– Activa una sola estación. Puede especificarse el tiempo de riego de la estación
sin afectar a ningún programa.
MANUAL PROGRAM
OFF
– Activa un programa sin tener en cuenta su hora de arranque programada.
– Desactiva cualquier operación que esté en progreso actualmente. Deje el dial de funciones en la
posición de OFF para apagar el sistema de aspersores.
Descripción de la Pantalla LCD
1
2
3
4
5
6
terminales del sensor. Si está instalado un
sensor de lluvia (opcional), SENSOR indica
que se ha detectado lluvia.
6
7
11
9
12 13
1
14
8
7
10
8
Season Adjust
9
AM o PM Indica la hora en formato AM
15
MONTH – El número parpadeante de 2 dígitos
indica el mes actual.
2
STATION – Indica el número de la estación
seleccionada.
3
NO AC – Parpadea cuando no se detecta la corriente
CA.
4
5
SENSOR – Indica que se han activado los
PROGRAM A, B o C – Indica el
programa seleccionado.
– Indica que los
programas automáticos han sido ajustados.
(mañana) o PM (tarde).
10
Riego
/ Sin riego
– iconos
indicadores.
DAY – Indica el día actual.
YEAR – Indica el año actual.
12 RUN TIME – Indica el tiempo de riego de
11
la estación visualizada.
Nivel bajo/pila agotada
– Indica que es
necesario instalar una pila de 9 voltios.
13
START TIME – Indica el número y el
Riego activo
14
Días de la semana – corresponden al
15
ODD o EVEN – calendario de riego en
– Indica que hay un programa o una
operación manual actualmente activo.
valor de la hora de arranque.
calendario de riego en días seleccionados.
días pares o impares.
Instalación del programador
Para una operación segura y fiable, instale el programador en un lugar que:
• Esté protegido contra la intemperie.
• Esté a menos de cuatro pies (1,2 m) de una toma de corriente de 110 Vca, 60 Hz, que no esté
controlada por un interruptor de luz ni utilizada por un aparato de gran consumo, como por ejemplo
un frigorífico, un aparato de aire acondicionado o un mecanismo de apertura de la puerta del garaje.
• Esté al alcance del cableado de las válvulas de control de los aspersores y del cableado de los accesorios
opcionales.
Paso 1 –Utilice la plantilla para la colocación de los tornillos de la última página para marcar la posición de
los tornillos. Utilice un nivel para alinear horizontalmente los dos tornillos. Instale dos tornillos en
la pared al nivel de los ojos, con una separación entre sí de cinco pulgadas (12,7 cm). Los tornillos
deben sobresalir aproximadamente 1/4 pulgada (6 mm) de la pared para poder enganchar la caja del
programador.
lawn
master
Si la pared es de cartón piedra o de albañilería, instale anclajes apropiados para los tornillos.
Paso 2 –Cuelgue el armario usando los orificios en forma de bocallave del panel posterior.
Asegúrese de que
SENSOR
ON
el armario queda correctamente asentado sobre los tornillos.
OFF
Paso 3 –(Opcional) Retire el panel de acceso del programador e instale un tornillo de montaje central.
Apriete firmemente el tornillo.
PRG
Questions?
Call the Toro Helpline
(800) 367-8676
www.toro.com
RS1 RS2 AC1 AC2 COM MV
5’’ (12.7cm)
S1
S2
S3
S4
S5
S6
(Opcional)
master
SENSOR
ON
Instalación de la pila
OFF
El Lawn Master II mantiene en memoria los programas y la fecha y hora
mediante una pila de respaldo de 9 V. En caso de producirse un corte de
energía eléctrica, si la pila de 9 V no está instalada o está casi agotada, se
reiniciará el programador con la fecha y la hora por defecto, es decir, el
01-01-2007, 12:00 AM. También se perderá cualquier calendario de riego
programado en el Lawn Master II.
RS1 RS2 AC1 AC2 COM MV
Cambie la pila de 9 V cada año para asegurarse de que no se
pierdan la fecha, la hora y los programas.
S1
S2
PRG
Questions?
Call the Toro Helpline
(800) 367-8676
www.toro.com
S3
S4
S5
S6
9-Volt
Battery
¡IMPORTANTE! Cada vez que se produzca un corte de energía
eléctrica, compruebe el programa de riego del programador para evitar
interrupciones en la actividad de su sistema de riego.
Paso 1 –
Retire la tapa del panel inferior del programador para tener
acceso al compartimiento de la pila.
Paso 2 –
Enchufe la pila de 9 V en el conector.
Paso 3 –
Coloque la pila en el compartimiento.
Paso 4 –
Vuelva a colocar la tapa del panel inferior.
OFF
PRG
Conexión eléctrica
Paso 1 –
Retire la tapa del panel inferior del programador para
tener acceso al compartimiento de los terminales de la
fuente de alimentación.
Paso 2 –
Conecte los cables del transformador externo a los
terminales marcados “AC1” y “AC2”.
No es
necesario observar la polaridad en esta conexión.
Paso 3 –
Vuelva a colocar la tapa del panel inferior, asegurándose
de que el cable del transformador pase por el orificio
provisto en la parte inferior del programador.
Paso 4 –
Enchufe del transformador en una toma de corriente de
120 Vca, 60 Hz.
Instalación del sensor de lluvia (Opcional)
Questions?
Call the Toro Helpline
(800) 367-8676
www.toro.com
RS1 RS2 AC1 AC2 COM MV
S1
S2
S3
S4
S5
9-Volt
Battery
S6
lawn
master
¡IMPORTANTE! El circuito del sensor está diseñado para un sensor de lluvia NORMALMENTE
CERRADO. Si no está conectado un sensor de lluvia, el interruptor del sensor debe estar en la posición
SENSOR
ON
OFF
“OFF” o debe instalarse el cable puente.
Paso 1 –
Retire la tapa del panel inferior del programador para
tener acceso a los terminales del sensor.
Paso 2 –
Lleve el cable del sensor de lluvia al programador.
Paso 3 –
Retire el cable puente de los terminales “RS1” y “RS2”.
Conecte los cables del sensor a los terminales.
Paso 4 –
Vuelva a colocar la tapa del panel inferior.
Paso 5 –
Ponga el interruptor “SENSOR” en “ON” para
monitorizar el estado del sensor.
PRG
Questions?
Call the Toro Helpline
(800) 367-8676
www.toro.com
RS1 RS2 AC1 AC2 COM MV
S1
S2
S3
S4
S5
S6
SENSOR
ON
OFF
9-Volt
Battery
Conexión de la válvula maestra y las estaciones
Para la conexión a las válvulas de riego, se recomienda el uso de cable multi-conductor de calibre 18
(puede utilizarse calibre 14 como máximo), apto para enterrar directamente. Seleccione un cable que tenga al
menos un conductor para cada válvula y un conductor adicional para la conexión común.
¡IMPORTANTE! Para evitar la corrosión y posibles cortocircuitos, utilice conectores de cable
impermeables en todos los empalmes.
lawn
master
SENSOR
ON
Paso 1 –
Para la conexión común de las válvulas, conecte un conductor (generalmente el blanco) al cable
del solenoide de cada una de las válvulas y conecte estos cables entre sí.
Paso 2 –
Conecte un conductor independiente al otro cable del solenoide de cada válvula.PRG
Para su referencia, anote el color del cable usado para cada conexión de válvula y la
estación de riego asociada.
Paso 3 –
Retire la tapa del panel inferior del
programador para tener acceso a los terminales
de la válvula maestra y de las estaciones.
OFF
Questions?
Call the Toro Helpline
Paso 4 –
Introduzca el cable en el programador a través
del orificio de la base de la unidad.
Paso 5 –
Conecte el conductor común de las válvulas al
terminal marcado “COM”.
Paso 6 –
Conecte la válvula maestra al terminal marcado
“MV” y las estaciones a los terminales
correspondientes (S1, S2, S3, ...).
Paso 7 –
Vuelva a colocar la tapa del panel inferior.
RS1 RS2 AC1 AC2 COM MV
S1
S2
S3
S4
S5
S6
COM
(800) 367-8676
www.toro.com
9-Volt
Battery
S3
S2
S1
MV
COM
Posición RUN
Gire el dial de funciones a RUN
para que el programador ejecute los ciclos de riego programados.
El Lawn Master II sólo ejecuta los programas si está en la posición RUN.
Ajuste de DÍA y HORA ACTUALES
Paso 1 –
Ponga el dial de funciones en la posición CURRENT TIME/DAY
Paso 2 –
Con YEAR en pantalla, pulse
o
Pulse
para avanzar a MONTH.
Paso 3 –
Con MONTH en pantalla, pulse
Pulse
para avanzar a DAY.
o
Paso 4 –
Con DAY en pantalla, pulse
o
Pulse
para avanzar a AM/PM.
para ajustar el valor al día actual.
Paso 5 –
Con AM o PM parpadeando, pulse
o
Pulse
para ajustar el valor HOUR.
Paso 6 –
Con HOUR parpadeando, pulse
o
para ajustar la hora actual.
Pulse
para ajustar el valor MINUTE.
Paso 7 –
Con el valor MINUTE parpadeando, pulse
o
Pulse
para volver a la pantalla YEAR (Paso 2).
Paso 8 –
Ponga el dial de funciones en RUN
.
para ajustar el valor al año actual.
para ajustar el valor al mes actual.
para seleccionar AM (mañana) o PM (tarde).
para ajustar los minutos actuales.
cuando termine.
Ajuste de DÍAS DE RIEGO
El ajuste DÍAS DE RIEGO determina cuándo se activa el programa de riego seleccionado. El Lawn Master
II permite seleccionar calendarios de riego de Días de la semana, días IMPARES solamente o días PARES
solamente. El calendario de Días de la semana permite deshabilitar días determinados.
Paso 1 –
Ponga el dial de funciones en la posición WATERING DAYS
Paso 2 –
Pulse
Paso 3 –
Para el calendario de Días de la semana, pulse
hasta que la pantalla muestre MON–SUN
(lun-dom). Todos los días de la semana que tengan el símbolo
son días de riego.
Para deshabilitar un día específico, pulse
o
hasta que parpadee el día de la semana
deseado. Pulse
para deshabilitar ese día. Se mostrará el icono
en la pantalla encima del día
sin riego.
Para habilitar un día sin riego, pulse
o
hasta que parpadee el día de la semana deseado.
Pulse
para habilitar ese día. Se mostrará el icono
en la pantalla encima del día activo.
Paso 4 –
Para el calendario ODD (días impares), pulse
o
hasta que la pantalla muestre ODD
(impar). Pulse el botón
para activarlo. La pantalla mostrará el símbolo
encima de ODD.
Cuando está seleccionado el calendario ODD (días impares), el Lawn Master II regará solamente
en los días impares del mes natural. El calendario ODD no riega el día 31, pero se reanuda el día
1 del mes.
Paso 5 –
Para el calendario EVEN (días pares), pulse
o
hasta que parpadee EVEN (par). Pulse el
botón
para activarlo. La pantalla debe mostrar el símbolo
encima de EVEN. Cuando está
seleccionado el calendario EVEN (días pares), el Lawn Master II regará solamente en los días
pares del mes natural.
Paso 6 –
Repita los pasos 2–5 para los demás programas, según sea necesario.
Paso 7 –
Vuelva a poner el dial de funciones en RUN
PRG
.
para seleccionar el programa a modificar. Seleccione entre A, B y C.
cuando termine.
Ajuste de HORAS DE ARRANQUE
El ajuste de START TIMES (horas de arranque) indica al programador la hora a la que debe activar el
programa seleccionado durante un día de riego activo. El Lawn Master II permite tres horas de arranque por
programa, con lo que se adapta a cualquier necesidad de riego.
Paso 1 –
Ponga el dial de funciones en la posición START TIMES
Paso 2 –
Pulse
Paso 3 –
Pulse
Paso 4 –
Pulse
o
para ajustar la hora de arranque deseada. Para las horas de arranque sin utilizar,
asegúrese de que la pantalla muestre OFF (deshabilitado). OFF está situado entre las horas de
11:45pm y 12:00am.
PRG
.
para seleccionar el programa a modificar. Seleccione entre A, B y C.
o
para seleccionar el número de hora de arranque (1, 2 o 3) a modificar.
Cada pulsación adelanta o retrasa la hora de arranque en 15 minutos.
Paso 5 –
Repita los pasos 2-4 para las demás horas de arranque, según sea necesario.
Paso 6 –
Vuelva a poner el dial de funciones en RUN
cuando termine.
¡IMPORTANTE! Si la hora de arranque de un programa coincide con un ciclo de riego que está en
progreso, el programa quedará en suspenso (apilado) hasta que se termine el ciclo de riego actual. Cualquier
programa que todavía está apilado a medianoche será cancelado.
10
Ajuste de TIEMPOS DE RIEGO POR ZONAS
El ajuste SET ZONE TIMES indica al programador durante cuánto tiempo estará activada cada estación
(tiempo de riego).
Paso 1 –
Ponga el dial de funciones en la posición SET ZONE TIMES
Paso 2 –
Pulse
Paso 3 –
Pulse
Paso 4 –
Pulse
o
para ajustar el tiempo de riego durante el cual la estación debe estar activada. El
tiempo de riego de cada estación puede ajustarse entre un minuto y seis horas. Las estaciones no
utilizadas deben tener un tiempo de riego de 0:00.
PRG
.
para seleccionar el programa a modificar. Seleccione entre A, B y C.
o
Horas
para seleccionar el número de Zona (estación) (1–6) a modificar.
Minutos
Paso 5 –
Repita los pasos 2–4 para los demás programas y estaciones.
Paso 6 –
Vuelva a poner el dial de funciones en RUN
cuando termine.
11
Ajuste de RIEGO PORCENTUAL
SEASON ADJUST le permite aumentar o reducir cómodamente el tiempo de riego (ZONE TIME) establecido
para cada uno de los programas. El ajuste puede realizarse en incrementos del 10% desde el 0% (OFF) hasta
el 200% del tiempo de riego normal (100%).
SEASON ADJUST es un ajuste universal que afectará a los tres programas (A, B y C).
Paso 1 –
Ponga el dial de funciones en la posición SEASON ADJUST
.
Paso 2 –
Pulse
o
para modificar el ajuste al porcentaje deseado; por ejemplo, 90% es igual a una
reducción del 10% en el tiempo de riego de la estación, y 200% duplicará el tiempo de riego de la
misma.
Paso 3 –
Vuelva a poner el dial de funciones en RUN
cuando termine.
Función ESTACIÓN MANUAL
MANUAL STATION (estación manual) le permite activar manualmente cualquier estación y establecer un
tiempo de riego temporal. Sólo es posible activar una estación utilizando la función MANUAL STATION.
Cualquier ajuste del tiempo de riego durante la operación de MANUAL STATION es temporal y no afectará
a los tiempos de riego de los programas.
Paso 1 –
Ponga el dial de funciones en la posición MANUAL STATION
Paso 2 –
Pulse
Paso 3 –
Pulse
o
para seleccionar el número de estación a activar.
Paso 4 –
Pulse
o
para ajustar el tiempo de riego.
Paso 5 –
Gire el dial de funciones lentamente a la posición RUN
para activarlo. La estación
seleccionada será activada hasta el final del tiempo establecido, luego el programador volverá a la
operación normal.
12
.
para activar la función MANUAL STATION.
Función PROGRAMA MANUAL
MANUAL PROGRAM (programa manual) le permite activar cualquier de los tres programas (A, B o C),
cualquiera que sea su hora de arranque (START TIME) establecida. Sólo es posible activar un programa
utilizando la función MANUAL PROGRAM. Cualquier ajuste del tiempo de riego durante la operación de
MANUAL PROGRAM es temporal y no afectará a los tiempos de riego de los programas.
El sensor de la lluvia no afecta la operacion de programa manual y estación manual.
Paso 1 –
Ponga el dial de funciones en la posición MANUAL PROGRAM
.
Paso 2 –
Pulse
Paso 3 –
Pulse
Paso 4 –
Para modificar temporalmente los tiempos de riego de las estaciones, pulse
o
para
seleccionar el número de la estación a modificar. Pulse
o
para ajustar el tiempo de riego.
Paso 5 –
Gire el dial de funciones lentamente a la posición RUN
para activarlo. La estación
seleccionada será activada hasta que terminen los ciclos de todas las estaciones programadas,
luego el programador volverá a la operación normal.
para activar la función MANUAL PROGRAM.
PRG
para seleccionar el programa a modificar. Seleccione entre A, B y C.
Posición OFF – Desconexión del Lawn Master II
Ponga el dial de funciones en OFF
para desactivar cualquier operación que esté en progreso
actualmente. Con el dial de funciones en la posición OFF
, no se activará ningún programa de riego.
Para dejar desactivado el sistema de riego durante un período largo, deje el dial de control en la posición
OFF
.
Ponga el dial de funciones en RUN
para reanudar las operaciones.
13
Guía de solución de problemas
Problema
Posible causa
Solución
Algunas válvulas no funcionan.
Solenoide defectuoso.
Cable suelto.
Compruebe y cambie el solenoide.
Compruebe las conexiones de los cables.�
Compruebe la continuidad de los cables.
No funciona ninguna válvula.
Dial de funciones en la posición OFF.
Ponga el interruptor en la posición RUN
o MANUAL.
Horas de arranque ajustadas a OFF.
Vuelva a programar las HORAS DE
ARRANQUE (START TIMES).
DÍAS DE RIEGO (WATERING DAYS) Vuelva a programar los DÍAS DE
incorrectamente ajustados.
RIEGO (WATERING DAYS).
TIEMPOS DE RIEGO (SET ZONE
TIMES) ajustado a OFF.
Vuelva a programar los TIEMPOS DE
RIEGO (SET ZONE TIMES).
AJUSTE PORCENTUAL (SEASON
ADJUST) ajustado a 0%.
Vuelva a ajustar AJUSTE PORCEN TUAL (SEASON ADJUST).
No está conectada la fuente de
alimentación CA. La pantalla muestra
NO AC.
No hay pila, o está casi agotada.
Compruebe y vuelva a conectar el
transformador externo.
Las válvulas no se apagan (dial de
funciones en la posición OFF).
Sobrecontrol mecánico (la purga
manual de la válvula está en ON).
Gire el solenoide de la válvula en el
sentido de las agujas del reloj hasta que
haga tope.
No se activan las funciones Manual
Station y Manual Program.
El dial de funciones se giró demasiado
rápidamente a la posición RUN.
Gire el dial de funciones lentamente a la
posición RUN.
La hora actual está mal y esta
parpadeando (después de un corte de
energía eléctrica o de ser desenchufado).
14
Cambie la pila y vuelva a programar el
programador.
Especificaciones
Transformador: Eficiencia energética nivel IV, Homologación UL/cUL, Certificación CSA (o equivalente)
Entrada: 120 Vca, 60 Hz
Salida: 24 Vca, a 0,75 A
Capacidad: Una estación más válvula maestra o relé de arranque de bomba de 24 Vca activa en cualquier
momento
Temperatura de operación: 32°F a 140°F (0°C a 60°C)
Temperatura de almacenamiento: –4°F a 149°F (–20°C a 65°C)
Humedad relativa: 0–95% sin condensación
15
Garantía limitada de un año
The Toro Company y su afiliado, Toro Warranty Company, bajo un acuerdo entre sí, garantizan conjuntamente este producto al
propietario contra defectos de materiales o mano de obra durante un periodo de un año a partir de la fecha de la compra.
Ni The Toro Company ni Toro Warranty Company son responsables del fallo de productos no fabricados por ellos, aún cuando dichos
productos se vendan o utilicen conjuntamente con productos Toro.
Durante dicho período de garantía, repararemos o sustituiremos, a nuestra discreción, cualquier pieza que resulte ser defectuosa.
Devuelva la pieza defectuosa al lugar de la compra.
Nuestra responsabilidad se limita exclusivamente a la sustitución o la reparación de piezas defectuosas. No existe ninguna otra garantía
expresa.
Esta garantía no es aplicable si los equipos son utilizados o si la instalación es realizada de manera contraria a las especificaciones e
instrucciones de Toro, o si los equipos son cambiados o modificados.
Ni The Toro Company ni Toro Warranty Company son responsables de daños indirectos, incidentales o consecuentes respecto al uso de
los equipos, incluyendo pero sin limitarse a: la pérdida de masa vegetal, el coste de equipos o servicios sustitutorios necesarios durante
periodos de avería o la pérdida consiguiente de uso, daños materiales o lesiones personales que son el resultado de la negligencia del
instalador.
Algunos estados no permiten exclusiones de daños incidentales o consecuentes, de manera que la exclusión o limitación anterior puede
no ser aplicable a usted.
Cualquier garantía implícita, incluyendo las de mercantibilidad y adecuación a un uso determinado, queda limitada a la duración de esta
garantía expresa.
Algunos estados no permiten limitaciones sobre la duración de una garantía implícita, de manera que limitación anterior puede no ser
aplicable a usted. Esta garantía le otorga derechos legales específicos, y es posible que usted tenga otros derechos que varían de un estado
a otro.
El compromiso Toro con la calidad – Temporizador Lawn Master II
Toro está comprometido a desarrollar y producir los productos más fiables, de mejor rendimiento y de más alta calidad del mercado.
Puesto que su satisfacción es nuestra primera prioridad, hemos puesto en marcha el Servicio de Ayuda Toro, que le ayudará a resolver
cualquier duda o problema que pueda presentarse. Si por alguna razón no está satisfecho con su compra o si tiene alguna pregunta, por
favor llámenos al teléfono gratuito 1-800-367-8676.
16© The Toro Company • División de Consumo • www.toro.com • Fabricado en China
Pieza Nº 373-0445 Rev. A
Guía de referencia rápida
Ajustar HORA y DÍA ACTUALES
Ponga el dial de funciones en la posición
. Pulse
o
para seleccionar el elemento a modificar
(YEAR (año), MONTH (mes), DAY (día), HOUR (hora) o MINUTES (minutos)). Pulse
o
para ajustar
el parámetro.
Establecer DÍAS DE RIEGO
Ponga el dial de funciones en la posición
. Pulse
o
para seleccionar días de la semana específicos,
ODD (impar) o EVEN (par). Pulse
para establecer un día de riego activo o
para establecer un día sin
riego (OFF).
Establecer HORAS DE ARRANQUE
Ponga el dial de funciones en la posición
. Pulse
de arranque por programa) a establecer. Pulse
o
o
para seleccionar la hora de arranque (3 horas
para ajustar la hora de arranque.
Establecer TIEMPOS DE RIEGO
Ponga el dial de funciones en la posición
. Pulse
o
o
para ajustar el tiempo de riego de la estación.
para seleccionar el número de estación. Pulse
Activar ESTACIÓN MANUAL
Ponga el dial de funciones en la posición
. Pulse
para activar la función. Pulse
para seleccionar la
estación a activar. Pulse
o
para ajustar el tiempo de riego de la estación. Ponga el dial de funciones en
para iniciar el riego.
Activar PROGRAMA MANUAL
Ponga el dial de funciones en la posición
. Pulse
programa a activar. Ponga el dial de funciones en
para activar la función. Pulse
PRG
para seleccionar el
para iniciar el riego.
17
5 pulgadas (12,7 cm)
18© 2007 The Toro Company • División de Consumo • www.toro.com • Fabricado en China
Pieza Nº 373-0445 Rev. AB