1
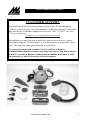
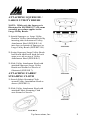
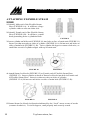
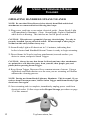
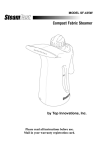
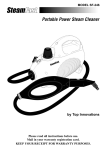
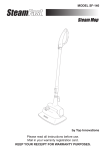
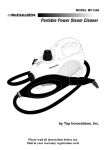
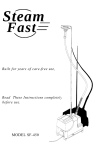
Model MC1227
Handheld Steam Cleaner
by Top Innovations, Inc.
Please read instructions before use.
Mail in your warranty registration card.
LETTER FROM THE CEO
Dear Valued Customer,
Thank you for purchasing the Handheld Steam Cleaner. This versatile
and convenient new product places the cleaning power of steam in a
compact and lightweight appliance that is easy to take anywhere you need
to clean.
Plug your Handheld Steam Cleaner in, and in minutes, you are ready to
clean automobiles, motorcycles, boats, ATVs, grills, and much more. The
clean and natural power of steam lets you care for some of your largest
investments without worry of damage that may be caused by using harsh
chemicals and devices. In addition to removing dirt, grease, and grime, you
will receive the many benefits that steam provides. Hot steam refreshes
vehicle upholstery and eliminates smoke and other unpleasant odors, as
well as dust mites and other allergens. And when you’re finished steaming,
the Handheld Steam Cleaner’s light weight and compact size make it
quick and convenient to store.
Top Innovations, Inc. would like to invite you to take advantage of our
Customer Support web site at:
www.topinnovations.com
On this website you will find additional information about many other
exciting McCULLOCH and Steam Fast products that are available, helpful
tips on ways in which you can utilize your Handheld Steam Cleaner, and
other useful information to assist you in maximizing the power of steam!
Enjoy your new Handheld Steam Cleaner!
Benny Lee
Chairman and CEO
Top Innovations, Inc.
2
Top Innovations, Inc.
CUSTOMER SUPPORT
CUSTOMER SUPPORT
For problems with your steam cleaner, refer to the Troubleshooting
Guide Located on page 14 of this manual. Additional inquiries should be
directed to our Customer Support services at 1-800-711-6617 ext. 102 /
130 or e-mailed to:
[email protected]
Should there be any missing or defective parts or accessories, contact
Customer Support. In most cases, it is not necessary to return the entire
unit. We can ship most parts directly to your door.
To ensure prompt and accurate service, call for a Return
Authorization number before returning any unit to Top Innovations.
Failure to obtain a Return Authorization number will cause a delay
in warranty or out-of-warranty service requests.
Top Innovations, Inc.
3
IMPORTANT SAFEGUARDS
WARNING: To reduce the risk of fire, electrical shock, or
injury, the following basic safety precautions should always
be followed when using an electrical appliance.
READ ALL INSTRUCTIONS BEFORE USING YOUR STEAM CLEANER
1. DO NOT leave your MC1227 Handheld Steam Cleaner unattended when
plugged in or not in use.
This unit is not a toy. Close supervision is required when using
2.
unit near children, pets, and plants. Steam produced by it is hot and
pressurized. Care must be taken to avoid burns or other injuries. Never
point nozzle at pets or people.
3. Always unplug electrical cord when unit is not in use. DO NOT use this
unit if electrical cord or outlet is damaged. DO NOT use unit if it is not
working properly or has been dropped, damaged, or left outdoors. If such
damage occurs, return unit to an approved service technician for repair.
4. This unit is an electrical appliance. DO NOT submerge it in water. DO
NOT use electrical cord as a handle. DO NOT allow cord to be crimped by
closing it in doors. DO NOT pull or stretch cord around sharp corners or
edges. Be sure to keep electrical cord away from all heated surfaces.
5. DO NOT use this unit with extension cords or electrical outlets that have
inadequate current capacity. A three-prong outlet or a properly grounded
adapter is necessary when using MC1227 Handheld Steam Cleaner.
6. In order to unplug MC1227 Handheld Steam Cleaner, grasp plug and pull
smoothly and firmly from outlet. DO NOT attempt to unplug unit by pulling
or tugging on cord.
7. DO NOT handle or use this unit while hands are wet or when not wearing
shoes. To avoid falls and other injuries, be sure to dry any wet areas on
floors and to stand away from damp surfaces while using steam cleaner.
SAVE THESE INSTRUCTIONS!
FOR HOUSEHOLD USE ONLY
4
Top Innovations, Inc.
IMPORTANT SAFEGUARDS
WARNING: To reduce the risk of electric shock, this appliance
has a three-pronged plug. This plug will fit in a polarized wall
outlet only one way. If the plug does not fit fully in the outlet,
contact a qualified electrician to install a proper outlet. DO NOT
attempt to modify the plug or defeat this safety feature in any way.
8. MC1227 Handheld Steam Cleaner is only meant to be used with
recommended MC1227 accessories. Other types of attachments such as
those used with vacuum cleaners are not to be used with Handheld Steam
Cleaner. Doing so may cause injuries or damage to unit.
9. Nozzles and attachments become hot during use. To avoid injuries, DO
NOT touch nozzles while using this appliance. DO NOT attempt to change
attachments while unit is emitting steam.
10. DO NOT turn unit on its side when in use.
11. When filling your Handheld Steam Cleaner with water, DO NOT overfill
Water Reservoir.
12. Before filling unit with water, always take the following steps:
(1) Turn appliance off
(2) Unplug electrical cord
Failure to follow these steps may result in electric shock and injury.
13. Only water should be used in unit. Other cleaning agents will damage
unit and can cause injuries.
14. DO NOT operate unit if steam opening is blocked. Should this occur,
shut unit off and unplug.
15. Store your MC1227 Handheld Steam Cleaner in a cool, dry place. Allow
unit to cool completely, and always drain Water Reservoir before storing.
SAVE THESE INSTRUCTIONS!
FOR HOUSEHOLD USE ONLY
Top Innovations, Inc.
5
MC1227 HANDHELD STEAM CLEANER
PRODUCT INFORMATION
The following features and accessories come with your steam cleaner.
Carefully inspect packaging material as some parts are shipped inside
Styrofoam packaging. To obtain possible missing parts, refer to the
Customer Support section on page 3 of this manual.
UNIT FEATURES AND
ACCESSORIES
1.
2.
3.
4.
5.
6.
7.
8.
9.
10.
11.
12.
13.
14.
15.
16.
17.
18.
6
Water Reservoir Cap
Steam Trigger
Handle
Grounded Power Cord
Steam Ready Light
Water Reservoir
Steam Jet Nozzle
Flexible Steam Hose
Measuring Cup
10 mm Nylon Utility Brush
15 mm Nylon Utility Brush
Brass Utility Brush
Utility Attachment Head
Large Utility Brush
Squeegee
Fabric Steaming Cloth
Scrub Pad
Angled Steam Nozzle
Top Innovations, Inc.
MC1227 HANDHELD STEAM CLEANER
PRODUCT INFORMATION
· The Water Reservoir Cap (1) securely covers the opening to the Water
Reservoir, safely containing the pressurized steam within the boiler. The
Water Reservoir Cap must be removed in order to fill the unit with water.
· The Steam Trigger (2) is depressed in order to release a spray of hot,
penetrating steam from the unit.
· The Handle (3) is designed to stay relatively cool and safe while
providing the optimum amount of user comfort.
· The Grounded Power Cord (4) provides a maximum amount of safety
against electrical shock, while still allowing a great deal of freedom and
mobility.
· The Steam Ready Light (5) indicates when the unit is ready to steam.
· The Water Reservoir (6) is the tank in which water is stored for use by
the unit. There must be a sufficient amount of water in the Water
Reservoir in order for the unit to function.
· The Steam Jet Nozzle (7) is the only accessory that is required at all times
in order for the unit to function. It focuses the spray of steam, and serves
as the base to which all other attachments connect.
· The Flexible Steam Hose (8) is used to effectively extend the reach and
flexibility of the Steam Jet Nozzle, allowing you to reach some hard to
clean areas.
· The Measuring Cup (9) is designed to assist you in consistently filling
the unit with the optimum amount of water.
· The 10 mm Nylon Utility Brush (10) and the 15 mm Nylon Utility Brush
(11) attach to the Steam Jet Nozzle, and provide extra power for
removing exceptionally tough dirt and stains from surfaces.
· The Brass Utility Brush (12) attaches to the Steam Jet Nozzle and is
designed for removed tough stuck-on grease and grime from grills.
· The Utility Attachment Head (13) attaches to the Steam Jet Nozzle, and
serves only as a base for attaching the Large Utility Brush (14), Squeegee
(15), and Fabric Steaming Cloth (16). The Large Utility Brush is
designed for cleaning carpeting and upholstery. The Squeegee can be
used to clean mirrors, windshields, and other smooth glass surfaces. The
Fabric Steaming Cloth is used to prevent any large water droplets from
falling on upholstered fabric surfaces as you steam them.
· The Scrub Pad (17) gives you extra cleaning power for removing tough
stains and grime from hard surfaces.
· The Angled Steam Nozzle (18) is designed to help you clean hard to reach
areas such as car engines.
Top Innovations, Inc.
7
ASSEMBLY INSTRUCTIONS
WARNING: Do not try to connect attachments while unit is emitting steam.
ATTACHING STEAM JET NOZZLE
1. Insert cylinder on back of Steam Jet Nozzle (FIGURE 1) into hole on face
of main unit (FIGURE 2). Insert it so that two tabs on sides of cylinder
(FIGURE 1-A) fit into two tab holes on sides of main hole (FIGURE 2-B).
FIGURE 1
FIGURE 2
2. Rotate Steam Jet Nozzle in direction indicated by the “Lock” arrow at
rear of nozzle (counter-clockwise). Twist until it will move no further to
ensure it is properly and securely seated.
ATTACHING SMALL ACCESSORIES
1. To attach Scrub Pad (FIGURE 3-A), Angled Steam Nozzle (FIGURE 3-B),
or one of the three Utility Brushes (FIGURE 3-C), first make sure Steam Jet
Nozzle is properly installed. Then simply slide accessory onto end of
Steam Jet Nozzle as illustrated (FIGURE 4).
IMPORTANT: To avoid injury, slide utility brush all the way to end of
Steam Jet Nozzle as illustrated (FIGURE 4) to ensure no steam escapes.
FIGURE 3
8
Top Innovations, Inc.
FIGURE 4
ASSEMBLY INSTRUCTIONS
ATTACHING SQUEEGEE /
LARGE UTILITY BRUSH
NOTE: While only the Squeegee is
illustrated in FIGURES 5-7, the same
assembly procedure applies to the
Large Utility Brush.
1. Attach Squeegee or Large Utility
Brush to Utility Attachment Head by
inserting tabs on bottom of Utility
Attachment Head (FIGURE 5-A)
into slots on bottom of Squeegee or
Large Utility Brush (FIGURE 5-B).
FIGURE 5
2. Swing Squeegee/Large Utility Brush
backwards until hook latch on back
snaps over tab on top of Utility
Attachment Head (FIGURE 6).
3. Slide Utility Attachment Head with
attached Squeegee/Large Utility
Brush onto Steam Jet Nozzle as
illustrated (FIGURE 7).
ATTACHING FABRIC
STEAMING CLOTH
FIGURE 6
1. Stretch Fabric Steaming Cloth
around Utility Attachment Head as
shown (FIGURE 8).
2. Slide Utility Attachment Head with
attached Fabric Steaming Cloth
onto Steam Jet Nozzle.
FIGURE 7
FIGURE 8
Top Innovations, Inc.
9
ASSEMBLY INSTRUCTIONS
ATTACHING FLEXIBLE STEAM
HOSE
1. Identify Male end of the Flexible Steam
Hose (FIGURE 9-A). It will have a large
cylinder with two tabs on either side.
2. Identify Female end of the Flexible Steam
Hose (FIGURE 9-B). It will have a small
knob protruding from a cylindrical hole.
FIGURE 9
3. Insert cylinder on Male end (FIGURE 10) into hole on face of main unit (FIGURE 11).
Insert it so that two tabs on sides of cylinder (FIGURE 10-A) fit into two tab holes on
sides of main hole (FIGURE 11-B). Twist cylinder 90 degrees counter-clockwise, so
small line on end of cylinder aligns with top of main unit.
FIGURE 10
FIGURE 11
4. Attach Steam Jet Nozzle (FIGURE 12) to Female end of Flexible Steam Hose
(FIGURE 13). Insert cylinder on back of Steam Jet Nozzle into hole in Female end
of Flexible Steam Hose. Insert it so that two tabs on sides of cylinder
(FIGURE 12-A) fit into two tab holes on sides of main hole (FIGURE 13-B).
FIGURE 12
FIGURE 13
5. Rotate Steam Jet Nozzle in direction indicated by the “Lock” arrow at rear of nozzle
(counter-clockwise). Twist 90 degrees, until properly and securely seated.
10
Top Innovations, Inc.
USING THE HANDHELD STEAM
CLEANER
FILLING HANDHELD STEAM CLEANER WITH WATER
1. Place Handheld Steam Cleaner on a flat, level surface.
2. Make sure power cord is unplugged from electrical outlet.
3. Press and hold Steam Trigger to ensure that any remaining steam has been
emitted from unit.
4. While still depressing Steam Trigger, cautiously unscrew and remove
Water Reservoir Cap.
CAUTION: Always press Steam Trigger while unscrewing Water Reservoir Cap.
This ensures that any steam inside unit will be safely vented out of nozzle.
5. Allow unit to cool for at least 3 minutes.
WARNING: Always allow unit to cool before adding water. Cold water added to
a hot boiler may cause hot water and steam to shoot out of fill hole.
6. Remove Water Reservoir Cap and empty any water remaining in Water
Reservoir from previous use.
CAUTION: Emptying unit before filling ensures that proper amount of water is
added. Too much water may cause excess water in steam and could damage unit.
7. Fill Measuring Cup to maximum fill line with water (10 oz.)
NOTE: To prolong lifetime of Handheld Steam Cleaner, we recommend using
distilled or de-mineralized water.
8. Carefully pour water from Measuring Cup into Water Reservoir through
fill hole.
WARNING: Extreme caution should be used when pouring water into boiler. Do
not look directly down fill hole when filling. Keep your free hand and any children
or pets at a safe distance.
9. Replace Water Reservoir Cap, using caution not to over tighten it.
Top Innovations, Inc.
11
USING THE HANDHELD STEAM
CLEANER
OPERATING HANDHELD STEAM CLEANER
NOTE: Be sure that Water Reservoir has already been filled and desired
attachments are connected before following these steps.
1. Plug power cord into a convenient electrical outlet. Steam Ready Light
will immediately illuminate. (Note: Steam Ready Light is illuminated
while boiler is heating. This unit has no On/Off power switch.)
CAUTION: This unit uses a grounded (3-prong) electrical plug. Use only in
properly installed 3-prong electrical outlets. Do not attempt to alter plug or
circumvent this safety feature in any way.
2. Steam Ready Light will deactivate in 3-4 minutes, indicating that
boiler is heated and Handheld Steam Cleaner is ready to begin steaming.
3. Direct Steam Jet Nozzle (and any attachments) towards surface you
desire to steam, and press Steam Trigger.
CAUTION: Always be sure that Steam Jet Nozzle and any other attachments
are pointed in a safe direction (away from yourself, other people, pets, and
plants) before pressing Steam Trigger.
4. Keep Steam Trigger Depressed for a constant stream of steam. Using a
slight back-and-forth motion over the area you are steaming will further
enhance the cleaning process.
NOTE: During use Steam Ready Light may illuminate. This is normal. If you
notice a drop in steam pressure, release Steam Trigger until Steam Ready Light
deactivates once again.
5. Once steaming task is complete, immediately unplug power cord from
electrical outlet. Follow steps under Proper Storage procedure on page
13 of this manual.
12
Top Innovations, Inc.
CARE AND STORAGE GUIDELINES
PROPER STORAGE
Preparing your Handheld Steam Cleaner for storage is quick and simple. When you
have finished your steaming tasks, follow the steps listed below:
1. Unplug power cord from electrical outlet.
2. Allow unit to cool completely (at least 30 minutes).
3. Remove all attachments from unit.
4. Drain any remaining water in Water Reservoir into a sink or tub to prevent
overfilling during your next use. Flush out Water Reservoir with fresh water to
minimize potential mineral buildup in Water Reservoir.
5. Store all attachments safely away, preferably near Handheld Steam Cleaner.
6. Store Handheld Steam Cleaner in a cool, dry location.
REMOVING MINERAL BUILD-UP
One common problem with steam appliances is mineral build-up caused by high
mineral content in many municipal water supplies.
The best way to avoid this is to use de-mineralized or distilled water in unit.
If you are unable to use de-mineralized or distilled water, we recommend you use
this procedure monthly to help avoid mineral build-up:
1. Unplug power cord from electrical outlet and allow unit to completely cool.
2. Remove all attachments from unit.
3. Remove Water Reservoir Cap and drain Water Reservoir into sink or tub.
4. Using Measuring Cup, make a mixture of 5 oz. vinegar and 5 oz. water.
5. Slowly pour water-vinegar solution into Water Reservoir.
6. Allow to stand for 40 minutes.
7. Drain water-vinegar solution from Water Reservoir.
8. Rinse Water Reservoir with fresh water and drain until vinegar odor dissipates.
9. Replace Water Reservoir Cap.
Top Innovations, Inc.
13
TROUBLESHOOTING GUIDE
PROBLEM
Unit fails to heat up.
Unit heats up, but fails to
steam.
Steam output is
intermittent.
14
POSSIBLE CAUSE
SOLUTION
Steamer is not plugged
in.
Plug into electrical
outlet.
Household Circuit
Breaker / Ground Fault
Interrupter has tripped or
blown a fuse.
Reset Circuit Breaker /
Ground Fault Interrupter,
or replace fuse. If you
need assistance, contact a
qualified electrician.
Mineral buildup in unit.
Follow Removing
Mineral Buildup
procedure on page 13 of
this manual.
Water Reservoir is
empty.
Refill Water Reservoir
using procedures on page
11 of this manual.
Mineral buildup in unit.
It is normal for unit to
periodically stop
steaming for a few
seconds. If steam stays
off for longer periods,
follow Removing
Mineral Buildup
procedure on page 13 of
this manual.
Top Innovations, Inc.
WARRANTY INFORMATION
THREE MONTH LIMITED WARRANTY
(If outside USA, additional shipping charges may apply)
Top Innovations, Inc. warrants this product to be free from defects in material
and workmanship for a period of three (3) months from the date of purchase.
This warranty does not cover damage caused by misuse, negligence, use by
improper current or voltage, use contrary to operating instructions or
disassembly, repair or alteration by any person other than Top Innovations,
Inc. Warranty Service Department.
Top Innovations, Inc. will repair or replace, at its option. This warranty gives
you specific legal rights and may have other rights, which may vary from
state to state.
Performance of any obligation under this warranty may be obtained by:
1. Call (800) 711-6617 for Return Authorization Number before returning
for repair
2. Include copy of purchase receipt
3. Include your name, address, telephone number, and Return Authorization
Number on returned package
Please send product postage prepaid to:
TOP INNOVATIONS, INC.
WARRANTY SERVICE DEPARTMENT
400 NW PLATTE VALLEY DR.
RIVERSIDE, MO 64150
After 3 month limited warranty has expired, you will be advised of the cost of
repair before any servicing is done unless you enclose a note indicating that
you would like us to proceed with repairs.
If you have any questions about coverage under this warranty, you may
contact warranty service department by telephone at (800) 711-6617 ext. 102 /
130 or e-mail [email protected]
Top Innovations, Inc.
15
Top Innovations, Inc.
400 NW Platte Valley Dr.
Riverside, MO 64150
Tel: (800) 711-6617
www.topinnovations.com
[email protected]
Printed In China
V030918