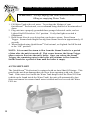
1
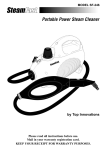
Model SF-465
QuickSteamTM Professional
by Top Innovations, Inc.
Please read instructions before use.
Mail in your warranty registration card.
LETTER FROM THE CEO
Dear Valued Customer,
Thank you for purchasing the QuickSteamTM Professional
steamer. This product is designed to quickly refresh and remove
wrinkles from curtains, draperies, and the garments you wear. Turn
your steamer on, and in less than one minute you are ready to
remove wrinkles from your garments with Tailor-Quality Results,
eliminating time-consuming and expensive trips to a professional dry
cleaner. In addition to removing wrinkles, you will receive the many
benefits that steam provides. Hot steam refreshes fabric and
eliminates smoke and other unpleasant odors, as well as dust mites
and other allergens.
Top Innovations, Inc. would like to invite you to take advantage
of our Customer Support website at:
www.topinnovations.com
On this website you will find additional information about many
other exciting Steam Fast products that are available, helpful tips on
ways in which you can utilize your SF-465 QuickSteamTM
Professional, and other useful information to assist you in
maximizing the power of steam!
Enjoy your QuickSteamTM Professional!
Benny Lee
Chairman and CEO
Top Innovations, Inc.
2
CUSTOMER SUPPORT
For problems with your steamer, please refer to the Troubleshooting Guide located
on page 14 of this manual. Additional inquiries should be directed to our Customer
Support services at 1-800-711-6617 ext. 102/130 or e-mailed to:
[email protected]
Should there be any missing or defective parts or accessories, contact Customer
Support. In most cases, it is not necessary to return the entire unit. We can ship
most parts directly to your door.
To ensure prompt and accurate service, call for a Return Authorization
number before returning any unit to Top Innovations. Failure to obtain a
Return Authorization number will cause a delay in warranty or out-ofwarranty service requests.
--------------------------------------------------------------------------------------------DETATCH ORDER FORM HERE
MODEL SF-465
ACCESSORY ORDER FORM
PART
PART DESCRIPTION
PRICE
A465-001
Lint Remover
$6.99
A465-002
Fabric Brush
$6.99
A465-015
Replaceable Water Filter
$2.99
A-465-K1
SF-465 Accessory Kit*
$34.99
QTY.
TOTAL
(+ $3.99 S&H)
*For more information on the SF-465 Accessory Kit, please visit www.topinnovations.com
Method of Payment (no C.O.D. orders)
Check or Money Order (payable to Top Innovations)
Charge to my
VISA
MASTERCARD
ACCOUNT NUMBER
EXPIRATION DATE
SIGNATURE: ____________________________________________
TO ORDER:
BY MAIL
Fill out this form
and return to
address on back
of this manual
BY PHONE
(800) 711-6617
EXT. # 102/130
BY FAX
(816) 584-9066
NAME: __________________________________________________
MAILING ADDRESS: _____________________________________
_________________________________________________________
TELEPHONE: ____________________________________________
3
IMPORTANT SAFETY GUIDELINES
Basic safety precautions should be used when using any electrical
appliance.
Please read all of the following instructions before using your SF-465
QuickSteamTM Professional in order to reduce risk of fire, electric shock,
or other injuries.
1. DO NOT leave your SF-465 QuickSteamTM Professional unattended when
plugged in or not in use.
This unit is not a toy. Close supervision is required when using
2.
unit near children, pets, and plants. Steam produced by it is hot and
pressurized. Care must be taken to avoid burns or other injuries. Never
point nozzle at pets or people.
3. Always unplug electrical cord when unit is not in use. DO NOT use this
unit if electrical cord or outlet is damaged. DO NOT use unit if it is not
working properly or has been dropped, damaged, or left outdoors. If such
damage occurs, return unit to an approved service technician for repair.
4. This unit is an electrical appliance. DO NOT submerge it in water. DO
NOT use steam hose or electrical cord as a handle. DO NOT allow cord to
be crimped by closing it in doors or allowing the unit to roll over it. DO
NOT pull or stretch cord around sharp corners or edges. Be sure to keep
electrical cord away from all heated surfaces.
5. DO NOT use this unit with electrical cords or outlets that have inadequate
current capacity. A three-prong outlet or a properly grounded adapter is
necessary when using SF-465 QuickSteamTM Professional.
6. In order to unplug SF-465 QuickSteamTM Professional, grasp plug and pull
smoothly and firmly from outlet. DO NOT attempt to unplug unit by pulling
or tugging on cord.
7. Always keep steam nozzle elevated above water container. DO NOT lay
hose on floor.
SAVE THESE INSTRUCTIONS!
FOR HOUSEHOLD USE ONLY
4
IMPORTANT SAFETY GUIDELINES
CAUTION: To reduce risk of electric shock and injury, connect to
properly grounded electrical outlets only.
CAUTION: DO NOT immerse in water. This unit is NOT intended for
space heating purposes. Use with base or wall receptacles only.
8. DO NOT handle or use this unit while hands are wet or when not wearing
shoes. To avoid falls and other injuries, be sure to dry any wet areas on
floors and to stand away from damp surfaces while using steam cleaner.
9. SF-465 QuickSteamTM Professional is only meant to be used with
recommended SF-465 accessories. Other types of attachments such as those
used with vacuum cleaners are not to be used with QuickSteamTM
Professional. Doing so may cause injuries or damage to unit.
10. Nozzles and attachments become hot during use. To avoid injuries, DO
NOT touch nozzles while using this appliance. DO NOT attempt to change
attachments while Steam Trigger is depressed.
11. DO NOT turn unit on its side when in use.
12. When filling your QuickSteamTM Professional with water, DO NOT
overfill Water Tank.
13. When Water Tank is empty, always take the following steps:
(1) Turn appliance off
(2) Unplug electrical cord
Failure to follow these steps may result in electric shock and injury.
14. Only water should be used in unit. Other cleaning agents will damage
unit and can cause injuries.
15. DO NOT operate unit if steam opening is blocked. Should this occur,
shut unit off and unplug.
16. Store your SF-465 QuickSteamTM Professional in a cool, dry place. Allow
unit to cool completely, and empty before storage.
SAVE THESE INSTRUCTIONS!
FOR HOUSEHOLD USE ONLY
5
SF-465 QUICKSTEAMTM PROFESSIONAL
PRODUCT INFORMATION
The following features and accessories come with your steamer. Carefully
inspect packaging material as some parts are shipped inside Styrofoam
packaging. To obtain possible missing parts, refer to the Customer Support
section on page 3 of this manual.
1.)
2.)
3.)
4.)
5.)
6.)
7.)
8.)
9.)
10.)
11.)
12.)
13.)
14.)
15.)
6
FEATURES AND
ACCESSORIES
Pole
Pole Base
Water Tank
Water Tank Cap
Carrying Strap
Lighted On/Off Switch
Drain Plug
Power Cord
Roller Casters
Hose Base and
Electrical Plug
Receptacle
Hose
Handle
Steam Trigger
Steam Nozzle
Water Filter
WARNING
Always turn unit off and unplug from electrical
outlet before emptying Water Tank.
SF-465 QUICKSTEAMTM PROFESSIONAL
PRODUCT INFORMATION
· The Pole (1) connects the Pole Top (not shown) to the
main unit at the Pole Base (2). The Pole Top is comprised of the
Clothes Hanger Hook and the Steam Nozzle Holder. The Clothes
Hanger Hook allows you to steam garments that are hanging
from a clean, rust-free hanger, while the Steam Nozzle Holder
provides a safe and convenient place to hang the Steam Nozzle.
· The Water Tank (3) is the reservoir where water is placed for use
by the steamer. Water is placed in the Water Tank by removing
the Water Tank Cap (4), exposing the inlet into which water
can be poured.
· The Carrying Strap (5) can be used to safely lift the unit off of the
ground and carry it up flights of steps or other obstacles over
which the unit cannot be rolled.
· The Lighted On/Off Switch (6) provides a visual indication of
whether or not the steamer is in use.
· The Drain Plug (7) can be removed for easy drainage of the Water
Tank.
· The Power Cord (8) plugs into a standard three-prong electrical
outlet.
· The Rolling Casters (9) allow for quick and effortless movement
of the steamer over flat, stable surfaces.
· The Hose Base and Electrical Plug Receptacle (10) is the point to
which the Hose attaches to the main unit. The Hose (11) is the
delivery system for the steam to be transmitted from the Water
Tank to the Steam Nozzle.
· The Handle (12) is permanently attached to the Steam Nozzle, and
provides a safe point to grip and direct the flow of steam.
· The Steam Trigger (13) must be depressed in order for
steam to be emitted from the Steam Nozzle.
· The Steam Nozzle (14) is the aperture from which steam flows
and is spread over a wide area.
· The Water Filter works to purify the water in the Water Tank,
ensuring that the steam you use is as clean and pure as possible.
The Water Filter is replaceable (see page 3 of this manual for
information on ordering replacement filters).
7
ASSEMBLY INSTRUCTIONS
Assembling Pole
1. Insert Pole Top into middle section of Pole and rotate it clockwise to tighten
the two sections together (FIGURE 1).
2. Slide Screw Knob over top of bottom Pole section. It will come to rest on
stopper ring towards bottom of Pole section (FIGURE 2).
3. Insert middle Pole section into bottom Pole section, rotating middle section
clockwise to tighten the two sections together (FIGURE 3).
4. The Pole should now be completely assembled (FIGURE 4).
FIGURE 1
FIGURE 2
FIGURE 3
FIGURE 4
Attaching Pole to Main Unit
1. Insert bottom of Pole into Pole Base hole located on top of main unit
(FIGURE 5).
2. Push Pole down as far as possible. Screw knob in a clockwise direction
until Pole fits snugly and securely in place (FIGURE 6).
NOTE: To ensure maximum stability of your QuickSteamTM Professional,
attach Pole in such a way so that Clothes Hanger Hook faces towards rear
of unit.
8
FIGURE 5
FIGURE 6
ASSEMBLY INSTRUCTIONS
Attaching Hose and Electrical Inlet
NOTE: Unplug unit from electrical outlet before attaching Hose
and Electrical Inlet.
1. Flip up cover on main unit to expose Electrical Plug Receptacle.
Attach Hose and Electrical Inlet to Hose Base on main unit, lining up
electrical plugs on Inlet with slots on Electrical Plug Receptacle on
unit (FIGURE 7).
2. When Hose and Electrical Inlet appear to be firmly seated onto Hose
Base and Electrical Plug Receptacle, rotate knob on Hose in a
clockwise fashion to secure it firmly to main unit (FIGURE 8).
FIGURE 7
FIGURE 8
Attaching Accessories to Steam Nozzle
WARNING: DO NOT attempt to attach an accessory while steamer
is still on. To avoid burns caused by hot steam, release Steam Trigger
and wait until flow of steam from Steam Nozzle has completely ceased.
To attach any included accessories to Steam Nozzle, simply line up pegs
on back of accessory (FIGURE 9) to slot on face of Steam Nozzle
(FIGURE 10). Press accessory peg into slot gently but firmly, until it fits
securely in place.
FIGURE 9
FIGURE 10
9
USING YOUR QUICKSTEAMTM PROFESSIONAL
WARNING: Always unplug unit from electrical outlet before
filling or emptying Water Tank.
1. Fill Water Tank with cool water. To prolong the lifetime of your
QuickSteamTM Professional, we recommend using distilled or de-mineralized
water.
2. Plug unit into a properly grounded three-pronged electrical outlet, and set
Lighted On/Off Switch to “On” position. Verify that light on switch is
illuminated.
3. Hold Steam Nozzle over object that you desire to steam. Press Steam
Trigger. Steam should begin flowing from Steam Nozzle in approximately 45
seconds.
4. When finished using QuickSteamTM Professional, set Lighted On/Off Switch
to the “Off” position.
NOTE: It is normal for steam to flow from the Steam Nozzle for a period
of time after the unit is turned off. This occurs because the Steam Trigger
allows water to flow into the unit’s boiler. Once you release the Steam
Trigger, the remaining water in the boiler will continue to flow from the
Steam Nozzle for a period of time until the boiler is empty.
AUTO SHUT-OFF
The QuickSteamTM Professional is equipped with an Auto Shut-Off feature. This
protects the unit from damage that can occur from operating with a dry Water
Tank. If the water level inside the Water Tank drops below the Water Fill Line
(which can be found inside the Water Tank), the unit will automatically shut
down and cannot be restarted until water is added and level exceeds the Water
Fill Line.
10
USING YOUR QUICKSTEAMTM PROFESSIONAL
STEAMING FABRIC
CAUTION: Be careful when handling garments on Clothes Hanger Hook.
Pulling on the garment with too much force may cause unit to tip over.
1. To steam garment, place it on clean, rust-free clothes hanger, and place
hanger on Clothes Hanger Hook.
2. Grasp Handle, and direct Steam Nozzle at the bottom of garment. Steam
will rise along inside and outside of fabric, removing wrinkles. Slowly slide
nozzle vertically, from bottom to top of garment.
NOTE: DO NOT allow kinks to form in Hose at any time.
3. Direct steam away from garment, and smooth fabric with free hand.
4. Repeat steps 2 and 3 as necessary until fabric is wrinkle-free.
5. Curtains and draperies can be steamed while still hanging.
6. To remove wrinkles from towels, handkerchiefs, and napkins, drape them
over a rod or towel rack, and gently steam.
7. Heavier fabrics may require repeated steaming.
8. To remove stubborn wrinkles, steam both sides of fabric.
For special steaming needs, a Fabric Brush and Lint Remover have
been included with your QuickSteamTM Professional. See the
“Attaching Accessories to Steam Nozzle” section on page 9 for more
information on attaching these accessories.
FABRIC BRUSH
May be used to assist you in
removing exceptionally
stubborn wrinkles from fabric
LINT REMOVER
Useful for removing lint and
other small particles from
garments, drapes, and curtains
NOTE: Refer to page 3 of this manual for information on acquiring
replacement accessories.
11
CARE AND STORAGE GUIDELINES
QUICK STORAGE
1.
2.
3.
4.
5.
Set Lighted On/Off Switch to “Off” position.
Unplug Power Cord from electrical outlet.
Wrap Hose loosely around Pole one time.
Hang Steam Nozzle from Steam Nozzle Holder.
Roll QuickSteamTM Professional to a convenient storage location.
CLEANING AND LONG-TERM STORAGE
It is recommended that you follow this procedure at least once per week.
Use of distilled or de-mineralized water reduces the need for cleaning and
prolongs the lifetime of your QuickSteamTM Professional.
1.
2.
3.
4.
5.
6.
Set Lighted On/Off Switch to “Off” position.
Unplug Power Cord from electrical outlet.
Wait for unit to cool completely (at least 30 minutes).
Remove Hose and Pole from unit, and set them aside.
Using Carrying Strap, carry the unit to a sink or tub.
Drain water from Water Tank into sink or tub. Rinse Water Tank with
fresh water, and drain completely.
7. Drain steamer by removing Drain Plug and emptying the contents into
sink or tub. Tilt unit towards Drain Plug to facilitate removal of
water.
8. Flush unit by filling Water Tank and Hose Base with fresh water and
draining completely. Replace Drain Plug.
9. Reattach Pole and Hose to unit (refer to assembly instructions on pages
8 and 9 for assistance).
10. Wrap Hose loosely around Pole one time.
11. Hand Steam Nozzle from Steam Nozzle Holder.
12. Roll QuickSteamTM Professional to a convenient storage location.
REPLACING THE WATER FILTER
The QuickSteamTM Professional incorporates a unique replaceable water filter
in its steam delivery system. This filter removes most impurities found within
water, ensuring that steam produced by the unit is as clean and pure as
possible.
After a certain amount of use, the filter will no longer remove water impurities
as efficiently. When this occurs, it is recommended that you replace it in order
to continue getting the most out of your QuickSteamTM Professional. To do
this, simply unscrew the Drain Plug Cap, grasp the filter by the handle, and
pull it out. Then insert a new filter into the unit cylinder-first (refer to item 15
on page 6 for an illustration of correct filter orientation). See order form on
page 3 of this manual for information on obtaining new water filters.
12
REMOVING MINERAL BUILDUP
One common problem with steamers is mineral build-up caused by a high
mineral content in many municipal water supplies. Mineral residue inside
of internal pipes and heater can cause intermittent steaming or, in some
cases, no steaming at all.
NOTE: To reduce or eliminate occurrence of mineral build-up we
recommend use of de-mineralized or distilled water in unit.
The procedure below can be used to reduce mineral build-up. If you are
unable to use de-mineralized or distilled water, we recommend you follow
this procedure monthly.
1. Turn unit off, and unplug power cord.
2. Remove Hose and Pole from unit.
3. Drain Water Tank by following steps 1-7 of the Cleaning and LongTerm Storage procedure on page 12 of this manual.
4. Mix a solution of 50% vinegar and 50% water. In most cases, 32oz. of
this solution will be sufficient. (16oz. of each)
5. Slowly pour water-vinegar solution into Hose Base connector.
6. If standing water-vinegar solution becomes visible in Water Tank’s
inlet hole, continue to pour solution into Hose Base until mixture is
visible in Water Tank.
7. If standing water-vinegar solution does not become visible in Water
Tank’s inlet hole, continue pouring solution into Hose Base until
standing solution appears near top of Hose Base. Pour additional
solution into Water Tank until a layer of solution covers bottom.
8. Allow to stand for 40 minutes.
9. Drain solution out of Water Tank by removing drain plug and allowing
liquid to drain into a sink or tub.
10. Drain solution out of Hose Base by tilting unit over a sink or tub and
pouring the water out of Hose Base.
11. Pour clean water in Hose Base and Water Tank inlet, and drain.
Repeat this step until vinegar odor dissipates.
12. Reassemble unit and operate normally.
If this procedure does not return unit to normal operation, it may be in
need of servicing. Please Contact our trained customer support team at
(800) 711-6617 ext. 102/130.
13
TROUBLESHOOTING GUIDE
PROBLEM
SOLUTION
Steamer is not plugged in.
Plug into electrical outlet.
Household Circuit Breaker /
Ground Fault Interrupter has
tripped or blown a fuse.
Reset Circuit Breaker /
Ground Fault Interrupter, or
replace fuse. If you need
assistance, contact a
qualified electrician.
Auto Shut-Off feature has
activated.
Refill Water Tank so that
water level exceeds Water
Fill Line.
Mineral buildup in unit.
Follow Removing Mineral
Buildup procedure on page
13 of this manual.
Water Tank is empty.
Refill Water Fill Tank using
procedures on page 10 of
this manual.
Water drips from nozzle.
Condensation has built up in
hose.
Extend hose vertically to
allow water to drain back
into water reservoir.
Excessive gurgling of Hose
and Steam Nozzle.
Condensation has built up in
hose.
Some gurgling is a natural
effect of the steaming
process. For excessive
gurgling, extend hose
vertically to allow water to
drain back into water
reservoir.
Steam output is intermittent.
Mineral buildup in unit.
NOTE: It is normal for unit
to periodically stop steaming
for a few seconds. Use
these troubleshooting tips
only if steam stays off for
longer periods.
Follow Removing Mineral
Buildup procedure on page
13 of this manual.
Water Filter has become
clogged or is no longer
functioning at full capacity.
Rinse filter out with clean
water. If problem persists,
replace filter using order
form on page 3 of this
manual.
Unit fails to steam. Light on
the On/Off Switch does not
illuminate.
Unit fails to steam. Light on
the On/Off Switch does
illuminate.
14
POSSIBLE CAUSE
WARRANTY INFORMATION
ONE YEAR LIMITED WARRANTY
(If outside USA, additional shipping charges may apply)
Top Innovations, Inc. warrants this product to be free from defects in material
and workmanship for a period of one (1) year from the date of purchase. This
warranty does not cover damage caused by misuse, negligence, use by
improper current or voltage, use contrary to operating instructions or
disassembly, repair or alteration by any person other than Top Innovations,
Inc. Warranty Service Department.
Top Innovations, Inc. will repair or replace, at its option. This warranty gives
you specific legal rights and may have other rights, which may vary from
state to state.
Performance of any obligation under this warranty may be obtained by:
1. Call (800) 711-6617 for Return Authorization Number before returning
for repair
2. Include copy of purchase receipt
3. Include your name, address, telephone number, and Return Authorization
Number on returned package
Please send product postage prepaid to:
TOP INNOVATIONS, INC.
WARRANTY SERVICE DEPARTMENT
400 NW PLATTE VALLEY DR.
RIVERSIDE, MO 64150
After 1 year limited warranty has expired, you will be advised of the cost of
repair before any servicing is done unless you enclose a note indicating that
you would like us to proceed with repairs.
If you have any questions about coverage under this warranty, you may
contact warranty service department by telephone at (800) 711-6617 ext.
102/130 or e-mail [email protected]
15
Top Innovations, Inc.
400 NW Platte Valley Dr.
Riverside, MO 64150
Tel: (800) 711-6617
www.topinnovations.com
[email protected]
Printed In China
V030710