1
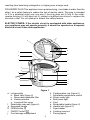
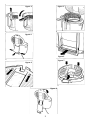
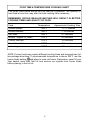
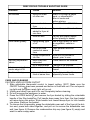
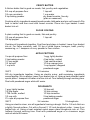
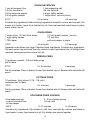
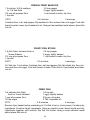
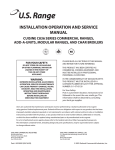
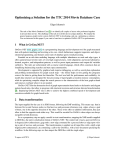
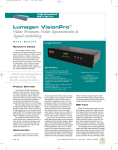
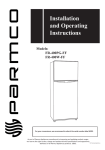
READ AND SAVE THESE INSTRUCTIONS
WARNING: A risk of fire and electrical shock exists in all electrical appliances and
may cause personal injury or death. Please follow all safety instructions.
Deep Fryer
Use and Care Guide
Model 815U
IMPORTANT SAFEGUARDS
When using electrical appliances, basic safety precautions should always be
fo l l owed to reduce the risk of fire, electric shock and injury to persons, including the
following:
• Read all instructions before using fryer.
• Do not touch hot surfaces. Use handles and buttons.
• This fryer is not for use by children.
• Close supervision is necessary when any appliance is used near children.
• Do not operate unattended.
• Unplug from outlet when not in use and before cleaning.Allow to cool before putting
on or taking off parts, and before cleaning the fryer.
• To disconnect, push off button, then remove plug from power supply.
• Do not operate a damaged fryer. Do not operate with a damaged cord or plug or
after the fryer malfunctions, or has been dropped or damaged in any manner. Return
fryer to the nearest authorized service facility for examination, repair or mechanical
adjustment.
• Do not put cord, plug, or body of fryer in or under water or other liquid. See instructions for cleaning.
• Use attachments only if recommended by Toastmaster Inc.
• Do not use outdoors or when standing in damp area.
• Do not use fr yer for other than intended use.
• Do not let cord hang over edge of table or counter or touch hot surfaces.
• Do not place on or near a hot gas or electric burner, or in a heated oven.
• Extreme caution must be used when moving fryer containing hot oil or other hot
liquids. Allow to cool before removing.
• Be sure handle is fully extended and handle lock is securely in place before lifting
basket. See detailed operating instructions.
SAVE THESE INSTRUCTIONS
THIS PRODUCT FOR HOUSEHOLD USE ONLY
CAUTION: A short power supply cord is provided to reduce the risk of personal injury
resulting from becoming entangled in or tripping over a longer cord.
POLARIZED PLUG:This appliance has a polarized plug, (one blade is wider than the
other), as a safety feature to reduce the risk of electric shock. This plug is intended
to fit in a polarized outlet only one way. If the plug does not fit fully in the outlet,
reverse the plug. If it still does not fit, contact a qualified elect ri c i a n to replace the
obsolete outlet. Do not attempt to defeat this safety feature.
ELECTRIC POWER: If the electric circuit is overloaded with other appliances,
your appliance may not operate properly. It should be operated on a separate
electrical circuit from other appliances.
b
a
c
d
t
e
s
r
f
q
p
g
o
h
n
i
j
k
m
l
Figure 1
a. Lid assembly
b. Black tabs (figure 6)
c. Removable washable filter
d. Viewing window
e. Louvered filter cover
f. Detachable rear wall (figure 4)
g. Recessed handle
h. OPEN button
i. ON/OFF button
j. Cord storage compartment
k.
l.
m.
n.
o.
p.
q.
r.
s.
t.
2
Condensation cup (figure 5)
Adjustable temperature control
Green ready light
Red power light
Cord
Retractable handle (figure 2)
Handle lock (figure 2)
Fryer basket
Cooking reservoir
Pouring spout
figure 3
figure 2
figure 4
figure 5
figure 7
figure 6
figure 8
3
Thank You for purchasing this Toastmaster appliance.
Featuring superior technology and craftsmanship, the Global Design Collection is an
exceptional line of kitchen appliances. The deep fryer’s state-of-the art design is matched
only by its excellent performance. Enjoy!
BEFORE USING YOUR DEEP FRYER
1. Read all sections of the booklet carefully. Become familiar with this appliance
and its parts (see figure 1).
2. Be sure to fill out the warranty service information on the back of this manual.
3. Clean the fryer basket and non-stick reservoir (see CARE AND CLEANING).
NOTE: When emptying the cold oil from the deep fryer, the unit is easier to handle
without the lid assembly. We suggest that you become familiar with removing the
lid assembly before your first use.
USING YOUR DEEP FRYER
1. Place fryer on large secure surface.
2. Pull the cord from the cord storage compartment to the desired length.
3. Press OPEN button
to open lid. The lid will open automatically.
4. Remove the fryer basket by sliding the retractable handle of the fryer basket
up. Pull handle down away from fryer; the fryer basket will raise during this
action. Slide handle lock toward deep fryer to lock handle into place (see
figure 2).
5. Lift the fryer basket out of the fryer.
6. Fill reservoir with vegetable oil. Use the MIN (8 cups) and MAX (10 cups) fill
indicator lines in reservoir. Never add oil once the unit has been plugged in
and allowed to heat up.
7. Close lid until it latches into place. Slide adjustable thermostat control to
lowest setting (320°F). Plug into 120 V ~ 60 Hz outlet.
8. Push in the ON/OFF button to turn the unit on. The red power light will come
on.
9. Slide the thermostat to the appropriate setting. Allow the fryer to preheat for
15 minutes for the initial use each time. The green light will come on when the
desired temperature has been reached. For repeat cycles, wait until the green
ready light comes on before putting more food into the fryer.
10. Fill fryer basket with food, never filling more than 1/2 full. When fryer basket is
lowered into hot oil, all food should be immersed.
11. Carefully open lid of fryer by pressing the OPEN button . Place fryer basket
securely onto fryer by placing the tab under the fryer basket handle into the
opening on the rim of the fryer (see figure 3). Carefully close lid. Unlock the
handle by sliding the handle lock away from the basket. Slowly lower the
basket into the oil by letting the handle rise to a vertical position. Slide handle
down into original position.
12. At the end of the desired cooking time, remove the fryer basket from the hot
oil by sliding the retractable handle of the fryer basket up. Pull handle down
away from fryer; the fryer basket will raise during this action. Slide handle lock
toward deep fryer to lock handle into place (see figure 2). Allow oil to drain
from food for 30 seconds. Carefully open lid by pressing OPEN button and lift
basket out. Empty food on to a plate covered with an absorbent paper towel.
13. Carefully close lid and allow fryer to re-heat. When green ready light comes on,
4
fill fryer basket with food and place into fryer. Repeat steps 10-13 as necessary.
14. When finished, close lid, slide adjustable thermostat control to lowest position
(320°F) and push ON/OFF button to turn off the unit. The red operating light
will go out and ON/OFF button will be flush with unit. If on, the green ready
light will go off also.
15. Unplug. Allow fryer and oil to cool completely before moving, cleaning or
s t o ri n g . Do not store electric fryer in refrigerator. If oil can be used again, strain
food particles from oil and store in a covered container in refrigerator for future
use. See CARE AND CLEANING.
HELPFUL HINTS FOR FRYING
• Fry more batches of smaller amounts of food. Best results are obtained when the
hot oil can freely circulate all around the food thus allowing the fryer to maintain hotter cooking temperatures.
• In general, pre-cooked foods require higher temperatures and less cooking time.
• Cut or sort the food into uniform sizes. Cook same size pieces together so that they
will be done in the same amount of time.
• Be sure foods are free from ice crystals and excess moisture before frying. Water
on the surface can cause the oil to splatter and foam.
• When using a breading, evenly coat the food to be fried. Uniform and fine crumbs
stick better than coarse and uneven ones. Shake off all extra breading to help
keep oil clean.
• Foods with a coating should be spaced in fryer basket so as not to touch while
cooking.
• For best results when frying doughs or foods dipped in a liquid batter, either remove
the fryer basket or lower it into the hot oil before using a heat resistant metal spoon
to carefully place the food into the oil. If the fryer basket is immersed in oil, use the
basket to remove the cooked food.
HELPFUL HINTS ON OIL
• Never over fill or under fill the fryer with oil.Minimum and maximum oil amounts are
marked on the inside of the cooking reservoir.
• Clean or strained oil may be stored in fryer tempora ri l y, but should be transferred
to a covered container for storing once cooled. Store the container in the refrigerator.
• If you fry fish or seafood, the oil will absorb a fishy taste. We suggest you change
your oil before frying other foods.
5
FOOD TIME & TEMPERATURE COOKING CHART
The times listed below should only be used as a guideline. The quantity of
food fried at one time may alter the total cooking time necessary.
REMEMBER, FRYING SMALLER BATCHES WILL RESULT IN BETTER
COOKING TIMES AND QUALITY OF FOOD.
Food
chicken pieces
chicken tenders
fish fillets
shrimp - regular or jumbo
French fries-thin
French fries-thick
onion rings
Temperature
340°F
340°F
340°F
370°F
370°F
370°F
370°F
Approximate Cooking Time
11-17 minutes
7-10 minutes
5-7 minutes
3-5 minutes
3-5 minutes
7-9 minutes
3-5 minutes
NOTE: Frozen foods may require different cooking times and temperatures; follow package directions. If recommended temperature is above 365°F use the
frozen foods setting
and allow to cook until done. Remember, never fill your
fryer basket more than half full and remove ice crystals from frozen foods
before placing in the hot oil.
6
DEEP FRYING TROUBLE SHOOTING GUIDE
Problem
Cause
Solution
oil smokes
failure to strain
oil after use
oil bubbles over
too much oil in
fryer
too much food
added to fryer at
one time
food too wet
Strain oil through a paper
towel, or cheesecloth
after oil cools and
before storing.
Do not fill above MAX fill line.
food tastes greasy
omitting unpleasant
odors
steam escaping from
under edge of lid
food is not crisp
using wrong type
of oil
too much food
cooked at same
time
frying temperature
too low
both filters are
saturated
oil is deteriorated
lid is not closed
Fry smaller quantities at a time.
Pat dry with paper towels
before placing in basket.
Use a high-quality oil such
as vegetable, canola or
corn.
Cook smaller amounts
of food.
Allow unit to preheat or
reheat prior to use.
Filters need to be cleaned.
Change oil as needed.
The lid needs to be securely
closed.
too much has been Fry food in small batches,
fried at same time especially frozen foods.
CARE AND CLEANING
CAUTION: UNPLUG FROM OUTLET
1. Slide adjustable thermostat control to lowest setting, 320°F. Make sure the
ON/OFF button has been pressed and button is flush with unit. The red operating light and the green ready light will go out.
2. Unplug and allow fryer and oil to cool completely before cleaning.
3. Do not immerse the appliance in water.
4. Press the OPEN button
and remove the fryer basket by sliding the retractable
handle of the filter basket up. Pull handle down away from fryer; the fryer basket
will raise during this action. Slide handle lock toward deep dryer to lock handle
into place. Remove the basket.
5. To remove the lid assembly, grasp the detachable rear wall of the fryer at the bottom end, press both sides together, and pull out to remove the detachable rear
wall (see figure 4). Remove the condensation drip cup (see figure 5); empty and
wash in warm soapy water.
7
6. The lid assembly can now be lifted out of the hinge. To remove the filters, place
the lid assembly on the countertop with the louvered filter cover face up. Press
both black tabs forward as indicated by the direction of the arrows. The louvered filter cover will pop up and can be removed from lid assembly (see figure
6). Lift up on both black tabs and remove the washable filters for cleaning.
7. To clean the remainder of the lid assembly, wipe inside and outside with a damp
cloth and dry.
8. Carefully pour cold oil out of reservoir using the pouring spout. Wash interior of
reservoir with mild dish detergent and warm water. A plastic scouring pad may
be used if necessary. DO NOT IMMERSE.
9. The washable filters and fryer basket may be placed on the top shelf of the dishwasher or they may be washed in warm soapy water with a non-abrasive pad or
brush and dried thoroughly. Wash the filters often to reduce cooking odors.
10. The oil can be reused several times. If re-using oil, strain food particles from cold
oil after each use. Place basket back into fryer with handle in its locked position.
11. Line the fryer basket with a large clean paper towel or cheese cloth. The liner
must cover the bottom of the fryer basket and approximately one inch up the
sides.
12. Slowly pour cold oil through basket liner back into the clean fryer for short term
storing. When storing oil for longer periods of time, place oil in covered container
and put in refrigerator.
13. Discard basket liner. Wash and dry fryer basket thoroughly before putting into
fryer for storage.
14. Once the filters have been washed and dried thoroughly, insert into lid assembly
with the grooved edges face up. Push both black tabs down to hold filters in
place.
15. Place louvered cover onto lid assembly and lock into place with black tabs (see
figure 7).
16. Replace condensation drip cup to its original position (see figure 5).Place the lid
assembly onto the appliance by inserting hinges into notches (see figure 8).
While holding the lid assembly straight up, line up the notches of the detachable
rear wall on the hinges until it snaps into place (see figure 8). Close lid assembly.
17. Clean the outside of the deep fryer with a damp cloth and dry thoroughly.
CAUTION: DO NOT IMMERSE CORD, PLUG OR DEEP FRYER UNIT IN WATER
OR OTHER LIQUID.
RECIPES
BEER BATTER
A light batter good on fish and chicken.
1 cup all-purpose flour
1/4 cup cornstarch
1/4 tsp cayenne pepper
1 tsp garlic salt
3/4 cup flat beer
2 eggs, lightly beaten
2 TBL vegetable oil
Remove fryer basket before preheating. Combine all dry ingredients. Add liquid ingredients and mix well. Allow batter to chill in refrigerator for at least 1 hour before
coating fish or chicken. Dip food in batter and place into oil using a heat resistant
metal spoon.
8
CRISPY BATTER
A thicker batter that is good on meats, fish, poultry and vegetables.
3/4 cup all-purpose flour
1/4 cup cornstarch
2 tsp baking powder
1 tsp salt
1 cup water
dry bread crumbs, fine-dry
(plain or seasoned)
Combine all dry ingredients except bread crumbs. Add water and mix until s m o o t h .D i p
food in batter and then coat with bread crumbs. Place into fryer basket. Lower
basket into oil.
FLOUR COATING
A plain coating that is good on meats, fish and poultry.
1/2 cup all-purpose flour
1/4 tsp pepper
1 tsp salt
Combine all ingredients together. Coat food and place in basket. Lower fryer basket
into oil. For flavor variation, add 1/2 tsp of dried thyme, tarragon, basil, poultry
seasoning, or 1 teaspoon of curry powder to flour mixture.
APPLE FRITTERS
3 cups all-purpose flour
2 tsp baking powder
1/2 cup sugar
1/2 tsp salt
1 cup milk
350°F
1 egg, lightly beaten
4 tsp butter, melted
1 tsp vanilla extract
1/3 cup orange juice
1 cup apples, chopped
powdered sugar
3-5 minutes
18 fritters
Sift dry ingredients together. Using an electric mixer, add remaining ingredients
except apples. Stir in apples. Lower fryer basket into oil. Using a heat resistant metal
spoon place 1 teaspoon of batter at a time into oil. Turn halfway through cooking time.
Dust with powdered sugar while still warm.
DOUGHNUTS
1 egg, lightly beaten
1/2 cup sugar
1 TBL butter, melted
1/2 cup milk
21⁄2 cups all-purpose flour
350°F
1/4 tsp salt
1/4 tsp nutmeg
1/2 tsp cinnamon
2 tsp baking powder
powdered sugar
3-4 minutes
18 doughnuts
Using an electric mixer, mix all ingredients forming a dough. Roll to 1/4 inch thick on
a lightly floured surface. Cut with a floured 2 1/2 inch doughnut cutter. Lower fr yer
basket into oil. Using a heat resistant metal spoon place doughnuts into oil. Turn
halfway through cooking time. Dust with powdered sugar or a cinnamon sugar
mixture while still warm.
9
QUICK ‘N’ EASY DOUGHNUTS
1 can of 10 refrigerated biscuits
powdered sugar or cinnamon sugar mixture
350°F
2-4 minutes
10 doughnuts
Separate dough into 10 biscuits and cut hole in center of each. Lower fryer basket
into oil. Using a heat resistant metal spoon place doughnuts into oil. Turn half way
through cooking time. Dust with powdered sugar or sugar and cinnamon mixture
while still warm.
SMOOCHIES
1 can of 10 refrigerated biscuits
20 pieces chocolate candy kiss
1/2 cup powdered sugar
350°F
2-3 minutes
20 pieces
Separate dough into 10 biscuits. Cut each biscuit in half and flatten. Place 1
chocolate kiss in the center of each and pull edges up around candy kiss to seal tightly.
Roll between palms until all seams are sealed making a ball. Lower fryer basket into
oil. Using a heat resistant metal spoon place smoochies into oil. Dust with powdered
sugar while still warm.
HUSH PUPPIES
1 egg, lightly beaten
1 8 oz pkg corn muffin mix
1 cup all-purpose flour
2 tsp dehydrated onions
1/2 tsp garlic, minced
1/2 cup + 3 TBL milk
350°F
3-5 minutes
14 pieces
Mix all ingredients together until a batter is formed. Lower fryer basket into oil. Using
a heat resistant metal spoon drop batter by tablespoons into oil.
VEGETABLE FRITTERS
3/4 cup bread crumbs, fine-dry
2 TBL Parmesan cheese
1 tsp onion salt
1/4 tsp garlic powder
2 egg whites, lightly beaten
2 TBL water
350°F
21⁄2 cups fresh vegetables
sliced into 1/4 inch thick pieces carrots, mushrooms,
green and red peppers,
zucchini
3-5 minutes
21⁄2 cups
Combine dry ingredients, set aside. Combine liquid ingredients. Dip vegetables into
liquid mixture and then coat with dry mixture. Place into fryer basket. Lower fryer
basket into oil. Serve with ranch flavored dressing.
10
ONION HAYSTACKS
1 cup all-purpose flour
1/4 cup cornstarch
1/4 tsp cayenne pepper
1/4 tsp garlic powder
1 tsp seasoning salt
3/4 cup flat beer
2 eggs, lightly beaten
1 large onion, cut into slivers
370°F
3-5 minutes
4-5 servings
Combine dry ingredients. Add remaining ingredients except for onions and mix well. Stir
onions into batter. Lower fryer basket into oil. Use heat resistant metal tongs to place
onion stacks into oil.
ONION RINGS
1 large onion, 1/2 inch thick slices
1 egg, lightly beaten
1 TBL water
370°F
1/2 cup bread crumbs, fine-dry
1/2 cup flour
salt and pepper to taste
3-4 minutes
3-4 servings
Separate onion slices into rings. Combine liquid ingredients. Combine dry ingredients.
Dip each onion ring into liquid then dry mixture. Lower fryer basket into oil. Using a heat
resistant metal spoon place onions into oil.
FRENCH FRIES
10 potatoes, peeled - 3/8 inch wide strips
salt to taste
370°F
12-15 minutes
4 servings
Pat dry potatoes. Place in baske t .L ower fryer basket into oil. Season with salt while still
warm.
COTTAGE FRIES
10 potatoes, thinly sliced (1/16 - 1/8 inch)
seasoned salt to taste
370°F
5-7 minutes
4 servings
Pat dry potatoes. Place in baske t .L ower fryer basket into oil. Season with salt while still
warm.
SOUTHERN FRIED CHICKEN
2 tsp seasoned salt
1 cup all-purpose flour
1/4 tsp pepper
340°F
2 - 3 lbs chicken pieces
1/4 cup milk
11-17 minutes
8-10 pieces
Combine dry ingredients. Dip chicken in milk then coat with dry mixture and place in
fryer basket. Lower fryer basket into oil. Fry similar size pieces together.
11
CHICKEN CROQUETTES
16-18 oz can cooked
chicken*, drained
1 cup onion, finely chopped
3 TBL butter
1/4 cup all-purpose flour
1/2 cup chicken broth
1/3 cup milk
1 TBL dried parsley
1 tsp lemon juice
1/4 tsp salt
1/4 tsp pepper
1/8 tsp of paprika
1/8 tsp of nutmeg
1 cup bread crumbs, dry-fine
2 eggs, lightly beaten
2 TBL water
Combine chicken and onion, set aside. In a sauce pan, melt butter, add flour and blend
until smooth. Add chicken broth and milk. Cook until thick. Remove from heat. Stir in
parsley, lemon juice, salt, pepper, nutmeg and paprika. Add chicken mixture and mix
well. Chill at least 1 hour.
350°F
2-3 minutes
24 balls
Roll into 1-1 ⁄2 inch balls. Mix egg and water. Dip each ball into egg mixture and roll in
bread crumbs. Place in fryer baske t .L ower fryer basket into oil.
1
*Or substitute any other pre-cooked meat or seafood.
CHICKEN FRIED CHICKEN
11⁄2 cups all-purpose four
2 tsp salt
1/2 tsp pepper
370°F
2 eggs, lightly beaten
1/4 cup milk
4 chicken breast, boneless-skinless
8-12 minutes
4 servings
Remove fryer basket from fryer before preheating. Combine all dry ingredients together.
Combine all liquid ingredients together. Dip chicken breast into liquid mixture and then
flour mixture. Repeat. Using a heat resistant metal spoon place chicken into oil. Serve
with milk gravy.
PORK CHOPS
3/4 cup all-purpose four
1/4 cup cornstarch
2 tsp baking powder
1 tsp salt
340°F
1 cup water
6 pork chops
2 cups bread crumbs, dry-fine
8-10 minutes
6 servings
Remove fryer basket from fryer before preheating. Combine first 5 ingredients until
smooth. Dip pork chops into batter coating thoroughly, then coat with bread crumbs.
Place pork chops into oil using a heat resistant metal spoon.
12
1.
2.
3.
4.
5.
6.
ROLLING EGG ROLL OR WON TON WRAPPERS
Place wrapper on counter in a diamond shape.
Moisten all corners with water.
Spoon filling onto the center of the wrapper.
Fold top of diamond over just enough to cover filling.
Fold side corners toward center over top corner.
Moisten bottom corner with water; roll top down until sealed.
MINI EGG ROLLS
1/2 lb. ground lean pork
1/4 lb shrimp, fresh or frozen chopped
1/4 cup water chestnuts, finely chopped
1/4 cup green onions, finely chopped
340°F
2 tsp soy sauce
1/4 tsp salt
12 oz pkg won ton wrappers
4-5 minutes
30 egg rolls
Combine pork and shrimp. Add remaining ingredients and mix well. Place 2 teaspoons
of mixture in the middle of egg roll wrapper. Follow instructions for rolling won ton
wrappers. Place in fryer basket. Lower fryer basket into oil.
SAMOSAS
2 TBL vegetable oil
1/2 cup onion, chopped
1 tsp ginger, grated
1 tsp garlic powder
1 tsp curry powder
1/2 lb ground beef
1 medium tomato, chopped
1 tsp salt
1/2 cup peas, cooked
16 oz pkg egg roll
wrappers
340°F
5-6 minutes
18 egg rolls
Sauté onion in oil until browned, add ginger, garlic and curry powder. Cook for 2
minutes. Add ground beef, tomato and salt, cook until beef is done. Stir in peas and
allow to cool. Place 2 teaspoons of mixture in the middle of egg roll wrapper. Follow
instructions for rolling egg roll wrappers. Place in fryer baske t .L ower fryer basket into oil.
FRENCH FRIED JUMBO SHRIMP
2 lbs jumbo shrimp in shells,
fresh or frozen
2 cups all-purpose flour, divided
1/2 tsp sugar
1/2 tsp salt
370°F
1 egg, lightly beaten
1 cup cold water
2 TBL cooking oil
1 cup bread crumbs, dry-fine
(optional)
4-8 minutes
6-8 servings
Peel shrimp leaving last section and tail in tact. With a sharp knife, remove the sandy,
black vein. Cut the shrimp down the middle to butterfly and pat dry with a paper towel.
Remove fryer basket from fryer before preheating oil. Stir together 1 cup flour, sugar
and salt. Add liquid ingredients using an electric mixer to blend until smooth. Dip shrimp
in remaining 1 cup of flour and then into batter. Coat with bread crumbs for darker
browning. Lower fryer basket into oil. Using a heat resistant metal spoon place shrimp
into oil.
13
FRENCH FRIED SEAFOOD
1 lb shrimp, 3/4 lb scallops,
or 1 lb fish filets
1/2 cup all-purpose flour
1 tsp salt
1/4 tsp pepper
2 eggs, lightly beaten
1 cup bread crumbs, dry-fine
370°F
2-8 minutes
4 servings
Combine flour, salt, and pepper. Dip seafood in flour mixture then into eggs. Coat with
bread crumbs. Lower fryer basket into oil. Using a heat resistant metal spoon, place fish
into oil.
CRISPY FISH STICKS
1 lb fish filets, skinless-fresh or
frozen-thawed
1/2 cup all-purpose flour
1 tsp salt
330°F
1/4 tsp pepper
2 eggs, lightly beaten
1 cup bread crumbs, dry-fine
3-5 minutes
4 servings
Cut fish into 1 inch strips. Combine flour, salt and pepper. Dip fish sticks into flour mixture and then into eggs. Coat with bread crumbs. Place fish in fryer basket and lower
into oil.
FRIED FISH
1 lb skinless fish filets,
fresh or frozen-thawed
1 cup all-purpose flour
1/2 tsp sugar
370°F
1/2 tsp salt
1 egg, slightly beaten
3/4 cup cold water
2 TBL vegetable oil
4-9 minutes
4 servings
Remove fryer basket before preheating oil. Cut fish 4 inch x 4 inch pieces. Combine dry
ingredients. Combine liquid ingredients. Using an electric mixer, blend liquids and dr y
ingredients together until smooth. Dip fish into batter. Using a heat resistant metal
spoon place fish into oil.
14
RECIPE INDEX
Batters and Coatings
Beer Batter . . . . . . . . . . . . . . . . . . . . . . . . . . . . . . . . . . . . . . . . . . . . . . . . . . 8
Crispy Batter . . . . . . . . . . . . . . . . . . . . . . . . . . . . . . . . . . . . . . . . . . . . . . . . . 9
Flour Coating . . . . . . . . . . . . . . . . . . . . . . . . . . . . . . . . . . . . . . . . . . . . . . . . 9
Doughs
Apple Fritters . . . . . . . . . . . . . . . . . . . . . . . . . . . . . . . . . . . . . . . . . . . . . . . . . 9
Doughnuts . . . . . . . . . . . . . . . . . . . . . . . . . . . . . . . . . . . . . . . . . . . . . . . . . . 9
Hush Puppies . . . . . . . . . . . . . . . . . . . . . . . . . . . . . . . . . . . . . . . . . . . . . . . 10
Smoochies . . . . . . . . . . . . . . . . . . . . . . . . . . . . . . . . . . . . . . . . . . . . . . . . . 10
Quick ‘N’ Easy Doughnuts . . . . . . . . . . . . . . . . . . . . . . . . . . . . . . . . . . . . . . 10
Meats
Chicken Croquettes . . . . . . . . . . . . . . . . . . . . . . . . . . . . . . . . . . . . . . . . . . . 12
Chicken Fried Chicken . . . . . . . . . . . . . . . . . . . . . . . . . . . . . . . . . . . . . . . . . 12
Crispy Fish Sticks . . . . . . . . . . . . . . . . . . . . . . . . . . . . . . . . . . . . . . . . . . . . 14
French Fried Seafood . . . . . . . . . . . . . . . . . . . . . . . . . . . . . . . . . . . . . . . . . 14
French Fried Jumbo Shrimp . . . . . . . . . . . . . . . . . . . . . . . . . . . . . . . . . . . . . 13
Fried Fish . . . . . . . . . . . . . . . . . . . . . . . . . . . . . . . . . . . . . . . . . . . . . . . . . . 14
Mini Egg Rolls . . . . . . . . . . . . . . . . . . . . . . . . . . . . . . . . . . . . . . . . . . . . . . . 13
Pork Chops . . . . . . . . . . . . . . . . . . . . . . . . . . . . . . . . . . . . . . . . . . . . . . . . . 12
Samosas . . . . . . . . . . . . . . . . . . . . . . . . . . . . . . . . . . . . . . . . . . . . . . . . . . . 13
Southern Fried Chicken . . . . . . . . . . . . . . . . . . . . . . . . . . . . . . . . . . . . . . . . 11
Vegetables
Cottage Fries . . . . . . . . . . . . . . . . . . . . . . . . . . . . . . . . . . . . . . . . . . . . . . . . 11
French Fries . . . . . . . . . . . . . . . . . . . . . . . . . . . . . . . . . . . . . . . . . . . . . . . . 11
Onion Haystacks . . . . . . . . . . . . . . . . . . . . . . . . . . . . . . . . . . . . . . . . . . . . . 11
Onion Rings . . . . . . . . . . . . . . . . . . . . . . . . . . . . . . . . . . . . . . . . . . . . . . . . 11
Vegetable Fritters . . . . . . . . . . . . . . . . . . . . . . . . . . . . . . . . . . . . . . . . . . . . 10
SERVICE INFORMATION
Please refer to warranty statement to determine if in-warranty service applies.
This appliance must be serviced by a Toastmaster authorized service center. Consult
your phone directory under “Appliances-Household-Small-Service and Repair,” or call
1-800-947-3744 in the U.S. and Canada, 52-5-397-2848 in Mexico.
If an authorized service center is not available locally, your appliance may be returned
postage prepaid to our National Service Center at the address shown in the warranty statement. Products must be adequately protected to avoid shipping damage.
Surround your appliance with three inches of protective padding and include a note
explaining the problem you have experienced. We recommend insuring your package.
No C.O.D. shipments accepted.
15
ONE YEAR LIMITED WARRANTY
Toastmaster Inc. warrants this product, to original purchaser, for one years from purchase date to be free of defects in material and
workmanship.
This warranty is the only written or express warranty given by Toastmaster Inc.This warranty gives you specific legal rights. You may
h ave other rights which va ry from state to state. ANY OTHER RIGHT WHICH YOU MAY HAVE, INCLUDING ANY IMPLIED WA RR A N T Y OF MERCHANTABILITY OR FITNESS FOR A PARTICULAR PURPOSE IS LIMITED IN DURATION TO THE DURATION OF THIS
WARRANTY.
Defective product may be brought or sent (freight prepaid) to an authorized service center listed in the phone book, or to Service
Department, Toastmaster Inc., 70 8 South Missouri St., Macon, MO 63552, for free repair or replacement at our option.
Your remedy does not include: cost of inconvenience, damage due to product failure, transportation damages, misuse, abuse, accident or
the like, or commercial use. IN NO EVENT SHALL TOASTMASTER INC. BE LIABLE FOR INCIDENTAL OR CONSEQUENTIAL DAMAGES.
Some states do not allow limitations on how long an implied warranty lasts, or allow the exclusion or limitation of incidental or
consequential damages, so the above limitations or exclusions may not apply to you.
For information, write Consumer Claims Manager, at the Macon address. Send name, address, zip, telephone area code and daytime number, model, serial number, and purchase date.
KEEP DATED SALES RECEIPT FOR WARRANTY SERVICE.
Keep this booklet. Record the following for reference:
Date purchased
Model number
Date code (stamped on bottom)
Horario:8:00 a.m.hasta 4:30 p.m., hora del
National Service Center
Centro
708 South Missouri St.
Toastmaster de México, SA de CV
Macon, MO 63552
Cerrada de Recursos
In USA and Canada call:
Hidráulicos Numero 6
Consumer Service 1-800-947-3744
La Loma Industrial
Consumer Parts 1-800-947-3745
Tlalnepantla de Baz, C.P. 54060
Hours:8:00 a.m.- 4:30 p.m.CST
Estado de México
Aux É.-U. et au Canada, veuillez appeler
Service consommateur :1-800-947-3744
Piéces détachées consommateur :1-800-947-3745
Heures ouvrables :8 h - 16 h 30 Heure Centrale
En México - 52-5-397-2848
PART NO. 32685P01
FOR SPANISH SECTION ONLY
ESPECIFICACIONES TECNICAS
Potencia Nominal (Watts)
Tension de Alimentacion o Tension Nominal (Volts)
Frencuencia de Operacion o Frecuencia Nominal (Hertz)
2000 W
127 V ~
60 Hz