1
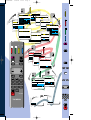
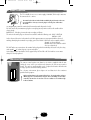
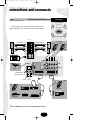
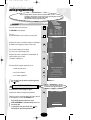
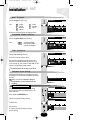
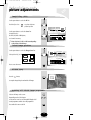
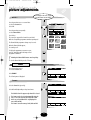
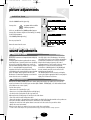
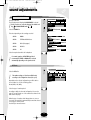
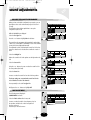
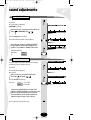
COUVERTURE
3/06/96 17:02
Page 1
U
s
m
a
n
U
u
s
m
a
a
s
m
a
s
m
a
2
a
K
u
8
l
r
a
9
l
r
e
n
M
a
u
l
r
e
n
U
a
u
l
r
e
n
U
a
u
s
m
r
e
n
U
7
e
D
l
U
COUVERTURE
3/06/96 17:02
Page 2
P.
☞
P.
☞ 20
9
BROWSE
PREFERENCES
☞ 10
Max. Volume
Language
GB F
Programme Display
Time reference
IR download
(-)No
SET-UP
Teletext Fine
Tuning
PREFERENCES
CLOCK
☞ 22
LOCK
SET-UP
D E I S NL
Off
On
PR 01
Yes(+) PR -Off
On
00
01
02
03
04
PR 02 BBC 2
05
BBC 1
06
BBC 2
07
I T V
08
CHAN 4
09
+/0..9
S-NEXS
MOVIES
BROWSE
M-GOLD
M-CHAN
CHILD
CLOCK
BROWSE
Sleep-timer
Signal
Name
AV1
S-Video
CAMCOR
☞ 27
CLOCK
LOCK
AV2
☞ 34
(-/+) -:--
AV1
AV2
Enter your PIN number
Store your PIN number
Norm (-/+)
PAL I (UK)
Decoder
None
AV1
Search
Channel
CH 22
Cable
CC -Programme
02
Fine Tuning
Station name
BBC 2
Erase (-)
Store (+)
PROGRAMME AV1 AV2 Access
AV3 to the organiser (+)
AV3
PROGRAMME
RGB
Signal
Name
AV1
AV2
S-Video
VCR 2
AV3
AV2
VT
AV3
Signal
Name
RGB
S-Video
VCR 1
RGB
☞ 27
☞ 27
P.
☞ 24
TUNING
Volume
Brightness
Colour
Contrast
Resets to these preferences
PROGRAMME
LOCK
Next / Previous page
Select a programme
VT
LOUDSPEAKERS HEADPHONES AV
Auto/Stéréo
LOUDSPEAKERSMono
HEADPHONES
Normal
Wide
Sound
Effect
Balance
TV Treble
TV Bass
AV
LOUDSPEAKERS HEADPHONES AV
-
ZOOM
+
☞ 16
Headphone
☞ 19
AV Device
☞
PR.-
a
–
ZOOM
+
–
PROG
+
19
a
2
PICTURE
3
4
5
6
7
8
9
PICTURE
Brightness
Colour
Contrast
Digital Mastering
PIP
PIP
FORMAT
FORMAT
Format
Subtitles Zoom
Subtitles position
Off
4/3
16/9
Off
On
Down(-) Up (+)
On
☞ 14
☞ 11
0/AV
........
........
Mono
PR.+
z z
1
Stéréo
a
RCT3006
THOMSON
z z
a
1
2
3
4
5
6
7
8
9
0
PR O6 M 6
PR O2 FR 2
☞ 21
☞
21
........
........
000 Précautions
3/06/96 14:55
Page 1
MAINS CONNECTION
The TV is suitable for use on a.c. mains supply, 220-240V, 50 Hz only. It must not
be connected to d. c. mains.
The mains lead of the TV is fitted with a moulded plug. If the mains sockets are
not compatible or if for any reason the plug is removed please follow these
directions:
The moulded plug cannot be rewired and if removed must be disposed of safely.
DO NOT under any circumstances plug the severed plug into any mains socket as this could result in
electric shock.
IMPORTANT : If the plug is removed rewire new plug as follows:
The wires in the mains plug are coloured in accordance with the following code : BLUE - NEUTRAL
BROWN - LIVE
As the colours of the wires in the mains lead of this apparatus may not correspond with the coloured
markings identifying the terminals in your plug, proceed as follows : BLUE wire to the terminal coded N
(Neutral) or coloured black.
BROWN wire to the terminal coded L
(Live) or coloured red.
DO NOT make any connection to the terminal in the plug which is marked by the letter E or by the safety
earth symbol
or coloured green or green and yellow.
A fused plug must be fitted with a 5A fuse approved by ASTA or BSI to BS 1362 and fuse covers must
always be securely replaced.
REMOTE BATTERIES
The remote control requires two batteries size AAA as supplied with the unit.
Unclip the cover at the rear and insert the batteries the correct way round as
shown. The ends are usually marked + and –. Replace the batteries when the unit
no longer operates at normal viewing distances.
For a cleaner environment, please dispose of used batteries in the containers
provided for this purpose.
When replacing batteries do not mix old and new - do not mix makes and types.
Alkaline types are recommended for long life. Never risk damage to the remote
control by extreme heat - do not leave close to a radiator or on a window ledge
in direct sunshine.
2
SOMMAIRE
3/06/96 15:57
Page 1
remote
control
functionscontrol remote
using
P.
PROGRAMME
Set-up - Preferences Browse - Clock - Lock Tuning - AV1 - AV2 - AV3.
When a red, green or yellow button is pressed for the first
time, the contents of the menu are displayed at the top of
the screen and the menu of the function selected is
displayed at the bottom of the screen.
SOUND
Speaker configuration - Balance - Loudspeakers Headphone - AV (Audiovisual).
Moving horizontally along in the menus
selects the required function on the contents
line if it has not been already selected.
- The selected function is displayed in the same colour as
the button pressed (red, green, yellow).
PICTURE
Picture - PIP - Format.
Press the coloured button repeatedly to move down
through the menus selecting different lines.
TELETEXT / TOPTEXT / FASTEXT
- The line selected in the menus is displayed in the same
colour as the button pressed (red, green, yellow).
VT
Make any adjustments.
PERSONAL ADJUSTMENTS
and scrolling back through the menus.
TO REMOVE THE MENU DISPLAY
or to display programme information, the type of sound
transmission (MONO, STEREO or DUAL),
the programme name and number, the time.
PICTURE FREEZE
–
ZOOM
+
ZOOM FUNCTION
TO CALL UP PREVIOUSLY VIEWED PROGRAMME
–
PROG
+
TO CALL UP ALL PROGRAMMES IN TURN
VOLUME
- Horizontal movement in the menus
- -/+ adjustments of other functions.
a
z z
a
1
2
3
4
5
6
7
8
9
0
Keys 1 to 0 are used to :
- Select the programmes (from 1 to 99)
- Enter the channels numbers
- The 0 key is used to call AV inputs 1, 2 and 3.
MUTE
........
........
STAND-BY
Changes are saved when you quit the menus, except in
the PROGRAMME menu.
contents
CONNECTIONS AND COMMANDS
5/6
AUTO-PROGRAMMING
Switching on - Automatic station search
Programme organiser - New region
7/9
INSTALLATION
Volume limitation - Menu language Programme number display - Time reference Preferred settings
PICTURE ADJUSTMENTS
PIP - Format
9/10
11/14
SOUND ADJUSTMENTS
15/19
Pro Logic - Loudspeakers - Balance - Headphone - AV
DAY TO DAY OPERATION
Switching on/Selecting programmes - Browse
20/21
OTHER FUNCTIONS - EXTRAS
Clock - Child lock - Lock
22/25
CONNECTIONS
26/28
Video recorder connections - Calling up audiovisual
programmes - Copying video tapes Speakers connections
TELETEXT
29/31
Calling up Teletext - Options - Alarm - How to select Subtitles - New flash
MANUAL PROGRAMMING
32/33
Norm - Decoder - Channel/Cable - Programme - Fine
Tuning - Station name - Store/Erase - Access to the
organiser.
C10) 00 DOLBY GB
3/06/96 14:58
Page 5
television
setcommands
connections and
For further details,
see page 26.
FRONT AND RIGHT SIDE
Connect to A.C. main
supply 220-240 V ~ 50 Hz
VIDEO
L
AUDIO
R
S-VIDEO
On/Off switch
On/Standby light :
Green = On
Red = Standby
PR-
PR+
INSTAL
Programme
selection
VIDEO and
AUDIO Sockets
VIDEO
L
Volume adjustments
S-VIDEO and
AUDIO Sockets
AUDIO
R
PR-
PR+
INSTAL
S-VIDEO
Headphone
socket
Ø 6,35 mm
Installation-menu access button
AV 3
5
C10) 00 DOLBY GB
3/06/96 14:58
Page 6
television
setcommands
connections and
BACK CONNECTIONS
Ideal setting
Front speakers
Connect respectively the red and black terminals of the
supplied speakers to the television’s red and black terminals.
Listening
area
Surround speakers
R
L
Front speaker
Front speaker
Surround speaker
Surround speaker
S-VHS
Camcorder
or VHS
AV2
R
L
C
S
(IN)
Ψ 75
S-Video
Video
Audio
(OUT)
Inoperative in
Pro Logic mode
Unit 1
AV 2
AV 1
Aerial*
Unit 2
AV2
AV1
Camescope
Camcorder
CDV player
Video recorder
Décoder
Satellite receiver
Video recorder
Video games console
* We recommend that you use an aerial cable with double isolation.
6
C11) 1 GB
3/06/96 18:40
Page 7
television
set
auto-programming
This set is equiped with an automatic station search system which is used for :
• Searching for all the stations received in your region and storing them in memory
• Automatically searching for the name of the station
• Automatically allocating a programme number.
WELCOME
BIENVENUE
WILLKOMMEN
BIENVENIDO
BENVENUTO
VÄLKOMMEN
WELKOM
WELCOME
Turn on the television set main power.
ENGLISH
FRANÇAIS
DEUTSCH
ESPAÑOL
ITALIANO
SVENSKA
NEDERLANDS
The WELCOME menu is displayed.
If it is not,
Press the INSTAL button on the television set control panel.
INSTAL
Briefly press the remote control button number corresponding to
the number of the language you require for the menus.
a
z
1
Press
Appuyer
Drücken
Pulse
Premere
Tryck
Druk op
key number
sur la touche
Sie die Taste
tecla numero
il tasto
knapp nummer
knop nummer
[1]
[2]
[3]
[4]
[5]
[6]
[7]
CHOOSE YOUR COUNTRY :
UK :
[1]
FRANCE :
[2]
GERMANY :
[3]
ITALY :
[4]
SPAIN :
[5]
PORTUGAL :
[6]
SWISS :
A list of countries appears (on two pages).
To go to the next or previous pages, press
Briefly press the remote control button corresponding to the
country in which you are located.
For example : England, press
[7]
AUTRIA :
[8]
Next page :
[9]
9
a
z
1
NETHERLANDS :
[1]
BELGIUM :
[2]
LUXEMBOURG :
[3]
SWEDEN :
[4]
DANMARK :
[5]
FINLAND :
[6]
NORWAY :
[7]
OTHERS :
[8]
Previous page :
[9]
The menu which then appears permits the user to :
• start an automatic search,
• search for new channels,
a
z
1
z
a
2
AERIAL INSTALLATION
Make sure that the aerial cable
and decoder (if any)
are connected to this TV set.
[ 1 ] Launch terrestrial installation
[ 2 ] Update the terrest. installation
• access channel organisation.
3
[ 3 ] Access to the organiser
You can always leave the menus at any time by pressing
the
button.
To help you, follow the instructions at the
bottom of the menu (grey background).
AUTO-PROGRAMMING
For the first time or after a change of region :
start automatic channel search by pressing the button
a
z
1
AUTO - PROGRAMMING
Searching for stations and storing them in the memory depends
on the language chosen from the WELCOME menu.
The previously memorised stations are erased.
Searching for stations
AUTO-PROGRAMMING is completed when the cursor is at
the extreme right.
To interrupt the search, press briefly on the
key,
this displays the channel management menu.
10 stations found
7
C11) 1 GB
3/06/96 18:41
Page 8
television
set
auto-programming
This menu is used to :
• change the programme number,
• change the station number,
• delete a programme.
Programme Organiser
Programme Organiser
When the automatic search is completed, the
Programme Organiser menu appears.
Scan through to check that the stations found are correctly
numbered and named as you want than:
PR.-
PR.+
• IF YES ➡ press briefly
the menu disappears and is replaced by the picture of the
programme selected.
PR+, PR- Select a station
+, -, 0..9 Move this programme
Blue
Change the name
Yellow
Erase this station
01
To exit, press the (TV) key
• IF NO ➡ you make changes as follows
- The programme number
Select the programme number to be changed.
01
02
03
04
05
06
07
08
09
PR.-
PR.+
Bring the cursor to the new programme number.
02
03
04
05
06
07
08
09
You may also use the number buttons 0 to 9.
Moving PR 06 BBC to PR 04
+, -, 0..9 Give it another number
Green
Confirm change
Red
Cancel change
Confirm the change (green button).
- The station name
VT
Programme Organiser
Press the blue button briefly.
A list of station names per country appears
United Kingdom
Nederlands
France
Belgique
Deutschland
Luxembourg
Italia
Sverige
España
Danmark
Portugal
Finland
Schweiz
Norge
Österreich
01
02
03
04
05
06
07
08
09
United Kingdom
BBC 1
BBC 2
I T V
CHAN 4
CHAN 5
SKY +
M-GOLD
M-CHAN
CHILD
C N N
+, PR+, PRGreen
Red
SKYONE
DISCOV
UKGOLD
SKYSPO
BRAVO
ESPORT
S-NEWS
M T V
EUNEWS
-------
Next/Previous name page
Select a new name
Confirm change
Cancel change
Select the country you require.
If the name appears in the list displayed,
select the name
PR.-
PR.+
PR.-
PR.+
Confirm the selection (green button).
If the name does not appear in the list displayed,
select the "- - - - - -"line
+, PR+, PRGreen
Red
You have 6 characters to enter a station name
To enter a station name,
Press the green button briefly and
the first character flashes.
Select the first character of the new name.
PR+, PR- Select a station
+, -, 0..9
Move this programme
Blue
Change the name
Yellow
Erase this station
To exit, press the (TV) key
PR.-
PR.+
Enter the next character
and repeat the process up to the last character.
Confirm your choice (green button). The new name is
stored in the memory and the list disappears.
+, PR+, PRGreen
Red
Next/Previous name page
Select a new name
Create station name
Cancel change
Next/Previous position
Select a character
Confirm new name
Cancel new name
PR+, PRSelect a station
+, -, 0..9
Move this programme
Blue
Change the name
Yellow
Erase this station
To exit, press the (TV) key
8
C11) 1 GB
3/06/96 18:41
Page 9
television
set
auto-programming
To delete a programme
Select the programme to be deleted.
PR.-
PR.+
P.
Press the yellow button.
Confirm your choice (green button).
The programme is deleted
the following programme is selected.
01
02
03
04
05
06
07
08
09
BBC 1
BBC 2
CANAL+
Erase PR 04 CANAL+
Green
Confirm erase
R ed
Cancel erase
You may cancel any unconfirmed command (change of
programme number or channel name, programme erasure)
by pressing the red button .
Turn on the television set by pressing
one of the buttons from 1 to 9.
New channels
To search only for new channels :
Press the INSTAL. button on the televisions set key pad.
INSTAL
z
Select the country and press the button
a
2
When search is finished, the Programme Organiser menu appears.
Reorganise the programmes.
To do this, follow the instructions given on the previous page.
To make menu disappear, press on
installation
Par ce
pouvez :
With
thismenu,
menuvous
you may:
Limit the
maximum
volume.
• •Limiter
le volume
sonore
maximum.
• Change
the menu
(German,
Spanish, French,
English,
Italian,
Swedish,
Dutch),
• Modifier
la language
langue des
menus (allemand,
espagnol,
français,
anglais,
italien,
suédois).
• Permanently
display
the number
of the
watched,
• Obtenir
l'affichage
du numéro
deprogramme
programmebeing
regardé.
• Store the time reference programme number,
• Mémoriser le numéro de programme de référence horaire.
PREFERENCES
SET-UP
SET-UP
P.
Press the yellow button then the (-) button.
Max. Volume
Language
GB F D E I S NL
Programme Display
Off
On
Time reference
PR 01
IR download
(-)No
Yes(+) PR -Teletext Fine Tuning Off
On
The SET-UP menu is displayed
Maximum Volume Limitation
P.
PREFERENCES
SET-UP
Select the Max. Volume line (yellow button).
Set the maximum volume with the cursor.
Max. Volume
Language
GB F D E I S NL
Programme Display
Off
On
Time reference
PR 01
IR download
(-)No
Yes(+) PR -Teletext Fine Tuning Off
On
The volume cannot be set to zero when using this function.
9
C11) 2 TVA PIP DM GB
3/06/96 15:05
Page 10
television
installation set
Menu language
P.
PREFERENCES
Select the Language line (yellow key).
Select
GB
F
D
E
: English
: French
: German
: Spanish
I
: Italian
S
: Swedish
NL : Dutch
SET-UP
Max. Volume
Language
GB F D E I S NL
Programme Display
Off
On
Time reference
PR 01
IR download
(-)No
Yes(+) PR -Teletext Fine Tuning Off
On
All the menus will be displayed in the language selected.
Programme number display
P.
Select the Programme Display line (yellow key).
Select :
•
•
Off
On
no permanent display.
the programme number
is permanently displayed
PREFERENCES
SET-UP
Max. Volume
Language
GB F D E I S NL
Programme Display
Off
On
Time reference
PR 01
IR download
(-)No
Yes(+) PR -Teletext Fine Tuning Off
On
Time reference
P.
PREFERENCES
Select the Time reference (yellow key).
SET-UP
The television’s internal clock must be set.
Max. Volume
Language
GB F D E I S NL
Programme Display
Off
On
Time reference
PR 01
IR download
(-)No
Yes(+) PR -Teletext Fine Tuning Off
On
This synchronises automatically when the television set is
turned on to a programme broadcasting Teletext, you can
opt to select any one of the 4 channels - BBC1, BBC2, ITV, CH4.
Select the corresponding programme number.
The IR download line has no effect on your TV set.
Teletext Fine Tuning
This adjustment allows writing errors (missing letters) on the
teletext pages of French networks (L Standard) to be reduced.
To do this,
On must be selected in the Teletext Fine Tuning line.
Teletext Fine Tuning
Off
On
This adjustment is not active for B, G, D, K, K' and
I standards.
PREFERENCES
This menu enables you to save your preferred settings.
Press the yellow or pink key repeatedly to return to the
Menu contents line.
Press to display the PREFERENCES menu.
P.
or
P.
PREFERENCES
SET-UP
Volume
Brightness
Colour
Contrast
Resets to these preferences
Select the line required with the yellow key.
PREFERENCES
SET-UP
Set with the key.
Volume
Brightness
Colour
Contrast
Resets to these preferences
Erase the menu.
To return to your preferred settings at any time,
press the pink key.
10
C11) 2 TVA PIP DM GB
3/06/96 15:05
Page 11
television
set
picture adjustments
PICTURE
You may adjust the picture
settings at any times.
PICTURE
Press the green key.
The PICTURE menu is displayed :
PICTURE is selected.
PIP
Brightness
Colour
Contrast
Digital Mastering
If this is not the case, select the Contents line using the
green key
and Picture with the
key.
FORMAT
Off
PICTURE
PIP
On
FORMAT
Select the Brightness line (green key).
Adjust the brightness.
Brightness
Colour
PICTURE
Contrast
Repeat the same procedure to select and adjust the Colour,
and Contrast.
PIP
Digital Mastering
Brightness
Colour
Contrast
Digital Mastering
Tint
The TINT line only appears if the source is
NTSC from an AV1, AV2 or
AV3 audio-visual programme.
FORMAT
Off
On
Off
On
Digital Mastering
PICTURE
Select the Digital Mastering line (green key).
Select the option required.
When changing channels, Digital Mastering automatically
returns to On.
This process suppresses flicker from the TV image.
In addition, Digital Mastering improves image quality
with a further reduction of the trembling effect.
The images are more stable, sharper and less
straining to the eyes. Finally, image noise is reduced
automatically according to reception quality
(INR system : Intelligent Noise Reduction).
PIP (Picture in picture)
PIP
Brightness
Colour
Contrast
Digital Mastering
FORMAT
Off
On
Gives you several possibilities
for programmes inlays.
You use this function to :
• inlay in one of the corners of the screen (P I P) :
– images from the input connectors (AV1, AV2, AV3 or RGB),
while viewing a channel ;
– or one of the channels, while viewing a programme from one
of the audiovisual input connectors (AV).
• inlay on the screen in groups of 9, all the channels in memory
(Channel guide).
PICTURE
PIP
FORMAT
Press the green button once or several times to select
the contents line.
PIP
Source
Channel Guide
Change Corner
Select P I P.
The PIP menu appears.
11
Off
0n
(-) 03 (+)
(+)
1 2 3 4
C11) 2 TVA PIP DM GB
3/06/96 15:06
Page 12
television
set
picture adjustments
Image inlay (PIP)
Use the green button to select the PIP line.
Press briefly to select :
Off : no picture in picture
On : picture in picture
Use the green button to select the Source line.
As required select :
the AV1, AV2, AV3 or RGB picture,
or a channel in memory.
PR.-
PR.+
PICTURE
PIP
PIP
Source
Channel Guide
Change corner
(-)
PICTURE
PIP
FORMAT
Off
03
(+)
1 2
On
(+)
3
4
Picture in picture is in 4/3 or 16/9 format depending
on the format of the AV image.
Inlaid image position
Use the green button to select the Change Corner line.
Select position 1, 2, 3 or 4.
4
1
3
2
PIP
Source
Channel Guide
Change corner
Press to erase the menu.
Picture swap
Press the
button,
to swap the image being viewed and the PIP image.
Scanning all inlaid image programmes
Select an AV image on the screen.
Repeatedly press the PR +/- button
on the remote control to scroll through PIP displays of all
stored programmes and the other AV programmes.
0/AV
PR.-
PR.+
Press and hold to remove the PIP.
12
FORMAT
Off
(-)
03
(+)
1 2 3
On
(+)
4
C11) 2 TVA PIP DM GB
3/06/96 15:06
Page 13
television
set
picture adjustments
You can display on the screen, in group of
9, all the channels stored in memory.
Mosaic
Press the green button once or several times
to select the Contents line.
PICTURE
PIP
FORMAT
Select P I P.
Press the green button repeatedly
to select Channel Guide.
PIP
Source
Channel Guide
Change corner
Off
(-)
On
(+)
03
(+)
1
2
3
4
Press the key.
The screen goes grey and the channels become inlaid
With the corresponding programmes numbers superimposed.
The Channel Guide programmes change every 3 seconds.
When the Channel Guide appears,
the sound goes off.
To display the programme you want on screen,
press the
button when the image of that
programme is animated
Activating the Channel Guide feature cancels any inlays.
To clear the Channel Guide, press the TV button.
FORMAT
Press the green button once
To select the Contents line.
PICTURE
PIP
FORMAT
Select FORMAT.
Format
Subtitles Zoom
The following menu is displayed.
4/3
Off
16/9
On
Format
PICTURE
Select the Format line (green key).
PIP
FORMAT
Select 4/3 or 16/9 depending on the picture format.
Format
Subtitles Zoom
The Subtitles Zoom line appears only when 4/3 is selected
The format can also be selected automatically when the
source is one of the two Euro-AV sockets AV1 or AV2.
In this case, select AUTO which is only displayed for
sources AV1 and AV2.
The format is stored in memory for AV1, AV2 and AV3.
PICTURE
Format
13
4/3
Off
PIP
4/3
16/9
On
FORMAT
16/9
Auto
C11) 2 TVA PIP DM GB
3/06/96 15:07
Page 14
television
set
picture adjustments
Subtitles Zoom
PICTURE
Select the Subtitles Zoom line (green key).
You may select
Off
On
: programme without subtitles
: subtitled programmes.
PIP
Format
Subtitles Zoom
FORMAT
4/3
Off
16/9
On
In this case, an additional line (Subtitles position) appears
You may choose between a higher or lower framing, for example,
for sub-titled programmes.
PICTURE
PIP
FORMAT
Select Subtitles position (green key),
then set your picture lift.
Format
Subtitles Zoom
Subtitles position
Remove the menu from the screen.
4/3
Off
Down (-)
16/9
On
up (+)
television
set
sound adjustments
NICAM DIGITAL STEREO
NICAM (Near Instantaneous Companded Audio Multiplex)
digital audio.
The digital signal broadcast together with the existing
sound and pictures of terrestrial television are decoded by
this receiver to enable high quality stereo sound to be
reproduced with advantages similar to those of compact
discs. i. e. extended dynamic range and channel
separation with low noise and low distortion. These are
considerable benefits compared with the current standard
system. The digital channel separation will allow the
Broadcasters to transmit dual languages as en alternative
feature after the service is established.
You will be able to take full advantage of this exciting
new facility. The increase in over all realism and ambience
created by this new dimension in television sound will
bring increased viewing enjoyment to all forms of
programme materiel to sport as well as the more obvious
advantages to all forms of musical entertainment.
In the absence of NICAM signals or if the NICAM signal
becomes extremely weak, the receiver will select the
standard system automatically.
The standard signal can also be chosen by selecting the
mono mode using the appropriate IMC on screen graphics
display. This is known as forced mono.
Dolby* Surround Pro Logic
Derived from the DOLBY-STEREO system used in cinemas, Dolby Surround Pro Logic enables you to re-create the
acoustic environment of the cinema in your own home (with a DOLBY - STEREO signal), or to obtain enhanced sound
effects (with a mono or stereo signal).
You have three options :
• Connect two sets of speakers (Pro Logic),
• Connect one set of speakers (Dolby Phantom or Dolby Stereo),
• Use the television sound system only (Pro Logic mode off).
Make sure that the following steps are carried out in the order shown.
• Turn off the television at the main power switch.
• Connect the speakers to the appropriate sockets and make sure that the black speaker terminals on the speakers are
connected to the black terminals on the television, and likewise for the red terminals.
• Configure the television for the speakers that are connected or for the acoustic effect you wish to obtain.
• Balance the acoustic environment.
When these steps have been completed, you can carry out the other sound settings.
* “ DOLBY “ and the double D symbol are registered trade-marks belonging to the Dolby Laboratories Licencing Corporation.
14
C11) 2 bis SON NIC DOL GB
3/06/96 15:09
Page 15
television
set
sound adjustments
CONNECTING THE SPEAKERS
To benefit from the Dolby Surround Pro Logic system, you must connect to your television set
4 loudspeakers :
- 2 front speakers
- 2 surround speakers
} Speakers, ref. DPL 4 K delivered
R
L
Front speaker
Front speaker
Surround speaker
Surround speaker
R
L
C
S
To select the speakers you have connected, you must configure your television set :
SPEAKER CONFIGURATION
The following menu is displayed:
Press
2 times
Select the Configuration line.
SPEAKER CONFIGURATION BALANCE
Configuration
L
S
1
TV
2
3
4
R
S
Depending on the speakers connected, or the audio effect
preferred, choose one of the configurations offered.
CONFIGURATION
1
2
3
4
TV speakers only
TV speakers +
Front speakers
TV speakers +
Surround speakers
TV speakers +
Front speakers +
Surround speakers
ACOUSTIC EFFECT
Mono signal
Stereo signal
Stereo effect
Stereo effect
Matrix*
Matrix*
*Matrix : sound delay in the rear speakers.
Press briefly to remove the menu.
15
Wide stereo
Wide stereo
or Dolby 3 Stereo
Phantom or Hall
Pro Logic
or Hall
C11) 2 bis SON NIC DOL GB
3/06/96 15:10
Page 16
television
set
sound adjustments
LOUDSPEAKERS
LOUDSPEAKERS HEADPHONES AV
Press the red button
The following menu is displayed: LOUDSPEAKERS is selected.
If this is not the case, select the Contents line with the red
key and LOUDSPEAKERS with
.
Select the SOUND line.
Sound
Effect
TV Treble
TV Bass
Auto/Stereo
Normal
Mono
Wide
Sound
Auto/Stereo
Mono
Auto
Mono
This varies depending on the sound type received:
SOUND
MONO
Sound
SOUND
STEREO or NICAM Stereo
Sound Auto/Stereo
SOUND
DUAL (2 languages)
Sound Sound 1
SOUND
NICAM 3
Sound Sound 1 Sound 2 Sound 3
SOUND
AV
Source Stereo Sound 1 Sound 2
Mono
Sound 2
Select the required sound for the loudspeakers.
For normal operation, AUTO/STEREO position is
recommended. STEREO or MONO will be selected
automatically depending on the signal received.
Effect
LOUDSPEAKERS HEADPHONES AV
Select the Effect line
Sound
Auto/Stereo Mono
Effect Normal
Hall
Dolby
Treble
Bass
TV treble
TV bass
The number and type of selections available varies
according to the configuration selected (see p. 15).
Depending on the selected configuration,you will be able to
choose betwen 2 or 3 of the following options :
Normal, Wide, Hall, Dolby.
Select the type of sound required.
According to which selection and configuration is chosen (see
page 15), you will obtain one of the sound effects shown on the
table on the next page.
When the type of sound received changes (mono to stereo or
vice versa), the sound effect automatically becomes that selected
for the type of sound received.
Press briefly to remove the menu.
16
C11) 2 bis SON NIC DOL GB
3/06/96 15:10
Page 17
television
set
sound adjustments
CONFIG.
AUDIO
SOUND
1
2
3
4
EFFECT SELECTION
Normal
Wide
Hall
Mono
Mono
Pseudo-Stereo
Stereo
Stereo
Wide stereo
Mono
Mono
Stereo
Stereo
Mono
Mono
Stereo
Stereo
Hall
Mono
Mono
Matrix
Stereo
Stereo
Hall
Dolby
Pseudo-Stereo
Wide stereo
Dolby 3 Stereo
Matrix
Phantom
Pro Logic
BALANCE
SPEAKER CONFIGURATION BALANCE
Press SOUND button then the (–) button.
The following menu is displayed :
The menu varies depending on which configuration is selected.
• Configuration 1
Select the Left/Right line.
Balance the sound between the two audio channels.
Left/Right
SPEAKER CONFIGURATION BALANCE
• Configuration 2
Adjust the balance on the front speakers, and the sound level on
the central loudspeakers as shown in the chapter
BALANCING THE ACOUSTIC ENVIRONMENT.
Test Signal
Left/Right
Centre
Volume
Off
On
SPEAKER CONFIGURATION BALANCE
• Configuration 3
Adjust the balance on the front speakers and the sound
level on the surround speakers, as shown in the chapter
BALANCING THE ACOUSTIC ENVIRONMENT.
Test Signal
Left/Right
Surround
Volume
Off
On
SPEAKER CONFIGURATION BALANCE
• Configuration 4
Adjust the balance on the front speakers and the sound
level on the surround speakers, as well as the sound level
on the central loudspeakers as shown in the chapter
BALANCING THE ACOUSTIC ENVIRONMENT.
Test Signal
Left/Right
Surround
Centre
Volume
Press briefly to remove the menu.
17
Off
On
C11) 2 bis SON NIC DOL GB
3/06/96 15:10
Page 18
television
set
sound adjustments
BALANCE THE ACOUSTIC ENVIRONMENT
When you have selected the configuration you require, you can
then balance the acoustic environment (except for selection 1 :
TV only).
The instructions given below explain how to set up the
configuration (selection 4).
SPEAKER CONFIGURATION BALANCE
Test Signal
Left/Right
Surround
Centre
Volume
With the BALANCE menu displayed
Select the Test Signal line.
Test Signal
Left/Right
Surround
Centre
Volume
Press the + or - button to highlight On in red letters.
Off
On
Off
On
The sound from the programme being watched is replaced by a
”white noise” sound which is transmitted to each of the channels
in turn (Left, Center, Right and Surround).
The adjustment consists of balancing the sound level of the four
channels so that the noise has the same sound level on each of
them.
Select the Left/Right line
Balance the sound level for the speakers on the right and on the
left.
Select the Surround line.
Test Signal
Left/Right
Surround
Centre
Volume
Off
On
Test Signal
Left/Right
Surround
Centre
Volume
Off
On
Test Signal
Left/Right
Surround
Centre
Volume
Off
On
Test Signal
Left/Right
Surround
Centre
Volume
Off
On
Using the + or - buttons, increase or reduce the sound level for
the rear speakers (Surround).
Select the Centre line.
Increase or reduce the sound level on the television speakers.
The above settings are correct when the sound level for the
noise is identical on each of the channels.
Press repeatedly to select the Test Signal line.
Briefly press the + or - buttons to highlight Off.
TONE ADJUSTMENT
The following menu is displayed :
LOUDSPEAKERS is selected.
LOUDSPEAKERS HEADPHONES AV
Sound
Effect
Treble
Bass
TV Treble
TV Bass
Select the Treble and Bass lines in turn, and
increase or reduce the treble or bass frequency level on
the speakers, and the level on the front speakers if
they are connected.
Press briefly to remove the menu.
18
Auto/Stereo
Normal Hall
Mono
Dolby
C11) 2 bis SON NIC DOL GB
3/06/96 15:11
Page 19
television
set
sound adjustments
HEADPHONES
Press briefly
The following menu is displayed :
HEADPHONES is selected.
LOUDSPEAKERS HEADPHONES AV
If this is not the case, select the Contents line with the red
button and HEADPHONES with
.
Headphones
Select the Headphones line (red key).
You can then adjust the volume for the headphone.
Headphones
Note : When the transmission is multilingual (DUAL) or
an AV programme, the following menu appears. It is
possible to select SOUND 1 or SOUND 2 in the headset.
Source
Headphones
Sound 2
Sound 1
Select the Source line:
then select
or
Sound 1
Sound 2
AV
LOUDSPEAKERS HEADPHONES AV
The sound output on sockets AV1 and AV2 must be adjusted
according to the type of headset connected.
Press briefly.
AV Device
The following menu is displayed :
AV is selected.
If this is not the case, select the Contents line with
the red key
and AV with
.
Stereo
Mono
LOUDSPEAKERS HEADPHONES AV
Select the AV Device line (red key).
Then select
Stereo
Mono
AV Device
= stereo VCR
= mono VCR
Selecting stereo permits simultaneous recording of both
languages of a bilingual programme on a stereo video recorder :
Sound 1 on the left track and Sound 2 on the right track.
The sound available at the AV1 and AV2 outputs must be
adjusted according to the type of device connected.
Press to remove the menu from the screen.
19
Stereo
Mono
C11) 3 PIP GB
3/06/96 15:15
Page 20
television
set
day to day operation
SWITCHING ON / SELECTING PROGRAMMES
Switch on the television set with the mains switch if the standby
light is off.
If the standby light is on, select the programme required by the
remote control or the PR-/+ buttons on the front of the set.
For the programmes 1 to 9 :
Press the corresponding number briefly.
PR.-
a
PR.+
PR 02
BBC 2
z
1
0/AV
PR 1 For programmes 10 to 99 :
Hold on to display the tens.
Press briefly to display the units.
a
z
1
PR 14
4
BROWSE
BROWSE
This comprises 10 pages of 10 programmes each, giving for each
programme number : the station name (if it has been
programmed).
00
01
02
03
04
P.
The BROWSE menu is displayed.
+,0..9
P.
CLOCK
PR 02 BBC 2
05
BBC 1
06
BBC 2
07
I T V
08
CHAN 4
09
Next / Previous page
Select a programme
BROWSE
CLOCK
LOCK
MOVIES
S-NEWS
M-GOLD
M-CHAN
CHILD
LOCK
To select the directory page displayed.
+,0..9
PR 02 BBC 2
05
BBC 1
06
BBC 2
07
I T V
08
CHAN 4
09
Next / Previous page
Select a programme
+,0..9
PR 53
50/AV
55
51
56
52
57
53
58
54
59
Next / Previous page
Select a programme
00
01
02
03
04
To select the other pages, press repeatedly.
Example : Page 6 (programmes 50 to 59)
Press 5 times
To select a programme from the page displayed,
press only the unit digits of the programme
selected (example for 53: press 3).
Programme PR 00 corresponds to the last audiovisual
programme (AV1, AV2 or AV3).
Press briefly to select BROWSE again.
P.
S-NEWS
MOVIES
M-GOLD
M-CHAN
CHILD
Press briefly to remove the directory from the screen.
Volume
Set the volume as desired.
Volume
When the headphones are plugged in, you can adjust the volume
of the headphones or loudspeakers :
Headphones
Loudspeakers
Select the line you wish to adjust.
Sound mute
Pressing once turns the sound off. The sound returns
if the button is pressed once more.
Mute
20
C11) 3 PIP GB
3/06/96 15:16
Page 21
television
set
day to day operation
RETURN TO PREFERRED SETTINGS
Press briefly to return to personal adjustments (PREFERENCES
menu)
DISPLAY / ZAPPING
Zoom 1
Displays details of the station being watched (programme name
and number, time).
Press repeatedly to scroll through the programmes.
PR.-
PR.+
11 : 35
PR 06
MOVIES
PICTURE FREEZE
Press key,
The picture freezes instantly
The transmission continues
The still picture cannot be recorded.
Press briefly to return to the programme being viewed.
LAST PROGRAMME VIEWED
P.
VT
This function is used to switch rapidly between 2 programmes.
Press the key.
The previously viewed programme is selected.
Last
programme
viewed
ZOOM
Press to enlarge or reduce the picture.
ZOOM 0
ZOOM 1
ZOOM 1 S/T
–
ZOOM 2
ZOOM
ZOOM
-
ZOOM 1
ZOOM 1 S/T
ZOOM 2
–
+
PR.-
ZOOM
Zoom S/T : image enlarged and moved up for easier reading of
subtitles.
z z
STAND-BY
Stand-By
........
........
........
........
AUTOMATIC STOP
The set is automatically switched to standby a few minutes
after the station being watched stops broadcasting.
21
PR.+
Zapping
a
1
2
3
4
5
6
7
8
9
0/AV
Press briefly, the Stand-By light turns red to indicate
that the set is now in standby.
+
+
a
ZOOM 0
ZOOM
Display
Picture
freeze
Zoom
........
........
C11) 3 PIP GB
3/06/96 15:16
Page 22
television
set
other functions
- extras
CLOCK
BROWSE
P.
CLOCK
LOCK
Select CLOCK
Sleep-timer
(-/+)
- : - -
Sleep-timer
(-/+)
- : - -
Sleep-timer
(-/+)
2 : 1 5
The Sleep-timer line is displayed.
Sleep-timer
P.
Select the Sleep-timer line (yellow key).
Set the time in steps of 15 minutes (up to 4 hours).
Remove the menu from the screen.
The set will switched to standby at the end of the timer interval.
You can display the time left before the stop time.
Press the TV key briefly
Sleep-timer
(-/+)
0 : 0 1
One minute before sleep timer time, the screen displays that sleep
timer is imminent.
The standby lamp flashes to indicate the CHILD LOCK state.
The television set can only be turned on with the remote
control.
You may cancel sleep timer command.
P.
Sleep-timer
BROWSE
Select the Sleep-timer line.
(-/+)
CLOCK1 : 4 5
LOCK
Press repeatedly to return to : - : - Sleep-timer
Remove the menu from the screen.
(-/+)
- : - -
Putting the television set on standby when a sleep timer
command is programmed, also cancels this function.
Clock (automatic on)
You can programme your television set to switch on
automatically to the programme of your choice.
The internal TV clock must be set to the correct time.
BROWSE
Sleep-timer
Press briefly on the key.
CLOCK
(-/+)
LOCK
- : - -
P.
Select the CLOCK menu.
P.
Press twice the yellow key to select the Wake-up time line.
The first figure flashes.
22
Wake-up time 00:00
Mode
Off
Once Daily
Programme
01
Current time 00:11
C11) 3 PIP GB
3/06/96 15:16
Page 23
television
set
other functions
- extra
To set the clock to the right time.
BROWSE
CLOCK
LOCK
0/AV
6
Enter the Wake-up time using 24 hour format.
4
Wake-up time
06:45
5
P.
Select the Mode line (yellow key).
Select
Off
Once
Daily
= the alarm is off
= the alarm will only go off once
= the alarm will go off everyday
If a new alarm is programmed, Once is selected
automatically.
Select the programme for the alarm.
Remove the menu from the screen.
........
........
........
........
If the set is switched on before the alarm function is
actived, it will not switch to the programme selected for
the alarm at the programmed time.
It is possible to programme both the automatic switching
off (STANDBY) and switching on (ALARM) of the set. In
this case the automatic switching on time must be
programmed to take place after the switching off time.
CHILD LOCK
You can prohibit the use of your television set using the keypad.
Use of the TV set is prohibited :
- after the sleep timer function ;
- when the set is switched to standby and a sleep timer
command is programmed ;
- when the set is turn off at the mains and a sleep timer
command is programmed ;
- when a wake-up command is programmed.
- after switching off the TV set by holding down the standby
button on the remote control for more than 3 seconds.
The CHILD LOCK function is indicated by the flashing of the
indicator lamp.
06:45
Off
01
00:11
Wake-up time
Mode
Programme
Current time
06:45
Off
Once
01
00:11
Once
Daily
P.
Select the Programme, line (yellow key).
Turn the television set on to standby.
It will turn on automatically at the time programmed
and turn off one hour after.
Wake-up time
Mode
Programme
Current time
........
........
........
........
The set can only be switched back on using the remote
control.
23
Daily
C11) 3 PIP GB
3/06/96 15:17
Page 24
television
set
other functions
- extra
LOCK
This function enables you, for example,
to prevent your children from watching certain programmes by
“locking“it so that the set cannot be switched on. The set can
be “unlocked“ with a PIN number
BROWSE
P.
Press the yellow key
to select the menu Contents line,
then the volume (+) key
to select LOCK. The following menu is displayed.
CLOCK
LOCK
Enter your PIN number
- - - -
Enter your PIN number
P.
Press the yellow key briefly to select the line
Enter your PIN number.
Then enter your PIN number figures
(example : 1111).
The menu displays :
----
Enter your PIN number
1111
Store your PIN number (+)
P.
Press the yellow button briefly to select the line
Store your PIN number.
Enter your PIN number
1 1 1 1
Store your PIN number (+)
Press the volume (+) key briefly.
The code is stored in the memory and the menu displays :
Change you PIN number
Enter your PIN number
Change your PIN number
----
Access the programme list (+)
If your previous code has been divulged.
Enter the your new code numbers (example : 1234).
Change your PIN number
1234
Store your PIN number (+)
The previous menu then returns.
P.
Press the yellow button briefly to select the line
Store your PIN number.
Change your PIN number
Press the volume (+) key briefly.
The new code is stored in the memory and the menu displays :
Change your PIN number
1 2 3 4
Store your PIN number (+)
----
Access the programme list (+)
When you enter a code for the first time, the figures replace
the dashes ; where not, the dashes are replaced by an
asterisk.
Change your PIN number
* * * *
Access the programme list (+)
Access the programme list
P.
Press the yellow key briefly to select the line
Access the programme list (+).
BROWSE
Press the volume (+) key briefly.
A page of the directory appears depending on the programme
being watched (example : page 1, programme 6 : M6).
Select the programme you wish to Lock or Unlock :
CLOCK
Change your PIN number
Access the programme list (+)
PR.-
PR.+
24
LOCK
- - - -
C11) 3 PIP GB
3/06/96 15:17
Page 25
television
set
other functions
- extra
To Lock, briefly press the zoom (+) key
the programme locked turns to red,
or
To Unlock, briefly press the zoom (-) key
the programme unlocked turns to blue.
+
ZOOM
• Unlock the programme with the key
CLOCK
LOCK
PR 06 MOVIES
–
ZOOM
00
01
02
03
04
BBC 1
BBC 2
I T V
CHAN 4
05
06
07
08
09
S-NEWS
MOVIES
M-GOLD
M-CHAN
CHILD
Select a programme with PR+, PR Lock / (Unlock) with ZOOM + / (ZOOM -)
To lock or unlock other programmes :
• Select the directory range with the keys
• Select the programme, including the audiovisual programmes
AV1, AV2 or AV3 with keys
• Lock the programme with the key
BROWSE
PR.-
PR.+
+
ZOOM
–
ZOOM
After locking or unlocking all of the required programmes, erase
the menu with the key
.
To access this programme
Enter your PIN number
The locked programmes cannot be obtained using
the PR –/+ keys on the remote control and the keypad.
If they are selected using the remote control number buttons, the
following message is displayed on the screen :
- - - -
Incorrect PIN number
• If you do not enter the right code, the message Incorrect PIN
number will appear above the first one.
The programme does not change and after a few seconds, both
messages disappear.
To access this programme
Enter your PIN number
- - - -
• If you enter the right code, the programme selected appears
immediately.
When the code is entered once to unclock a programme, all
of the programes which were locked are also unlocked.
The lock will be re-activated after the set is turned off.
ACCESS TO THE STATION TUNING MENUS
When there is at least one programme locked, access to the
station tuning menus Auto-Programming and Manual
Programming is also locked.
If you call up one of these menus, the following message appears
on the screen.
To access this menu
Enter your PIN number
****
P.
Briefly press the yellow key to select the line
Enter your PIN number if it is not already selected.
To access this menu
Enter your PIN number
Enter your code number and the menu appears immediately
If the code is not correct, the message Incorrect PIN number
appears for a few seconds.
----
Incorrect PIN number
To access this menu
Enter your PIN number
If you forget your personal code,
see last page of instructions booklet .
25
- - - -
C10) 4 PIP AV3 DOLBY GB
3/06/96 15:34
Page 26
television
connections set
VIDEO RECORDER CONNECTIONS
CR
rV
to you
Refer anual
m
VIA THE AERIAL SOCKET
To tune your TV into your VCR you should refer to Manual
Programming (page 34).
The channel number (usually 36 or 60) is given in the manual of
your VCR. The programme selected for your VCR must be 9, 19
or 29.
Whenever you wish to use your VCR, you must select the
programme assigned to it.
VIA THE EURO-AV SOCKET 1 (AV1)
This is used to connect :
• Satellite receiver or decoder
• a VHS or 8mm video recoder or camcorder (VIDEO)
or a S-VHS or Hi-8mm video recorder or camcorder (S-VIDEO)
• a PC or video games console (RGB).
Video recorder
and/or
Decoder
and/or
Satellite receiver
or
Camcorder
or
PC or video
games console
AV 1
VIA THE EURO-AV SOCKET 2 (AV2)
This is used to connect :
• a VHS or 8mm (VIDEO), S-VHS or Hi-8mm (S-VIDEO) video
recorder.
Video recorder
and/or
Satellite
receiver
AV 2
If you have two VCRs connected, the decoder must be connected to the VCR connected to the
Euro-AV1 socket.
If you have a satellite receiver, refer to the operating manual in order to find out the type of
signal delivered then select VIDEO, S-VIDEO or RGB.
You can also connect it to the decoder socket of the second VCR if the latter is fitted with one.
VIA THE AUDIO/VIDEO/S-VIDEO SOCKETS (AV2)
This is used to connect :
• an S-VHS or Hi-8mm video recorder (S-VIDEO)(S and AUDIO
sockets).
(IN)
S-Video
Video
Audio
(OUT)
AV 2
In order to maintain the optimum sound and picture
quality of your set, it is recommended not to connect
2 units to the Euro- AV1 socket and the
AUDIO/VIDEO/S sockets simultaneously.
VIA THE AUDIO/VIDEO/S-VIDEO SOCKETS (AV3)
This is used to connect :
• to a camcorder VHS or 8 mm (VIDEO)(VIDEO and AUDIO sockets)
S-VHS or Hi 8 mm (S-VIDEO)(S and AUDIO sockets).
VIDEO
L
AUDIO
VHS
R
S-VIDEO
S-VHS
26
C10) 4 PIP AV3 DOLBY GB
3/06/96 15:34
Page 27
television
connections set
Your television set selects and
automatically displays in the menu the type
of signal (Video or S-Video) for
the equipment connected.
Signal
Name
Video
Signal
Name
S-Video
RGB
RGB
UNITS CONNECTED
EURO
AV 1
EURO
AV 2
AUDIO/VIDEO/
AUDIO/VIDEO/
S-VIDEO AV 2 SOCKETS S-VIDEO AV 3 SOCKETS
PAY-TV decoder
VIDEO
Automatic selection
VIDEO
Automatic selection
Satellite receiver
VIDEO
Automatic selection
VIDEO
Automatic selection
Video recorder VHS/S-VHS
VIDEO/S-VIDEO
Automatic selection
VIDEO/S-VIDEO
Automatic selection
VIDEO/S-VIDEO
Call AV 2 0/AV
Camcorder
PC / Games console
VIDEO/S-VIDEO
Call AV 3 0/AV
Select RGB
Call AV 1 0/AV
Name
You may give each piece of equipment connected a name.
Call up the AV 1, AV 2 or AV 3 menu.
P.
AV 1
AV 2
AV 3
P.
Select the Signal line (yellow key).
Signal
Name
Video
RGB
Signal
Name
S-Video
RGB
Signal
Name
Video
-
RGB
Check the type of signal or select as necessary.
P.
Select the Name line.
The first dash flashes.
You may enter the name of the channel using 6 characters.
Continue to press, the signs, figures and letters are displayed in
alphabetical order.
Continue to press : the letters are shown in reverse order.
a
z
1
z
a
2
When the required character appears, go to next character.
To leave a space look for the blank character (between ? and A).
CALLING UP AUDIOVISUAL PROGRAMMES
Press AV to call AV1, AV2 or AV3 programmes in sequence.
In most cases, the television set changes automatically to AV1,
AV2 or AV3, when the VCR connected is in play back mode.
When the VCR is stopped, the TV set returns to the station
previously watched.
0/AV
The TV set changes automatically to 16/9 format if the unit
connected supplies the control voltage and if you have
selected AUTO from the FORMAT menu.
27
C10) 4 PIP AV3 DOLBY GB
3/06/96 15:35
Page 28
television
connections set
COPYING VIDEO TAPES
It is necessary to have 2 VCRs with the same specifications : 2 VHS/8 mm or 2 S-VHS/Hi-8 mm.
Connect the playback VCR to the Euro-AV1 socket in playback mode.
Connect the recording VCR to the Euro-AV2 socket in recording mode.
During the copying of the tape, you can watch the station you are copying.
PLAY
EQUIPMENT
VHS
CALL UP
PROGRAMME
SOCKET
Video recorder
Euro-AV 1
Video recorder
AV 1
or
Camcorder
AV 3
Video recorder
or
Camcorder
or
S-VHS
RECORD
EQUIPMENT
Camcorder
Audio/Video/S-Video
SOCKET
Euro-AV 2
Audio/S-Video AV 2
Euro-AV 2
Audio/S-Video AV 2
SPEAKERS CONNECTIONS (OTHER OPTIONS)
CENTRAL SPEAKER
• Direct connection
If preferred, one or two speakers can be connected to replace one of the loudspeakers on your television set, as
shown below :
Dummy plug to cut the
sound from the second
internal loudspeaker
(if you plug one speaker only)
Unit 2
Unit 1
In this case, the speaker or the speakers must be placed beneath the television set.
CONNECTION TO A HI-FI SYSTEM
To boost the audio power, you may connect a Hi-Fi system, if you have one.
You must however avoid connecting your Hi-Fi and speakers to similar outputs (e.g. Hi-Fi on the CINCH surround
socket and speakers on the surround clips).
In this case, the configuration of the television set will match that described on page 15.
For a full appreciation of Dolby Surround Pro Logic, your television set should be placed in a spacious room.
28
C10) 4 PIP AV3 DOLBY GB
3/06/96 15:35
Page 29
television
connections set
• Dolby Surround Pro Logic
R
L
Surround
speaker
Surround
speaker
R
L
C
S
Hi-Fi
After making the connection, choose configuration 4 from the SPEAKER CONFIGURATION menu, and Dolby from
the LOUDSPEAKERS menu.
Then proceed to the adjustment of the audio environment.
To do so, call up the BALANCE menu (page 17) and proceed as shown.
You should also adjust the volume of your Hi-Fi.
If you have an amplifier or another Hi-Fi :
R
L
Hi-Fi
R
L
C
S
Dummy plug :
Cut the sound
from the internal
loudspeaker
Amplifier
Dummy plug :
Cut the sound
from the internal
loudspeaker
Unit 1 Unit 2
After making the connection, choose :
- configuration 4 from the SPEAKER CONFIGURATION menu
- and Dolby from the LOUDSPEAKERS menu.
Then proceed to the adjustment of the audio environment.
To do so, call up the BALANCE menu (page 17) and proceed as show.
You should also adjust the volume of your Hi-Fi.
29
C10) 4 PIP AV3 DOLBY GB
3/06/96 15:35
Page 30
television
connections set
• WIDE STEREO/Dolby 3 Stereo
R
L
Hi-Fi
R
L
C
S
After making the connection, choose :
- configuration 2 from the SPEAKER CONFIGURATION menu
- and wide from the LOUDSPEAKERS menu to obtain wide stereo
- or Dolby to obtain Dolby 3 Stereo sound.
Then proceed to the adjustment of the audio environment.
To do so, call up the BALANCE menu (page 17) and proceed as shown.
You should also adjust the volume of your Hi-Fi.
30
C10) 5 PIP GB
3/06/96 15:42
Page 31
television
set
teletext
Your television set is equipped to receive teletext. There are 3 types of teletext : • Teletexte (France-Europe),
• Fastext (UK, Spain),
• Toptext (Germany)
If you notice writing errors (missing letters) on the teletext pages of French networks (L Standards), check :
- That you have good reception
- That On is selected in the Teletext Fine Tuning line of the SET-UP menu (see page 10).
CALLING UP TELETEXT
Select a station on which there is Teletext (for France, TF 1, FR2).
a
S100
z
1
SKYTEXT
100
Tue
18 Oct 1544:10
0/AV
VT
Briefly press the blue key.
The contents page (Page 100) appears automatically.
A - Z
INDEX
ON
199
WHAT'S ON YOUR TV GUIDE......110
TV GUIDE.....110
FINANCE......200
CABLE........140
SHARES.......220
RADIO........145
LOANS........288
SUSCRIBE.....150
WEATHER......300
NEWS FLASHES: SPORT 104 FINANCE 239
ON SKYSPORTS: SPORT, FOOTBALL, RACING
You may enter the page number required (3 figures).
Example: page 170, enter 1, 7, 0 (the number is displayed at the
top left of the screen).
When the page is found, it appears on the screen.
–
You can move through the pages to select them.
PR.-
ZOOM
+
PR.+
HENNESSY GOLD CUP BREAK SkyOne p 365
GUIDE
FAVORITE
<<
>>
DISPLAY
SUBCODE
110
200
While the teletext is displayed, you may adjust or turn off
the volume.
To quit Teletext, press
.
OPTIONS
GUIDE
See next page.
FAVORITE
<<
The two menu lines, under the Teletext page, are different,
depending on the type of Teletext received (Teletext, Fastext,
Toptext) and your selection (see page 32).
You may select different options using the top line of this menu.
These are shown in colour.
Briefly press the corresponding colour key (red, green, yellow, blue).
The menu bottom line is then activated.
GUIDE
FAVORITE
<<
GUIDE
200
DISPLAY
SUBCODE
110
200
FAVORITE
DISPLAY
100 200 300 400 500 600
GUIDE
VT
To select options from the bottom line, press the equivalent
colour button.
SUBCODE
110
>>
<<
P.
DISPLAY
>>
FAVORITE
HOLD
GUIDE
SUBCODE
ZOOM
MIX
FAVORITE
Subpage No
>>
DISPLAY
?
CLEAR
SUBCODE
DISPLAY
-
- - -
SUBCODE
ALARM ON
To return to the first line of the menu, press the pink key.
HOW TO SELECT
Repeatedly press the pink key
to select the possible options under the required colour.
Red key
OVERVIEW
: MENU, DIRECT, PREVIEW, GUIDE (Toptext)
INDEX, GUIDE (Teletext or Fastext)
Green key
: FAVORITE, SUBPAGE
Yellow key
: DISPLAY, UPDATE
STORE (+)
GUIDE
INDEX
DISPLAY
SUBCODE
TOP-Menu
FAVORITE
DISPLAY
SUBCODE
TOP-Menu
FAVORITE
DISPLAY
SUBCODE
INDEX PAGE 100
P.
INDEX
STORE (+)
SUBPAGES
FAVORITE
DISPLAY
SUBCODE
<<
>>
VT
INDEX
Blue key
FAVORITE
STORE (+)
GUIDE
TV PROG
DIRECT
OVERVIEW
HOLD
: SUBCODE.
P.
VT
?
MENU
CLEAR
Briefly press the same colour key
(red, green, yellow or blue) to select.
To save your choice, briefly press the (+) button.
31
FAVORITE
FAVORITE
Sous-Pages
STORE(+)
UPDATE
DISPLAY
ZOOM
DISPLAY
-
- - -
SUBCODE
MIX
SUBCODE
ALARM ON
C10) 5 PIP GB
3/06/96 15:42
Page 32
television
set
teletext
Key
Type
Name
When the red
and green
rectangles are displayed in these menus, pressing
the red key displays the previous page, pressing
the green key displays te next page.
<<
<<
Functions
Menus
MENU
Displays Toptext menu (red key).
MENU
SUBPAGES
DIRECT
Directly displays the priority pages determined by the
station (red and green keys).
DIRECT
SUBPAGES
P 100
ARD 11:25:49
TOP - Menu
NACHRICHTEN
FINANZ-INFOS
SPORT
WETTER
LOTTO/SPIELE
A-Z/ADRESSEN
FERNSEHEN
UEBERSICHT 2
DIE AKTUELLE
DOLLARKURS
WOCHENSCHAU
DISPLAY
TOP-Overview
DIRECT
DISPLAY
TV HEUTE
SUBCODE
TV-MORGEN
UEBERSICHT 1
UEBERSICHT 2
DIE AKTUELLE
retour
THEME
CHAPITRE
SUBCODE
Direct page : ÜBERSICHT 2
<<
>>
TOPTEXT
PREVIEW
Displays TV programme page (red and green keys)
TV PROG
Displays subject (yellow key) or field (blue key)
GUIDE
<<
Red
INDEX
Calls up Contents page (red key).
GUIDE
Selects different heading (red, green, yellow, blue keys)
SUBPAGES
DISPLAY
SUBCODE
TV PROG : TV HEUTE
<<
GUIDE
SUBPAGE
>>
INDEX
SUBPAGES
>>
DISPLAY
SUBCODE
TV-TIPS
TV-MORGEN
DISPLAY
SUBCODE
INDEX PA 100
FASTEXT
GUIDE
TV INDEX
INDEX
Displays Contents page (red key).
GUIDE
You may call :
• The previous page (red key)
• The next page
• The first page of the next ten after the page
displayed (yellow key)
• The first page of the next hundred after the page
displayed (blue key). Eg : page displayed : 135
-> page called up : 140 or 200
INDEX
SUBPAGES
FIN INDEX
DISPLAY
SUBCODE
HEADLINES
SHARES
DISPLAY
SUBCODE
SUBPAGES
INDEX PA 100
GUIDE
>>
<<
TELETEXT
<<
SUBPAGES
>>
DISPLAY
SUBCODE
110
200
DISPLAY
SUBCODE
200
110
SUBPAGES
Green
TOPTEXT
FASTEXT
FAVORITE
TELETEXT
DISPLAY
Used to display subpages if any.
The number of the subpage displayed is underlined.
Select subpages with red or green keys.
Allows you to store up to 6 of your favourite teletext pages.
To store your favourite pages, select one of the 6 locations by
using either the red or green keys (the selected location will
have its 3-digit number underlined). Then enter the number
of the required page. Repeat the process for each favourite page.
(There are 6 favourite page locations for each PR number).
The colour of the buttons depends on the option
required.
GUIDE
SUBPAGES
01 02 03 04 05 06 07 08
<<
GUIDE
<<
GUIDE
HOLD
FAVORITE
DISPLAY
231 240 . . .
... ... ...
SUBPAGES
?
>>
SUBCODE
>>
DISPLAY
SUBCODE
ZOOM
MIX
DISPLAY
SUBCODE
ZOOM
MIX
DISPLAY
SUBCODE
ZOOM
MIX
DISPLAY
SUBCODE
ZOOM
MIX
Option selection.
For games :
Briefly press the green key to see a hidden answer.
TOPTEXT
To enlarge the text : yellow key
Press once : top half of screen doubled in height.
Press twice : bottom half of screen doubled in height.
Press three times : return to normal Teletext.
Yellow FASTEXT
Mix mode :
Briefly press the blue key to overlay the Teletext page on
the TV picture.
P.
GUIDE
HOLD
SUBPAGES
?
GUIDE
HOLD
SUBPAGES
?
GUIDE
HOLD
SUBPAGES
?
TELETEXT
If you wish to stop page scrolling (eg : 4/7)
Briefly press the red key, the page number
replaces «HOLD».
Press the red key again to continue scrolling.
UPDATE
GUIDE
HOLD
Automatic renewal of the page displayed.
Press the yellow key, you can watch your TV programme
while waiting for page search to complete.
SUBPAGES
?
GUIDE
SUBPAGES
DISPLAY
SUBCODE
ZOOM
MIX
UPDATE
SUBCODE
Back to TV until new page received
When the page is found, the message «PAGE XXX RECEIVED»
appears on the screen.
Press the blue button to display the page.
Blue
TOPTEXT SUBCODE
VT
FASTEXT
TELETEXT
Enter the subpage number (eg : 0009).
Press the green key.
The TV picture is displayed and as soon as the subpage is
found, it is displayed.
32
GUIDE
CLEAR
FAVORITE
Subpage No
UPDATE
-
- - -
SUBCODE
ALARM ON
C10) 5 PIP GB
3/06/96 15:42
Page 33
television
set
teletext
SUBTITLES
Some programmes are transmitted with subtitles for the hard of
hearing. These subtitles are received via Teletext on a special page
number. They can be superimposed on the screen by selecting
that page in Teletext mode. Find the appropriate page number
from the Teletext Index page. Enter the number and once the
page has been found, you will see the normal TV programme
with the subtitles superimposed on it.
To erase the subtitles, press twice the key
.
NEWS FLASH
The latest news can be superimposed on the television picture.
Look up the teletext index to find the page number and enter it.
Once the page has been found, you can watch the normal
television programme. When the lastest news page is updated
it will be superimposed on the picture.
The remote control can be used for sound and picture settings
again. If you switch to another station, the «Latest news»
function is disabled.
If after having seen these news you wish to remove the
VT
display from the screen, press the blue key
followed by the key
.
ALARM
If the teletext transmits an alarm page, you can make it come up
at a set time.
While entering the number of the alarm page (E. G. TVE : 697,
ORF : 784). Then enter the digits to choose the time ( e.g., for
20.45, type 2, 0, 4, 5) and hold down the last digit until the teletext is removed.
At the chosen time, the alarm page will appear on the screen.
VT
To erase the alarm page, first press the blue key
then the key
.
33
C10) 6 PIP GB
3/06/96 19:29
Page 34
television
set
manual programming
You may use this channel adjustment menu if you do not wish to restart
auto programming (where there are only few channels in your area
or if a new channel is transmitting).
TUNING
PROGRAMME
PROGRAMME
AV1
AV2
AV3
P.
The following menu is displayed :
TUNING is selected
If this is not the case, select the contents line using the
yellow key
and TUNING with the key
.
Norm (-/+)
PAL I (UK)
Decoder
None
AV1
Search
Channel
CH 22
Cable
CC -Programme
02
Fine Tuning
Station name
BBC 2
Erase (-)
Store (+)
Access to the organiser (+)
P.
If the menu is not in English, refer to the INSTALLATION
chapter, page 10.
AV2
Norm
TUNING
P.
AV1
AV2
AV3
Select the Norm (-/+) line (yellow key).
Norm (-/+)
PAL I (UK)
Decoder
None
AV1
Search
Channel
CH 22
Cable
CC -Programme
02
Fine Tuning
Station name
BBC 2
Erase (-)
Store (+)
Access to the organiser (+)
Select the broadcasting standard :
PAL/SECAM BG (Euro) : Western Europe (BG)
FRANCE
: France and Luxembourg (LL’)
PAL BG+
: Special standards (Switzerland)
SECAM DKK’
: Eastern Europe, Middle Eadt (DKK’)
PAL I (UK)
: United Kingdom, Ireland (I)
AV2
Decoder
This function allows you to access programmes using the PR –/+
keys (zapping).
Select Decoder line (yellow key).
P.
Norm (-/+)
PAL I (UK)
Decoder
None
AV1
Search
Channel
CH 22
Cable
CC -Programme
02
Fine Tuning
Station name
BBC 2
Erase (-)
Store (+)
Access to the organiser (+)
Select one of the options :
None = no decoder
AV1
= Decoder connected to Euro-AV1 socket
AV2
= Decoder connected to Euro-AV2 socket.
AV2
Channel/Cable
If you do not know the channel numbers.
P.
Select the Search line (yellow key).
TUNING
Start the search by pressing :
+ : for forward channel search
- : for backward channel search.
The cursor indicates the part of the range in which it is performing the search.
The channel numbers are displayed on
• Channel line when received via an aerial
or
• Cable line for cable networks.
Once a station has been received, the picture appears on the
screen. If the picture, corresponds to the station required, go to
the Programme line, otherwise continue the search, with (+).
If you already know the channel numbers.
Norm (-/+)
PAL I (UK)
Decoder
None
AV1
Search
Channel
CH 22
Cable
CC -Programme
02
Fine Tuning
Station name
BBC 2
Erase (-)
Store (+)
Access to the organiser (+)
Select the line
• Channel for TV channels (aerial) or
• Cable for cable networks.
Enter the channel number (it must have 2 digits)
e.g. : for channel 6, enter 0 and then 6.
TUNING
34
AV1
AV2
AV2
Norm (-/+)
PAL I (UK)
Decoder
None
AV1
Search
Channel
CH 22
Cable
CC -Programme
02
Fine Tuning
Station name
BBC 2
Erase (-)
Store (+)
Access to the organiser (+)
P.
0/AV
AV1
6
AV3
AV2
AV3
AV2
C10) 6 PIP GB
3/06/96 19:29
Page 35
television
set
manual programming
Programme
P.
Select the Programme line (yellow key).
TUNING
Enter the station number.
Programme 1 to 9 :
Press the corresponding digit briefly (eg: 03, press 3).
Programme 10 to 99 (eg : 52) :
Briefly press 5 to display the tens :
3
5-
5
z
Briefly press 2 to display the units : 5 2
a
2
AV1
AV2
Norm (-/+)
PAL I (UK)
Decoder
None
AV1
Search
Channel
CH 22
Cable
CC -Programme
02
Fine Tuning
Station name
BBC 2
Erase (-)
Store (+)
Access to the organiser (+)
AV3
AV2
Optional :
To be used if the picture is not clear or for searching
for a specific source, for example, a video recorder channel
Fine Tuning
Search
Channel
CH 22
Cable
CC -Programme
02
Fine Tuning
Station name
BBC 2
Erase (-)
Store (+)
Access to the organiser (+)
P.
Select Fine Tuning line (yellow key).
+ : sharper picture contours or search higher in the range
- : softer picture contours or search lower in the range.
Station name
P.
TUNING
Select the Station name line (yellow key).
The station name can be written in 6 characters.
Hold down the button : the characters are displayed in ascending order.
Hold down the button : the characters are displayed in the
descending order.
When the required character appears, press these buttons to go
the next or previous character.
To leave a space look for the blank character (between ? and A).
a
z
1
z
a
2
AV1
AV2
AV3
Norm (-/+)
PAL I (UK)
Decoder
None
AV1
Search
Channel
CH 22
Cable
CC -Programme
02
Fine Tuning
Station name
BBC 2
Erase (-)
Store (+)
Access to the organiser (+)
AV2
Erase / Store
P.
Press yellow key to select Erase (-) Store (+) line.
Briefly press, your channel is stored in the memory.
If you wish to Erase, press
Continue the search for a different station.
Search and store all the stations by repeating the above
procedure starting from Search, Channel or Cable.
Repeat the process for the next programme/station starting
from NORM.
TUNING
AV1
AV2
AV3
Norm (-/+)
PAL I (UK)
Decoder
None
AV1
Search
Channel
CH 22
Cable
CC -Programme
02
Fine Tuning
Station name
BBC 2
Erase (-)
Store (+)
Access to the organiser (+)
P.
AV2
Access to the organiser
When all the channels or the new channel have been retrieved,
you can access the channels management menu.
Select the line Access to the organiser (yellow key)
The menu Programme Organiser appears.
Proceed as explained on page 7 to list the channels in the order
required by you and to give them a name if this
has not already been done.
To return to the TUNING menu
press once on the key
.
To clear the menus
press twice on the key
Programme Organiser
P.
01
02
03
04
05
06
07
08
09
BBC 1
BBC 2
PR+, PR- Select a station
+, -, 0..9 Move this programme
Blue
Change the name
Yellow
Erase this station
To exit, press the (TV) key
.
35
Page vignette GB
3/06/96 19:31
Page 1
We recommend you cut out this sticker to keep it hidden from the children.
IF YOU NO LONGER REMEMBER YOUR PERSONAL CODE
P.
Press the yellow button to select the menu Contents line,
then the (+) button to select LOCK.
Press the yellow button to select the line Enter your PIN number.
Press simultaneously the
and
buttons on the TV.
P.
- PR+
The old code is then erased and you may enter a new one.
After changing code, it is not necessary to relock the programs which were already locked.
✄