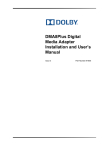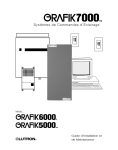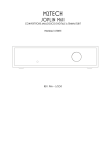
1
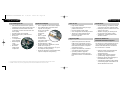
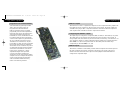
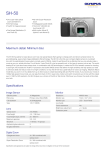
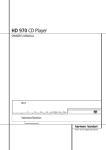
GRR00868.01-DVD32RFLR UM
5/30/02
12:23 PM
Page 01
contents
02
04
07
10
11
14
18
20
21
controls
welcome
key features
regional coding
connecting
controlling the DVD32FLR
the first time setup
main functions
playing a DVD (CD)
28
30
37
42
43
44
50
53
01
TAGtronic Communications Bus
test patterns
future expansion
running in and warming up
care and maintenance
programming the system-remote
technical data
acknowledgments
dvd player DVD32FLR
9602X
|
GRR00868.01-DVD32RFLR UM
02
|
5/30/02
12:23 PM
Page 02
controls
controls
2.
1.
6.
5.
3.
|
01 power/standby LED
7.
02 standby and function buttons
03 disc tray
04 display
05 transport control buttons
open/close
06 remote control active LED
kHz
standby
display
play
–
+
search
–
+
skip
PAL
07 remote control window
pause
video
08 fuse carrier
stop
dvd player DVD32FLR
09 ac supply socket
10 remote relay sockets
4.
8.
12.
10.
16.
14.
11 TAGtronic Communications sockets
20.
18.
12 composite video sockets
13 S-Video sockets
CAUTION - VISIBLE AND INVISIBLE LASER RADIATION
WHEN OPEN AND INTERLOCKS DEFEATED.
14 DVI output socket option
DO NOT STARE INTO BEAM OR VIEW
WITH OPTICAL INSTRUMENTS
CAUTION
DVI OUTPUT
RISK OF ELECTRIC SHOCK
RISK OF ELECTRIC SHOCK
DO NOT OPEN
DO NOT OPEN
REMOTE
220-240V
~ 50-60Hz
Fuse: T1A L 250V
OPTION
Manufactured by TAG McLaren Audio Ltd.
Huntingdon, Cambridgeshire, United Kingdom
IN-C
Manufactured under license from Macrovision
Apparatus Claims of U.S. Patent Nos. 4,631,603;
4,577,216; 4,819,098 and 4,907,093 licensed
for limited viewing uses only.
IN-S
serial number
PROGRESSIVE SCAN OPTION
OUT
OUT-2
IN
15 component video output sockets
Made in United Kingdom
Double insulated: When servicing, use only
identical replacement parts.
IN
(G)
(B)
(R)
Y
PB
PR
T
2
LINK
ANALOG AUDIO
OPTION
IN
OUT
1
2
SURR.LEFT
CENTRE
LEFT
SURR.RIGHT
SUB
RIGHT
17 option
OUT
CLASS 1
LASER PRODUCT
BUS
this product complies
with 21 CFR §1010
OUT-1
COMPOSITE
S-VIDEO
16 option
Y
PB
PR
OPTION
COMPONENT VIDEO
3
D I G I TA L O U T P U T
18 TAGtronic Synchronisation Link sockets
19 digital audio output sockets
9.
11.
13.
15.
17.
19.
20 analog audio option
03
GRR00868.01-DVD32RFLR UM
04
|
5/30/02
12:24 PM
Page 04
welcome
welcome
welcome to
Dr. Udo Zucker
Chief Executive Officer
TAG McLaren Audio
TAG McLaren Audio exists with one aim
in mind: to produce the very best audio and
audio-visual equipment.
Like many people, I often have my best
ideas when relaxing to a piece of music or
watching a movie. For years, knowing the
technical capabilities of TAG McLaren, I
have nurtured the ambition to push music
and movie reproduction to the absolute limit
without compromising ease of use; that’s
why we formed TAG McLaren Audio.
Pushing technological
boundaries; TAG McLaren’s
F1 electronics
At the core of our development team are
highly experienced engineers whose
heritage of award-winning hi-fi and worldbeating electronic control systems is envied
by many and equalled by few.
dvd player DVD32FLR with our
award winning av processor AV32R
There are many immediate spin-offs into
audio from our expertise in automotive
electronics, mechanical engineering and the
material science of Formula One motor
racing: multi-layer printed circuits, fast digital
signal processing, electronic noise
suppression, radio frequency technology and
software expertise to name but a few, all
prerequisites of an outstanding audio product.
TAG McLaren’s aim is sonic perfection
combined with aesthetic delight and solid
build quality – a rare combination in hi-fi
but one which TAG McLaren Audio is
already delivering.
Dr Udo Zucker
|
05
GRR00868.01-DVD32RFLR UM
06
|
5/30/02
12:25 PM
Page 06
welcome
key features
heading
|
There are many outstanding features included in this high-performance DVD player
DVD32FLR. Within this manual we focus on the operation of the DVD32FLR. If you want to
know more about the technical background, which led to this outstanding player, then please
refer to our in-depth technical documentation which can be found in the DVD32FLR product
section at our website www.tagmclaren.com.
performance and formats
Thank you for purchasing the TAG McLaren
dvd transport DVD32FLR
The DVD32FLR is a high performance video source that supports a wide range of video
outputs, making it the perfect choice for home cinema installations. It is particularly well
suited to situations which cannot accommodate our top-loading DVD32R. The DVD32FLR is
an ideal complement to the TAG McLaren Audio theatre AV32R but also complements many
other high-performance audio-visual processors.
• Compatible with DVD-Video and CD
music (8 and 12 cm)
• Native support of
PAL and NTSC
video formats
• Composite,
S-Video and
Component
outputs
• Very low jitter
clock re-times the
SPDIF audio data,
resulting in very high quality signal
timing of the digital audio data
• The TAGtronic Synchronisation Link T2L
allows the DVD32FLR to synchronise its
master clock to the clock within the
TAG McLaren Audio av processor
AV32R, resulting in a very low-noise,
ultra-low jitter
reference right
next to the
audio output
DACs. The
result is a
crisper,
cleaner and
much more
controlled sound.
This is a world first for a DVD player!
07
GRR00868.01-DVD32RFLR UM
08
|
5/30/02
12:25 PM
heading
key
features
key building blocks
• Dual laser DVD mechanism for optimum
performance when playing DVDs and CDs
• Mediamatics/National Semiconductor’s
32 bit RISC processor for best audio and
video quality
• Powerful 16-bit microcontroller
• Stable multi-frequency internal clocks
• Round-core
transformer
• 12 independent
power supplies
• Premium-grade
audio
components
• Broadcastquality video
components
1.
2.
Page 08
key heading
features
inputs and outputs
• Two Composite and two S-Video outputs(1)
• Two multi-standard Component video
outputs, one using RCA
phono and one BNC
connectors(2) for
best picture
quality
• DVI 1.0 digital
progressively
scanned video
output when optional
Progressive Scan
Module PSM192 is fitted
• Three digital audio outputs (two coaxial
SPDIF and one optical)
• TAGtronic Synchronisation Link T2L, input
and output for daisychaining
• Enhanced TAGtronic Communications Bus,
input and output for daisychaining
One Composite and one S-Video connector become inputs to the Progressive Scan Module PSM192 when this option is fitted
The BNC connectors carry the analog progressively scanned output from PSM192 when this option is fitted
ease of use
• Fully remote controlled
• Unique setup wizard lets you forget
printed user manuals
• Learning backlit remote control
• User configurable auto-standby function
• TAGtronic Communications Bus for
inter-product communication and
firmware upgrades
upgrade paths
• Optional Progressive Scan Module
PSM192 for progressively scanned
analog and digital video outputs from
DVDs and from external Composite
and S-Video sources
• Prepared for DVD-Audio, hardware
and software upgrade required
• Operating software upgrades,
distributed via the Internet using the
Enhanced TAGtronic Communications
Bus
|
construction
• Mixed technology construction, leaded
and surface mount for optimum results
• Multi-layer printed circuit board for best
signal to noise ratio
• Vibration damping of chassis panels
for best sound and picture quality
• SorbothaneTM mounting feet for best
vibration isolation
Enhanced TAGtronic
Communications Bus support
The TAGtronic Communications Bus can be
user configured to activate the following
features if the DVD32FLR is connected to
the AV32R and/or 100x5R:
• Relaying remote commands between
TAGtronic Communications Bus
equipped products
• Sending all products into standby
• Synchronising display brightness
• Displaying AV32R status messages on
the DVD32FLR video outputs
• Automatically adjusting picture settings
and selecting inputs on the PSM192 to
suit the selected video source
09
GRR00868.01-DVD32RFLR UM
10
|
5/30/02
12:25 PM
Page 10
heading coding
regional
connecting
heading
...regional coding
We know that you are keen to get your DVD32FLR working. This section describes the
connections required to make your DVD32FLR fully functional and have you viewing your
favourite movies as quickly as possible. Refer to page 2 for diagrams to help you find your
way around your DVD32FLR(1).
Regional coding has been defined by the developers of the DVD standard (the licensors) to
protect the sequential patterns of distribution for the motion picture producers’ copyrighted
works. In line with these copy protection laws, your DVD32FLR has been configured for one
of six regions (1 to 6), dependent upon the country of destination. The region of your
DVD32FLR is clearly shown on the packaging beside the mains operating voltage and
frequency, and can also be obtained from the information screen via the setup menu.
Simply press menu, 5 and a screen, similar to the one shown below, appears:
before you start
Make sure that all components of your audio-visual system are disconnected from the AC
supply whenever you change any connections.
player information
_______________________________________
DVD32FLR
model :
serial number :
regional code :
software version :
|
Please keep the original packing and use it whenever your DVD32FLR is transported.
Shipping without the appropriate transit protection will invalidate your warranty.
positioning
DVD-...
2
V...
Your DVD32FLR is designed to run warm during normal operation. Please ensure that there is
adequate ventilation above and below the unit. We recommend that you do not place your
DVD32FLR near any heat sources such as radiators or in direct sunlight.
In the example above, the DVD32FLR is set to region code 2.
Do not expose your DVD32FLR to dripping or splashing liquids. Do not place
objects filled with liquid, such as vases, on or near to it.
Do not place the DVD32FLR on top of the AV32R (or other electronics), it will harm both
products because of restricted ventilation.
1.
Throughout the instruction manual, bold print indicates the lettering that you will find on the panels of your DVD32FLR and Remote
11
GRR00868.01-DVD32RFLR UM
12
|
5/30/02
12:25 PM
Page 12
connecting
connecting
power connection
|
surround sound (audio visual) processor connection
Your DVD32FLR has two types of digital output; Two coaxial SPDIF (called DIGITAL OUTPUT 1
and 2) and one OPTICAL. We recommend using one of the coaxial connections for best
sound quality. Using a high quality digital interconnect, such as our F3-10-DIG, connect the
DIGITAL OUTPUT 1 or 2 of your DVD32FLR to a digital input on your AV processor.
Using the cable supplied, connect the socket on the back of your DVD32FLR to
an AC supply outlet. The player will automatically enter standby when the
power is applied, press any button on the front panel or the system remote
(see ‘remote control’ on page 14) to bring it out of standby. The blue power LED will come
on, followed by ‘SELFTEST’ then the software version, shown on the front panel display.
TAGtronic Synchronisation Link (T 2Link)
video display connection
If you use the DVD32FLR with the TAG McLaren AV32R you can also connect the output
labelled ‘sync’ on the AV32R to the input labelled T2Link in on your DVD32FLR using a high
quality analogue cable, such as our F3-10-ANA. This connection provides synchronisation
between the AV32R and DVD32FLR which, when enabled(1), further enhances the sound
quality produced by the AV32R. The DVD32FLR will also work with your AV32R without this
connection so you could activate the T2Link at a later stage.
Your DVD32FLR has three different types of video output; COMPONENT VIDEO(1), S-VIDEO(2)
and COMPOSITE VIDEO. By definition, Component video will give better quality than SVideo, which in turn will give much better quality than Composite video. You should therefore
use the highest quality video type which your video display device or video processor can
support, and connect directly from your DVD32FLR using high quality video cables (for
example our F3-10-SVID S-Video cable or our F3-10-VID Composite/Component cable).
Your DVD32FLR is shipped with a shorting plug in the T2Link (Sync) input. It is recommended
that the shorting plug be left in place if no T2Link connection to the AV32R is made, for best
sound quality.
When the optional Progressive Scan Module PSM192 is fitted it provides progressively
scanned video outputs in digital form on the DVI connector and in analog form on the BNC
component connectors. The analog progressively scanned outputs can be configured as
component YPbPr or RGB format with sync on green.
1.
2.
If you intend to use Component video for best video quality, the picture may appear in false colours until your DVD32FLR has been setup correctly
S-Video is also available on the Y (luminance) and Pb (chroma) ‘component’ connectors to achieve a higher quality S-Video connection (compared
to the standard S-Video connector)
ATTENTION:
Remove the shorting plug when using the TAGtronic Synchronisation Link,
otherwise the link will not function.
1.
Refer to the AV32R user manual for instructions on how to enable the T 2Link
13
GRR00868.01-DVD32RFLR UM
14
|
5/30/02
12:25 PM
Page 14
controlling the DVD32FLR
controlling the DVD32FLR
heading
standby
The DVD32FLR has a standby mode which can be entered by
pressing standby either on the front panel or Remote(1). The blue
power LED will be dimmed and the display switched off. Normal
operation may be resumed by pressing any button on the front
panel or Remote. You can keep the DVD32FLR in standby for long
periods of time without penalty of a high electricity bill, as the
DVD32FLR includes its own low-current standby transformer and
circuitry.
system-remote
REMOTE SELECTION
av
cd
sat
tv
mute
+
amp
vcr
ld
+
VOL
CH
--
--
menu
return
skip
remote control
dvd
+
standby
record
LFE
+
pause
r
e
w
f
f
d
ok
play
---
---
stop
LFE
eject
skip
cancel
Your DVD32FLR is supplied with a backlit system-remote(2), suitable
for controlling all the main functions of your complete home cinema,
for day to day operation. For more details see the following pages.
1
2
space
abc
4
1.
2.
The player enters standby automatically when power is applied
The system-remote is identical to the one shipped with the TAG McLaren av processor AV32R
normal
def
time
6
display
mno
+/–
8
9
tape
tuv
wxyz
subtitle
10
0
surround
THX
audio
angle
shift
tv
vcr
m1
Before using the remote for the first time, you will need to insert the
batteries supplied (be sure to insert the batteries with the polarity as
indicated). For optimum operation you should point the Remote
towards your DVD32FLR when using it. The red Remote active LED on
the front panel flashes when commands are received from the Remote.
jkl
7
cd
inserting batteries
3
5
ghi
pqrs
sat
ld
tuner
dvd
m2
md
m3
aux
dab
m4
light
system-remote
The backlit system-remote is designed to
control your complete home cinema system.
The system-remote comes preprogrammed
and ready to use for many TAG McLaren
Audio products, including the TAG
McLaren av processor AV32R, five-channel
amplifier 100x5R, three-channel amplifier
250x3R and your DVD player DVD32FLR.
Other devices which are not
preprogrammed to work with the systemremote will need to be ‘learnt’. To program
the system-remote for other devices, you
will need the original remote control for the
unit you wish to control. Details of how to
program the system-remote are included at
the end of this manual.
|
controlling the DVD32FLR
Before you can control the DVD32FLR with
the system-remote you must first select DVD
as the device to control. This is done by
pressing the dvd key in the REMOTE
SELECTION area at the top of the systemremote. The DVD32FLR will remain selected
by the Remote until another unit is chosen
via the REMOTE SELECTION area. Once the
DVD32FLR has been selected, it can be
controlled from the system-remote. A red
light on the front panel of the DVD32FLR
will flash when commands from the systemremote are received, and the ‘DVD’ key in
the REMOTE SELECTION area will light
briefly with each key press.
15
GRR00868.01-DVD32RFLR UM
16
|
5/30/02
12:25 PM
Page 16
controlling the DVD32FLR
controlling the DVD32FLR
context sensitive remote keys
The system-remote, once switched to
operate the DVD32FLR, is a Context Sensitive Remote, meaning keys operate
differently, depending on the content on
your television. What might sound initially
confusing is very intuitive. Just do what you
instinctively would do and you can control
the DVD32FLR with very few keys - a
perfect solution for operating a hiperformance home cinema in the dark.
Example: Playing a DVD requires you to
open the DVD32FLR tray, insert a DVD and
start it after selecting any special function
from the DVD disc menu. The system-remote
lets you do all this by using very few keys,
all located around the remote control’s
central cursor keys. eject opens the tray,
play starts spinning the disc until it reaches
the DVD disc menu(1). (The DVD disc menu
is the page from which you usually select
any special settings, such as audio modes,
subtitles, documentary etc.)
1.
In DVD disc menu: accepts
menu item otherwise play.
Repetitive pressing selects
DVD32R's status information
pause or in DVD disc
menu: cursor up
In setup:
goes back one step
otherwise: skip forward
return
skip
+
Search backwards or
in DVD disc menu
cursor left
r
e
w
--Skip backwards
skip
cancel
record
LFE
ok
play
stop
the menu key can call up the DVD disc menu and the DVD32FLR setup
The menu key activates the DVD disc menu, if a DVD is playing. If not playing a disc
(stopped or none loaded) the menu key will activate the DVD32FLR’s setup menu, (just as the
av menu key would activate the AV32R’s setup menu)(1).
title
+
pause
Search forward or
in DVD disc menu
cursor right
f
f
d
--LFE
eject
manual selection of the cursor keys
Opens the
DVD32R door
The transport function keys rev, ffw, stop, and pause change their
functionality to the cursor control , , and when the DVD is
within the DVD disc menu. Some DVDs do not allow the DVD32FLR
to detect the presence of the DVD disc menu automatically. In this
case pressing menu for more than two seconds will force the
DVD32FLR to switch over the transport function to the cursor control.
The keys remain in the cursor control state until you press menu
again for more than two seconds. The icon shown opposite will
appear in the top right corner of the picture when cursor control is
manually activated.
Stop or in DVD disc menu: cursor down,
or stop if held > 1 second.
Overview of the context sensitive keys:
Whilst in the DVD disc menu the cursor
keys change their usual function from rev,
ffw, stop and pause to , , and ,
allowing you to navigate through the DVD
disc menu options. Once you have selected
the item you want, simply press the
play=ok key.
If you wish to stop the DVD while in the
disc menu, simply hold down the stop key
for more than one second.
If the DVD doesn’t automatically invoke the DVD disc menu, the menu key will bring it up
|
1.
You need to stop the disc before setup can be activated
17
GRR00868.01-DVD32RFLR UM
18
|
5/30/02
12:25 PM
Page 18
the first time setup
the first time setup
stop key
If a disc is playing (and not in the DVD disc menu), stop will stop the disc, allowing you to
resume from exactly the same position when you press play. Pressing stop a second time will
clear the resume buffer, meaning play will now start the DVD/CD from its beginning. In the
DVD disc menu, stop becomes cursor down, unless it is held for more than one second.
setup wizard
Configuring for the optimum performance
...let the setup wizard guide you through a perfect setup but close the DVD32FLR’s tray first.
ATTENTION:
When the player is in setup mode many control buttons, such as open/close
are temporarily de-activated. Setup cannot be invoked when the DVD32FLR’s
tray is open or a disc is playing.
19
ATTENTION:
The DVD32FLR setup menus can only be accessed when the DVD32FLR’s tray
is closed and no disc is playing.
Depending on the software version loaded in your DVD32FLR, the player might support several
languages for the player setup menus and on screen display information. It is recommended that
you select your preferred language before commencing with the setup wizard. This is done
using set languages from the menu.
The Setup Wizard is invoked if you select first time setup. Alternatively, if you are an
experienced user, select item 3, change setup, which allows you to individually configure
each feature.
setup
1. set languages
2. first time setup
3. change setup
4. test-patterns
5. show player information
To maximise the performance from your DVD32FLR, it is essential to configure it correctly;
this will ensure it performs at its very best. Without this setup you might significantly reduce
your player’s potential.
Configuring your DVD32FLR will be very simple as the DVD32FLR includes a comprehensive
step-by-step setup wizard. After connecting the DVD player DVD32FLR to your display
device, e.g. a television, your surround sound processor and the power, simply press ‘menu’
on the system-remote. If a disc is playing you must stop it first, otherwise this key will invoke
the menu of the DVD you are playing.
|
A setup wizard for first time users. Takes the user through all of
the player’s settings, giving detailed explanations along the way.
Use
[
,
, and [
] to go back. [
] or number key to select.
] to exit setup.
After activating the setup wizard, we suggest you sit back and relax whilst the wizard takes you
step-by-step through the entire setup procedure. At the end you will not only have covered all
possible features but will also have perfectly mastered and configured them. It is time well spent!
GRR00868.01-DVD32RFLR UM
20
|
5/30/02
12:25 PM
Page 20
main functions
playing a DVD (CD)
Press the open/close(1) button or eject on the remote control and the
tray will open.
front display brightness
Pressing display will cycle through the display brightness options. You can customise the
brightness levels, including the brightness during play, by using the DVD32FLR’s menus.
When your DVD32FLR leaves standby the display will be set to the intensity level which
is determined in the display menu under ‘startup brightness’. The DVD32FLR allows you
to define a different display brightness when a disc is playing (or even to switch off the
display). The display can also be configured to automatically switch to an ‘after hold’
brightness, which can be ‘off’, after a given time interval.
Put a disc in the tray with its label facing up. Press play(2) to close
the tray and start the disc playing.
return
skip
+
r
e
w
--skip
cancel
record
LFE
+
pause
ok
play
f
f
d
---
stop
LFE
eject
After a few seconds the disc will start playing.
If the disc is not loaded correctly, is dirty or faulty, the display will
show the message ‘cannot read disc’. If this happens, open the tray
and clean the disc.
if the TAGtronic Communications Bus is connected
ATTENTION:
Your DVD32FLR is regionally coded in line with
international law. If you try to play a disc of an
incompatible zone the player will refuse to play the disc, showing
‘wrong region’.
If you have connected the TAGtronic Communications Bus between the DVD32FLR and the
TAG McLaren av processor AV32R, and the AV32R(1) is configured to synchronise the
DVD32FLR’s front display brightness to the AV32R’s, then your manual setting will be
overridden whenever the AV32R changes its front display brightness. The DVD32FLR can also
be configured to override the AV32R’s settings. If both products are configured to define the
display brightness, then the last change (either from the DVD32FLR or AV32R) will take
precedence.
For details see paragraph ‘TAGtronic Communications Bus’ later in this manual and the AV32R
user manual.
The AV32R needs to run software version v3.6 or higher
21
inserting a disc
After the setup is completed
...let’s go through the player’s controls
1.
|
1.
2.
Should the DVD32FLR be in standby, pressing the open/close key will ‘wake up’ the DVD32FLR and will then automatically, after it
carried out its diagnostics, open the tray
If the play key is pressed, when the player is in standby, the DVD32FLR will wake up from standby and will, after the initialisation is
over, start playing a disc (if one was loaded)
open/close
GRR00868.01-DVD32RFLR UM
22
|
5/30/02
12:25 PM
Page 22
playing a DVD (CD)
pause
Pressing pause while a disc is playing (and is not in the DVD’s menu(1)) will pause it and
‘pause’ will appear on the display. Press pause again or play to resume playing from the
place at which it paused.
stop
This key will act differently depending on the context in which it is used. If you press stop
with a disc playing(2), the disc will stop, storing the current disc position so that you can
continue at a later stage from the same position. If you press stop again a subsequent press
of play will start the DVD from its beginning.
accessing the DVD’s disc menu options during play
DVD disc menus vary as to how they react to key presses as they are software driven. Press
menu to enter the menu mode(3) and navigate through the options by pressing (depending on the menu displayed) followed by ok to select your choice. If a disc was in
play mode when menu was pressed, then pressing menu again, whilst in a lower menu,
resumes the disc playing from the point at which play was interrupted.
Press menu to leave the DVD disc menu without activating any function. You should hold
down stop for > 1 second if you want to stop the disc.
playing a DVD (CD)
time display
Press time while a disc is playing to cycle
through the four time display modes:
1.
2.
3.
4.
chapter (track) time elapsed
chapter (track) time remaining
title (disc) time elapsed
title (disc) time remaining
skip
The skip + / - buttons provide the ability to
move forwards (skip +) and backwards
(skip -) through the chapters (tracks) on the
disc; on each key press either moving
forward or backwards one chapter (track).
When a CD is loaded the skip keys may be
used when the disc is stopped to select a
track which can then be started by pressing
play or cued by pressing pause (cue
function).
search
1.
2.
3.
In the DVD disc menu pause will be interpreted as cursor up
In the DVD disc menu stop will be interpreted as cursor down unless held for > 1 second
Some DVDs do not allow the DVD32FLR to detect the presence of the DVD disc menu automatically. In this case pressing menu for more than
two seconds will force the switch over from the transport function keys rev, ffw, stop, and pause to the cursor control keys , , and .
The keys remain in the cursor control state until you press menu again for more than two seconds
The ffd / rew keys only operate when
the disc is playing. They provide the ability to
search forwards (search + >) and backwards
|
23
(< search -) in time, through the disc, for DVD
even at two speeds - medium and fast.
Pressing either key once will start a medium
speed search, and pressing the same key
again, a high speed search. A third press will
resume normal play. Normal play can also be
resumed at any time by pressing play.
slow motion
Slow motion is only available when playing
a DVD.
ffd / rew and skip + / - have a dual
function when used with the pause key. Press
pause to pause the picture and to enter slow
motion mode.
Pressing ffd will start slow movement
forward, pressing ffd again will move
even slower. Pressing ffd a third time will
pause the picture again.
Pressing rew after pause will activate slow
movement backwards, pressing rew again
activates pause.
GRR00868.01-DVD32RFLR UM
24
|
5/30/02
12:25 PM
Page 24
heading a DVD (CD)
playing
playing a DVD
heading
(CD)
single frame display in slow
motion mode
Pressing skip + / - causes the DVD to skip
forwards, or backwards, by one frame (if
activated from pause). Repeated presses of
skip + / - continue the skip, frame by frame.
Pressing play deactivates slow motion mode.
direct entr y whilst playing a disc
title
The number keys on the Remote can be
used to jump directly to a specific chapter
(track) on the disc. Just enter the number (1
to 99) using the Remote keys to make the
jump. If a number greater than the last
chapter (track) number is entered, then the
last chapter (track) will be played (which is
often the DVD’s menu).
The title of a DVD, if available, can be
accessed pressing the record/LFE or 0/title
key. The 0/title key will only be interpreted
as title if the DVD32FLR isn’t in any number
editing mode. A second press will resume
play from where it was interrupted by the
first press(1).
audio
skip+/skip- rew, ffd
if playing a CD
from pause
Executing a direct track entry (such as
entering the number of the next track) or
pressing skip +, skip -, rew or ffd ,
whilst a CD is paused, moves the reading
point to the selected disc position before
pausing there. Pressing play will start
playing from the reading position (disc
jockey function).
special functions
Special Functions are features which tend to
be used infrequently and hence are not
represented by a direct access key on the
DVD32FLR remote control. Pressing the
record LFE+ key for more than 2 seconds will
show the Special Functions menu. Pressing
record LFE+ briefly again will leave the
Special Functions menu, as will the activation
of any Special Function.
menu
Repeated presses of the audio key scroll
through the available (audio) options on a
DVD, assuming more than one option is
available.
menu is used to bring up the menu screen
for the DVD if a DVD is playing(1). Pressing
menu again will resume play from where it
was interrupted.
subtitle
Repeated presses of the subtitle key scroll
through the available subtitle options on a
DVD, assuming subtitles are available.
angle
1.
|
Repeated presses of the angle key scroll
through the available camera angles on a
DVD, assuming more than one camera
angle is available.
If no disc is playing menu will bring up the DVD32FLR’s setup
1.
Special Functions
>repeat..
random..
goto
The function selected, in the example above
repeat.., will also be shown in the
DVD32FLR front display, allowing you to
select special functions without a display
device or when playing a CD.
Dots after a menu item, e.g. repeat..,
indicate a related sub-menu. You can switch
between menus using the , keys and
between sub-menus using the , keys.
On some DVDs the title key will bring up the disc’s menu, depending on how the disc was authored
25
GRR00868.01-DVD32RFLR UM
26
|
5/30/02
12:25 PM
Page 26
playing a DVD (CD)
special function repeat...
This function allows repeating an interval
(repeat selection), a title (repeat title) or the
whole disc (repeat all).
playing a DVD (CD)
repeat selection...
repeat title
Move the cursor to repeat selection…, then
press to select the sub-menu which
allows the start and the end points of the
selection to be specified.
>select ‘start’ of the selection
select ‘end’ of the selection
>repeat selection…
repeat title
repeat all
repeat off
Whilst playing mark the beginning of the
selection by placing the cursor at select
‘start’ of the selection and press ok. Wait
until the disc has reached the desired end
point, then mark the end by choosing select
‘end’ of the selection and ok. The interval
marked with start and stop will now be
repeated until repeat selection… is turned
off using repeat off.
special function goto
Select this special function if you want to
repeat the current title when playing a DVD
or the current track when playing a CD.
The title/track will be repeated until repeat
selection… is turned off using repeat off.
Move the cursor to repeat.. using the the
, keys, then branch to the following
sub-menus, pressing :
|
Selecting goto while playing a DVD
activates go to title: _ _. Type in the title
you want to go to using the numeric keys of
the remote control. Pressing ok or waiting
for a few seconds will start the selected
title(1), if available.
repeat all
Select this special function if you want to
repeat the whole disc until deactivated by
selecting repeat off.
special function random..
A CD only includes a single title, therefore
goto is identical to ‘direct entry whilst
playing a disc’, as described earlier in this
manual.
(only for CD)
To replay the tracks on a CD in random
order select random.. , then press to
select random play, followed by ok. The
random indicator in the front display will
light up (only visible on the DVD32FLR front
display as a CD will switch off video).
random play is deactivated pressing stop
twice or selecting random.., followed by
random play off.
1.
Please do not confuse titles with chapters. Many DVDs have only 1 title or use the title sequence for advertising, copyright or trademark
statements
27
GRR00868.01-DVD32RFLR UM
28
|
5/30/02
12:25 PM
Page 28
TAGtronic Communications Bus
TAGtronic Communications Bus
The DVD32FLR features the Enhanced TAGtronic Communications Bus. This allows TAG
McLaren Audio products to exchange information and work seamlessly together to form an
effective, fully integrated system. The DVD32FLR(1) offers at present four configurable features:
•
•
•
•
relay remote commands
synchronise display brightness
show AV32R status
send standby commands to products connected to the Bus
relay remote commands
Your DVD32FLR has the capability to relay remote control commands received by its IR
receiver onto the Enhanced TAGtronic Communications Bus. This is ideal when some of your
equipment is in a location that does not permit direct line of sight from the Remote and also
opens up the possibility of multi-room control.
TAGtronic Communications Bus
show AV32R status
If your video device is directly connected to
your DVD32FLR (or routed through the AV32R
without using the output + on-screen display)
the Enhanced TAGtronic Communications Bus
can be used to convey on-screen information
from the AV32R to the DVD32FLR. When this
feature is enabled(1), on-screen information
from the AV32R is overlaid onto the video
signal in the DVD32FLR. The AV32R transmits
status messages (press ok with the AV remote
control), volume and surround information.
It does not send the setup screens of the
AV32R.
|
relay standby commands
The DVD32FLR can be configured to relay
standby commands onto the TAGtronic Bus.
This provides a means of putting all
products into standby using a single press
of standby. Similarly, all products can be
brought out of standby using the same key.
If the DVD32FLR is configured for autostandby(2), then this too will cause a
standby command to be relayed on to the
bus.
synchronised display brightness
Rather than having to individually control the display brightness of each piece of your TAG
McLaren Audio system, it is possible to synchronise their brightness to match the display on
your DVD32FLR. This not only gives single point control of display brightness, but also allows
display appearance to be consistent across all products.
1.
2.
1.
This requires DVD32FLR software v3.6 or higher, AV32R software v3.6 or higher and 100x5R/250x3R v3.5 or higher
This requires AV32R software version 3.6 or higher
Auto-standby puts the DVD32FLR into standby if it ‘idles’ for a user selectable time. See ‘first time setup’ in the DVD32FLR setup menu
for details (on-screen)
29
GRR00868.01-DVD32RFLR UM
30
|
5/30/02
12:25 PM
Page 30
test patterns
test patterns
test patterns
brightness
|
(black level)
The DVD32FLR has a in-built test pattern generator to assist you in adjusting your picture, PAL
or NTSC, for best performance.
Black is the absence of light, and this is the first parameter you should adjust. Use the display
device’s black level control which some manufacturers call, quite inappropriately, brightness.
Many display devices are wrongly adjusted when leaving the factory because they need to
overcome the bright lighting in the show rooms from which they are usually selected.
However, once installed at home, the viewing conditions vary considerably from those in the
show rooms, hence display devices need re-calibrating.
The DVD32FLR includes two test patterns, PLUGE 1 and PLUGE 2, which will allow you to
adjust the black level until black becomes ‘really’ black (and not just a dark grey). If you set
the black level too high then a scene filmed at night looks like a scene filmed in the afternoon
(as black will be replaced by dark grey). However, if the black level is set too low then the
picture will lose detail in dark scenes.
Most important for a perfect picture is the absence of surrounding light in the room,
particularly light which can hit the screen. An often suggested low brightness light, placed
behind the screen (hence preventing it from reflecting in the screen) should only be used if
you want to watch tv leisurely for a long period of time. For best movie presentation, keep
the surrounding light intensity as low as possible.
Both test-patterns include a signal, created by hardware circuitry inside your DVD32FLR(1),
which produces a level which is electrically below black, i.e. invisible if the black level of the
display device is correctly adjusted. This signal is called PLUGE (Picture Line Up Generating
Equipment). Both test patterns also include, to the right of PLUGE, separated by a black
zone, a dark grey bar (electrically above black, by exactly the same amount as PLUGE is
below).
It is not just the absence of surrounding light which can improve the performance of your
display device, it is also the colour of the walls, as these will also reflect light, emitted (or
reflected, when using a front projector) from your screen, ‘bouncing’ it back on to the screen
to ‘wash-out’ the picture. The perfect home cinema would be pitch black with no added light
in the room! Not the most pleasant of rooms, but highly effective. The result would be great
picture quality, assuming the display device is up to the task and adjusted properly. A more
practical solution is walls painted in darker colours without a reflective surface.
If the black level is correctly adjusted then PLUGE is no longer visible but the dark grey bar
still (just) is.
PLUGE 2 contains, in addition to PLUGE 1, a brilliant white field to check if the black level is
affected by high picture contrast.
1.
The DVD32FLR will not display the blacker than black test signals recorded on some test discs as it will remove those ‘out of spec’ signal
levels. Some video processors will not display PLUGE at all
31
GRR00868.01-DVD32RFLR UM
32
|
5/30/02
12:25 PM
Page 32
test patterns
test patterns
pluge 1
pluge 2
The PLUGE 1 signal will look like this with black level (brightness) set too high.
black
PLUGE
black
dark
grey
Turn the brightness(1) up until you can clearly see the PLUGE bar. Then turn the brightness
down slowly until the PLUGE bar just disappears in the dark background(2). Don't turn the
brightness down too much, you should always see the grey bar to the right of the PLUGE
bar(3).
1.
2.
3.
The PLUGE 2 signal will look like this with the black level (brightness) set too high.
If you intend to play both PAL and NTSC then you need to make sure you have set the ‘NTSC black level’ (->setup->change setup->video>black level) correctly before you carry out this adjustment as both are interrelated. This will make sure that the black level is maintained
when switching between PAL and NTSC
Black is the absence of light. You will only achieve a ‘deep’ black if you prevent additional light from hitting your screen
Some projectors, for example LCD and DLP types, cannot achieve real black (the absence of light) because of their internal construction.
You can easily test this by standing between the projector and the screen when displaying the PLUGE 1 test pattern. If you can see your
shadow on the black background (assuming there is total darkness in the room) then the projector still outputs light whilst trying to
produce black. This is characteristic for these projector types and not a fault
PLUGE
dark
grey
white
PLUGE 1 has low average intensity, whilst PLUGE 2 includes a white bar. Adjust the black
level using both test-patterns (PLUGE 1 and PLUGE 2), and if the settings differ use the
average of both. Only the very best display devices are able to maintain a constant black
level independent of the picture content. You might need to select an average of both
calibrations.
|
33
GRR00868.01-DVD32RFLR UM
34
|
5/30/02
12:25 PM
Page 34
test patterns
pluge 2
The cross hatch included in the DVD32FLR is
a multi-purpose test-pattern which will allow
adjustment of contrast and sharpness.
cross hatch shown on a 4:3 display device
The test pattern includes a series of black
lines on a white background. Adjust the
contrast, after having set the black level
correctly, so that white becomes solid
without blurring into the black lines and
without turning the black lines grey.
test patterns
colour
Cross-check your setting by turning back to
the PLUGE 2 test-pattern and check that the
bright white field (PLUGE 2) isn't blurred
into the black background. Some display
devices allow a very high contrast setting
without blurring, others will always blur.
The colour test-pattern allows you to adjust Colour (and Tint in NTSC)(1). Adjust those two
parameters until yellow looks yellow (without including too much red) and Red is not oversaturated. Your might use filters, available from specialist suppliers, which will allow you to
more objectively adjust colour.
On some display devices the black lines
will have a second or even multiple lines
beside them, usually shown in a light grey.
They can be caused by many reasons, for
example poor cables between the DVD
player and the display device or - usually
only available in NTSC - a wrongly
adjusted sharpness control. Use good
cables, such as our S-Video or digital cable
(for Composite or Component) and turn the
sharpness right down to remove these
artifacts. Frequently you might find that you
cannot remove those extra lines completely.
black and white representation of the colour test pattern
1.
CRT projectors usually allow colour, (tint) and the individual colours red, blue and green
|
35
GRR00868.01-DVD32RFLR UM
36
|
5/30/02
12:25 PM
Page 36
test patterns
aspect ratio
future expansion
|
convergence
Many display devices form white by generating a mixture of the primary colours red, green
and blue which our eyes add to white. If these colours aren’t hitting exactly the same spot
they won’t form perfect white. This is called imperfect ‘convergence’.
Convergence of some display devices, primarily projectors, can be user adjusted, others will
need a service engineer or aren’t adjustable at all. The quality of the convergence can be
checked using any of the Aspect Ratio test-patterns as they show white lines on a black
background.
If the white lines aren’t white but show the prime colours, shifted against each other, then the
convergence need adjustment.
These test patterns output a cross hatch of white lines on a black background, including
several perfect circles. If the geometry of your display device or the output format of the
DVD32FLR aren’t correctly set these circles will look distorted. Make sure your display device
is switched to the correct aspect ratio and you have set the DVD32FLR correctly (see setup>change set up->video->aspect ratio)(1).
On a 4:3 standard tv the cross hatches 4:3 and 16:9 letterbox should look undistorted.
On a 16:9 display device all 3 test patterns should look correct, assuming the correct zoom
mode is selected (e.g. none, letterbox, anamorphic).
1.
A projector usually needs manual switching between the three aspect ratios
37
GRR00868.01-DVD32RFLR UM
38
|
5/30/02
12:25 PM
Page 38
future expansion
progressive scan module PSM192
Your DVD32FLR may optionally be fitted
with a video processing board, the
Progressive Scan Module PSM192.
PSM192 generates analog and digital
progressively scanned video outputs from
interlaced video inputs - that applies to the
video signal from DVDs played by the
DVD32FLR, of course, but the PSM192 also
has external inputs to allow progressively
scanned video output to be generated from
all your composite and S-Video sources.
The PSM192 is a de-interlacer, not just a
line doubler, by which we mean it examines
the incoming video fields and determines
which fields can be recombined to produce
an output with maximum vertical resolution.
At the heart of the PSM192 is the Silicon
Image Sil 504 de-interlacer, a highly
sophisticated digital video processor,
carrying out 6 billion operations per
second. The Sil 504 uses advanced motion
adaptive and source adaptive techniques to
create an output image with maximum
vertical resolution without introducing
motion and interlacing artefacts.
future expansion
|
PSM192 outputs
The PSM192 has a DVI 1.0 digital video output and a set of component analog outputs. The
DVI output has its own connector on the rear panel of your player. The analog outputs are
available on the player’s BNC component connections. The normal interlaced component
video signals remain available on the RCA component connections.
configuring the PSM192 outputs
The outputs may be configured as component (YPbPr) or RGsB (i.e. RGB with sync on green).
The output mode can be changed only when the player does not have a disc loaded. To
change output mode, first remove any disc that is loaded, close the tray, and wait for the “no
disc” message to appear. To select component press the number keys corresponding to the
letters COM, i.e. 2, 6, 6 on the system remote. To select RGB press the number keys
corresponding to the letters RGB, i.e. 7, 4, 2.
PSM192 inputs
The PSM192, installed in a DVD32FLR, provides external composite and S-Video inputs via
the upper composite and S-Video connectors on the player‘s rear panel. It also has an
internal connection to the DVD video output. For best quality the DVD32FLR should be
configured for component output.
39
GRR00868.01-DVD32RFLR UM
40
|
5/30/02
12:26 PM
Page 40
future expansion
future expansion
selecting PSM192 inputs
advanced control with AV32R (1)
To select the external composite video input to PSM192, press shift then 1 on the system
remote. The front panel display will show “PSM192” on the large display area and
“composite” on the lower dot matrix area when the external composite video input is
selected, the “composite” text will remain on the dot matrix area of the display as long as the
composite input is selected.
The PSM192 has many advanced options which
can be controlled via a TAGtronic connection
between DVD32FLR and AV32R. These include
individual black level (brightness), white level
(contrast), colour and hue (NTSC only) picture
settings for each video source. The picture
settings may be applied automatically whenever
the associated source is selected on the AV32R.
The AV32R can also control the PSM192 to
automatically select the PSM192 external
composite or S-Video input when composite or
S-video sources are selected on AV32R, two
connections between the AV32R composite and
S-video outputs and the PSM192 composite and
S-video inputs then allow you to obtain
progressively scanned output for all your video
sources.
To select the external S-Video video input to PSM192, press shift then 2 on the system
remote. The front panel display will show “PSM192” on the large display area and “SVideo” on the lower dot matrix area, the “S- Video” text will remain on the dot matrix area
of the display as long as the S-Video input is selected.
To select the internal DVD connection press shift then 3 on the system remote. The front panel
display reverts to its normal operation.
4:3 mode for 16:9 displays
The PSM192 has a special mode to display 4:3 video signals on a 16:9 widescreen display.
If your display is configured as 16:9 in the player menus, you can use the PSM192 to add
black bars at the sides of 4:3 images so that they are centred within your 16:9 display. This
is controlled by pressing shift then display on the system remote, press them once to turn on
the black bars for 4:3 input signals, press again to remove them for 16:9 input signals. The
external composite and S-Video inputs have black bars active by default (i.e. they expect a
4:3 input by default), press shift then display to turn the bars off if the input signal is 16:9.
software upgrades distributed via the internet
One of the most flexible aspects of DVD32FLR is that the software is stored in reprogrammable memory. The software can be upgraded using a PC connected via the
TAGtronic Communication Bus.
Details of our future upgrades will be published on our website, www.tagmclaren.com, and
the updates themselves will be downloadable for user installation via a PC.
1.
requires AV32R software version v3.7 or later
|
41
GRR00868.01-DVD32RFLR UM
42
|
5/30/02
12:26 PM
Page 42
running in and warming up
TAG McLaren Audio equipment is designed
to give optimum performance for many
years.
running in
Just like a high-quality car, the performance
of DVD32FLR will improve during the first
few weeks of operation. The electronic
components will then have reached and
settled down to near-perfect specification.
warming up
Every time you switch on your DVD32FLR,
the performance will improve until the
components reach their optimum operating
temperature.
care and maintenance
fuses
There is a fuse in the power socket on the
back of your DVD32FLR. To change the
fuse, unplug the power cable and pull out
the fuse carrier drawer.
The fuse carrier contains a spare fuse. This
is the first one you see when you open the
carrier. It is essential that you use a fuse of
the correct type and rating.
There are no other user-serviceable parts
inside your DVD32FLR.
|
43
cleaning
In order to maintain the appearance of your
DVD32FLR you can clean it as follows:
before cleaning always disconnect
DVD32FLR from the AC supply.
any grease or dirt on the case may be
removed with a dry soft lint-free cloth. Do
not use any liquids, solvents or abrasives.
take great care not to get any liquid inside
the case. If this happens you should have
your DVD32FLR serviced.
ser vice
The only servicing you should carry out yourself is described in the previous section. All other
servicing should only be carried out by our authorised service agents.
If service is required, please contact your authorised TAG McLaren Audio retailer or arrange it
directly via our website: www.tagmclaren.com. If your DVD32FLR is still under guarantee, please
refer to the guarantee card which gives you details on how to claim against the guarantee.
Please keep the original packaging and use it whenever your DVD32FLR is transported. A
detailed packing instruction is available from www.tagmclaren.com or can be requested from
our [email protected]. Shipping without the appropriate transit protection will
invalidate your warranty.
GRR00868.01-DVD32RFLR UM
44
|
5/30/02
12:26 PM
Page 44
programming the system remote
programming the system remote
Programming the system-remote control
|
learning new commands
REMOTE SELECTION
The system-remote comes preprogrammed and ready to use for the
following TAG McLaren Audio products:
To ‘learn’ new commands:
1. Select the device you wish to program by pressing the appropriate
REMOTE SELECTION key on the system-remote.
2. Place the system-remote and the remote of the unit you want to
control on a flat surface. Line up the remote controls head to head,
about 5 to 10cm (2 to 3in) apart.
3. Simultaneously press and hold the REMOTE SELECTION key
selected in step 1 and the ok key for about four seconds. The
learning status LED will turn yellow to indicate that the Remote is
now in learning mode(1).
4. Press and release the key on the system-remote which you want to
program(2). The status LED will flash yellow.
5. Press and hold for approximately three seconds the key on the
original remote control which corresponds to the function you want
the system-remote to learn. The status LED will flash shortly in
green if the code is correctly understood. If it flashes red then you
need to restart with step 4 as the code was not understood by the
remote.
6. Release the key on the original remote and re-press and hold it for
approximately a further three seconds. If the learning process has
been successful, the status LED will flash green twice, then return to
yellow. If the LED flashes red you need to restart with step 4 as the
code could not correctly be interpreted by the remote.
• audio-visual processor theatre AV32R
• five-channel amplifier 100x5R and three-channel amplifier 250x3R
• dvd player DVD32FLR and DVD32R
Other devices which are not pre-programmed to work with the systemremote will need to be ‘learnt’. To program the system-remote for other
devices, you will need the original remote control for the unit you wish
to control.
programming the system-remote
Some devices (other than those listed above) may partially work
with the system-remote as supplied. To check this, select the desired
unit using one of the REMOTE SELECTION keys and try pressing a
few of the keys. If the device responds as expected, you may only
need to edit the set-up for that unit by programming one or two
keys, as explained on the following pages, otherwise you will need
to program the Remote for all commands.
REMOTE SELECTION
av
cd
dvd
amp
sat
tv
vcr
ld
av
cd
dvd
amp
sat
tv
vcr
ld
return
skip
+
record
LFE
+
pause
r
e
w
f
f
d
ok
play
---
---
stop
LFE
eject
skip
cancel
REMOTE SELECTION
av
cd
dvd
amp
sat
tv
vcr
ld
Repeat steps 4 through 6 to program further keys.
1.
2.
The Remote will stay in learning mode for 20 seconds, after which it will return to normal operation mode if there have been no further
key presses
The macro keys m1 to m4 can be programmed with new commands, but if they are used for the macro feature (see ‘programming macro
features’) the new command will be over-ridden
45
GRR00868.01-DVD32RFLR UM
46
|
5/30/02
12:26 PM
Page 46
programming the system remote
learning new commands
programming the system remote
7. Once you have finished teaching the system-remote all the
desired commands from the original remote, you must store
them by simultaneously pressing the appropriate REMOTE
SELECTION key and the ok key for about four seconds.
When using the macro functions, it can take up to 10 seconds to
transmit a 10-key sequence. You should keep the system-remote
pointing towards the appropriate unit while the commands are being
transmitted to ensure they are received correctly.
Once you have stored the ‘learnt’ functions, test the keys you have
taught to make sure that they are programmed correctly.
If the system-remote has problems learning from the original
remote(1),you should:
• check that the original remote has fresh batteries
• avoid fluorescent lights and strong sunlight, which may interfere
with the learning process
• increase or decrease the distance between the two remote
controls (within a range of 2 to 15cm / 1 to 6in)
programming a macro function
To program in a macro function:
1. Simultaneously press the REMOTE SELECTION key for the set of
macros you wish to program (av or sat) and the mute key. The
learning status LED and the REMOTE SELECTION key will both
turn red to indicate that the Remote is in macro learning mode(1).
2. Press one of the macro keys m1 to m4 or standby to which you
wish to allocate the functions.
3. Press the keys for the commands (up to 10) you want stored in
the macro key(2).
4. Press the CH + (or CH -) key to store your selections. The
learning status LED and the REMOTE SELECTION key will both
flash red twice, then go out.
5. To use the macro, simply press the macro button.
programming macro features
tv
vcr
cd
ld
m1
sat
tuner
dvd
m2
md
m3
aux
dab
m4
--
--
light
1.
1.
47
Macros can only be programmed with either av or sat selected!
Macros programmed under av will be recalled, pressing m1, m2, ...
m4 or standby, when you use av, cd, dvd, or amp. Macros
programmed under sat will be recalled when using sat, tv, vcr and ld.
(cont’d)
The keys m1 to m4 and standby can act as macro keys. These can
be programmed to store up to 10 commands to send together with
one key press. Any key press function (except mute, CH + and CH –)
can be programmed into the macro keys. There are 2 groups of
macros, one used if the av, cd, dvd or amp remote selection keys
have been pressed, the other for the sat, tv, vcr or ld keys; i.e. there
are a total of 10 macros available.
|
Some remote controls operate at non-standard infra-red, UHF or ultrasonic frequencies, and cannot be learnt; this is sometimes also
caused by unusual or complex functions which are not universally recognised. If you continue to experience problems programming the
system-remote, please consult your retailer for advice
2.
REMOTE SELECTION
av
cd
dvd
amp
sat
tv
vcr
ld
mute
tv
vcr
sat
tuner
aux
cd
ld
dvd
md
dab
m1
m2
m3
m4
light
+
+
VOL
CH
--
--
The Remote will stay in macro learning mode for 20 seconds, after which it will return to normal operation mode if there have been no
further key presses
You can select functions to control another unit as part of a macro by first pressing the appropriate REMOTE SELECTION key before
pressing the keys for the desired functions. This REMOTE SELECTION key press counts as one of the 10 presses you may store in the
macro key
--
--
GRR00868.01-DVD32RFLR UM
48
|
5/30/02
12:26 PM
Page 48
programming the system remote
programming the system remote
erasing single commands
To erase a learnt command from a key:
|
erasing all commands for one device
To erase all learnt commands for one device:
REMOTE SELECTION
av
cd
dvd
sat
tv
vcr
1. Simultaneously press the REMOTE SELECTION key for the appropriate
device and the ok key until the status LED turns yellow and the chosen
+
REMOTE SELECTION key is lit.
2. Press the key for the function which you wish to erase. The REMOTE
--SELECTION LED will turn off and the status LED will flash continuously
yellow.
3. Press the light key. The status LED will flash green twice then turn a constant
yellow colour. The chosen REMOTE SELECTION key LED will turn back on.
return
skip
amp
ld
record
LFE
+
pause
r
e
w
ok
play
stop
f
f
d
--LFE
eject
skip
cancel
light
--
1. Press the REMOTE SELECTION key for the appropriate device and the ok key
simultaneously until the status LED turns yellow and chosen REMOTE SELECTION key is lit.
2. Press and hold the light key. The status LED will flash red five times and the selected
devices LED will turn off. Release the light key; the status LED will flash green twice then
turn a steady yellow and the selected device key LED will turn on again.
-- 3. To finish, press and hold the REMOTE SELECTION and ok keys simultaneously. The
REMOTE SELECTION key LED will go out and the status LED will flash yellow twice then
go out.
erasing all commands for all devices
Repeat steps 2 and 3 to erase any other learnt commands for the selected
device.
To erase all learnt commands for ALL devices:
4. To finish, simultaneously press and hold the REMOTE SELECTION and ok
keys. The REMOTE SELECTION key LED will go out and the status LED will
flash yellow twice then go out.
1. Press and hold the tv REMOTE SELECTION and light keys simultaneously. The status LED
will flash red 10 times, then green once, yellow once and turn off(1).
erasing a macro function
remote control warning
To erase a macro function:
1. Simultaneously press the appropriate REMOTE SELECTION key (av
or sat) and the mute key until the learning status LED turns red.
2. Press the macro key (m1 to m4 or standby) you wish to erase.
3. Press the CH + (or CH -) key. The learning status LED will flash red
twice then go off.
You will, from time to time, have to replace the batteries in your system-remote. During the
battery changing operation the Remote will remember your programmed commands, but you
should avoid pressing any key on the Remote during battery changing as you may lose all
your stored settings.
1.
Caution – this will erase every function that you have programmed into the Remote
49
GRR00868.01-DVD32RFLR UM
50
|
5/30/02
12:26 PM
Page 50
technical data
technical data
This section is for those of you who really want to know the ‘insides’ of your DVD32FLR. You
will not miss out on any of the functions or performance of your DVD32FLR if you choose not
to read any further.
laser type
playable disc types
dual semiconductor laser
Linear PCM
Dolby Digital
DTS
sample rates
44.1, 48.0 and 96.0 kHz
word lengths
16, 20 and 24 bit
IEC958 output level
TOSLINKTM output
level
s-video and composite video outputs
supported output
television standards
DVD-Video
CD
CD-R
digital audio outputs
supported output
formats
video outputs
PAL-B/D/G/H/I
PAL M
NTSC-M
output levels
composite
S-video
component video
outputs
1 V p-p (75 ohm load, negative sync.)
Y-signal:
C-signal:
1 Vp-p (75 ohm load, negative sync.)
PAL: 300 mVp-p (75 ohm load)
NTSC:286 mVp-p (75 ohm load)
Y-signal:
Pb(B-Y)-signal:
Pr(R-Y)-signal:
1 Vp-p (75 ohm load, 300 mV sync.)
700 mVp-p (75 ohm load)
700 mVp-p (75 ohm load)
0.5 V p-p into 75 ohm load
power requirements
100/115/230 V AC 50/60 Hz by model variant
-18 dBm (wavelength 660 nm)
power consumption
operating:
standby:
35 w (typical)
less than 5 w (typical)
|
51
GRR00868.01-DVD32RFLR UM
52
|
5/30/02
12:26 PM
technical data
dimensions
weight
Page 52
acknowledgements
445 x 320 x 111 mm
9 kg (approx.)
operating
temperature
5 – 35 ˚C
operating humidity
5 – 90 %
storage temperature
-5 – 55 ˚C
|
This product incorporates copyright protection technology that is protected by method claims
of certain U.S. patents and other intellectual property rights owned by Macrovision
Corporation and other rights owners. Use of this copyright protection technology must be
authorised by Macrovision Corporation, and is intended for home and other limited viewing
uses only unless otherwise authorised by Macrovision Corporation. Reverse engineering or
disassembly is prohibited.
53