1
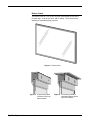
Rigid Rear Projection Screens O W N E R ’ S M A N U A L To the Owner Installation Instructions Frame Types Maintenance RP-1005 T O T H E I N S TA L L E R : B E S U R E T O L E AV E T H I S M A N U A L W I T H T H E O W N E R . Printed in U.S.A. ©2004 - 2005 Stewart Filmscreen Corporation Stewart Filmscreen reserves the right to make changes to the product specified in this document. From time to time, this document is updated. Current versions of documentation are posted on the Stewart Filmscreen website at www.stewartfilm.com. Rigid Rear Projection Screens O W N E R ’ S M A N U A L Contents To the Owner . . . . . . . . . . . . . . . . . . . . . . . . . . . . . . . . . . . . . . 2 Preparing for Installation . . . . . . . . . . . . . . . . . . . . . . . . . . . . . 2 Installation . . . . . . . . . . . . . . . . . . . . . . . . . . . . . . . . . . . . . . . . 3 Frame Types . . . . . . . . . . . . . . . . . . . . . . . . . . . . . . . . . . . . . . .4 Screen Care and Cleaning . . . . . . . . . . . . . . . . . . . . . . . . . . . 7 Product Warranty . . . . . . . . . . . . . . . . . . . . . . . . . . . . . . . . . . .8 Rigid Rear Projection Screens: Owner’s Manual 1 TO THE OWNER Congratulations on your purchase of the finest optical viewing screen available anywhere in the world! To create Rigid Rear Projection Screens, Stewart Filmscreen fuses advanced optical coatings to various glass and plastic substrates. This provides optimized image fidelity for any viewing environment. Please take a moment to review this manual; it will help ensure you many years of trouble-free service from your new Stewart Filmscreen product. PREPARING FOR INSTALLATION Before proceeding with the installation of this screen, take time to thoroughly read and understand these installation and operation instructions. Preparation Specifications regarding the individual screen dimensions, weight, and frame type are provided by the factory when the unit is ordered. Before beginning the installation: Check the specifications for the frame type. Ensure that the aperture is the right size. (Refer to the section on frame types, starting on page 4.) Ensure that the area is prepared. In general, the screen should be installed after electricians, painters, carpet-layers, and other craftspeople have completed their work. This minimizes the risk of damage to the optical surface. Especially with large screens, ensure there is adequate access to the installation area (e.g., door heights, width of hallways, elevator capacity). Check the size and weight of the screen to be installed so that you can plan for the number of people and equipment required for the installation. You will need: 2 Clean gloves for handling the screen Suction cups of the type typically used by glass and window installers A level Appropriate fasteners (for installations that require them) Appropriate tools for any fasteners used Sufficient ladders, if required, for the personnel supporting the screen during the installation. A fork lift for very large or heavy screens Stewart Filmscreen Corporation INSTALLATION Professional mounting techniques should be used. Stewart Filmscreen Corporation cannot be liable for substandard or faulty installations. General notes The screen and frame are typically shipped as one complete unit. In some instances, knocked-down, pre-drilled frame components and hardware are shipped ready for assembly. In some cases, no frame is supplied, as the screen is built in as part of the installation. Coated side One side of the screen has a special optical coating. Whenever possible, the screen should be installed with the coated side toward the audience. The picture is more pleasing because there is no imaging reflection of lighted objects in the audience. Exceptions are: Where the screen environment is uncontrolled and potential abuse of the coating is a concern. Screen marking pens are used during projection. Unpacking and handling Keep the screen protected until the environment is clean and there is no danger of damage to the optical coating. Open the crate as indicated, as this will expose the non-coated side of the screen. If the screen is already attached to the frame, do not lift the screen by the upper frame member, as the frame may pull off the screen, damaging the coating. Use suction cups to remove and install the screen. Use the suction cups only on the non-coated side of the screen. Keep hands and tools off the optical coating. Use cotton gloves when installing the screen. Installing the screen in the aperture In general, the installation of a rigid rear projection screen is similar to the process used when installing a window in a house. Use care when handling the screen, especially the coated side, as mentioned above. Once the screen is in place, make sure that it is level and plumb. Use shims as needed. Rigid Rear Projection Screens: Owner’s Manual 3 FRAME TYPES P1000, P1500, and P2000 The P1000 frame requires a wall opening 2 5/8” (6.668 cm) larger in both height and width than the screen image size. Figure 1. P1000 The P1500 frame requires a wall opening 3.5” (8.89 cm) larger in both height and width than the screen image. Figure 2. P1500 The P2000 frame requires a wall opening 4” (10.16 cm) larger In both height and width than the screen image. Figure 3. P2000 4 Stewart Filmscreen Corporation Deluxe frame The Deluxe frame is 3 1/4” (8.255 cm) wide, with mitered corners and a beveled edge. It can be set into a wall or cabinet. There are also freestanding or suspended (flying) systems. Figure 4. Deluxe frame Figure 5. Cross section detail of Deluxe frame; top frame member Rigid Rear Projection Screens: Owner’s Manual Figure 6. Cross section detail of suspended Deluxe frame; top frame member 5 Wedge frame The wedge frame is used in videowalls, simulators, and command and control centers. The wedge profile tapers down on the image side to a knife edge where it contacts the screen. Multiple wedge frames can be installed in a containment frame. Figure 7. Wedge frame Figure 8. Detail of two Wedge frames in a partial containment frame Quick-Stall The Quick-Stall frame allows for easy installation of a rigid rear screen by eliminating the need for a finish trim. The Quick-Stall frame covers unfinished molding with a built-in 5/8" (1.6 cm) trim. The Quick-Stall frame requires a wall opening 5” (12.7 cm) larger in both height and width than the screen image. Figure 9. Quick-Stall 6 Stewart Filmscreen Corporation SCREEN CARE AND CLEANING With reasonable care, you may expect many years of trouble-free use of your Stewart projection screen. We encourage you to keep your screen clean. Avoid getting any foreign material on the screen, as cleaning may prove very difficult. It may not be possible to remove scratches, paint, ink, etc. General maintenance The uncoated side of the screen requires only the care normally given to glass or acrylic surfaces. Pay special attention to these instructions when cleaning the surface with the optical coating. Use a draftsman-style brush to lightly whisk away any loose dirt or dust particles. (This type of brush is usually available at office supply stores.) Stewart Filmscreen has an optional screen cleaning kit that contains the proper type of brush. Contact your dealer if you would like to obtain this cleaning kit. For tougher spots, use a solution of mild detergent and water. Rub lightly using a sponge or clean cotton cloth. Do not use aggressive or excessive pressure as the optical characteristics could be degraded. Blot with a damp sponge to absorb excess water. Any residual water marks or streaks will evaporate in a few minutes. Do not use any other cleaning materials on the screen, especially chemicals, solvents, and abrasive cleansers. Contact the factory if you have questions about removing difficult spots. Replacement parts and service No user-serviceable parts are contained within the unit. Contact your dealer or the factory if you require part replacement or service. Rigid Rear Projection Screens: Owner’s Manual 7 PRODUCT WARRANTY This warranty covers defects in materials and workmanship for a period of one (1) year from the date of installation, not to exceed fifteen (15) months from the date of shipment, provided this product is installed in a normal environment and maintained according to written instructions in the product Owner’s Manual. Stewart Filmscreen warrants against loss of usefulness, discoloration or deterioration of optical quality within the warranty period as a result of manufacturing or material defects. A factory authorized returned screen arriving prepaid to our facility for inspection and proved defective due to an inherent manufacturing fault will be repaired or replaced by Stewart Filmscreen Corp. This warranty expressly does not cover any costs of removal, installation, framing, or other incidental costs to replacing the screen or returning it to the manufacturer. Should you encounter a perceived product fault or problem, contact your dealer regarding application of this warranty. 8 Stewart Filmscreen Corporation MAINTENANCE NOTES www.stewartfilm.com 800-762-4999 Fax 310-326-6870