1
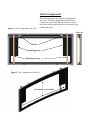
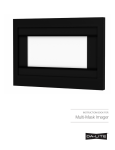
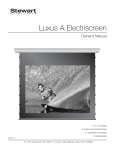
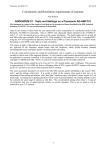
Stewart Filmscreen Corporation
Cine V
Assembly Instructions.
CineV
Owner’s Manual
Contents
To the Owner…………………………………………….1
Preparing the Installation………………………………..2
Frame Assembly and Wall Mount………………………3
Attaching the Screen to the Frame………………………4
Operating the Cine V…………………………………….5
Screen Care and Cleaning……………………………….6
Product Warranty………………………………………..7
Troubleshooting…………………………………………8
TO THE OWNER
Congratulations on your purchase of one of the finest
optical viewing screens available anywhere in the world.
Please take a moment to review this manual, it will help
ensure you many years of trouble-free service from your
new Stewart Filmscreen product.
About the CineV
Your CineV Features a 2.35:1 aspect ratio to allow full
enjoyment of images in this dramatic, super-widescreen
format produced by a projector with an anamorphic lens.
To accommodate other aspect ratios, the CineV feature a
masking system. The screen maintains a constant vertical
height, while the electronically controlled masking panels
drop down at the left and the right of the screen to create a
perfect HDTV image area.
A side trim cover is available as an option.
The frame acts as a projection overscan border. The VeLux
finish is designed to absorb any light spill.
VICS
The CineV uses the Stewart Filmscreen VICS ( Video
Interface Control System) for operation of the masking
motors or desired aspect ratios.
VICS (220 VOLTS
VICS 110 VOLTS
Preparing the Installation
Preparation
Specifications regarding the individual screen dimensions,
weight, mounting type, and controls are provided by the
factory when the unit is ordered. Before beginning the
installation:
♦
Check the specifications for the frame and the
mounting to be used.
♦
Prepare for electrical access
♦
Check the size and weight of the screen to be installed
so that you can plan for the number of people required
for the mounting procedure. You need at least two
people to mount the frame and attach the screen.
You will need:
♦
Gloves, for handling the screen.
♦
Ladders for the personnel supporting the screen during
the mounting process, as needed.
♦
A level.
♦
Fasteners appropriate for the surface on which the
screen is being mounted.
♦
Drills for making holes to attach brackets to the
mounting surface, as needed.
♦
Tools for tightening fasteners, including 7/16” and ½”
hex head wrench.
Note: Bolts and other fasteners for the screen are standard
gauge and sizes used in the U.S., regardless of where
they will be installed. For this reason, the sizes are
expressed in inches rather than metric measurements.
Unpacking
Be sure to unpack carefully in a clean area. Use
special care when handling the screen so that it does
not become soiled or damaged.
Inspect contents of this container immediately upon
receipt. All damage claims must be made within 24
hours after receipt of goods.
CineV Components
Figure 1. CineV components, rear view
This section identifies the principal components of
the CineV. The unit is shipped in several different
sections: the top, bottom and side member sections,
top section with a motor assembly on the outside, plus
mounting brackets.
Side view
Motors.
Masking panels.
Mounting brackets.
Figure 2. CineV components, front view
Front bezel or face shield.
Frame Assembly and Wall Mount
Professional mounting techniques should be used.
Stewart Filmscreen Corporation cannot be liable for substandard
or faulty installations.
This section describes assembly and mounting of the CineV frame.
1.
Assemble the frame by fitting together the slip joints of the side
sections. The sections are number matched from one to four. Secure
the sections using the supplied ¼-20 X 3/4 hex head bolt.
2.
If necessary , attach the center wall mount to the back of frame.
3.
Mount the frame to the wall. If possible, attach to wall studs.
Alternately, use hollow wall anchors or molly bolts appropriate for
the weight of the screen and frame assembly.
4.
Make sure the frame is level and plumb.
5.
Ensure that after you attach the screen, you can access the motor and
cables for attachment to the VICS controller.
6.
When you are ready to connect the motor cables to the VICS, refer to
the VICS manual.
3
SLIP JOINT
REAR VIEW
3
2
4
2
4
1
1
ATTACHING THE SCREEN TO THE FRAME
This section provides instructions for attaching the screen to
the frame.
Caution
♦
Be sure that your hands and clothing are clean. Use of
gloves is recommended. Be careful not to touch or
scratch the image surface with fingernails.
♦
Do not use any tools to fasten the screen to the frame.
♦
Do not fold or crease the screen.
You will need at least two people, one to support the screen, and
one to snap the screen in place. The viewing side of the
projection screen is rolled to the inside to protect the optical
coating. The screen is rolled lengthwise, with protective
paper rolled in with the screen. The screen fabric attaches to
the frame with snap fasteners.
1.
Remove the screen from the cardboard shipping tube.
2.
Look at the frame and locate the snaps.
3.
While supporting the screen roll, snap the screen into the
frame starting at the top left. Gently allow the screen to
stretch onto the snaps. Refer to Figures and Attach the snaps
on the top corners and top horizontal section first, unrolling
the screen as you go. Attach remaining snaps.
Operating the CineV
CineV operation is controlled by a Stewart Filmscreen VICS.
Refer to the VICS manual for details. You can use either a
hand-held remote control or a wall mounted switch to operate
the masks.
Caution
Keep objects and fingers out of the way of the mask when
they are in motion.
Screen Care and Cleaning
General Maintenance
The surface of our screen is delicate. Special attention to these
instructions should be followed when cleaning.
BRUSH
♦A draftsman-style brush may be used to lightly whisk away any loose
dirt or dust particles. Stewart Filmscreen may supply a screen cleaning
kit that contains the proper type of brush. Contact the dealer if you
would like to obtain an additional cleaning kit.
♦ For tougher spots, use a solution of mild detergent and water. Rub
lightly using a sponge. Blot with a damp sponge to absorb excess
water. Residual water marks will evaporate within a few minutes.
Do not use any other cleaning material on the screen. Contact the
factory if you have any questions about removing difficult spots.
SFC CLEANING KIT
Caution
Do not use chemicals or liquid to clean the fabric.
VeLux Covering
♦Use a lint roller to remove particles from the VeLux material.
♦A brush can be used to comb (lift) the nap off the VeLux material to
help eliminate depression marks
Replacement Parts and Service
LINT ROLLER
No user-serviceable parts are contained within the unit. Contact your
dealer or the factory if you require part replacement or service.
Troubleshooting
With reasonable care, you may expect many years of
trouble free use of your Stewart projection screen.
Refer to following guidelines if you encounter a
difficulty in the operation of your Stewart screen.
Problems related to electrical or motor function may
require a qualified service or electrician.
Should you have a problem that is not addressed here,
call the Stewart Filmscreen Corporation. 800 762-4999
Problem Description
Probable Cause
Action to Take
Dirt, finger prints, marks, etc.
on screen surface or masking
panels.
Improper handling of
screen.
Brush off or use a mild
detergent solution with
clean rag or cotton swab
(screen only).
Motor chatters when power is
activated.
Can be caused by
voltage drop, bad
connections, or a
defective switch.
Have an electrician or
qualified service person
check all hook-ups
including all outboard
wiring.
When retracing the masks,
grinding noise occurs.
Drop in Voltage
Motor requires full
voltage. Have an
electrician or qualified
service person check
available voltage.